Ọrọ Iṣaaju
This manual provides comprehensive instructions for the safe and efficient operation, maintenance, and troubleshooting of your SINGER 4423 Heavy Duty Sewing Machine and its compatible Extension Table. Please read this manual thoroughly before using the machine to ensure optimal performance and longevity.
Awọn Itọsọna Aabo
- Always unplug the machine from the electrical outlet when removing covers, lubricating, or when making any other user servicing adjustments mentioned in this instruction manual.
- Jeki awọn ika ọwọ si gbogbo awọn ẹya gbigbe. A nilo itọju pataki ni ayika abẹrẹ ẹrọ abẹrẹ.
- Lo awo abẹrẹ to dara. Awo ti ko tọ le fa ki abẹrẹ naa fọ.
- Ma ṣe fa tabi Titari aṣọ nigba stipping. Eyi le yi abẹrẹ naa pada, ti o fa ki o fọ.
- Always use the foot controller to operate the machine.
- Never operate the machine with any air openings blocked. Keep ventilation openings of the sewing machine and foot controller free from lint, dust, and loose cloth.
- Ohun elo yii kii ṣe ipinnu fun lilo nipasẹ awọn eniyan (pẹlu awọn ọmọde) pẹlu idinku ti ara, imọlara tabi awọn agbara ọpọlọ, tabi aini iriri ati imọ, ayafi ti wọn ba ti fun wọn ni abojuto tabi itọnisọna nipa lilo ohun elo nipasẹ eniyan ti o ni iduro fun aabo wọn.
Package Awọn akoonu
Your SINGER 4423 Heavy Duty Sewing Machine package typically includes the following items:
- ORIN 4423 Eru Duty Sewing Machine
- Adarí Ẹsẹ
- Standard Presser Foot (All-Purpose Foot)
- Ẹsẹ idalẹnu
- Buttonhole Ẹsẹ
- Bọtini Sewing Ẹsẹ
- Seam Ripper / Lint fẹlẹ
- Abere Pack
- Bobbins
- Spool Holders
- Iranlọwọ Spool Pin
- Fẹ́lẹ̀ Spool Pin
- Screwdriver
- Asọ-Apa Eruku Ideri
- SINGER Heavy Duty Sewing Machine Extension Table
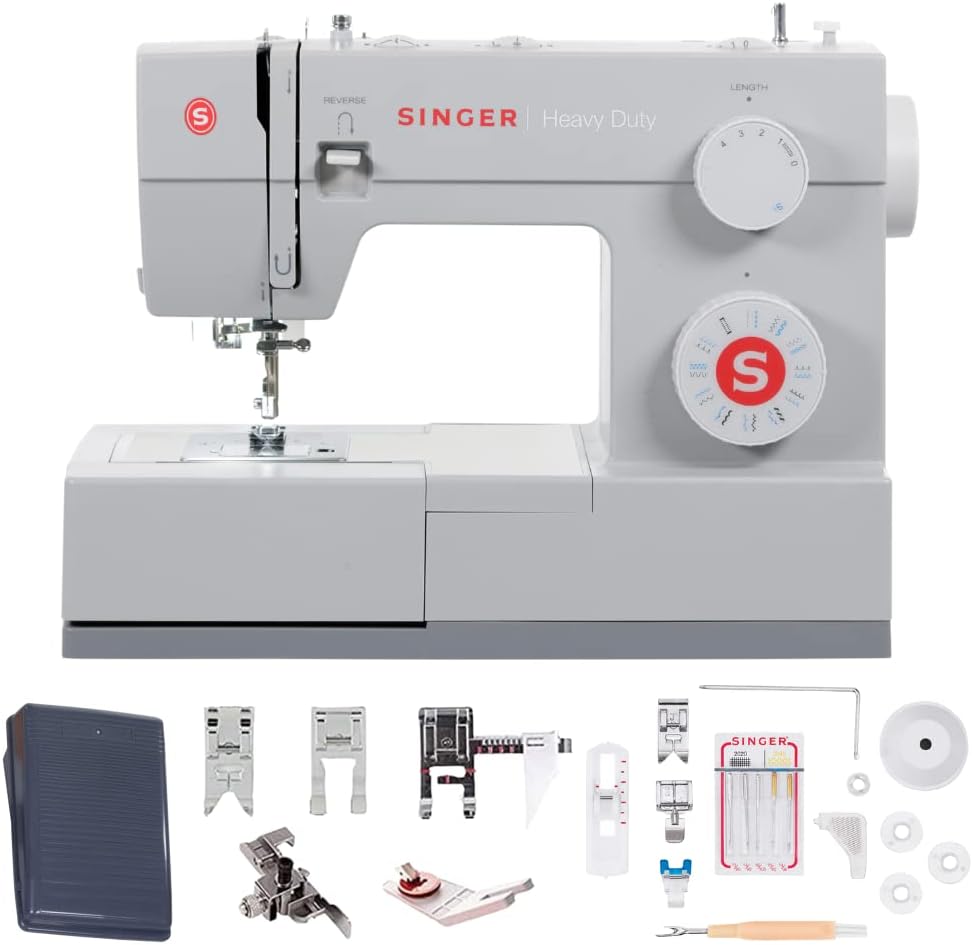
Image: SINGER 4423 Heavy Duty Sewing Machine with various presser feet, needles, bobbins, and a foot pedal.

Image: Close-up of SINGER sewing machine accessories, including different presser feet and a pack of universal needles. For more information on needles, visit https://uqr.to/hjvc.
Ṣeto
1. Unpacking ati Placement
Carefully remove the machine from its packaging. Place the machine on a stable, flat surface. Ensure there is adequate space around the machine for comfortable operation.
2. Asopọ agbara
Connect the foot controller plug into the machine's power socket. Then, plug the power cord into a suitable electrical outlet.

Aworan: Ẹyin view of the SINGER 4423 sewing machine showing the power input and foot pedal connection point.
3. So Table Itẹsiwaju
To attach the extension table, slide it onto the free arm of the sewing machine until it clicks securely into place. The table provides an expanded work surface, useful for larger projects.

Image: The SINGER extension table, designed to provide a larger work area for sewing projects.

Aworan: Oke view of the SINGER extension table, featuring integrated measurement markings in inches and centimeters.
4. Asapo ẹrọ
Proper threading is crucial for good stitch quality. Follow these steps carefully:
- Bobbin Winding: Place a spool of thread on the spool pin. Guide the thread through the bobbin winding tension disc and then around the bobbin several times. Place the bobbin onto the bobbin winder spindle and push it to the right. Press the foot controller to wind the bobbin. Stop when the bobbin is full and push the spindle to the left to disengage.
- Fifi Bobbin sii: Ṣí àwo ìbòrí bobbin náà. Fi bobbin ọgbẹ́ náà sínú àpótí bobbin náà, kí o sì rí i dájú pé okùn náà tú sí ọ̀nà tó tọ́ (nígbà gbogbo, ní ọ̀nà òdìkejì sí ọwọ́ ọ̀tún). Darí okùn náà gba inú ìsun omi tí ó ń gbọ̀n kí o sì jáde nínú ihò àpótí bobbin náà. Ti ìbòrí bobbin náà.
- Ìfọ̀rọ̀wérọ̀ òkè: Raise the needle to its highest position using the handwheel. Place a spool of thread on the spool pin. Guide the thread through the upper thread guide, down into the tension discs, up and through the take-up lever, and then down to the needle. Thread the needle from front to back.
- Bringing Up the Bobbin Thread: Hold the upper thread lightly. Turn the handwheel towards you to lower and then raise the needle. The upper thread will catch the bobbin thread, bringing a loop up through the needle plate hole. Pull both threads under the presser foot and towards the back of the machine.
Ṣiṣẹ ẹrọ
1. Aṣayan aranpo
The SINGER 4423 offers 97 stitch applications. Use the stitch selector dial on the front of the machine to choose your desired stitch pattern. Refer to the stitch chart on the machine for available options.

Aworan: Isunmọ view of the SINGER 4423 sewing machine's stitch selector dial, showing various stitch patterns.
2. Ṣíṣe àtúnṣe gígùn àti fífẹ̀ sí ara aṣọ
Adjust the stitch length using the upper dial and stitch width using the lower dial, as indicated on the machine. Experiment with different settings on a scrap piece of fabric to achieve the desired result for your project.
3. Using the Foot Pedal
The foot pedal controls the sewing speed. Press gently for slower speeds and apply more pressure for faster sewing. Release the pedal to stop.
4. Yiyipada Sewing
To reinforce stitches at the beginning and end of a seam, press and hold the reverse lever (usually located on the front of the machine) while sewing. Release the lever to resume forward stitching.
5. Needle and Presser Foot Replacement
Always use the correct needle type and size for your fabric. To replace the needle, loosen the needle clamp screw, remove the old needle, insert the new needle with the flat side facing the back, and tighten the screw. To change presser feet, raise the needle and presser foot lifter, then press the release button on the back of the presser foot holder. Attach the new foot by aligning it and lowering the presser foot lifter until it snaps into place.
Itoju
1. Ninu
Regular cleaning helps maintain your machine's performance.
- Yiyọ kuro: Unplug the machine. Remove the needle, presser foot, and needle plate. Use the provided lint brush to remove lint and dust from the bobbin area and feed dogs.
- Isọdanu Oju: Fi aṣọ rírọrùn, gbígbẹ, nu ìta ẹ̀rọ náà. Má ṣe lo àwọn kẹ́míkà líle tàbí àwọn ohun ìfọmọ́ tí ó máa ń pa ara.
2. Fífi epo kun
Your SINGER 4423 Heavy Duty Sewing Machine is designed to require minimal oiling. Refer to the full instruction manual for specific oiling points if necessary, or consult a qualified service technician. Over-oiling can attract lint and cause issues.
3. Ibi ipamọ
When not in use, cover the machine with the provided dust cover to protect it from dust and debris. Store in a dry, stable environment.
Laasigbotitusita
Apá yìí ń sọ̀rọ̀ nípa àwọn ìṣòro tó wọ́pọ̀ tí o lè bá pàdé. Fún àwọn ìṣòro tó le koko jù, kan sí onímọ̀ iṣẹ́ tó péye.
| Isoro | Owun to le Fa | Ojutu |
|---|---|---|
| Skitches Stitches | Abẹrẹ ti ko tọ, abẹrẹ tẹ, okun ti ko tọ, iwọn abẹrẹ ti ko tọ fun aṣọ. | Replace needle, re-thread machine, use correct needle for fabric type. |
| O tẹle Fifọ | Improper threading, tension too tight, damaged needle, poor quality thread. | Re-thread machine, adjust tension, replace needle, use good quality thread. |
| Ṣíṣe aṣọ Pípa | Tension too tight, incorrect stitch length, wrong presser foot. | Adjust tension, increase stitch length, use appropriate presser foot. |
| Ẹrọ Ko Ibẹrẹ | Kò sí ìsopọ̀ mọ́, kò sí ìsopọ̀ mọ́ agbára, kò sí ìsopọ̀ mọ́ ìdarí ẹsẹ̀. | Check power connections, ensure switch is on. |
Awọn pato
- Nọmba awoṣe: 4423
- Brand: AKORIN
- Ìwọ̀n Nkan: 14.5 iwon
- Ohun elo: Irin, Irin Alagbara
- Orisun Agbara: Okun Itanna
- Àwọn Ohun Èlò Aṣọ-ara: 97
- Àwọ̀: Grẹy
Atilẹyin ọja ati Support
Fun alaye atilẹyin ọja ati atilẹyin alabara, jọwọ tọka si kaadi atilẹyin ọja ti o wa pẹlu ọja rẹ tabi ṣabẹwo si SINGER osise webojula. Tọju iwe-ẹri rira rẹ bi ẹri rira.