
1. Ifihan
This manual provides detailed instructions for the installation, operation, and maintenance of your SOGTICPS BL912-40A-WIFI MPPT Solar Charge Controller. This advanced charge controller is designed for off-grid solar applications, compatible with 12V/24V battery systems, including Gel, Flooded, and Lithium types. It features efficient MPPT tracking, an LCD display, dual USB outputs, and WiFi connectivity for remote monitoring.
Awọn ẹya pataki:
- Innovative MPPT (Maximum Power Point Tracking) technology for up to 99% tracking efficiency.
- Automatic 12V/24V system voltage erin.
- Integrated LCD display for real-time monitoring of temperature, charge current, discharge current, and power generation.
- Comprehensive system protection: over-temperature, over-current, short-circuit, open-circuit, and reverse polarity.
- Compatibility with Gel, Flooded, and Lithium battery types.
- Dual 5V 2A USB outputs for charging mobile devices.
- WiFi communication for remote parameter adjustment and monitoring via a dedicated application.
- Industrial-grade main control chip with 16AD sampling konge.
- Two-way MOS tube anti-reverse circuit for high-power charging and low heat generation.
2. Awọn ilana aabo
Please read all instructions carefully before installation and operation. Failure to follow these instructions may result in damage to the unit, personal injury, or property damage.
- Ensure all connections are tight and correct to avoid excessive voltage drop and potential hazards.
- Install the controller indoors, away from direct sunlight, high temperatures, and moisture.
- The controller generates heat during operation; ensure adequate ventilation.
- Connect the battery first, then the solar panel, and finally the load. Disconnect in the reverse order: load, solar panel, then battery.
- Do not connect any inverter directly to the load terminals of the controller.
- Ensure the solar panel's open-circuit voltage (Voc) ko koja awọn oludari ká pọju input voltage.
- Use appropriate circuit breakers or fuses for the battery and solar panel circuits.
- Keep children away from the solar power system.
- Má ṣe gbìyànjú láti tú tàbí tún olùdarí náà ṣe fúnra rẹ. Pe àwọn òṣìṣẹ́ tó mọ̀ nípa iṣẹ́ náà fún iṣẹ́ náà.
3. Ọja Ipariview
The SOGTICPS BL912-40A-WIFI solar charge controller features a robust design with an intuitive LCD display and multiple connection points.

Aworan: Iwaju view of the SOGTICPS BL912-40A-WIFI Solar Charge Controller, highlighting its security protection features such as short-circuit, overload, overcharge, under-voltage, ati lori-voltage Idaabobo.
Awọn eroja:
- Ifihan LCD: Shows real-time system status and parameters.
- Awọn bọtini Iṣakoso: For navigating menus and setting parameters.
- Solar Panel Input Terminals: Connect to solar panels.
- Awọn ibudo batiri: Connect to the battery bank.
- Awọn Ibugbe Ijade Agbejade: Connect to DC loads.
- Dual USB Ports (5V 2A): Fun gbigba agbara awọn ẹrọ ita.
- Eriali WiFi: Fun ibaraẹnisọrọ alailowaya.
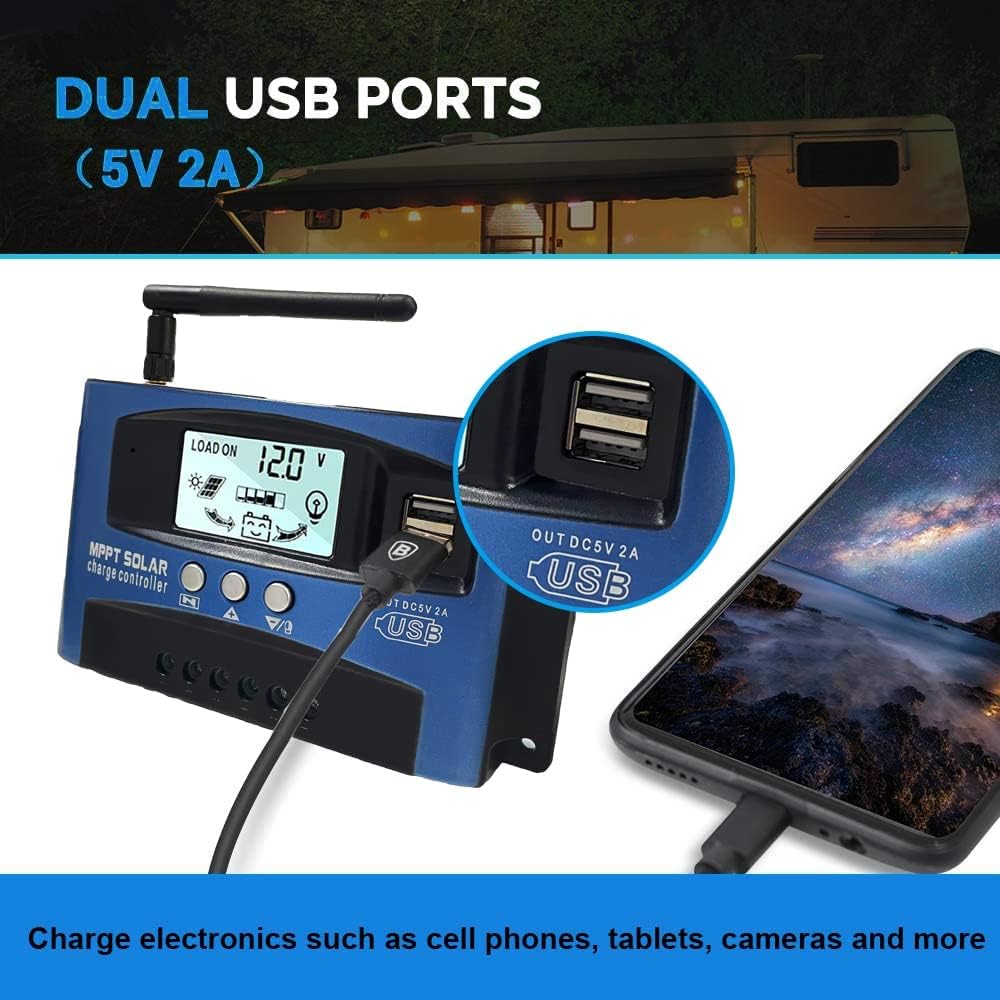
Aworan: Sun mo tipetipe view of the SOGTICPS BL912-40A-WIFI Solar Charge Controller, showing the dual 5V 2A USB ports in use, charging a smartphone.
4. Eto & Fifi sori
Proper installation is critical for the safe and efficient operation of your solar charge controller. Follow the connection order precisely.
Bere fun Asopọmọra:
- Connect the Battery First: Connect the battery to the charge controller's battery terminals. Ensure correct polarity (+ to + and - to -). The controller will automatically detect 12V or 24V system voltage.
- So Awọn Paneli Solar: Connect the solar panels to the charge controller's solar input terminals. Again, observe correct polarity.
- Connect DC Load (Optional): Connect your DC loads to the load output terminals.
Pataki: When disconnecting, reverse the order: first disconnect the load, then the solar panels, and finally the battery. Failure to follow this order may damage the controller or other components.
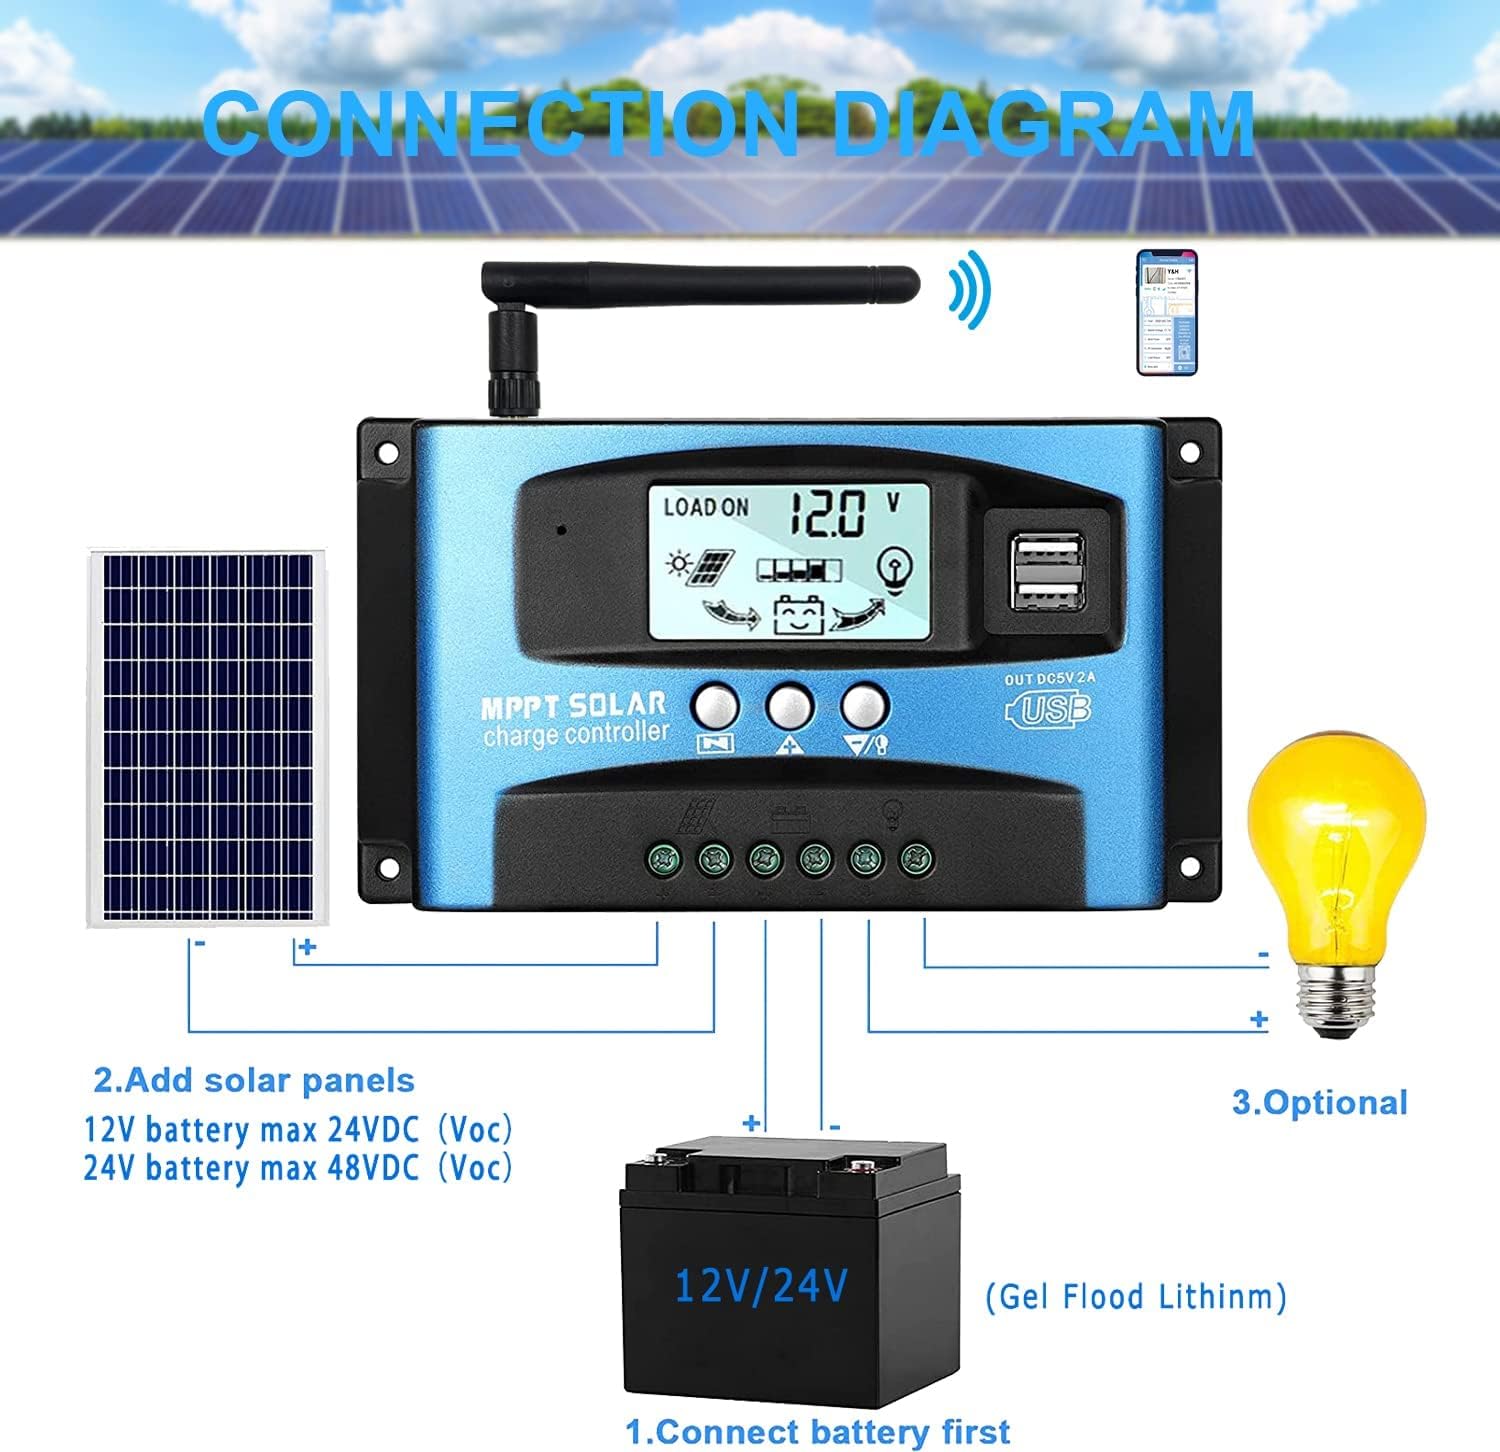
Aworan: A clear connection diagram illustrating the proper wiring sequence for the solar charge controller, connecting to a battery, solar panels, and an optional DC load. It emphasizes connecting the battery first.
Ibamu Batiri:
The controller is compatible with various battery types, including Gel, Flooded (Lead-Acid), and Lithium batteries. Ensure the correct battery type is selected in the controller settings for optimal charging.

Aworan: Visual representation showing the SOGTICPS BL912-40A-WIFI Solar Charge Controller's compatibility with Gel, Flooded, and Lithium battery types, indicated by arrows pointing between battery icons and the controller.
5. Awọn ilana Iṣiṣẹ
Ifihan LCD ati Lilọ kiri:
The LCD provides real-time information about your solar system. Use the control buttons to navigate through the display interfaces and adjust parameters.

Aworan: A series of LCD screen captures demonstrating the browsing interface and parameter setting process for the SOGTICPS BL912-40A-WIFI Solar Charge Controller. It shows main display, float voltage, discharge reconnect, discharge stop, load work mode, battery type, and work parameter display.
- Browsing Interface: Tẹ awọn Akojọ button to cycle through different display interfaces, showing information such as main display, float voltage, discharge reconnect voltage, discharge stop voltage, load work mode, battery type, and other work parameters.
- Eto Awọn paramita: In interfaces 2-8, press the Akojọ button to enter the setting mode. Use the UP ati SILE buttons to adjust the values. Press Akojọ lẹẹkansi lati jẹrisi ati jade kuro ni ipo eto.
WiFi Monitoring:
The controller supports WiFi connectivity, allowing you to monitor and control your solar system remotely via a smartphone application.

Aworan: The SOGTICPS BL912-40A-WIFI Solar Charge Controller shown alongside a smartphone displaying its monitoring application interface. This illustrates the wireless monitoring capability of the PV system.
- Fifi sori ẹrọ: Download the dedicated application for your smartphone (Android). Refer to the QR code or instructions provided with the product for app download.
- Asopọmọra: Follow the in-app instructions to connect your controller to your local WiFi network.
- Abojuto latọna jijin: Ni kete ti o ti sopọ, o le view real-time data such as temperature, charge current, discharge current, accumulated power generation, battery voltage, and adjust charging modes from anywhere.
6. Itọju
Itọju deede ṣe idaniloju igbesi aye gigun ati iṣẹ ti o dara julọ ti oludari idiyele oorun rẹ.
- Ṣayẹwo Awọn isopọ: Máa ṣe àyẹ̀wò gbogbo àwọn ìsopọ̀ wáyà láti rí i dájú pé wọ́n ní ìdènà tí kò sì ní ìbàjẹ́.
- Adarí mimọ: Jẹ́ kí olùdarí náà mọ́ tónítóní, kí ó sì wà láìsí eruku àti ìdọ̀tí. Lo aṣọ gbígbẹ fún fífọ nǹkan mọ́.
- Afẹfẹ: Ensure the installation area has adequate ventilation to prevent overheating.
- Ayewo Batiri: Regularly check battery terminals for corrosion and ensure battery fluid levels (for flooded batteries) are correct.
- Abojuto eto: Use the LCD display or the WiFi app to monitor system performance and identify any anomalies early.
7. Laasigbotitusita
If you encounter issues with your solar charge controller, refer to the following common problems and solutions:
| Isoro | Owun to le Fa | Ojutu |
|---|---|---|
| Ko si ifihan lori LCD | Batiri ko sopọ mọ tabi kekere voltage; polarity ìyípadà. | Ṣayẹwo awọn asopọ batiri ati voltage. Rí i dájú pé ìṣọ̀kan tó tọ́. |
| Batiri ko ngba agbara | Solar panels not connected; insufficient sunlight; faulty solar panel; incorrect battery type setting. | Check solar panel connections and ensure adequate sunlight. Verify solar panel functionality. Confirm battery type setting. |
| Fifuye ko ṣiṣẹ | Load disconnected; battery low voltage protection; overload protection. | Check load connections. Charge battery. Reduce load or check for short circuits. |
| WiFi app issues (connection/language) | Incorrect WiFi setup; app region/language settings; firmware issues. | Ensure correct WiFi network and password. Check app settings for language. Contact support if issues persist. |
8. Awọn pato
| Paramita | Iye |
|---|---|
| Awoṣe | BL912-40A-WIFI |
| Ti won won idiyele Lọwọlọwọ | 40 A |
| Eto Voltage | 12V/24V Auto-detection |
| Max PV Input Power (12V) | 480 W |
| Max PV Input Power (24V) | 960 W |
| Niyanju Solar Panel Voltage | 18V for 12V battery; 36V for 24V battery |
| Lilo ara-ẹni | <10mA |
| Awọn iwọn otutu ti nṣiṣẹ | -14°F si 140°F (-10°C si 60°C) |
| Ifihan Iru | LCD |
| Ijade USB | Méjì 5V 2A |
| Ibaraẹnisọrọ | WiFi |
| Awọn iwọn (Apapọ) | 18 x 11 x 5 cm |
| Ìwúwo (Apapọ) | 330 giramu |
| Olupese Reference | 2-BL912-40A-WIFI-DE |
| UPC | 732246237116 |
9. Atilẹyin ọja ati Support
For warranty information and technical support, please refer to the documentation included with your purchase or contact SOGTICPS customer service. Keep your purchase receipt as proof of purchase.