
1. Ifihan
This manual provides detailed instructions for the setup, operation, and maintenance of your XTUGA U-260 Dual Channel UHF Wireless Microphone System. Please read this manual thoroughly before using the product to ensure proper functionality and to maximize its lifespan. Retain this manual for future reference.
2. Ọja Ipariview
The XTUGA U-260 is a professional-grade dual UHF wireless microphone system designed for various applications including church events, karaoke, weddings, and other live events. It features a robust design, adjustable frequencies, and convenient auto-scan and IR pairing functions.
2.1. Awọn irinše to wa
- U-260 UHF Wireless Receiver (1 unit)
- UHF Wireless Handheld Microphones (2 units)
- Eriali (awọn ẹya mẹrin)
- Adapter agbara (ẹyọkan 1)
- User's Manual (1 unit)
- Okun Olohun (Ẹyọ 1)
- Anti-skid Rings (2 units)
- Power Plugs (2 units)
- Power Cables (2 units)

Figure 2.1: All components included with the XTUGA U-260 Wireless Microphone System, including the receiver, two microphones, antennas, power adapter, cables, and anti-skid rings.
2.2. Key Awọn ẹya ara ẹrọ
- Dual UHF Channels: Two independent channels with 100 selectable frequencies each (Channel 1: 540.1 - 564.85 MHz; Channel 2: 568.1 - 592.85 MHz).
- Auto Scan Function: Automatically searches for the least interference channel.
- IR Synchronization: Seamlessly pairs the receiver and microphones.
- Titiipa Igbohunsafẹfẹ: Prevents accidental frequency changes.
- Long Range Operation: Up to 492ft (150 meters) operating distance.
- Ikole ti o tọ: Microphones feature sturdy metal construction.
- Didara Ohun Didara: High-quality dynamic cartridge designed to limit feedback and interference.
- Rechargeable Microphones: Built-in lithium batteries provide up to 8 hours of use on a 3-hour charge via USB-C.
- Dashboard-Inspired Display: Receiver features a unique display for AF and RF signal indication.

Figure 2.2: The receiver's display screen, featuring a dashboard-inspired design for clear signal indication.
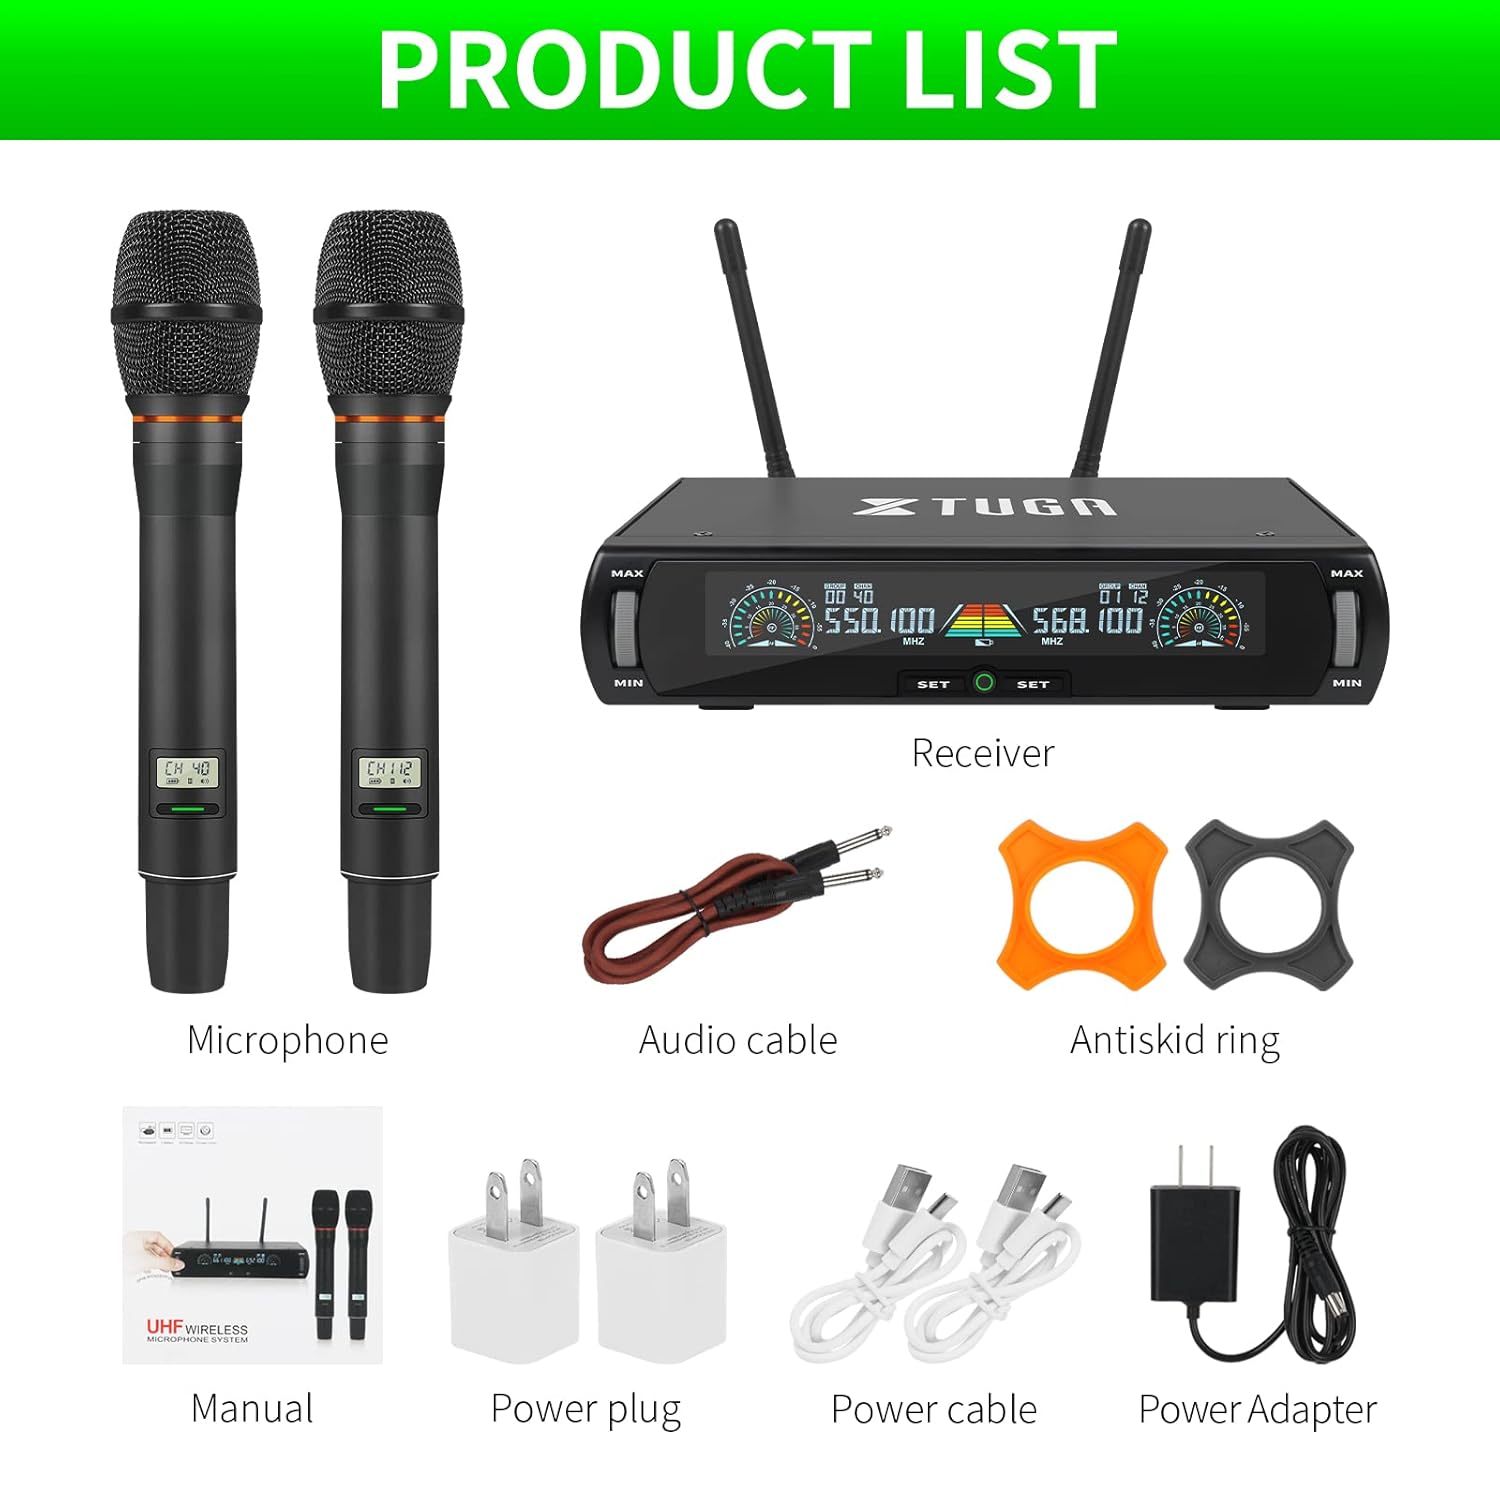
Figure 2.3: Illustration of the microphone's cardioid pickup pattern, designed to reduce noise and capture sound realistically.
2.3. Idanimọ paati

Nọmba 2.4: Alaye view of the receiver and microphone components.
- Iṣakoso iwọn didun
- Function settings button
- Switch (Power/Mode)
- Iboju ifihan
- Power socket (DC 12V)
- Jack Eriali
- Ijade XLR
- Audio output (6.35mm/1/4 inch)
- Steel meshed head (Microphone)
- Display screen (Microphone)
- Switch (Microphone Power)
- Type-C charging port (Microphone)
3. Awọn ilana iṣeto
- Yọ awọn ohun elo kuro: Fara yọ gbogbo awọn ohun kan kuro ninu apoti.
- Asopọmọra Antenna: Screw the two antennas into the antenna jacks on the rear of the receiver. Ensure they are securely tightened.
- Asopọ agbara: Connect the power adapter to the receiver's power socket (DC 12V) and plug it into a suitable power outlet.
- Ijade ohun:
- For balanced output, connect XLR cables from the receiver's XLR outputs to your mixer or amplifier.
- For unbalanced output, use the provided 6.35mm (1/4 inch) audio cable to connect the receiver's audio output to your mixer or amplifier.
- Agbara Lori olugba: Press the power switch on the receiver. The display screen should illuminate.
- Charge Microphones: Before first use, ensure both microphones are fully charged using the provided USB-C cables and power plugs. The microphone display will show charging status.
- Agbara Lori Awọn gbohungbohun: Press and hold the power switch on each microphone until its display illuminates.

Figure 3.1: The XTUGA U-260 system ready for operation, showing the receiver with antennas and two handheld microphones.
4. Awọn ilana Iṣiṣẹ
4.1. Frequency Selection and IR Pairing
The system features an auto-scan function to find clear frequencies and IR synchronization for easy pairing.

Figure 4.1: Diagram illustrating the IR pairing process between the microphone and receiver.
- Initiate Auto Scan: On the receiver, press the "SET" button three times quickly for the desired microphone channel (left or right). The receiver will scan for the clearest available frequency.
- Select Frequency (Optional): If you wish to manually select a frequency after the scan, rotate the volume knob corresponding to the microphone channel you are adjusting.
- IR Pairing: Once a frequency is displayed on the receiver, hold the front of the microphone (where its display is located) close to the IR sensor on the receiver. The IR sensor is located on the bottom left side of the receiver's screen.
- Jẹrisi Isopọpọ: While holding the microphone near the IR sensor, press the "SET" button on the receiver once for the corresponding microphone channel. A small indicator light on the receiver should flash, and the microphone's display will update to show the new frequency, confirming successful pairing. This process may require a couple of attempts to ensure proper alignment and timing.
4.2. Frequency Lock Function
To prevent accidental changes to the selected frequency, use the frequency lock function.

Figure 4.2: Visual representation of the frequency lock function, showing a padlock icon.
- Lati Tii: Press and hold the "SET" button on the receiver for the desired microphone channel until a lock icon appears on the display.
- Lati Ṣii silẹ: Press and hold the "SET" button again until the lock icon disappears.
4.3. Iṣakoso iwọn didun
Each microphone channel has an independent volume control knob on the receiver. Rotate the "MIN/MAX" knobs to adjust the output volume for each microphone.
4.4. Microphone Charging
The handheld microphones are equipped with built-in rechargeable lithium batteries.

Figure 4.3: Illustration of microphone battery life (8 hours work) and charging time (3 hours) via USB-C.
- Connect a USB-C cable to the charging port at the bottom of the microphone.
- Connect the other end of the USB-C cable to a power adapter or a USB power source.
- A dim red light on the microphone's display bar indicates charging. The light will turn off or change color when fully charged.
- A full charge typically takes approximately 3 hours and provides up to 8 hours of continuous use.
5. Itọju
- Ninu: Use a soft, dry cloth to clean the receiver and microphones. Do not use liquid cleaners or solvents.
- Ibi ipamọ: Tọju eto naa ni itura, aye gbigbẹ kuro lati orun taara ati awọn iwọn otutu to gaju nigbati ko si ni lilo.
- Itọju Batiri: For optimal battery life, avoid fully discharging the microphones frequently. Recharge them regularly, especially if storing for extended periods.
- Iṣakoso USB: Ensure all cables are connected securely and are not strained or kinked.
6. Laasigbotitusita
| Isoro | Owun to le Fa | Ojutu |
|---|---|---|
| Ko si ohun jade. |
|
|
| Kikọlu tabi ariwo aimi. |
|
|
| Microphone not pairing. |
|
|
| Microphone battery drains quickly. |
|
|
7. Awọn pato
| Ẹya ara ẹrọ | Ẹ̀kúnrẹ́rẹ́ |
|---|---|
| Awoṣe | U-260 |
| Brand | XTUGA |
| Gbohungbo Fọọmù ifosiwewe | Ètò Gbohungbohun (Ìmúlò) |
| Asopọmọra Technology | UHF Wireless, XLR |
| Nọmba ti awọn ikanni | 2 (2x100 selectable frequencies) |
| Ìwọ̀n Ìgbìyànjú (Ikanni 1) | 540.1 - 564.85 MHz |
| Ìwọ̀n Ìgbìyànjú (Ikanni 2) | 568.1 - 592.85 MHz |
| Ibiti nṣiṣẹ | Titi de 492ft (mita 150) |
| Pola Àpẹẹrẹ | Unidirectional (Cardioid Pickup) |
| Ipalara | 600 ohm |
| Ifihan Ibuwọlu-si-Noise | 120 dB |
| Orísun Agbára Mákróónù | Batiri Lithium gbigba agbara gbigba |
| Ìgbésí ayé Bátírì Máákrófónù | Titi di wakati 8 |
| Aago gbigba agbara gbohungbohun | Approximately 3 hours (via USB-C) |
| Orisun Agbara olugba | DC 12V Power Adapter |
| Ohun elo | Metal (Microphones) |
| Awọn irinše to wa | Receiver, 2 Handheld Microphones, 2 Antennas, Power Adapter, User Manual, Audio Cable, Anti-skid Rings, Power Plugs, Power Cables |
| Iwọn Nkan | 2 kg |
8. Atilẹyin ọja ati Support
XTUGA provides a one-year free warranty period for products with authentic brand logos. For any questions, technical assistance, or warranty claims, please contact XTUGA customer support through your purchase platform or the official XTUGA webojula.
Jọwọ ṣe idaduro ẹri rira rẹ fun ijẹrisi atilẹyin ọja.