
Ọrọ Iṣaaju
This manual provides instructions for the RETROFLAG Handheld Controller, a one-piece joypad designed for use with Nintendo Switch LCD and Switch OLED models. This controller enhances your portable gaming experience with integrated controls, motion sensing, and vibration feedback.
Key Awọn ẹya ara ẹrọ
- One-piece handheld joypad design, compatible with Nintendo Switch OLED and LCD models.
- PD Fast Charge capability for efficient power delivery.
- Advanced playing options with an added Turbo Button and Hotkey.
- Simple plug-and-play assembly, no screwdrivers required.
- Integrated 6-Axis Motion Control for precise movements.
- Functional Dual Motor Vibration for immersive gameplay.
- Hall sensor Joysticks designed for anti-drifting performance.

Image: The RETROFLAG Handheld Controller securely attached to a Nintendo Switch console, ready for gameplay.
Ṣeto
1. Attaching the Controller
- Ensure your Nintendo Switch console (LCD or OLED model) is powered off or in sleep mode.
- Align the console with the central slot of the RETROFLAG Handheld Controller.
- Gently slide the console into the controller until it is securely seated and the USB-C connector is fully engaged. The controller is designed for plug-and-play functionality.
2. Agbara akọkọ Lori
Once the Switch console is securely attached, power on your Nintendo Switch. The controller should be automatically recognized and ready for use. No additional pairing steps are typically required.
3. Gbigba agbara
The controller supports PD Fast Charge. To charge your Switch console while it is attached to the RETROFLAG controller, connect a USB-C PD compatible charger to the USB-C port located at the bottom of the controller.
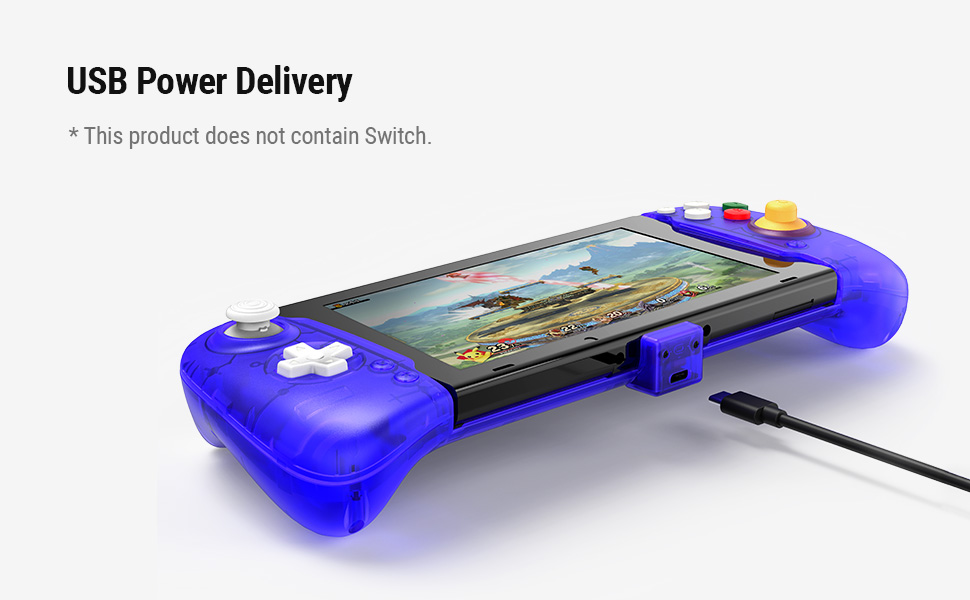
Image: The RETROFLAG controller with a Nintendo Switch console connected to a USB-C cable for PD fast charging.
Awọn ilana Iṣiṣẹ
1. Awọn iṣakoso ipilẹ
Mọ ara rẹ pẹlu eto bọtini naa:

Image: Detailed diagram illustrating the location and labels of all buttons and sticks on the RETROFLAG controller.
- Left Stick (L3) / D-pad: Fun lilọ kiri ati lilọ kiri akojọ aṣayan.
- Right Stick (R3) / ABXY Buttons: For camera control, actions, and menu selections.
- Awọn bọtini L/R, ZL/ZR: Awọn bọtini ejika ati okunfa fun awọn iṣe inu-ere oriṣiriṣi.
- Bọtini Sikirinifoto: Ó ya àwọn àwòrán inú eré náà.
- Bọtini Ile: Pada si Nintendo Yipada Akojọ Ile.
2. Motion Control
The controller features 6-axis motion control, allowing for precise in-game movements and aiming by tilting and rotating the controller. This functionality is automatically enabled for compatible games.
3. Iṣẹ́ Gbígbọ̀n
Dual motor vibration provides tactile feedback during gameplay, enhancing immersion. This feature is automatically active in games that support vibration.

Image: Visual representation of the motion control and vibration features supported by the controller.
4. Turbo Button and Hotkey
The controller includes a dedicated Turbo button and Hotkey for advanced playing options. Refer to specific game instructions or controller settings within the Switch system for customization and usage of these features.
5. Hall Effect Joysticks
The joysticks utilize Hall Effect sensing technology. This design means the components do not physically touch, which helps prevent joystick drift over time, ensuring long-term accuracy and responsiveness.

Image: An illustration of the internal components of a Hall Effect Sensing Joystick, highlighting its non-contact design.
Itoju
Ninu
- Use a soft, dry cloth to clean the surface of the controller.
- Fun idoti alagidi, die-die dampen aṣọ pẹlu omi. Yago fun lilo awọn kẹmika lile tabi awọn ohun elo abrasive.
- Ensure no liquid enters the controller's openings.
Ibi ipamọ
- Tọju olutọju naa ni itura, aye gbigbẹ kuro lati orun taara ati awọn iwọn otutu to gaju.
- When not in use for extended periods, detach the Nintendo Switch console from the controller.
Laasigbotitusita
Adarí Ko Fesi
- Ensure the Nintendo Switch console is fully and correctly inserted into the controller's USB-C port.
- Tun console Nintendo Switch rẹ bẹrẹ.
- Check for any system updates on your Nintendo Switch.
Awọn ọran gbigba agbara
- Verify that the USB-C charging cable and power adapter are functioning correctly and are PD compatible.
- Ensure the charging cable is securely connected to both the controller and the power source.
Ìwakọ̀ Joystick
The controller features Hall Effect joysticks designed to minimize drift. If you experience any unusual joystick behavior, try the following:
- Calibrate the joysticks through the Nintendo Switch system settings (System Settings > Controllers and Sensors > Calibrate Control Sticks).
- Ensure the controller is clean and free of debris around the joysticks.
Awọn pato

Image: Diagram outlining the dimensions and key features of the RETROFLAG Handheld Controller.
| Ẹka | Ẹ̀kúnrẹ́rẹ́ |
|---|---|
| Awoṣe | B0BKG8BLDS |
| Ibamu | Nintendo Switch, Nintendo Switch OLED model |
| Dimensions (Controller only) | 273 x 110 x 54 mm (tó tó 10.75 x 4.33 x 2.13 inches) |
| Weight (Controller only) | 270 g (tó tó ìwọ̀n 9.52 ounces) |
| Asopọmọra | Direct USB-C connection to console |
| Gbigba agbara | USB Power Delivery (PD) Fast Charge Compatible |
| Pataki Awọn ẹya ara ẹrọ | Hall Sensor Joysticks, 6-Axis Motion Control, Dual Motor Vibration, Turbo Button, Hotkey |
Atilẹyin ọja ati Support
For warranty information and technical support, please refer to the official RETROFLAG webojula tabi kan si eniti o ta taara. Tọju iwe-ẹri rira fun eyikeyi awọn ibeere atilẹyin ọja.