
1. Ifihan
The Elna eXcellence 710 is a computerized sewing and quilting machine designed for precision and ease of use. It features a large sewing area, an Advanced Dual Feed system, and a variety of built-in stitches and functions to support diverse sewing projects. This manual provides essential information for setting up, operating, maintaining, and troubleshooting your machine.

olusin 1: Iwaju view of the Elna eXcellence 710 Sewing and Quilting Machine.
2. Key Awọn ẹya ara ẹrọ
- Àwọn aṣọ ìránlọ́wọ́ 170: Includes alphabet and 10 automatic buttonholes, with a 9 mm stitch width.
- Convenience Functions: Button-operated automatic thread cutter, one-step needle plate conversion, and lock stitch.
- Igbimo Iṣakoso Fọwọkan: For easy selection of stitches and settings.
- High Sewing Speed: Tó tó 1000 ìrán ní ìṣẹ́jú kan.
- Advanced Dual Feed System: Evenly moves fabric from top and bottom for precision, ideal for multiple layers and pattern matching. Includes a removable Dual Feed foot wide.
- Ẹsẹ̀ Pítẹ 15: For various sewing functions, including a Dual Feed wide and convertible free-motion quilting kit.
- Ibi ipamọ Iṣọkan: Top compartment for presser feet and two compartments in the free arm.
- Knee Lifter: Allows lifting the presser foot with your leg, keeping hands on your project.
- Imọlẹ LED: 5 built-in white LED lights in 3 areas for enhanced visibility.
3. Eto
3.1 Ṣiṣii ati Gbe
Carefully remove the machine from its packaging. Place the machine on a stable, flat surface. Ensure adequate space around the machine for comfortable operation.

olusin 2: Apa view of the Elna eXcellence 710, showing its compact design.
3.2 Asopọ agbara
Connect the power cord to the machine and then to a suitable electrical outlet. Ensure the machine's power switch is in the 'Off' position before connecting.
3.3 Síso Tábìlì Ìfàgùnpọ̀ mọ́ra
The extension table provides an expanded workspace, particularly useful for quilting and larger projects. Slide the extension table onto the free arm until it clicks securely into place.

Figure 3: Elna eXcellence 710 with the extension table providing an expanded work surface.
3.4 Ìyípo Bobbin
Place a spool of thread on the spool pin. Guide the thread through the bobbin winding tension disc and then around the empty bobbin. Place the bobbin onto the bobbin winder shaft and push it to the right. Press the start/stop button to begin winding. The machine will automatically stop when the bobbin is full.
3.5 Ìfọ̀rọ̀wérọ̀ òkè
Raise the presser foot and the needle to its highest position. Follow the numbered threading path indicated on the machine, ensuring the thread is securely seated in all guides and tension discs. Use the built-in needle threader for easy threading of the needle eye.

olusin 4: Top view illustrating the threading path and stitch selection chart.
3.6 Fi sii Bobbin
Open the bobbin cover. Insert the wound bobbin into the bobbin case, ensuring the thread unwinds in the correct direction (usually counter-clockwise). Guide the thread through the tension spring and cutter. Close the bobbin cover.
4. Awọn ilana Iṣiṣẹ
4.1 aranpo Yiyan
Use the touch control panel to select your desired stitch. The machine offers 170 built-in stitches, including utility, decorative, and buttonhole stitches. Refer to the stitch chart located on the machine's top cover for visual reference.

olusin 5: Iwaju view with storage compartments open, revealing accessories and stitch chart.
4.2 Ṣíṣe àtúnṣe àwọn ètò àṣọ
After selecting a stitch, the touch control panel will display recommended stitch length and width. These can be adjusted using the dedicated buttons on the panel to suit your fabric and project requirements.

Figure 6: Close-up of the touch control panel for stitch and setting adjustments.
4.3 Bíbẹ̀rẹ̀ sí Ránṣẹ́
Place your fabric under the presser foot. Lower the presser foot. Use the start/stop button or the foot controller to begin sewing. Adjust the sewing speed using the speed control slider.
5. Itọju
5.1 Ninu ẹrọ
Regularly clean the bobbin area and feed dogs to remove lint and dust. Use the provided lint brush. Disconnect the machine from power before cleaning. Do not use liquid cleaners or solvents.
5.2 Rirọpo abẹrẹ
Replace the needle frequently, especially when sewing different fabric types or if the needle becomes dull or bent. Always use the correct needle type and size for your fabric.
6. Laasigbotitusita
6.1 wọpọ oran
- Awọn aranpo ti a fo: Ṣàyẹ̀wò bóyá a fi abẹ́rẹ́ náà sí i dáadáa, bóyá ó tẹ̀ tàbí ó rọ̀, tàbí bóyá a ń lo irú abẹ́rẹ́ tó yẹ fún aṣọ náà.
- Pipin okun: Ensure the machine is threaded correctly, the tension is appropriate, and the thread is not old or damaged.
- Ìdènà aṣọ: Verify that the presser foot is lowered before sewing and that the correct presser foot is used for the task.
- Awọn aranpo ti ko dọgba: Check upper and bobbin thread tension. Ensure the machine is clean and free of lint.
7. Awọn pato
| Ẹya ara ẹrọ | Ẹ̀kúnrẹ́rẹ́ |
|---|---|
| Ọja Mefa | 9 x 20.4 x 12.4 inches (9"D x 20.4"W x 12.4"H) |
| Iwọn Nkan | 26.9 iwon |
| Olupese | Elna |
| Nọmba Awoṣe Nkan | EL710 |
| Orisun agbara | Okun Itanna |
| Ohun elo | Irin, Ṣiṣu |
| Àwọ̀ | Funfun/pupa |
| Apejọ ti a beere | Rara |
| Awọn batiri ti a beere | Rara |

Figure 7: Dimensions of the Elna eXcellence 710 Sewing Machine.
8. To wa Awọn ẹya ẹrọ
The Elna eXcellence 710 comes with a comprehensive set of accessories to get you started immediately:
- Ẹsẹ boṣewa A
- Ti yiyi hem ẹsẹ D
- Ẹsẹ ẹlẹsẹ E
- Satin aranpo ẹsẹ F
- Ẹsẹ aranpo satin-ẹsẹ F2
- Ẹsẹ hem afọju G
- Overlock foot M
- ¼” ẹsẹ okun O
- Darning ẹsẹ PD-H
- Convertible free-motion quilting kit QB-S (including: closed-toe foot, open-toe foot, clear-view ẹsẹ)
- Automatic buttonhole foot R with stabilizer plate
- Bọtini masinni ẹsẹ T
- Dual Feed foot AD wide system
- Taara aranpo awo abẹrẹ
- Orunkun gbe soke
- Quilting itọnisọna bar
- Bobbins
- Seam ripper
- Eto abẹrẹ
- Fọlẹ lint
- Spool holder small x2
- Spool holder large x2
- Spool holder special x2
- Spool isinmi
- Felt cushion
- Afikun spool pin
- Screwdriver
- Fọwọkan nronu stylus
- Oludari ẹsẹ
- Semi-hard cover
- eExcellence 710 Masinni Machine
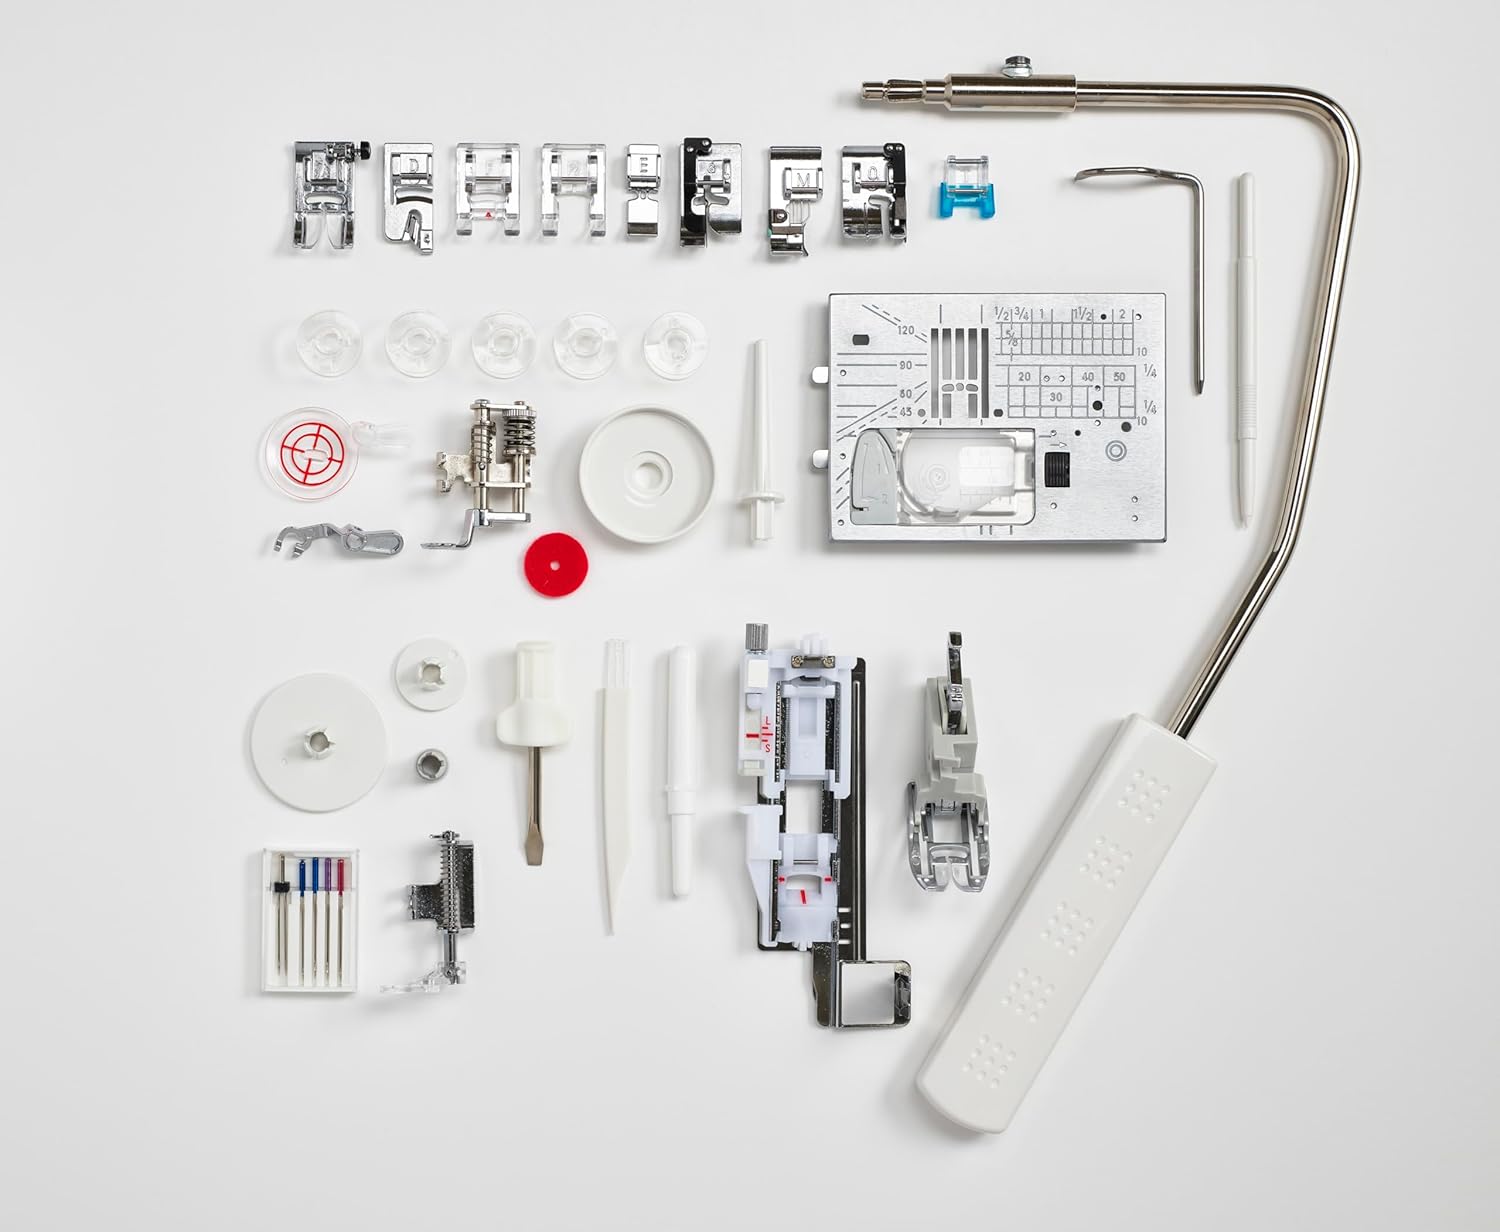
Figure 8: All included accessories, including various presser feet and tools.
9. Atilẹyin ọja ati Support
For warranty information and customer support, please refer to the documentation included with your product or visit the official Elna webojula. Jeki ẹri rira rẹ fun awọn iṣeduro atilẹyin ọja.
10. Awọn fidio ọja
No official product videos from the seller were found for this specific model in the provided data. Please refer to the written instructions or the manufacturer's website for visual guides.