
1. Ifihan
This manual provides detailed instructions for the assembly, operation, and maintenance of your Sharkoon SHA-VS4-WBK Mid-Tower PC Case. Please read this manual thoroughly before beginning installation to ensure proper setup and to maximize the lifespan of your components.
2. Ọja Ipariview
The Sharkoon SHA-VS4-WBK is a mid-tower PC case designed for ATX and Micro-ATX motherboards, featuring a full black aesthetic and an acrylic side window panel. It offers ample space for various components and efficient cable management.
Awọn ẹya pataki:
- Acrylic side window panel for component visibility.
- Three 5.25-inch drive bays (two with tool-less mounting).
- Three 3.5-inch drive bays.
- Four 2.5-inch drive bays.
- Two external USB 3.0 ports on the front panel.
- Expansion card clearance up to 385mm (with 2.5-inch drive cage removed).
- CPU cooler height support up to 160mm.
- Convex side panel design for improved cable management space.
Itọkasi wiwo:

olusin 2.1: Iwaju-ẹgbẹ view of the Sharkoon SHA-VS4-WBK Mid-Tower PC Case, showcasing the acrylic side panel and front I/O ports.
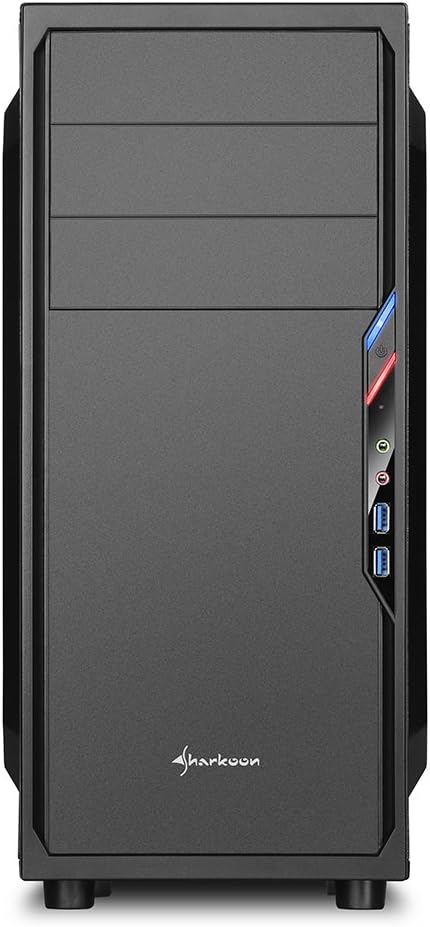
olusin 2.2: Iwaju view of the PC case, highlighting the drive bays and front panel design.

olusin 2.3: Apa view of the PC case, clearly showing the acrylic window panel.

olusin 2.4: Ẹyìn view of the PC case, showing expansion slots and power supply mounting area.

olusin 2.5: inu ilohunsoke view of the PC case, illustrating the motherboard tray, drive bays, and cable routing options.
3. Eto ati fifi sori
Follow these steps for proper installation of your PC components into the SHA-VS4-WBK case.
3.1 Ngbaradi Ọran naa
- Fi ìṣọ́ra tú àpótí náà kí o sì yọ gbogbo ohun èlò ìdìpọ̀ kúrò.
- Yọ awọn panẹli ẹgbẹ kuro nipa ṣi awọn skru atanpako ni ẹhin apoti naa.
3.2 Fifi sori modaboudu
- Install the necessary standoffs onto the motherboard tray according to your motherboard's form factor (ATX or Micro-ATX).
- Place the I/O shield into the rear opening of the case.
- Carefully align your motherboard with the standoffs and I/O shield, then secure it with screws.
3.3 wakọ fifi sori
- 5.25-inch Drives: For the two tool-less bays, simply slide the drive in until it clicks into place. For the third bay, secure with screws.
- 3.5-inch Drives: Mount 3.5-inch HDDs into the designated drive cages.
- 2.5-inch Drives: Mount 2.5-inch SSDs/HDDs into the designated drive cages. The 2.5-inch drive cage can be removed to accommodate longer expansion cards.
3.4 Imugboroosi kaadi sori
- Yọ awọn ideri aaye imugboroosi pataki kuro ni ẹhin apoti naa.
- Insert your expansion card (e.g., graphics card) into the appropriate PCIe slot on your motherboard.
- Secure the expansion card with the provided screws. Note the maximum clearance of 310mm, or 385mm if the 2.5-inch drive cage is removed.
3.5 Fifi sori ẹrọ Ipese Agbara
- Install your power supply unit into the rear-mount power supply bay at the bottom of the case.
- Secure it with screws from the outside of the case. Ensure the power supply's fan faces the correct direction for optimal airflow.
3.6 USB Management
Utilize the space behind the motherboard tray and the convex design of the side panel to route cables neatly. This improves airflow and the overall aesthetic of your build.
3.7 Àwọn Ibudo I/O Iwaju ti o so pọ
Connect the front panel cables (USB 3.0, audio, power, reset, LED indicators) to the corresponding headers on your motherboard. Refer to your motherboard manual for specific header locations.
4. Awọn ero ṣiṣe
Once all components are installed, ensure all cables are securely connected and the side panels are reattached. Power on your system and verify all components are functioning correctly. Monitor temperatures to ensure adequate cooling.
5. Itọju
Itọju deedee n ṣe iranlọwọ lati rii daju pe iṣẹ ṣiṣe to dara julọ ati igba pipẹ ti awọn paati PC rẹ.
- Pipa eruku: Periodically clean dust from the interior of the case, especially from fans and heatsinks, using compressed air or a soft brush.
- Ode Ninu: Mu ese ita gbangba pẹlu asọ, damp asọ. Yago fun abrasive ose.
- Acrylic Panel Care: Clean the acrylic side panel with a soft, lint-free cloth and a mild plastic cleaner to prevent scratches.
6. Laasigbotitusita
Ti o ba pade awọn iṣoro, ronu awọn igbesẹ laasigbotitusita ti o wọpọ wọnyi:
- Ko si Agbara: Check all power connections, including the power supply to the wall outlet, the 24-pin ATX connector, and the 8-pin CPU power connector on the motherboard. Ensure the power button cable is correctly connected to the motherboard.
- Àwọn Ẹ̀yà Tí Kò Bára Mu: Double-check component dimensions against the case specifications. For long graphics cards, ensure the 2.5-inch drive cage is removed if necessary.
- Afẹ́fẹ́ tó dára/gbóná ju bó ṣe yẹ lọ: Verify all fans are spinning correctly and are oriented for optimal airflow. Ensure cables are neatly managed to avoid obstructing airflow.
- Àwọn Ìṣòro Ìṣíṣẹ́/Ìdíwọ́ fún Páńẹ́lì Ìwájú: Confirm that all front panel connectors (USB, audio) are correctly plugged into the motherboard headers.
7. Awọn pato
| Ẹya ara ẹrọ | Sipesifikesonu |
|---|---|
| Brand | Sharkoon |
| Nọmba awoṣe | SHA-VS4-WBK |
| Iru Irú | Ile-iṣọ Mid |
| Modaboudu Ibamu | ATX, Micro-ATX |
| Awọn iwọn (L x W x H) | 44.5 x 20 x 43 cm |
| Iwọn | 3.5 kg |
| Ohun elo | Acrylic (Side Panel) |
| 5.25-inch wakọ Bays | 3 (2 tool-less) |
| 3.5-inch wakọ Bays | 3 |
| 2.5-inch wakọ Bays | 4 |
| Iwaju Awọn Ibudo I / O | 2 x USB 3.0 |
| Expansion Card Clearance | Max 310mm (385mm with 2.5-inch drive cage removed) |
| Sipiyu kula Max Iga | 160mm (Note: May be 155mm depending on motherboard/cooler) |
| Power Supply Max Depth | 250mm |
| Ọna Itutu | Itutu afẹfẹ |
8. Atilẹyin ọja ati Support
For warranty information and technical support, please refer to the official Sharkoon webaaye tabi kan si olupin agbegbe rẹ. Jeki ẹri rira rẹ fun awọn iṣeduro atilẹyin ọja.