1. Ifihan
Thank you for choosing the OQIMAX GH8013 Digital Projection Alarm Clock. This manual provides detailed instructions for the proper setup, operation, and maintenance of your device. Please read this manual thoroughly before use and retain it for future reference.
Alaye Aabo
- Ma ṣe fi ẹrọ naa han si awọn iwọn otutu to gaju, imọlẹ orun taara, tabi ọriniinitutu giga.
- Yago fun sisọ silẹ tabi tẹriba ẹrọ si awọn ipa to lagbara.
- Use only the provided power adapter or a compatible 5V USB power source.
- Jeki kuro ni arọwọto awọn ọmọde.
- Ma ṣe gbiyanju lati tunto tabi tun ẹrọ naa funrararẹ. Kan si atilẹyin alabara ti awọn ọran ba dide.
2. Package Awọn akoonu
Jọwọ ṣayẹwo package fun awọn nkan wọnyi:
- OQIMAX GH8013 Digital Projection Alarm Clock
- Okun Agbara USB
- CR2032 Button Cell Battery (for memory backup)
- Itọsọna olumulo

Image: Contents of the OQIMAX GH8013 package, including the alarm clock, USB cable, CR2032 battery, and user manual.
3. Ọja Ipariview
Mọ ara rẹ pẹ̀lú àwọn ohun pàtàkì àti àwọn ìṣàkóso aago ìkìlọ̀ rẹ.

Aworan: Oke ati isalẹ view of the alarm clock with labels for SNOOZE/LIGHT, PROJECT, ALARM, SET, DOWN, UP buttons, Speaker, Projection lamp, Power port, and CR2032 battery compartment.
Awọn ẹya pataki:
- Large LED display for time and alarm.
- Adjustable display brightness (4 levels).
- Projection function with 3 brightness levels and 180° flip.
- Iṣẹ lẹẹkọọkan (iṣẹju 1-60).
- Three alarm modes (Monday-Friday, Monday-Saturday, Everyday).
- 12/24 hour time format selection.
- Ifihan iwọn otutu.
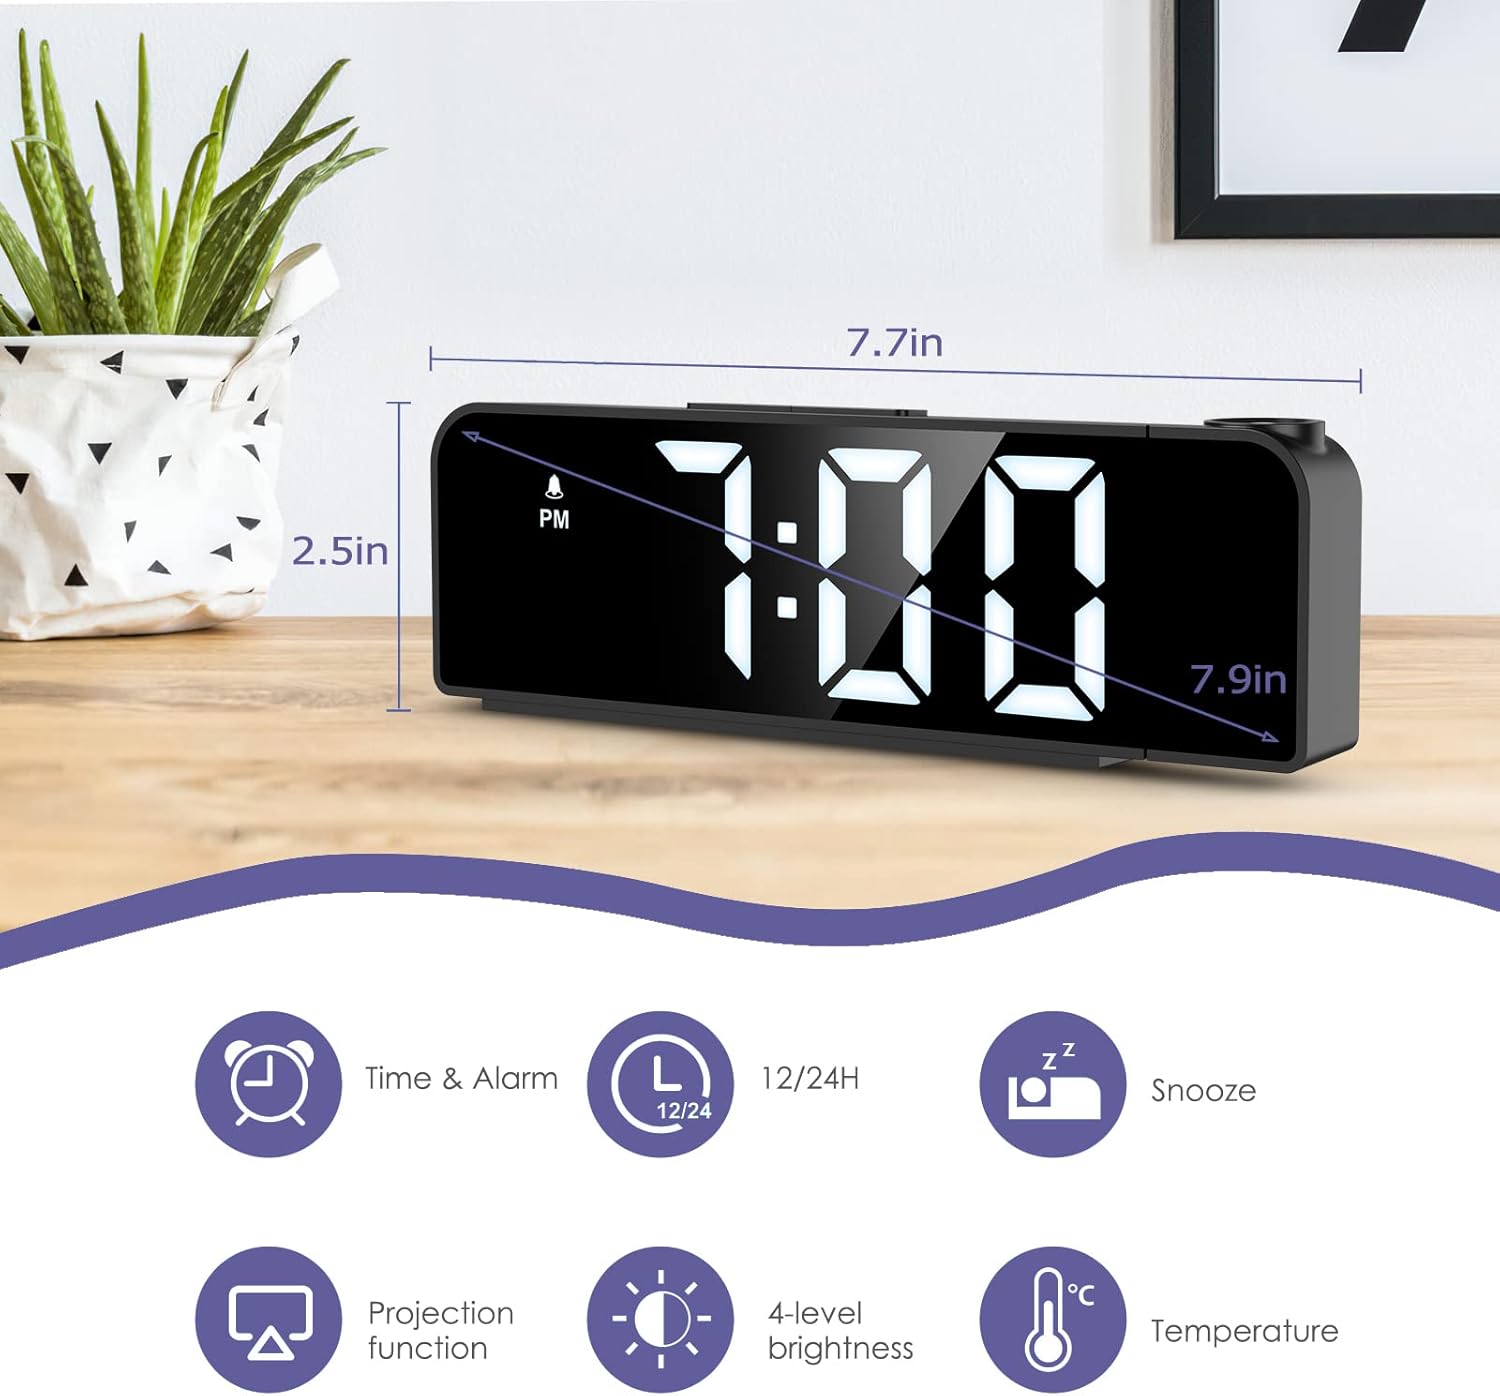
Image: The alarm clock displaying time, with icons indicating Time & Alarm, 12/24H, Snooze, Projection function, 4-level brightness, and Temperature features. Dimensions are shown as 7.7 inches length and 2.5 inches height.
4. Eto
4.1 Agbara Lori
- Insert the CR2032 button cell battery into the battery compartment on the bottom of the clock. This battery provides memory backup for time and alarm settings during power outages.
- Connect the USB power cable to the power port on the back of the alarm clock.
- Plug the other end of the USB cable into a 5V USB power adapter (not included) or a USB port. The display will light up.
4.2 Aago Ibẹrẹ
- Tẹ mọlẹ SET bọ́tìnì fún ìṣẹ́jú-àáyá mẹ́ta láti tẹ ipò ìṣètò àkókò wọlé. Àwọn nọ́mbà wákàtí náà yóò máa tàn yanranyanran.
- Lo awọn UP or SILE awọn bọtini lati ṣatunṣe awọn wakati.
- Tẹ SET lẹ́ẹ̀kan síi láti jẹ́rìí wákàtí náà kí o sì gbé e sí ìṣètò ìṣẹ́jú náà. Àwọn nọ́mbà ìṣẹ́jú náà yóò máa tàn yanranyanran.
- Lo awọn UP or SILE awọn bọtini lati ṣatunṣe iseju.
- Tẹ SET again to confirm the minute and exit time setting mode.
4.3 Àṣàyàn Ìrísí Wákàtí 12/24
Nígbà tí o bá wà ní ipò ìfihàn àkókò déédéé, tẹ UP button to switch between 12-hour and 24-hour time formats. In 12-hour format, "PM" will be displayed for afternoon hours.
5. Awọn ilana Iṣiṣẹ
5.1 Eto Itaniji
- Tẹ mọlẹ Itaniji button for 3 seconds to enter alarm setting mode. The alarm hour digits will flash.
- Lo awọn UP or SILE awọn bọtini lati ṣatunṣe aago itaniji.
- Tẹ Itaniji again to confirm the alarm hour and move to alarm minute setting. The alarm minute digits will flash.
- Lo awọn UP or SILE awọn bọtini lati satunṣe iṣẹju itaniji.
- Tẹ Itaniji again to confirm the alarm minute and select the alarm mode.
- Lo awọn UP or SILE buttons to cycle through the three alarm modes:
- 1-5: Monday to Friday
- 1-6: Monday to Saturday
- 1-7: Lojojumo
- Tẹ Itaniji again to confirm the alarm mode and exit alarm setting. The alarm icon will appear on the display, indicating the alarm is active.
To turn the alarm ON/OFF, short press the Itaniji button in normal time display mode. The alarm icon will appear or disappear.

Image: The alarm clock display showing the three alarm modes: 1-5 (Monday to Friday), 1-6 (Monday to Saturday), and 1-7 (Everyday).
5.2 Iṣiṣẹ Snooze
Nigbati itaniji ba ndun, tẹ tobi SNOOZE / LIGHT button on top of the clock to activate the snooze function. The alarm will pause for a set duration (default is 9 minutes, adjustable from 1-60 minutes) and sound again later.
Lati ṣatunṣe iye akoko sisun:
- While the alarm is sounding, press and hold the SNOOZE / LIGHT button for 3 seconds. The snooze time will flash.
- Lo awọn UP or SILE buttons to set the desired snooze duration (1-60 minutes).
- Tẹ SNOOZE / LIGHT lẹẹkansi lati jẹrisi ati jade.
Láti dá ìkìlọ̀ náà dúró pátápátá, tẹ bọ́tìnì mìíràn (fún àpẹẹrẹ, Itaniji, SET, UP, SILE) when it is sounding.
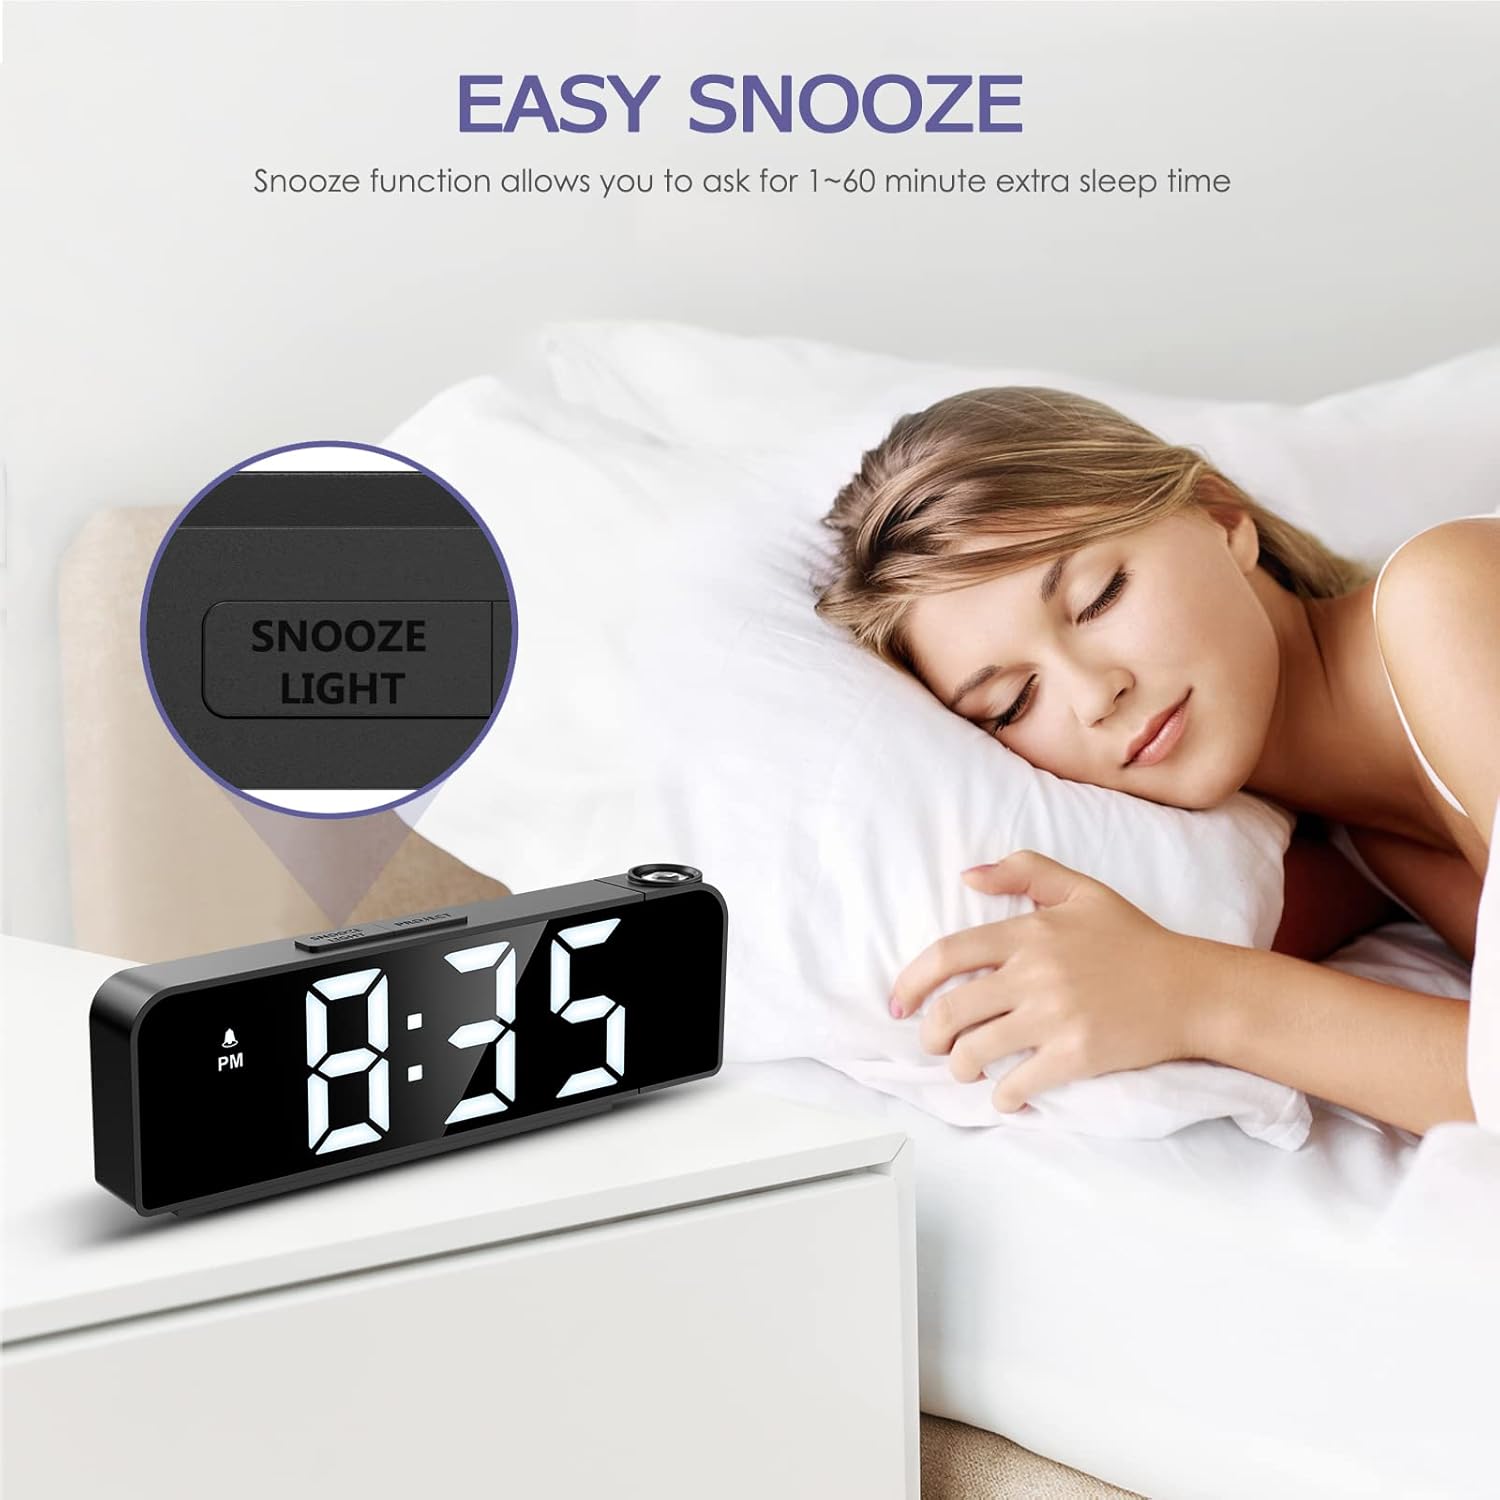
Image: A person sleeping next to the alarm clock, with the "SNOOZE/LIGHT" button highlighted, illustrating the snooze function.
5.3 Ifihan Imọlẹ Atunse
The main display has 4 adjustable brightness levels (Bright Light, Medium Light, Low Light, OFF).
Ní ipò ìfihàn àkókò déédéé, tẹ ní kúkúrú SNOOZE / LIGHT button to cycle through the brightness levels.

Image: The alarm clock display shown at Bright Light, Medium Light, Low Light, and OFF brightness settings.
5.4 Iṣẹ́ Àyẹ̀wò
The alarm clock can project the time onto a wall or ceiling.
- Tẹ awọn ISESE button to turn the projection ON/OFF.
- To adjust the projection brightness (3 levels), press the ISESE button repeatedly while the projection is active.
- The projection can be rotated 180 degrees for optimal viewing. Manually adjust the projection lens on the side of the clock to change the angle.
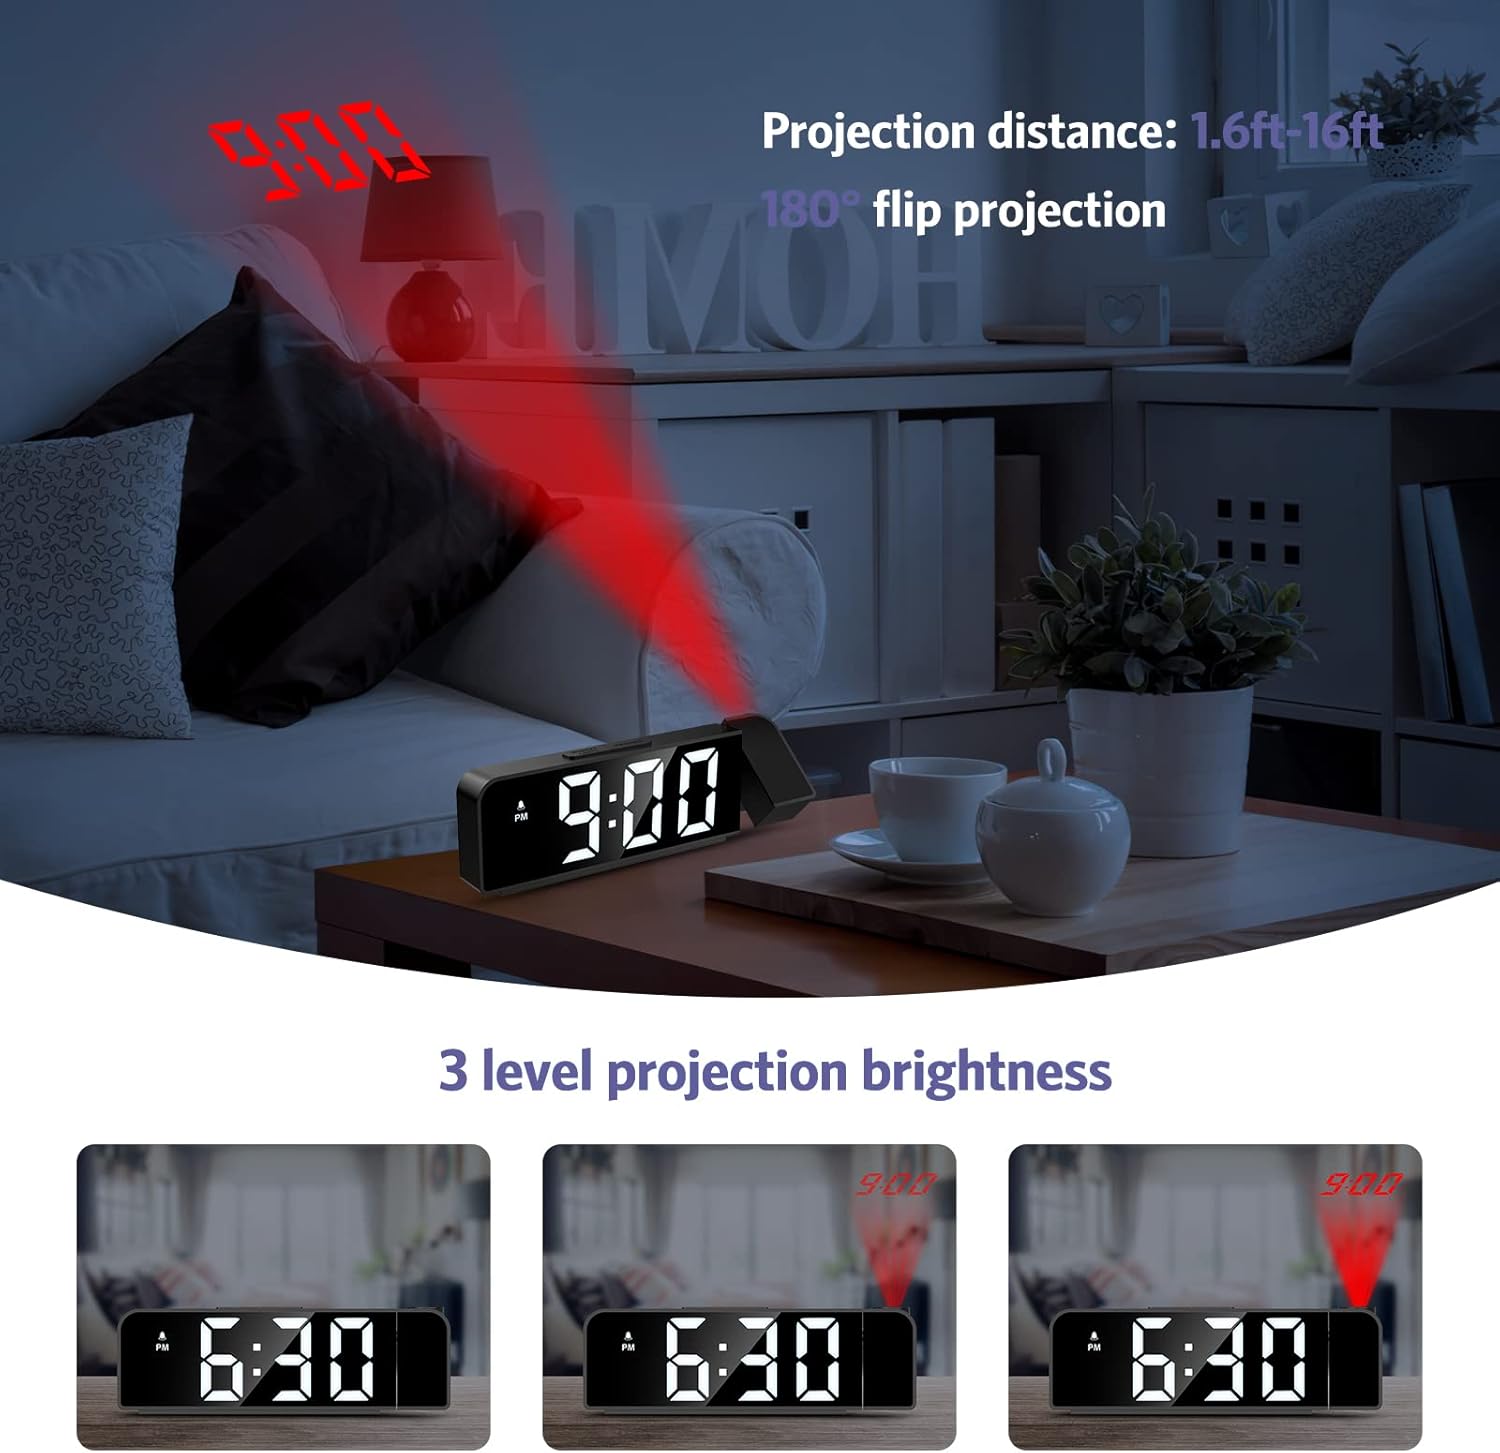
Image: The alarm clock projecting the time "9:00" onto a wall, demonstrating the projection distance (1.6ft-16ft) and 180° flip projection feature. Three levels of projection brightness are also shown.

Image: Four different scenarios showing the alarm clock projecting time onto various surfaces like a wall above a desk, a bedroom wall, and a ceiling while a person is in bed.
5.5 otutu Ifihan
The alarm clock displays the ambient temperature. This feature is automatic and does not require manual setting.
6. Itọju
- Nu ẹrọ naa pẹlu asọ ti o tutu, ti o gbẹ. Ma ṣe lo abrasive ose tabi epo.
- Rii daju pe ẹrọ naa ti yọọ kuro ṣaaju ṣiṣe mimọ.
- If the backup battery (CR2032) needs replacement, ensure the clock is powered on via USB to retain settings during the battery change.
7. Laasigbotitusita
| Isoro | Owun to le Fa | Ojutu |
|---|---|---|
| Ifihan naa ti pa tabi ti di dudu. | No power or display brightness set to OFF. | Ensure the USB power cable is securely connected. Press the SNOOZE / LIGHT bọtini lati ṣatunṣe imọlẹ ifihan. |
| Itaniji ko dun. | Itaniji ko mu ṣiṣẹ tabi ṣeto ti ko tọ. | Check if the alarm icon is displayed. If not, short press the Itaniji button to activate. Verify alarm time and mode settings. |
| Projection is blurry or upside down. | Projection focus or orientation needs adjustment. | Manually rotate the projection lens to adjust the angle. The device supports 180° flip projection. |
| Time resets after power loss. | CR2032 backup battery is dead or missing. | Replace the CR2032 button cell battery. Ensure it is inserted correctly. |
8. Awọn pato
- Awoṣe: GH8013
- Brand: OQIMAX
- Ohun elo: Acrylonitrile Butadiene Styrene (ABS)
- Iru ifihan: LED oni-nọmba
- Orisun Agbara: USB Cable (DC 5V)
- Batiri Afẹyinti: CR2032 Button Cell (included)
- Awọn iwọn: 20.9 x 8.4 x 4.7 cm (isunmọ. 7.7 x 3.3 x 1.85 inches)
- Ìwúwo: 200 giramu (isunmọ 0.44 lbs)
- Awọn ẹya pataki: Adjustable Brightness, Snooze, Projection Function, 12/24H Format, Temperature Display, Multiple Alarm Modes
9. Atilẹyin ọja ati Support
OQIMAX products are designed for reliability and performance. For any questions, technical support, or warranty claims, please contact OQIMAX customer service through the retailer where the product was purchased or visit the official OQIMAX webojula fun alaye olubasọrọ.
Please have your product model (GH8013) and purchase details ready when contacting support.