
Ọrọ Iṣaaju
This manual provides essential information for setting up, operating, and maintaining your GEEKOM Mini PC AS5. Please read these instructions carefully before using the device to ensure optimal performance and longevity. The GEEKOM Mini PC AS5 is a compact and powerful computing solution designed for various applications, from home entertainment to professional tasks.
Package Awọn akoonu
Kí o tó tẹ̀síwájú pẹ̀lú ìṣètò náà, jọ̀wọ́ rí i dájú pé gbogbo àwọn ohun tí a kọ sí ìsàlẹ̀ wà nínú àpò rẹ:
- GEEKOM Mini PC AS5
- Adapter agbara
- VESA Mount (with screws)
- SSD Mounting Screws
- HDD iṣagbesori skru
- Awọn ọna Itọsọna
- Afowoyi Olumulo (iwe-ipamọ yii)
- USB-C si okun USB-C

Nọmba 1: Contents of the GEEKOM Mini PC AS5 package.
Eto Itọsọna
1. Asopọmọra Agbeegbe
Connect your monitor, keyboard, and mouse to the GEEKOM Mini PC AS5. Refer to the port diagram below for correct connections.
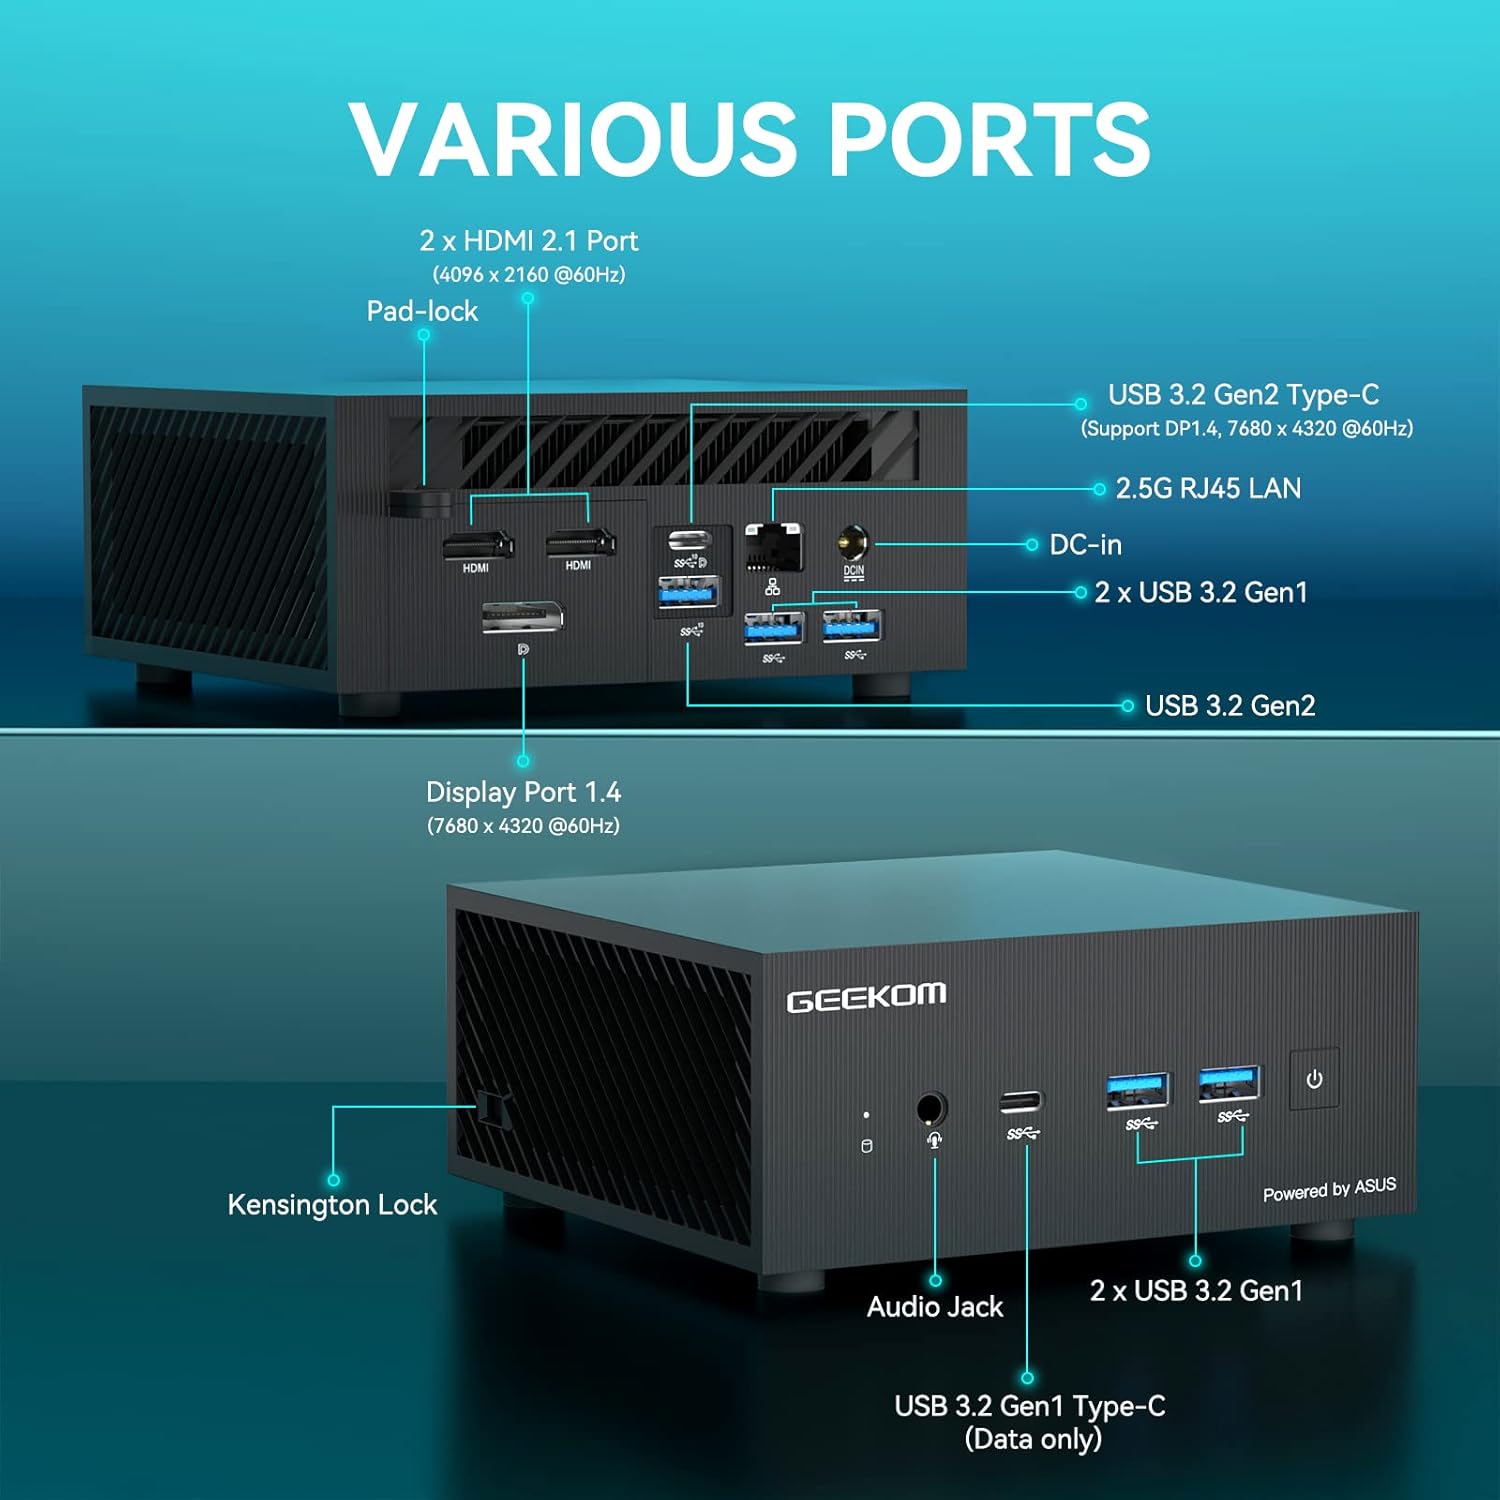
Nọmba 2: Pariview of available ports on the GEEKOM Mini PC AS5.
- Ifihan Asopọ: Use an HDMI cable to connect your monitor to one of the two HDMI 2.1 ports, or a DisplayPort cable to the Display Port 1.4. The USB 3.2 Gen2 Type-C port also supports DisplayPort 1.4 for video output.
- Awọn ẹrọ USB: Connect your keyboard, mouse, and other USB devices to the available USB 3.2 Gen1 and Gen2 ports.
- Isopọ nẹtiwọki: For a wired network connection, connect an Ethernet cable to the 2.5G RJ45 LAN port. For wireless, ensure your Wi-Fi network is available.
- Ohun: Connect headphones or speakers to the Audio Jack.
2. Asopọ agbara
Connect the power adapter to the DC-In port on the Mini PC, then plug the power adapter into a wall outlet.
3. Agbara akọkọ Lori
Press the power button located on the front of the Mini PC. The system will boot up, and you will see the operating system loading on your connected display.
4. Ṣiṣẹ System Oṣo
Follow the on-screen instructions to complete the initial setup of Windows 10 Pro, including language selection, network configuration, and user account creation.
Awọn ilana Iṣiṣẹ
Isẹ ipilẹ
- Titan/Apapa: Press the power button to turn the device on. To turn off, use the Windows shutdown option or press and hold the power button for 5 seconds.
- Tun bẹrẹ: Use the restart option within the Windows operating system.
- Ipo orun: The system will enter sleep mode after a period of inactivity. Press any key or move the mouse to wake it up.
Iṣeto ni ifihan
The GEEKOM Mini PC AS5 supports multiple displays, including up to four 4K displays or ultra-realistic 8K visuals.

Nọmba 3: The GEEKOM Mini PC AS5 supports ultra-realistic 8K visuals.

Nọmba 4: Multitasking across four 4K displays with the GEEKOM Mini PC AS5.
To configure multiple displays, right-click on the desktop, select "Display settings," and arrange your monitors as desired.
Network Connectivity (Wi-Fi 6E)
The Mini PC supports Wi-Fi 6E, offering enhanced wireless performance. To connect to a Wi-Fi network:

Nọmba 5: GEEKOM Mini PC AS5 featuring Wi-Fi 6E support for faster, lower-latency wireless connectivity.
- Click the Wi-Fi icon in the system tray.
- Yan nẹtiwọki ti o fẹ lati inu akojọ.
- Tẹ ọrọigbaniwọle nẹtiwọki sii ti o ba ṣetan.
- Click "Connect."
Itoju
Ninu
- Rii daju pe ẹrọ naa ti wa ni pipa ati yọọ kuro ṣaaju ṣiṣe mimọ.
- Lo aṣọ rirọ ati gbigbẹ lati nu ita Mini PC naa.
- Fun awọn ami alagidi, fẹẹrẹ dampen awọn asọ pẹlu omi. Yẹra fun awọn kẹmika lile tabi awọn afọmọ abrasive.
- Keep ventilation openings clear of dust and debris using compressed air.
Awọn imudojuiwọn Software
Regularly update your Windows operating system and drivers to ensure optimal performance and security. You can check for updates via Windows Update settings.
Ibi ipamọ Management
Periodically check your storage usage and remove unnecessary files to maintain system speed. The Mini PC supports additional storage expansion (SSD/HDD) if needed.
Laasigbotitusita
- Ko si Agbara:
- Rí i dájú pé ohun tí a fi ń ṣe agbára náà so mọ́ Mini PC àti ibi tí ó ń ṣiṣẹ́ dáadáa.
- Rii daju pe iṣan agbara n ṣiṣẹ nipa pilogi sinu ẹrọ miiran.
- Ko si Ifihan:
- Check that the monitor is powered on and the correct input source is selected.
- Ensure the HDMI or DisplayPort cable is securely connected to both the Mini PC and the monitor.
- Try a different cable or monitor if possible.
- Ko si Asopọ Ayelujara:
- Fún àwọn ìsopọ̀ oníwáyà, ṣàyẹ̀wò ipò okùn Ethernet àti réùtà.
- Fún Wi-Fi, rí i dájú pé Wi-Fi ṣiṣẹ́ nínú àwọn ètò Windows àti pé o ti so mọ́ nẹ́tíwọ́ọ̀kì tó tọ́ pẹ̀lú ọ̀rọ̀ìpamọ́ tó tọ́.
- Tun olulana rẹ ati Mini PC naa bẹrẹ.
- Ilọkuro eto:
- Pa awọn ohun elo ti ko wulo ti nṣiṣẹ ni abẹlẹ.
- Ṣayẹwo fun ati fi sori ẹrọ eyikeyi awọn imudojuiwọn Windows ni isunmọtosi.
- Run a disk cleanup and defragmentation (for HDDs) or TRIM (for SSDs).
- Ṣayẹwo fun malware tabi awọn ọlọjẹ.
Awọn pato
| Orukọ awoṣe | AS5 |
| isise | AMD Ryzen™ 9 5900HX (8 Cores, 16 Threads, Max Turbo Frequency 4.60 GHz, 16MB Cache, cTDP 35W) |
| Eto isesise | Windows 10 Pro |
| Àgbo | 32 GB DDR4 SDRAM |
| Ibi ipamọ | 1 TB (PCIE x 2 interface) |
| Awọn aworan | AMD Radeon™ Vega 8 Graphics (supports 8K visuals) |
| Alailowaya Asopọmọra | Wi-Fi 6E |
| Awọn ibudo |
|
| Awọn iwọn | 13 x 12 x 5.8 cm |

Nọmba 6: AMD Ryzen™ 9 5900HX Processor details.
Atilẹyin ọja & Atilẹyin
Alaye atilẹyin ọja
GEEKOM products typically come with a standard manufacturer's warranty. Please refer to the warranty card included in your package or visit the official GEEKOM webAaye fun alaye awọn ofin ati ipo atilẹyin ọja ni pato si agbegbe rẹ ati ọjọ rira. Jeki ẹri rira rẹ fun awọn iṣeduro atilẹyin ọja.
Onibara Support
For technical assistance, troubleshooting beyond this manual, or warranty inquiries, please contact GEEKOM customer support. You can usually find contact information on the official GEEKOM website or in the quick guide provided with your product.
Òṣìṣẹ́ GEEKOM Webojula: www.geekompc.com