
Asustor AS5402T
ASUSTOR AS5402T NAS User Manual
Model: AS5402T | Brand: Asustor
Ọrọ Iṣaaju
This manual provides comprehensive instructions for the setup, operation, and maintenance of your ASUSTOR AS5402T Network Attached Storage (NAS) device. The AS5402T is a high-performance 2-bay NAS designed for home and small office environments, featuring an Intel Quad-Core 2.0GHz CPU, four M.2 NVMe SSD slots, and dual 2.5 Gigabit Ethernet ports for efficient data management and multimedia streaming.

Figure 1: ASUSTOR AS5402T NAS Unit
The AS5402T NAS unit, shown from the front, highlighting its sleek black design and front-facing USB port.
Alaye Aabo
Please read all safety instructions carefully before using the device. Failure to follow these instructions may result in electric shock, fire, or damage to the device.
- Rí i dájú pé ohun tí a fi ń so agbára pọ̀ mọ́ ihò tí a fi ilẹ̀ ṣe.
- Ma ṣe fi ẹrọ naa han si omi tabi ọriniinitutu pupọ.
- Do not block ventilation openings. Ensure proper airflow around the device.
- Lo oluyipada agbara nikan ti a pese pẹlu ẹrọ naa.
- Yago fun gbigbe ẹrọ naa sinu ina taara tabi sunmọ awọn orisun ooru.
- Ma ṣe gbiyanju lati ṣii tabi tun ẹrọ naa funrararẹ. Tọkasi gbogbo iṣẹ si oṣiṣẹ oṣiṣẹ.
Package Awọn akoonu
Rí i dájú pé gbogbo àwọn ohun tí a kọ sí ìsàlẹ̀ yìí wà nínú àpò rẹ. Tí àwọn ohun kan bá sọnù tàbí tí wọ́n bá bàjẹ́, kan sí olùtajà rẹ.

Figure 2: AS5402T Package Contents and Dimensions
This diagram illustrates the AS5402T unit's dimensions and lists the included accessories: the NAS unit, Quick Installation Guide, AC Power Cord, AC Power Adapter, two RJ-45 LAN Cables (Cat 5e), and eight Flat Head Screws for 2.5" HDDs.
- ASUSTOR AS5402T Unit x1
- Awọn ọna fifi sori Itọsọna x1
- AC Agbara okun x1
- AC Power Adapter x1
- RJ-45 LAN Cable (Cat 5e) x2
- Flat Head Screw (for 2.5" HDD) x8
Hardware Loriview
Familiarize yourself with the components and ports of your AS5402T NAS.
Figure 3: AS5402T Front and Rear Panel Layout
This image displays the front and rear panels of the AS5402T, labeling key components such as the Power Button, various LED indicators (Power, System Status, Network, USB, Hard Drive), One Touch Backup Button, USB 3.2 Gen 2 ports, HDMI port, 2.5-Gigabit Ethernet ports, Reset Button, DC input, System Fan, and K-Lock security slot.
Iwaju Panel
- Bọtini agbara: Turns the NAS on or off.
- Awọn itọkasi LED:
- LED agbara: Tọkasi ipo agbara.
- System Status LED: Shows system health.
- Network LED: Indicates network activity.
- USB LED: Indicates USB device connection.
- Hard Drive LEDs: Show status of installed hard drives.
- One Touch Backup Button: Initiates a quick backup from a connected USB device.
- USB 3.2 Gen 2 Port: Fun sisopọ awọn ẹrọ USB.
Ru Panel
- Awọn ibudo USB 3.2 Gen 2 (x2): Additional high-speed USB ports.
- Ibudo HDMI: Fun asopọ si ifihan.
- 2.5-Gigabit Ethernet Ports (x2): Fun nẹtiwọki Asopọmọra.
- Bọtini atunto: Resets the NAS to factory defaults (use with caution).
- Input DC: Asopọ ohun ti nmu badọgba agbara.
- Olufẹ eto: For cooling the system.
- K-Lock: Iho aabo Kensington.
Awọn ohun elo inu
- Drive Bays (x2): For 3.5" or 2.5" SATA HDDs/SSDs.
- M.2 NVMe SSD Slots (x4): For high-speed NVMe SSDs, ideal for caching or storage pools.
- DDR4 Ramu: 4GB DDR4-2933 RAM, expandable.
- Intel Celeron N5105 CPU: Quad-Core 2.0GHz processor.


Figure 4: Internal M.2 Slots and Dual 2.5GbE Ports
The left image shows the four internal M.2 NVMe SSD slots, providing high-speed storage expansion. The right image highlights the dual 2.5-Gigabit Ethernet ports on the rear panel, enabling fast network connectivity.
Ṣeto
Follow these steps to set up your AS5402T NAS for the first time.
1. Hardware fifi sori
- Install Hard Drives/SSDs:
Slide out the drive trays from the front of the NAS. Secure your 3.5" or 2.5" SATA HDDs/SSDs into the trays using the provided screws. Slide the trays back into the NAS until they click into place.
- Install M.2 NVMe SSDs (Optional):
Locate the M.2 slots inside the NAS. Carefully insert the M.2 NVMe SSDs into the slots and secure them with the retaining screws.
- So Awọn okun Nẹtiwọọki pọ:
Connect one or both 2.5-Gigabit Ethernet ports on the rear of the NAS to your router or network switch using the provided RJ-45 LAN cables.
- So agbara:
Connect the AC power adapter to the DC input port on the rear of the NAS, then plug the power cord into a grounded electrical outlet.
- Agbara Tan:
Press the Power Button on the front panel to turn on the NAS. The Power LED will illuminate.
2. Initial Configuration (ADM Setup)
Once the NAS is powered on, you will need to access the ASUSTOR Data Master (ADM) operating system for initial setup.


Figure 5: ADM Setup Process and Control Center
The left image illustrates the four-step process for setting up the ASUSTOR NAS. The right image shows the ASUSTOR Control Center application, used to discover and manage your NAS on the network.
- Download ASUSTOR Control Center:
On a computer connected to the same network as your NAS, download and install the ASUSTOR Control Center utility from the official ASUSTOR webAaye (www.asustor.com/service/downloads).
- Ṣawari NAS:
Launch ASUSTOR Control Center. It will automatically scan your network and display your AS5402T NAS. Select your NAS from the list.
- Initialize System:
Follow the on-screen prompts to initialize the system. This includes creating an administrator password, setting up network configurations, and installing the latest ADM firmware.
- Create Storage Pool and Volume:
After ADM installation, you will be guided to create a storage pool and volume. Choose your preferred RAID level (e.g., RAID 1 for data redundancy with two drives) and file system (e.g., Btrfs for advanced features like snapshots).
Operating the NAS
This section covers common operations and features of the ASUSTOR AS5402T NAS.
Iwọle si Files ati Data

Figure 6: Cross-Platform Multi-User Access
The AS5402T supports access from various devices including desktops, laptops, tablets, and smartphones, enabling seamless file sharing across different operating systems.
- Network Shares: Access shared folders on your NAS directly from your computer's file explorer (Windows File Explorer, macOS Finder) using SMB/CIFS or NFS protocols.
- File Explorer (ADM): Lo awọn itumọ-ni File Explorer application within the ADM web interface to manage files directly from your browser.
- Awọn ohun elo Alagbeka: Download ASUSTOR mobile apps (e.g., AiData) for convenient file access and management on your smartphone or tablet.
Olumulo ati Ẹgbẹ Management
Manage user accounts and groups to control access permissions to shared folders and applications.
- Lilö kiri si Access Control > Local Users or Local Groups in ADM.
- Create new users, assign passwords, and configure their access rights to specific folders.
- Organize users into groups for easier management of permissions.
Application Installation (App Central)
Extend the functionality of your NAS by installing various applications from App Central.

Figure 7: Personal Plex Media Center
The AS5402T can serve as a powerful media server, allowing you to stream and play videos, music, and photos across various devices using applications like Plex.
- Ṣii App Central from the ADM desktop.
- Browse categories or search for specific applications (e.g., Plex Media Server, Download Center, Surveillance Center).
- Click "Install" to add the application to your NAS.

Figure 8: ASUSTOR Integration with Adobe Creative Cloud
ASUSTOR NAS devices are designed to integrate with professional creative workflows, including Adobe Creative Cloud, providing efficient storage solutions for content creators.
Data Backup and Synchronization
Protect your data by configuring backup and synchronization tasks.
- Backup & Restore: Schedule backups to external USB drives, remote NAS devices, or cloud storage services.
- DataSync Center: Muṣiṣẹpọ files with public cloud services like Google Drive, Dropbox, and OneDrive.
- Snapshots (Btrfs): If using Btrfs, utilize Snapshot Center to create point-in-time copies of your data for quick recovery from accidental deletion or ransomware attacks.
Remote Access and Multimedia
Access your NAS content from anywhere and enjoy multimedia features.

Figure 9: Live Streaming Capabilities
The AS5402T supports live streaming setups, allowing users to broadcast content to various platforms like YouTube, Twitch, and Facebook.
- EZ-Connect: Simplify remote access setup without complex router configurations.
- LooksGood: Manage and stream your video collection.
- SoundsGood: Organize and play your music library.
- Ile aworan: Browse and share your photo albums.
- Ijade HDMI: Connect the NAS directly to a TV or monitor for direct multimedia playback. The AS5402T supports 10-bit 4K hardware decoding.
Itoju
Regular maintenance ensures optimal performance and data integrity of your NAS.
- Awọn imudojuiwọn famuwia: Regularly check for and install ADM firmware updates via Settings > EZ-Update to ensure your system has the latest features, security patches, and bug fixes.
- Abojuto Ilera Eto: Monitor system status, CPU usage, memory usage, and disk health using the Alaye System ati Alakoso Ibi ipamọ applications in ADM.
- Disk Health Check: Periodically run S.M.A.R.T. tests on your hard drives through Alakoso Ibi ipamọ to detect potential issues early.
- Clean Ventilation: Ensure the NAS ventilation openings are clear of dust and obstructions to prevent overheating.
Laasigbotitusita
Abala yii n pese awọn ojutu si awọn ọran ti o wọpọ ti o le ba pade.
| Isoro | Owun to le Fa | Ojutu |
|---|---|---|
| NAS not powering on. | Power cable loose, power adapter faulty, power outlet issue. | Check all power connections. Try a different power outlet. Ensure the power adapter is functioning. |
| Cannot find NAS on network. | Network cable disconnected, incorrect IP settings, firewall blocking. | Verify LAN cable connection. Use ASUSTOR Control Center to locate the NAS. Temporarily disable firewall on your computer. Ensure NAS and computer are on the same network segment. |
| O lọra file awọn iyara gbigbe. | Network congestion, faulty cable, drive performance issues, network adapter settings. | Check network cable integrity. Ensure your network infrastructure (router, switch) supports 2.5GbE. Verify drive health in Storage Manager. Disable Jumbo Frames if not supported by all devices. |
| Hard drive LED blinking red. | Drive failure, bad sectors, RAID degradation. | Ṣayẹwo Alakoso Ibi ipamọ for detailed drive status. If a drive has failed, replace it and repair the RAID volume. Back up critical data immediately. |
| Forgot ADM password. | A ti gbagbe ọrọ igbaniwọle. | Use the reset button on the rear panel (refer to manual for specific reset procedure, usually a 3-second press for network settings reset, 10-second for factory reset without data loss). |
Awọn pato
Detailed technical specifications for the ASUSTOR AS5402T NAS.
| Ẹya ara ẹrọ | Apejuwe |
|---|---|
| Sipiyu | Intel Celeron N5105 Quad-Core 2.0GHz (Burst up to 2.9GHz) |
| Àgbo | 4GB DDR4-2933 (expandable) |
| Wakọ Bays | 2 x 3.5"/2.5" SATA III/II HDD/SSD |
| M.2 Iho | 4 x M.2 NVMe SSD slots |
| Àjọlò Ports | 2 x 2.5 Gigabit Ethernet (2.5GbE) |
| Awọn ibudo USB | 3 x USB 3.2 Gen 2 (10 Gbps) |
| HDMI Ijade | 1 x HDMI 2.0b |
| Awọn iwọn (HxWxD) | 170 x 114 x 230 mm (6.69 x 4.49 x 9.06 inches) |
| Iwọn | 2 kg (4.4 lbs) |
| Agbara agbara | (Varies by usage, refer to product page for specifics) |
| Awọn ipele RAID atilẹyin | Single, JBOD, RAID 0, RAID 1 |
| File Eto | Internal: EXT4, Btrfs; External: FAT32, NTFS, HFS+, EXT3, EXT4 |
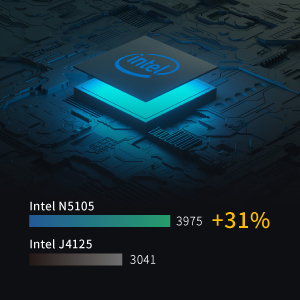
Figure 10: Intel N5105 CPU Performance
A visual representation of the Intel N5105 CPU's performance, indicating a significant improvement over previous generations like the Intel J4125.
Atilẹyin ati atilẹyin ọja
For further assistance and warranty information, please refer to the following resources:
- Official ASUSTOR Webojula: Ṣabẹwo www.asustor.com fun alaye ọja, FAQs, ati awọn orisun atilẹyin.
- Ilana Olumulo Ayelujara: Ìwé ìtọ́nisọ́nà oníṣe PDF tí ó kún rẹ́rẹ́ wà fún ìgbàsílẹ̀ ní ASUSTOR AS5402T User Manual (PDF).
- Oluranlowo lati tun nkan se: Contact ASUSTOR technical support through their website for specific issues not covered in this manual.
- Alaye Atilẹyin ọja: The ASUSTOR AS5402T comes with a standard manufacturer's warranty. Please refer to the warranty card included with your product or the official ASUSTOR webojula fun pato ofin ati ipo.
Ask a question about this manual
Ask about setup, troubleshooting, compatibility, parts, safety, or missing instructions. Manuals+ will review the question and use this page’s manual context to help answer it.