Ọrọ Iṣaaju
Thank you for choosing the Epson EB-L210SF projector. This manual provides essential information for the safe and efficient use of your projector. Please read it thoroughly before operating the device and keep it for future reference.
The Epson EB-L210SF is a 3LCD Full-HD projector designed for clear and vibrant image projection. It features a laser light source for long-lasting performance.
Alaye Aabo pataki
- Aabo lesa: Do not look directly into the projector lens when the laser light source is active. Avoid direct eye exposure to the laser beam.
- Afẹfẹ: Ensure adequate ventilation around the projector. Do not block ventilation openings. Overheating can cause damage.
- Orisun Agbara: Use only the power supply specified for this projector.
- Mimu: Fi ọwọ́ mú ẹ̀rọ ìṣiṣẹ́ náà dáadáa. Má ṣe jẹ́ kí ó jábọ́ tàbí kí ó fa ìkọlù líle.
- Ninu: Yọ okùn agbára náà kúrò kí o tó fọ ọ́. Lo aṣọ rírọrùn tí ó gbẹ. Má ṣe lo ohun ìfọmọ́ omi tàbí aerosol.
Ṣeto
1. Unpacking ati Placement
Carefully remove the projector and all accessories from the packaging. Place the projector on a stable, level surface. Ensure there is sufficient space around the projector for proper ventilation.

Nọmba 1: Iwaju ati ẹgbẹ view of the Epson EB-L210SF projector, showing the lens and ventilation grilles.
2. Nsopọ Agbara
- Connect the supplied power cord to the projector's AC inlet.
- Pulọọgi opin miiran ti okun agbara sinu iṣan itanna ti o wa lori ilẹ.
3. Nsopọ Awọn orisun Input
The projector supports various input sources. Connect your device (computer, Blu-ray player, etc.) to the appropriate port on the projector's rear panel.

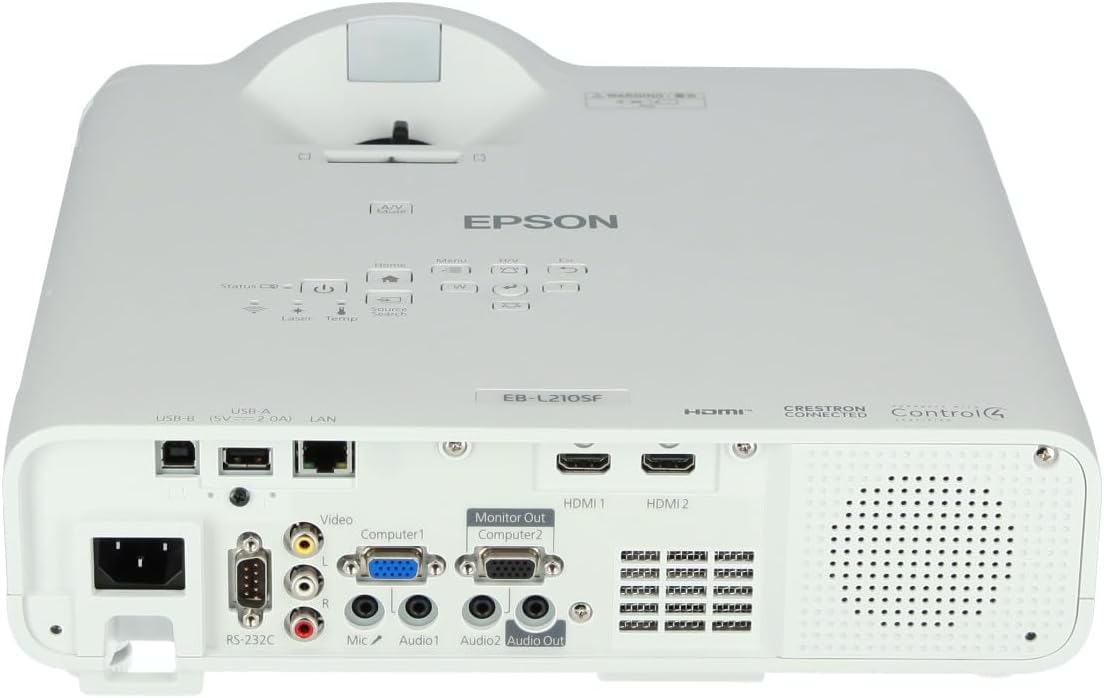
Figure 2: Rear panel of the projector, displaying various input and output ports including HDMI, Computer (VGA), Video, USB, and Audio connections.
- HDMI: Connect an HDMI cable from your device to one of the HDMI ports (HDMI 1 or HDMI 2).
- Kọmputa (VGA): Connect a VGA cable from your computer to the Computer 1 or Computer 2 port. For audio, connect a separate audio cable to Audio 1 or Audio 2.
- Fidio: Connect composite video and audio cables to the Video and Audio (R/L) ports.
- USB: Use the USB-A port for connecting USB storage devices or the USB-B port for display over USB.
- Lan: So okun Ethernet pọ fun iṣakoso ati ibojuwo nẹtiwọọki.
4. Initial Power On and Image Adjustment
- Press the power button on the projector or remote control to turn on the device. The power indicator will illuminate.
- Ṣatunṣe awọn oruka idojukọ yíká lẹ́ńsì náà títí tí àwòrán náà yóò fi hàn kedere tí yóò sì mọ́ kedere.
- Lo awọn zoom lever (if available) to adjust the image size.
- Ti aworan ba han trapezoidal, lo awọn atunse keystone feature (manual or automatic) to square the image. Refer to the Operating section for details on menu navigation.
Ṣiṣẹ awọn pirojekito
1. Iṣakoso igbimo Loriview
The control panel on top of the projector allows access to various functions and settings.
olusin 3: Top view of the projector, highlighting the control panel with buttons for power, menu, source selection, and navigation.
- Bọtini agbara: Yi pirojekito tan tabi pa.
- Iwadi orisun: Yiyipo nipasẹ awọn orisun igbewọle to wa.
- Bọtini Akojọ: Opens the on-screen display (OSD) menu.
- Navigation Buttons (Arrow keys): A lo lati lọ kiri nipasẹ awọn aṣayan akojọ aṣayan.
- Tẹ Bọtini: Jẹrisi awọn aṣayan ninu akojọ aṣayan.
- Esc Button: Jade akojọ aṣayan lọwọlọwọ tabi pada si iboju ti tẹlẹ.
- Bọtini Ile: Accesses the home screen or quick settings.
- Idakẹjẹ A/V: Temporarily mutes audio and blanks the screen.
2. Selecting an Input Source
Tẹ awọn Iwadi Orisun button on the control panel or remote control to cycle through the connected input sources (e.g., HDMI 1, HDMI 2, Computer 1, Video). The projector will automatically detect and display the active source.
3. Adjusting Image and Audio Settings
Tẹ awọn Akojọ aṣyn button to access the projector's on-screen display (OSD) menu. Use the navigation buttons to browse categories such as:
- Aworan: Adjust brightness, contrast, color, tint, sharpness, and color temperature.
- Ami: Configure input signal settings, aspect ratio, and overscan.
- Eto: General projector settings like language, display options, and power management.
- Ohun: Adjust volume, mute, and audio input selection.
Yan aṣayan kan ki o tẹ Wọle to modify its value. Press Esc lati jade ni akojọ.
Itoju
1. Ninu Pirojekito
- Òde: Wipe the projector's exterior with a soft, dry, lint-free cloth. For stubborn dirt, dampen the cloth slightly with water, then wipe dry.
- Lẹnsi: Gently wipe the lens with a lens cleaning cloth or lens paper. Avoid using abrasive materials or excessive force.
- Asẹ afẹfẹ: Regularly check and clean the air filter to prevent dust buildup, which can affect performance and cause overheating. Refer to the projector's on-screen menu for filter maintenance reminders.
2. Laser Light Source
The Epson EB-L210SF uses a laser light source, which offers a long operational life and does not require lamp replacement. No user maintenance is typically required for the laser light source itself.
Laasigbotitusita
Ti o ba pade awọn ọran pẹlu pirojekito rẹ, tọka si awọn iṣoro ti o wọpọ ati awọn ojutu wọnyi:
| Isoro | Owun to le Fa / Solusan |
|---|---|
| Ko si aworan akanṣe |
|
| Aworan jẹ blurry tabi ko ni idojukọ |
|
| Aworan ti daru (trapezoidal) |
|
| Ko si ohun |
|
| Projector is not wireless | The Epson EB-L210SF is not inherently a wireless projector. Wireless functionality typically requires an optional external wireless adapter, which is sold separately. Please consult Epson's official website or your retailer for compatible wireless adapters. |
| Overheating warning (Temp indicator) |
|
Awọn pato
| Ẹya ara ẹrọ | Ẹ̀kúnrẹ́rẹ́ |
|---|---|
| Nọmba awoṣe | V11HA75080 |
| Ipinnu Ifihan | 1920 x 1080 (HD ni kikun) |
| Asopọmọra Technology | HDMI, VGA, USB, LAN |
| Ọja Mefa | 11.81 x 11.81 x 11.81 inches |
| Iwọn Nkan | 10.14 iwon |
| Orisun Imọlẹ | Lesa |
| Olupese | Epson |
| Niyanju Lilo | Abojuto |
| Pataki Ẹya | Ìwúwo Fúyẹ́ |
| Awọn batiri ti a beere | 1 AAAA (for remote control, not included with projector unit) |
| Ọjọ Akọkọ Wa | Oṣu kọkanla ọjọ 14, ọdun 2023 |
Atilẹyin ọja ati Support
Fun alaye atilẹyin ọja, jọwọ tọka si kaadi atilẹyin ọja ti o wa pẹlu ọja rẹ tabi ṣabẹwo si Epson osise webojula. Awọn ofin atilẹyin ọja le yatọ nipasẹ agbegbe.
For technical support, product registration, or to download the latest drivers and software, please visit the official Epson support website or contact Epson customer service in your region. Contact information can typically be found on the Epson webojula.