
1. Ifihan
This manual provides comprehensive instructions for the installation, operation, and maintenance of the EVURU Digital Single Phase Energy Meter, model DDS662 Backlight (110V variant). This device is designed to accurately measure and display various electrical parameters including total energy (kWh), temporary energy (kWh), real voltage, real current, and real power consumption in single-phase AC circuits. Please read this manual thoroughly before installation and use to ensure safe and efficient operation.
2. Alaye Aabo
IKILO: Electrical installation and wiring should only be performed by qualified personnel. Failure to follow these safety guidelines may result in electric shock, fire, or damage to the device and property.
- Always disconnect power to the circuit before installing or servicing the meter.
- Rii daju pe gbogbo awọn asopọ wa ni aabo ati idabobo daradara.
- Do not operate the meter in wet or damp awọn ipo.
- Do not exceed the maximum current rating of 80A.
- Jẹrisi voltage rating of the meter (110V AC for this model) matches your electrical system.
- Pa ẹrọ kuro lati awọn ọmọde.
3. Ọja Ipariview
The EVURU DDS662 Backlight energy meter is a compact, DIN rail-mountable device featuring an LCD display for clear readings. It is designed for single-phase, two-wire AC systems.
Awọn ẹya pataki:
- Measures total Energy (kWh) and temporary Energy (kWh).
- Displays real-time Voltage (V), Current (A), and Power (W).
- LCD display with backlight for enhanced visibility.
- Pulse LED indicator for active energy measurement.
- 35mm DIN rail installation.
- Manual button for cycling through display parameters and resetting temporary kWh.
Ifiwera Awoṣe:
The EVURU series includes several models with varying features. The DDS662 Backlight model offers essential energy measurement with a clear backlit display.

Image 3.1: This image displays three different models of EVURU energy meters: DDS662, DDS667, and DDS668. Each meter shows its respective display interface, highlighting the variations in information presented and button configurations across the models.

Image 3.2: This table provides a detailed feature comparison between the DDS662 (with and without backlight), DDS667, and DDS668 models. It indicates which features, such as LCD display, electricity consumption, voltage, power, current, backlight, temporary power, manual switching, power factor, frequency, and zeroable temporary kWh, are present in each model.
Awọn iwọn:
The meter is designed for standard DIN rail mounting. Refer to the image below for detailed dimensions.

Image 3.3: This image illustrates the physical dimensions of the single-phase energy meter. Key measurements shown are 45mm width at the top, 79mm total width at the base, 66mm total height, and 43mm depth from the mounting surface.
4. Eto ati fifi sori
The EVURU DDS662 meter is designed for 35mm DIN rail installation. Ensure the power supply is disconnected before proceeding with installation.
Awọn igbesẹ fifi sori ẹrọ:
- Mount the meter onto a standard 35mm DIN rail in your electrical panel.
- Identify the Live (L) and Neutral (N) wires of your single-phase AC supply.
- Connect the wires according to the wiring diagram provided below. The meter supports two wiring modes: upper input/lower output and lower input/upper output. Ensure correct polarity.
- Secure all wire connections firmly using appropriate tools.
- Once wiring is complete and verified, restore power to the circuit.
Wiring Diagram (DDS662):

Image 4.1: This diagram illustrates the wiring connections for the DDS662 energy meter. It shows the Live (L) and Neutral (N) input connections at the top and corresponding output connections at the bottom, indicating the direction of current flow through the meter.
Wiring Diagram (DDS667):

Image 4.2: This diagram shows the wiring for the DDS667 energy meter integrated with circuit breakers. It details the connections of Live (L) and Neutral (N) wires from the main supply, through a circuit breaker, into the meter, and then out to another circuit breaker before reaching the load.
Wiring Diagram (DDS668):
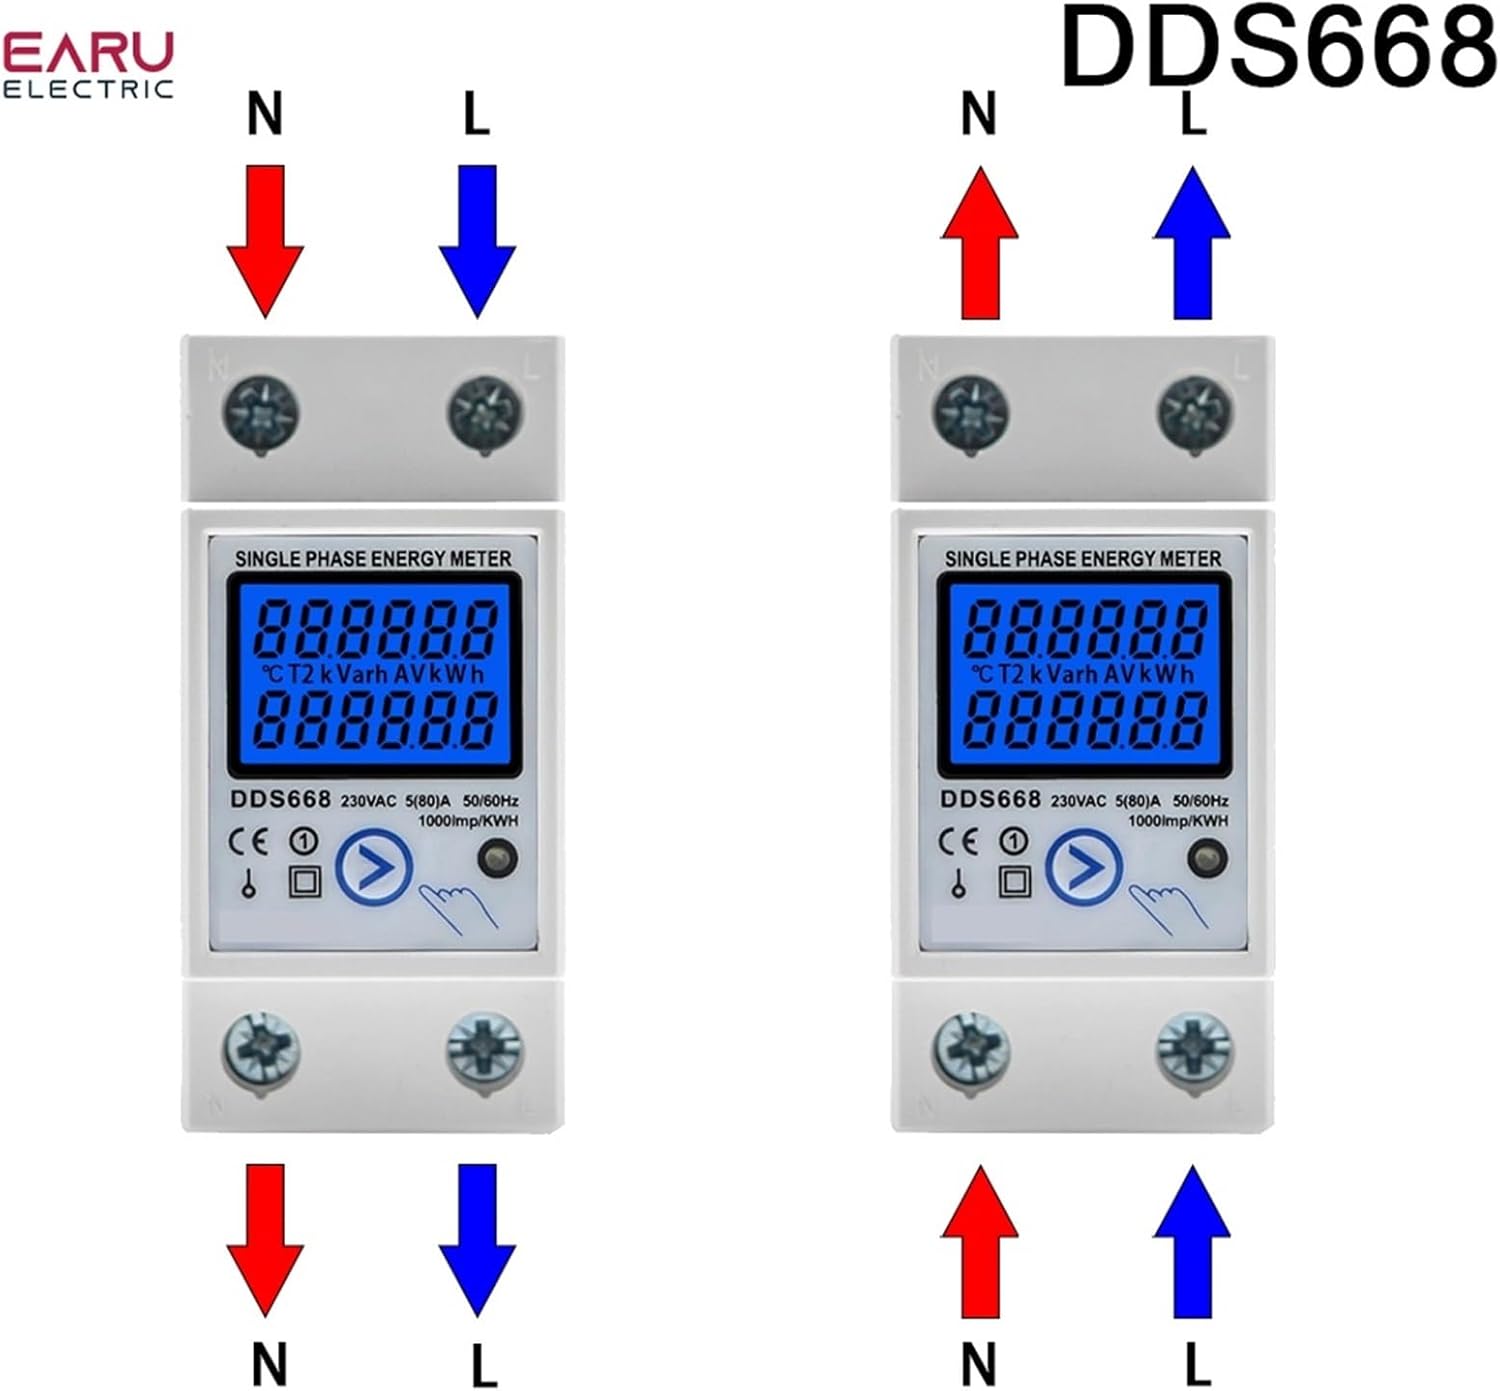
Image 4.3: This image presents two wiring configurations for the DDS668 energy meter. The left diagram shows the standard upper input (N, L) and lower output (N, L) connections. The right diagram illustrates an alternative configuration with lower input (N, L) and upper output (N, L) connections.
5. Awọn ilana Iṣiṣẹ
Once installed and powered, the meter will automatically begin measuring. The LCD display will show various parameters, which can be cycled through using the manual button.
Awọn iṣẹ Ifihan:
- Total Energy (kWh): This value represents the cumulative energy consumption and cannot be reset.
- Temporary Energy (kWh): This value represents energy consumption since the last reset. It can be reset to zero.
- Real Voltage (V): Displays the instantaneous voltage ti Circuit.
- Real Current (A): Displays the instantaneous current flowing through the circuit.
- Agbára gidi (W): Displays the instantaneous active power consumption.
Bọtini Isẹ:
- Tẹ kukuru: Press the button briefly to cycle through the different display parameters (Total kWh, Temporary kWh, Voltage, Current, Power).
- Tẹ gun (awọn aaya 6): Press and hold the button for approximately 6 seconds to reset the Temporary Energy (kWh) to zero. The Total Energy (kWh) cannot be reset.
Pulse LED Indicator:
The pulse LED on the meter indicates active energy measurement. It will flash at a rate of 1000 pulses per kWh, providing a visual confirmation of energy consumption.
6. Awọn pato
| Paramita | Iye |
|---|---|
| Awoṣe | DDS662 Backlight |
| Oṣuwọn Voltage | 110V AC |
| O pọju Lọwọlọwọ | 80A |
| Pulse Igbohunsafẹfẹ | 1000 imp / kWh |
| Ifihan | LCD pẹlu Backlight |
| Fifi sori ẹrọ | 35mm DIN Rail |
| Wiring Modes | Upper input lower output / Lower input upper output |
| Iwọn Nkan | 0.035 iwon |
7. Itọju
The EVURU DDS662 energy meter requires minimal maintenance.
- Keep the meter clean and free from dust. Use a soft, dry cloth for cleaning.
- Avoid exposing the meter to excessive moisture, direct sunlight, or extreme temperatures.
- Ṣe àyẹ̀wò àwọn ìsopọ̀ wáyà láti rí i dájú pé wọ́n wà ní ààbò nígbà gbogbo.
- Do not attempt to open or repair the meter yourself, as this may void the warranty and pose a safety risk.
8. Laasigbotitusita
If you encounter issues with your EVURU DDS662 energy meter, consider the following basic troubleshooting steps:
- Ko si Ifihan/Ko si Agbara: Ensure the power supply to the circuit is active and all wiring connections are correct and secure. Check for tripped circuit breakers.
- Awọn kika ti ko tọ: Verify that the meter is correctly wired according to the diagram for your specific model and voltage. Ensure the load is within the meter's specified current range.
- Temporary kWh Not Resetting: Ensure you are holding the button for the full 6 seconds required to reset the temporary kWh.
- Pulse LED Not Flashing: Confirm that there is an active load connected and consuming power. If no load is present, the LED will not flash.
Ti awọn iṣoro ba tẹsiwaju lẹhin igbiyanju awọn igbesẹ wọnyi, jọwọ kan si atilẹyin alabara fun iranlọwọ siwaju.
9. Atilẹyin ọja ati Support
For information regarding the product warranty, return policy, or technical support, please refer to the documentation provided at the time of purchase or contact your seller directly. EVURU is committed to providing reliable products and customer satisfaction.