Supermicro MBD-X10DRG-O+-CPU
Supermicro X10DRG-O+-CPU Motherboard User Manual
Model: MBD-X10DRG-O+-CPU
1. Ifihan
This user manual provides comprehensive instructions for the installation, configuration, and maintenance of the Supermicro X10DRG-O+-CPU Motherboard. This motherboard is designed for high-performance computing environments, supporting dual Intel Xeon E5-2600 v3/v4 processors and extensive memory configurations.
Please read this manual thoroughly before beginning the installation process to ensure proper setup and operation.
2. Alaye Aabo
Nigbagbogbo ṣe akiyesi awọn iṣọra ailewu atẹle nigba mimu modaboudu ati awọn paati kọnputa miiran:
- Rii daju pe ipese agbara ti ge asopọ lati inu iṣan ogiri ṣaaju fifi sori ẹrọ tabi yiyọ awọn paati eyikeyi kuro.
- Wọ okun ọwọ-atako-aimi tabi fi ọwọ kan ohun elo irin ti o wa lori ilẹ nigbagbogbo lati fi ina aimi silẹ.
- Mu modaboudu nipasẹ awọn egbegbe rẹ lati yago fun fifọwọkan awọn paati ifura.
- Keep the motherboard away from liquids and extreme temperatures.
- Refer to the safety guidelines provided with other components (CPU, RAM, etc.) for additional precautions.
3. Package Awọn akoonu
Verify that all items are present in the package. If any item is missing or damaged, contact your vendor immediately.
- Supermicro X10DRG-O+-CPU Motherboard
- I / O Shield
- Awọn okun SATA (iye le yatọ)
- Awọn ọna Reference Itọsọna
- CD/DVD awakọ (tabi ọna asopọ lati ṣe igbasilẹ awakọ)
4. Modaboudu Layout
Ni isalẹ jẹ ẹya pariview of the Supermicro X10DRG-O+-CPU Motherboard, highlighting key components and connectors.
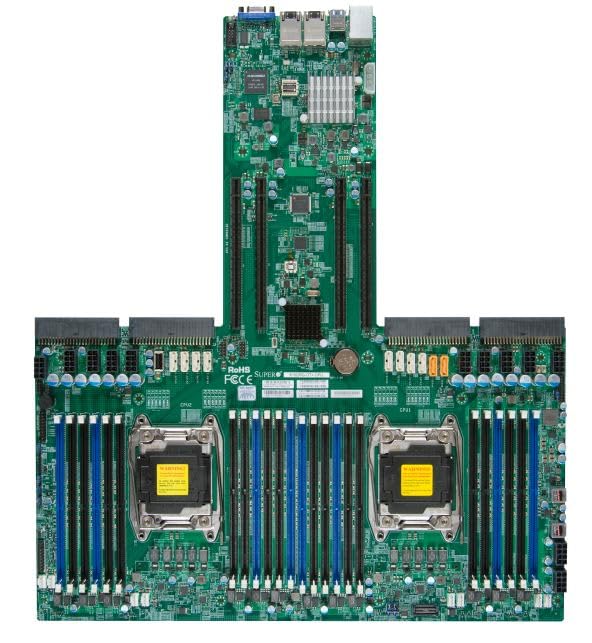
Figure 4.1: Supermicro X10DRG-O+-CPU Motherboard. This image displays the full motherboard, showing the dual CPU sockets, numerous DDR4 DIMM slots, PCIe expansion slots, and various I/O ports and connectors.
Awọn eroja pataki:
- CPU Sockets (LGA 2011-3): Two sockets for Intel Xeon E5-2600 v3/v4 processors.
- DDR4 DIMM Slots: Multiple slots supporting up to 3072 GB of ECC DDR4 memory.
- PCIe Imugboroosi Iho: Various PCIe 3.0 slots for graphics cards, network cards, and other expansion devices.
- Awọn ibudo SATA: Connectors for SATA 3.0 storage devices.
- Awọn ibudo USB: USB 2.0 and USB 3.0 headers and rear panel ports.
- Awọn ibudo LAN: Ethernet ports for network connectivity.
- Awọn asopọ agbara: ATX 24-pin, 8-pin EPS, and 4-pin power connectors.
5. Eto
Follow these steps for proper installation of the motherboard and its components.
5.1 Sipiyu fifi sori
- Open the CPU socket retention levers.
- Farabalẹ ṣe deede Sipiyu pẹlu iho, aridaju ami onigun mẹta lori Sipiyu baamu ami lori iho naa.
- Fi rọra gbe Sipiyu sinu iho lai fi agbara mu.
- Close the retention levers to secure the CPU.
- Apply thermal paste and install the CPU cooler according to the cooler manufacturer's instructions.
5.2 Memory (Àgbo) fifi sori
- Ṣii awọn agekuru ni awọn mejeji opin ti DIMM Iho.
- Parapọ ogbontarigi lori DDR4 iranti module pẹlu awọn bọtini ni DIMM Iho.
- Fi module ṣinṣin sinu Iho titi ti awọn agekuru imolara sinu ibi.
- Repeat for all desired memory modules, following the motherboard's memory population guidelines for optimal performance.
5.3 Fifi sori ẹrọ Ibi ipamọ
- So opin kan ti okun data SATA pọ mọ ibudo SATA lori modaboudu.
- So opin miiran ti okun data SATA si dirafu lile SATA tabi SSD rẹ.
- So okun agbara SATA kan lati ipese agbara rẹ si ẹrọ ipamọ.
5.4 Imugboroosi kaadi sori
- Select an appropriate PCIe slot for your expansion card (e.g., GPU, network card).
- Yọ ideri iho ti o baamu kuro ninu ọran PC rẹ.
- Align the expansion card with the slot and press down firmly until it is fully seated.
- Secure the card with a screw or retention clip to the PC case.
5.5 Awọn isopọ agbara
- Connect the 24-pin ATX power connector from your power supply to the main power header on the motherboard.
- Connect the 8-pin EPS (CPU) power connector(s) to the corresponding headers near the CPU sockets.
- Rii daju pe gbogbo awọn kebulu agbara ti sopọ ni aabo.
5.6 Iwaju Panel Awọn isopọ
Connect the front panel cables (Power LED, HDD LED, Power Switch, Reset Switch, USB, Audio) from your PC case to the corresponding headers on the motherboard. Refer to the motherboard's silkscreen labels for correct pin assignments.
6. Ṣiṣẹ
6.1 BIOS / UEFI Oṣo
Upon first boot, you may need to enter the BIOS/UEFI setup utility to configure system settings. Typically, you can access this by pressing DEL or F2 during the POST (Power-On Self-Test) sequence. Common settings to configure include boot order, date/time, and enabling/disabling specific features.
6.2 Driver fifi sori
After installing your operating system, install the necessary drivers for the motherboard's chipsets, LAN, audio, and other integrated components. Drivers can be found on the included driver CD/DVD or downloaded from the Supermicro official webojula.
6.3 Fifi sori ẹrọ eto
Insert your operating system installation media (USB drive or DVD) and follow the on-screen prompts to install the OS. Ensure the boot order in BIOS/UEFI is set to prioritize your installation media.
7. Itọju
7.1 Ninu
Regularly clean dust from the motherboard and components using compressed air. Ensure the system is powered off and unplugged before cleaning. Avoid using liquids or abrasive materials.
7.2 famuwia imudojuiwọn
Periodically check the Supermicro website for updated BIOS/UEFI firmware. Firmware updates can improve stability, performance, and add support for new hardware. Follow the provided instructions carefully when performing a firmware update to avoid system damage.
8. Laasigbotitusita
Abala yii n pese awọn ojutu si awọn ọran ti o wọpọ ti o le ba pade.
| Isoro | Owun to le Fa | Ojutu |
|---|---|---|
| System ko ni agbara lori. | Awọn kebulu agbara alaimuṣinṣin, ipese agbara ti ko tọ, awọn isopọ iwaju iwaju ti ko tọ. | Check all power connections (24-pin, 8-pin EPS). Verify front panel power switch connection. Test power supply. |
| Ko si igbejade ifihan. | Incorrectly seated GPU, faulty monitor cable, no integrated graphics. | Reseat the graphics card. Check monitor cable connections. Ensure monitor is on correct input. |
| Eto naa n dun leralera. | Memory (RAM) issue. | Reseat RAM modules. Try one module at a time. Refer to BIOS beep codes for specific diagnosis. |
| A kò rí ètò ìṣiṣẹ́. | Incorrect boot order, loose SATA cable, unformatted drive. | Check BIOS/UEFI boot order. Reseat SATA cables. Ensure drive is properly formatted and OS installed. |
9. Awọn pato
Detailed technical specifications for the Supermicro X10DRG-O+-CPU Motherboard.
- Nọmba awoṣe: MBD-X10DRG-O+-CPU
- Brand: Supermicro
- Sipiyu Support: Dual Intel Xeon E5-2600 v3/v4 Processors (LGA 2011-3)
- Ramu Memory pọju Iwon: 3072 GB DDR4 ECC
- System Bus Standard Supported: SATA 3
- Irú Asopọ̀ S/PDIF: Optical
- Package Mefa: 25 x 25 x 4 inches
- UPC: 672042176427
- Ọjọ Akọkọ Wa: Oṣu Kẹfa ọjọ 21, ọdun 2023
10. Atilẹyin ọja ati Support
For warranty information and technical support, please refer to the official Supermicro webaaye tabi kan si aaye rira rẹ. Jeki ẹri rira rẹ fun awọn iṣeduro atilẹyin ọja.
Supermicro Official Webojula: www.supermicro.com