
1. Ifihan
This manual provides comprehensive instructions for the installation, operation, maintenance, and troubleshooting of the Vivotek FE9391-EHV-V2 12MP Outdoor Fisheye IR Illumination Camera. Please read this manual thoroughly before using the product to ensure proper setup and functionality. Retain this manual for future reference.
2. Ọja Ipariview
2.1 Key Awọn ẹya ara ẹrọ
- 12 Megapixel Effective Still Resolution for high-quality imaging.
- Fisheye Lens with 1.2mm focal length for wide-area surveillance.
- Integrated IR Illumination for clear night vision up to 20 meters.
- WDR Pro technology for optimal image visibility in high contrast lighting.
- H.265/H.264/MJPEG compression for efficient video streaming.
- IP66-rated weather-resistant enclosure for outdoor use.
- Motion-only alert type for event detection.
- Wi-Fi Connectivity Protocol for flexible network integration.
2.2 Package Awọn akoonu
Jẹrisi pe gbogbo awọn ohun kan wa ninu package:
- Vivotek FE9391-EHV-V2 Camera Unit
- Ohun èlò ìfisẹ́pọ̀ (àwọn skru, àwọn ìdákọ́ró)
- Mabomire Asopọmọra
- Awọn ọna fifi sori Itọsọna
- Software CD (or download link information)
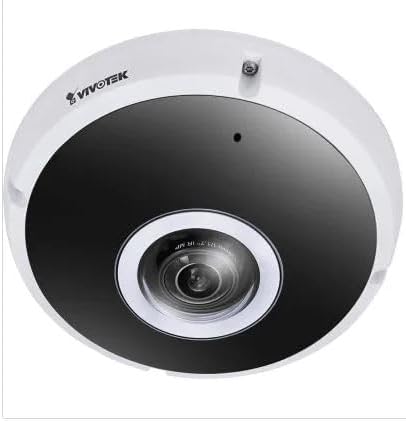
olusin 2.1: Iwaju view of the Vivotek FE9391-EHV-V2 12MP Outdoor Fisheye IR Illumination Camera, showing the lens and IR illuminators.
3. Alaye Aabo
- Ka gbogbo awọn ilana ni pẹkipẹki ṣaaju fifi sori ẹrọ ati ṣiṣẹ.
- Ensure the power source matches the camera's requirements (Corded Electric).
- Ma ṣe gbiyanju lati tu tabi yi kamẹra pada. Eyi yoo sọ atilẹyin ọja di ofo.
- Yẹra fún títọ́ka kámẹ́rà sí ibi tí ìmọ́lẹ̀ ti ń tàn dáadáa fún ìgbà pípẹ́.
- Fifi sori yẹ ki o ṣe nipasẹ oṣiṣẹ oṣiṣẹ ni ibamu pẹlu awọn koodu itanna agbegbe.
- Protect cables from being walked on or pinched.
4. Eto ati fifi sori
4.1 Iṣagbesori Location
Select a suitable outdoor location for mounting. Consider the desired surveillance area, proximity to power, and network connectivity (Wi-Fi or wired Ethernet). The camera is IP66 rated for outdoor use.

Figure 4.1: Dimensional drawing of the Vivotek FE9391-EHV-V2 camera, showing a diameter of 150mm and height of 68.2mm.
4.2 Fifi sori ti ara
- Mura Ilẹ Iṣagbesori: Use the provided mounting template (if included) to mark drill holes.
- Awọn iho iho: Lu awọn ihò awaoko ki o si fi awọn ìdákọró odi ti o ba jẹ dandan.
- Ṣe aabo kamẹra naa: Attach the camera base securely to the mounting surface using the provided screws.
- Awọn okun Sopọ:
- Agbara: So okun agbara pọ si orisun agbara to dara.
- Nẹtiwọọki: Connect an Ethernet cable for wired network access, or ensure Wi-Fi signal strength is adequate for wireless connection. Use the waterproof connector for outdoor Ethernet connections.
- Ṣatunṣe Igun Kamẹra: Loosen the adjustment screws (if applicable) to position the fisheye lens for optimal coverage. Tighten screws once adjusted.

Figure 4.2: An Ethernet cable with an RJ45 connector, used for wired network connectivity.
4.3 Iṣeto Nẹtiwọọki Ibẹrẹ
After physical installation and power-up, the camera needs to be configured on your network.
- Ṣawari Kamẹra naa: Use the Vivotek IP Utility software (available on the manufacturer's website) to discover the camera on your network.
- Pin Adirẹsi IP: Assign a static IP address or ensure it obtains an IP address via DHCP.
- Wiwọle Web Ni wiwo: Ṣii a web ẹrọ aṣawakiri ati tẹ adiresi IP kamẹra lati wọle si rẹ web-orisun iṣeto ni wiwo.
- Wo ile: Enter the default username and password (refer to the Quick Installation Guide for defaults). Change the default password immediately for security.
- Eto Wi-Fi (ti o ba wulo): Navigate to the network settings and configure the Wi-Fi connection if you are using wireless connectivity.
5. Awọn ilana Iṣiṣẹ
5.1 Live View
Once configured, you can access the live video feed through the web interface or compatible Vivotek surveillance software.
- Web Aṣàwákiri: Wọle si kamẹra naa web interface and navigate to the "Live View"apakan.
- Surveillance Software: Add the camera to your Vivotek NVR or VMS (Video Management Software) for centralized monitoring.
- Ohun elo Alagbeka: Download the Vivotek mobile app and add your camera for remote viewing.

Olusin 5.1: Example of surveillance footage from multiple cameras displayed on a tablet device, demonstrating remote monitoring capabilities.

Figure 5.2: A monitor displaying a split-screen view of four camera feeds, labeled CAM1 through CAM4, illustrating a typical surveillance setup.
5.2 Gbigbasilẹ ati Ibi ipamọ
The camera supports various recording options:
- Ibi ipamọ agbegbe: Insert a microSD card (not included) into the camera's slot for edge recording. Configure recording schedules and event triggers (e.g., motion detection).
- Agbohunsilẹ Fidio Nẹ́ẹ̀tìwọ́ọ̀kì (NVR): Connect the camera to a compatible NVR for continuous or event-based recording.
- Ibi ipamọ awọsanma: Some Vivotek models or third-party services may offer cloud storage integration. Refer to the camera's web interface for specific options.
5.3 Išipopada erin ati titaniji
Ṣe atunto awọn agbegbe wiwa išipopada ati awọn eto ifamọ ninu kamẹra web interface. When motion is detected, the camera can trigger actions such as:
- Recording video to local storage or NVR.
- Sending email notifications with snapshots.
- Uploading footage to an FTP server.
6. Itọju
- Fifọ lẹnsi: Fi aṣọ rírọrùn, mímọ́, nu lẹ́ńsì kámẹ́rà náà pẹ̀lú pẹ̀lẹ́pẹ̀lẹ́. Fún ìdọ̀tí líle, lo omi ìfọmọ́ lẹ́ńsì tí a ṣe fún àwọn ojú ojú. Má ṣe lo àwọn ohun ìfọmọ́ tí a fi ń pa ara.
- Isọsọ ile: Nu ile kamẹra mọ pẹlu ipolowoamp Aṣọ. Yẹra fún lílo àwọn ọṣẹ ìfọṣọ tó lágbára tàbí àwọn ohun olómi.
- Awọn imudojuiwọn famuwia: Regularly check the Vivotek website for firmware updates. Updating firmware can improve performance, add features, and enhance security.
- Ayẹwo USB: Lokọọkan ṣayẹwo gbogbo awọn kebulu fun awọn ami ti wọ tabi ibajẹ, pataki fun awọn fifi sori ita gbangba.
- Ṣayẹwo Ayika: Rii daju pe agbegbe iṣẹ kamẹra wa laarin iwọn otutu pato ati awọn sakani ọriniinitutu.
7. Laasigbotitusita
7.1 Ko si ifunni fidio
- Ṣayẹwo Agbara: Ensure the camera is receiving power. Verify power adapter and cable connections.
- Isopọ nẹtiwọki: Confirm the Ethernet cable is securely connected or that the Wi-Fi signal is strong and the camera is connected to the correct network.
- Adirẹsi IP: Verify the camera's IP address and ensure it is not conflicting with another device on the network.
- Ogiriina: Check if any firewall settings on your network or computer are blocking access to the camera.
7.2 Aworan Didara
- Lẹnsi mimọ: Rii daju pe lẹnsi kamẹra jẹ mimọ ati ofe lati eruku tabi smudges.
- Awọn ipo itanna: Adjust camera settings for optimal exposure in varying light conditions. Ensure IR illuminators are functioning at night.
- Awọn Eto ipinnu: Verify that the video resolution and quality settings are configured appropriately in the camera's web ni wiwo.
- Bandiwidi Nẹtiwọọki: Insufficient network bandwidth can lead to choppy or low-quality video. Check network load.
7.3 Wiwa išipopada Ko Ṣiṣẹ
- Mu Iwari išipopada ṣiṣẹ: Rí i dájú pé a ti ṣiṣẹ́ ìwádìí ìṣísẹ̀ nínú àwọn ètò kámẹ́rà náà.
- Sensitivity and Zones: Adjust motion detection sensitivity and define detection zones correctly.
- Eto Gbigbasilẹ: Verify that the recording schedule is active for motion-triggered events.
8. Awọn pato
| Ẹya ara ẹrọ | Ẹ̀kúnrẹ́rẹ́ |
|---|---|
| Nọmba awoṣe | FE9391-EHV-V2 |
| Ipinnu Iduro ti o munadoko | 12 MP |
| Lẹnsi | 1.2mm Fisheye Lens |
| IR Illumination Range | 20m |
| WDR ọna ẹrọ | WDR Pro |
| Fidio funmorawon | H.265 / H.264 / MJPEG |
| Ilana Asopọmọra | Wi-Fi |
| International Idaabobo Rating | IP66 |
| Orisun agbara | Okun Itanna |
| Awọn iwọn Ọja (L x W x H) | 5.9 x 5.9 x 2.68 inches (150 x 150 x 68.2 mm) |
| Olupese | Vivotek Inc. |
| Niyanju Lilo | Ita gbangba Aabo |
9. Atilẹyin ọja ati Support
For warranty information, technical support, and additional resources, please visit the official Vivotek webojula tabi kan si wọn onibara iṣẹ Eka.
- Olupese: Vivotek Inc.
- Webojula: www.vivotek.com (Eksample ọna asopọ, ọna asopọ gangan le yatọ)
- Olubasọrọ: Tọkasi awọn website for regional support contact information.
Please have your model number (FE9391-EHV-V2) and purchase date available when contacting support.