Hyper 5785587
Ìwé Ìtọ́sọ́nà Olùlò HyperDrive Next 10 Port USB-C Hub
Awoṣe: 5785587
Brand: Hyper
Ọrọ Iṣaaju
The HyperDrive Next 10 Port USB-C Hub is a versatile connectivity solution designed to expand the capabilities of your Mac, PC, or Chromebook. This hub provides a comprehensive array of ports, including 4K60Hz HDMI, multiple USB-A and USB-C ports with 10Gbps data transfer, 140W Power Delivery, SD and microSD card readers, Gigabit Ethernet, and a 3.5mm audio jack. It is engineered to enhance productivity, streamline workflows, and offer robust connectivity for various devices and peripherals.
Package Awọn akoonu
- HyperDrive Next 10 Port USB-C Ipele
- Afowoyi Olumulo (iwe-ipamọ yii)
Awọn ibudo Opinview
The HyperDrive Next 10 Port USB-C Hub features a comprehensive set of ports to meet diverse connectivity needs. Understanding each port's function is essential for optimal use.

Apejuwe aworan: A detailed diagram illustrating the layout and labeling of all 10 ports on the HyperDrive Next USB-C Hub. This includes USB-A 10Gbps, USB-A 5Gbps, 2x USB-C 10Gbps, SD 312MB/s, microSD 312MB/s, USB-C 140W PD 3.1, 4K60Hz HDMI, 3.5mm Audio Jack Combo, and Gigabit Ethernet.
- 4K60Hz HDMI Port: Connect an external monitor for extended display at up to 4K resolution at 60Hz.
- USB-A 10Gbps Port: For high-speed data transfer with USB-A devices.
- USB-A 5Gbps Port: For standard data transfer with USB-A devices.
- 2 x USB-C 10Gbps Ports: For high-speed data transfer with USB-C devices.
- USB-C 140W PD 3.1 Port: For power delivery to charge your host device (up to 125W) while using the hub. Requires a 140W PD 3.1 charger.
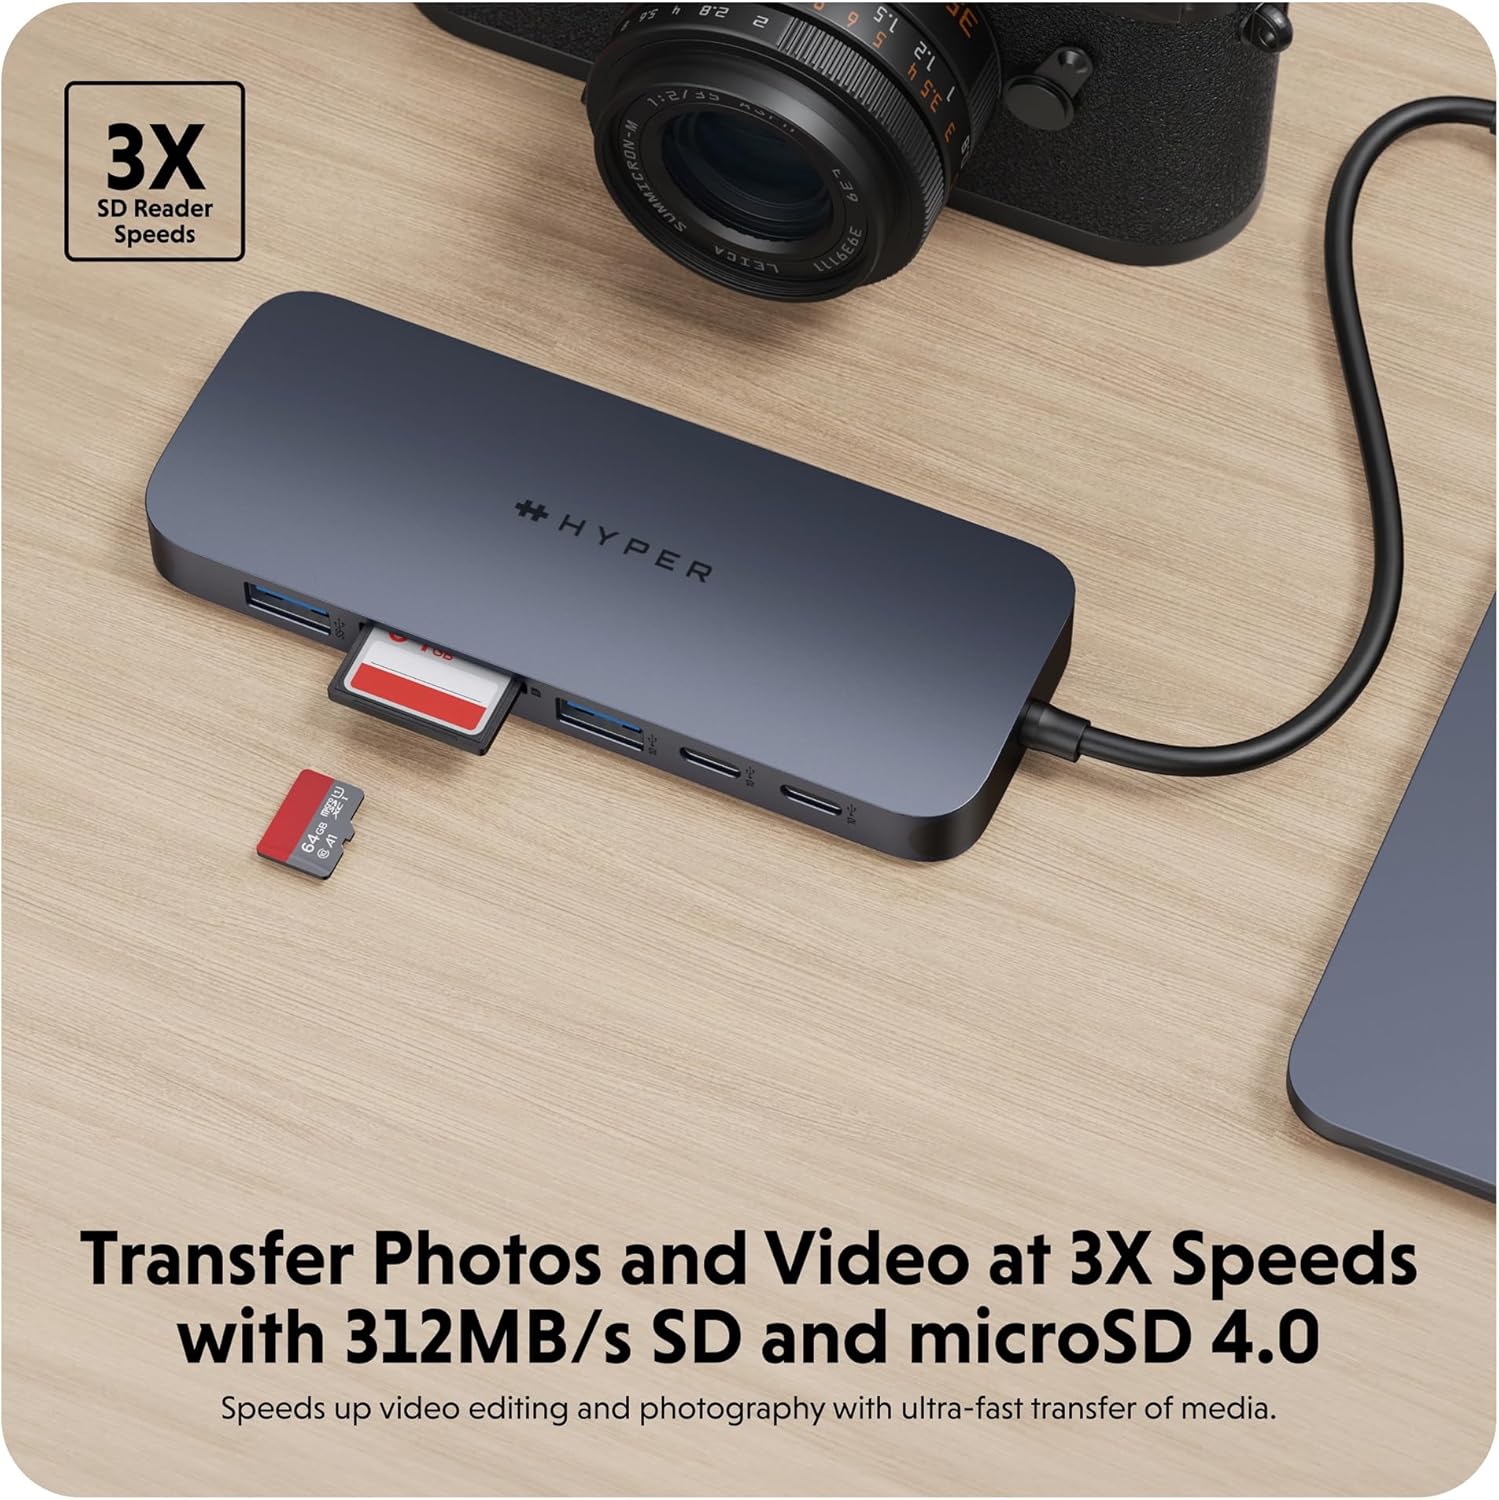
- SD Card Reader (312MB/s): For high-speed data transfer from SD memory cards.
- microSD Card Reader (312MB/s): For high-speed data transfer from microSD memory cards.
- Ibudo Ethernet Gigabit: Provides a stable and fast wired internet connection.
- 3.5mm Audio Jack Combo: Fún sísopọ̀ àwọn agbekọri tàbí makirofóònù.
Awọn ilana iṣeto
- So Ipele pọ mọ Ẹrọ Rẹ: Insert the integrated USB-C cable of the HyperDrive Next 10 Port USB-C Hub into an available USB-C port on your Mac, PC, or Chromebook.
- Asopọ agbara (Aṣayan ṣugbọn a ṣe iṣeduro): For optimal performance and to charge your host device, connect a compatible USB-C Power Delivery charger (up to 140W PD 3.1) to the USB-C 140W PD 3.1 port on the hub. This allows pass-through charging up to 125W.
- Awọn Agbeegbe Sopọ: Once the hub is connected, you can begin connecting your peripherals to the respective ports on the hub.
- For external displays, use the HDMI port.
- For USB devices (flash drives, external hard drives, keyboards, mice), use the USB-A or USB-C data ports.
- For memory cards, insert them into the SD or microSD card slots.
- For wired internet, connect an Ethernet cable to the Gigabit Ethernet port.
- For audio, plug your headphones or microphone into the 3.5mm audio jack.
- Pulọọgi ati Ṣiṣẹ: The HyperDrive Next hub is designed for plug-and-play functionality. No additional drivers or software installation are typically required for basic operation on compatible operating systems.

Apejuwe aworan: A sunmọ-soke view of the HyperDrive Next 10 Port USB-C Hub, showcasing its compact design and the integrated USB-C cable ready for connection to a host device. This image highlights the hub's sleek appearance and port accessibility.
Awọn ilana Iṣiṣẹ
Ijade Afihan (HDMI)
Connect an HDMI cable from the hub's HDMI port to your external monitor. Your device should automatically detect the display. You may need to adjust display settings (resolution, mirroring/extending) in your operating system's display preferences.

Apejuwe aworan: A laptop connected to an external monitor through the HyperDrive Next USB-C Hub, demonstrating the extended display functionality. The image shows a workspace setup with the hub facilitating multi-monitor use.
Data Transfer (USB-A, USB-C, SD/microSD)
Insert your USB devices (flash drives, external hard drives) into the appropriate USB-A or USB-C data ports. For SD or microSD cards, insert them into the corresponding slots. Files can then be accessed and transferred via your computer's file oluwakiri.
Apejuwe aworan: The HyperDrive Next USB-C Hub connected to an external hard drive, illustrating its capability for high-speed data transfer via USB 3.2. The image emphasizes the efficiency of moving large files.

Apejuwe aworan: The HyperDrive Next USB-C Hub with an SD card and a microSD card inserted into their respective slots, demonstrating the hub's fast media transfer capabilities for photographers and videographers.
Power Delivery (USB-C PD 3.1)
To charge your host device through the hub, connect a USB-C power adapter (140W PD 3.1 recommended) to the dedicated USB-C PD port on the hub. The hub will then pass through up to 125W of power to your connected laptop or device.

Apejuwe aworan: The HyperDrive Next USB-C Hub connected to a wall charger, illustrating its 140W Power Delivery 3.1 pass-through charging capability. This image shows the hub providing power to a connected device.
Network Connection (Gigabit Ethernet)
Plug an Ethernet cable from your router or modem into the Gigabit Ethernet port on the hub. Your device should automatically establish a wired network connection, providing stable and high-speed internet access.
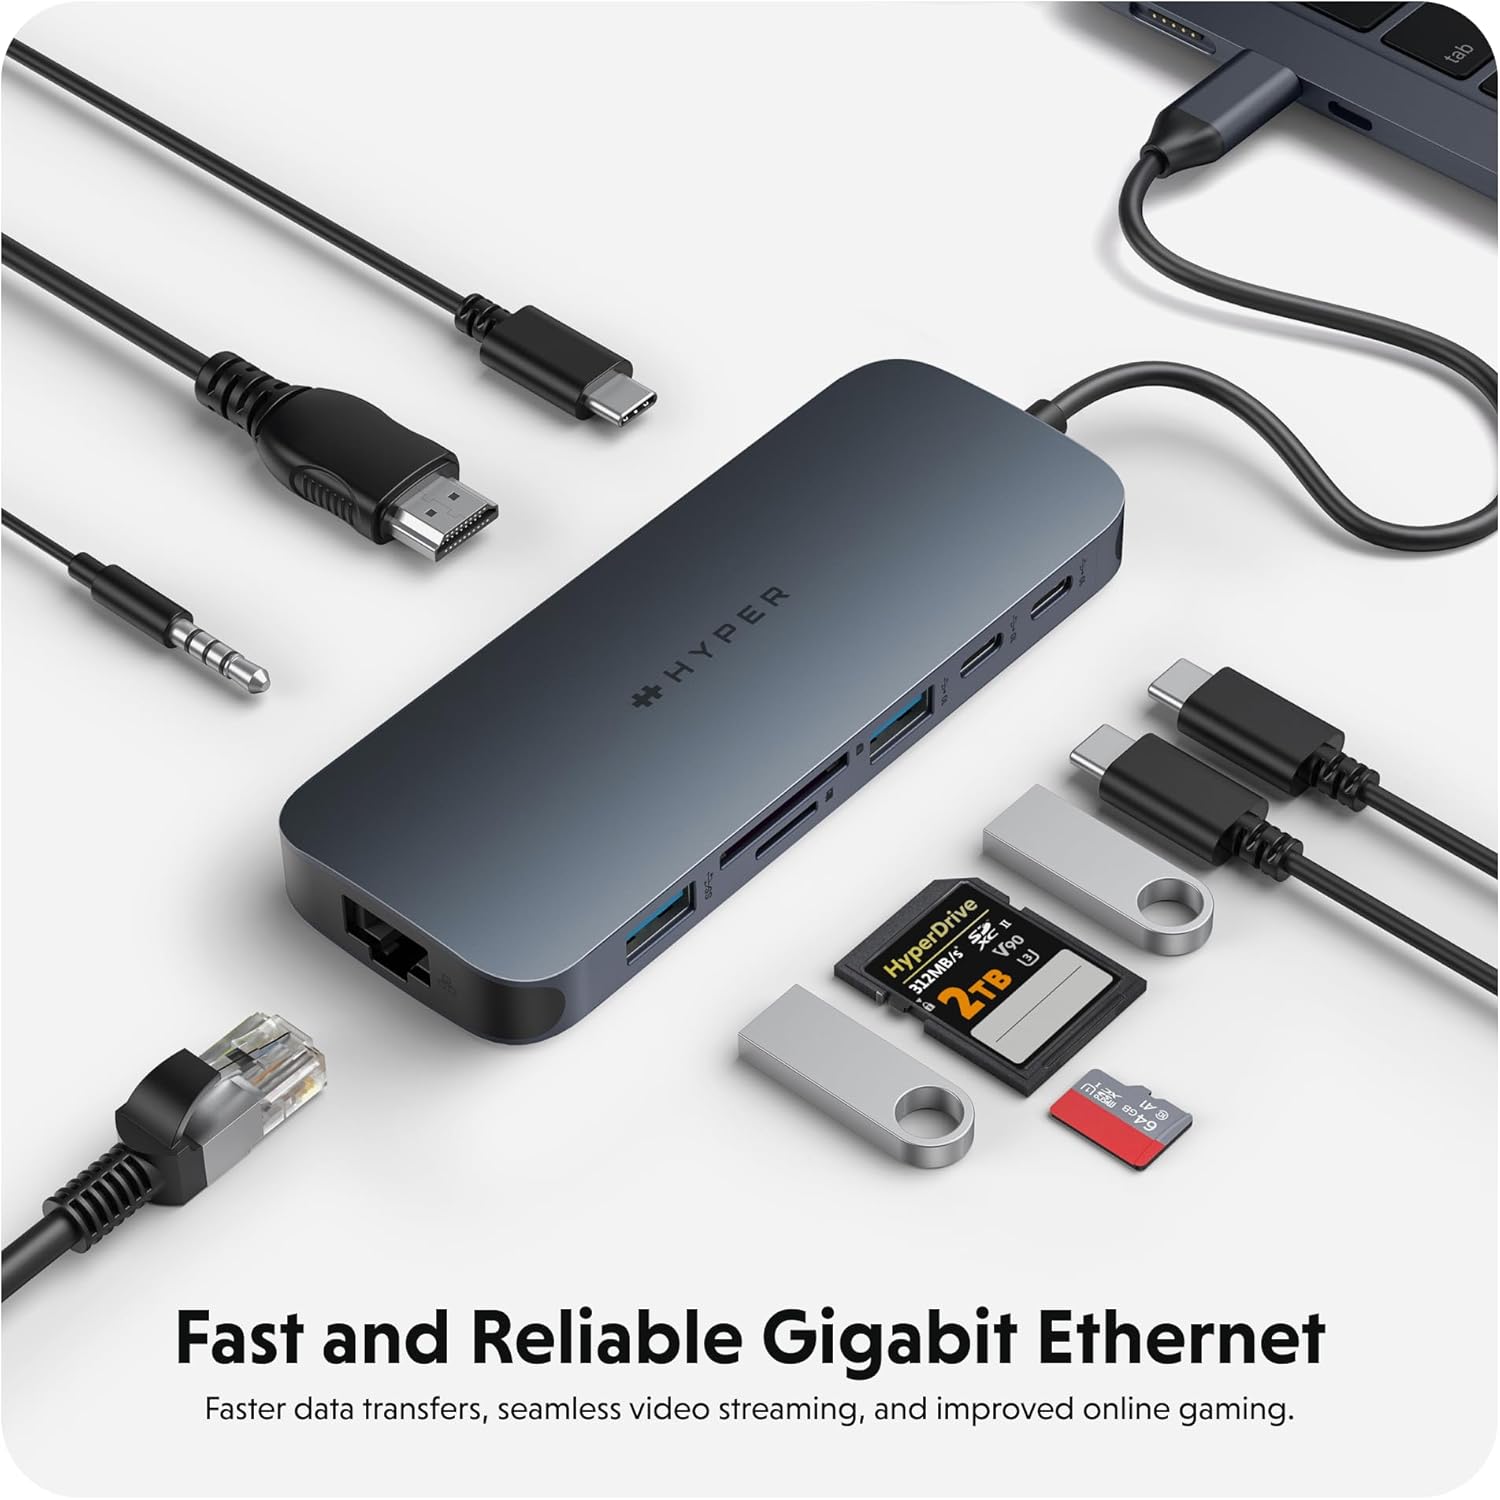
Apejuwe aworan: The HyperDrive Next USB-C Hub with an Ethernet cable connected, highlighting its Gigabit Ethernet port for fast and reliable wired internet access. The image also shows other cables and accessories, emphasizing the hub's comprehensive connectivity.
Audio Connection (3.5mm Audio Jack)
Connect your headphones or microphone to the 3.5mm audio jack. Ensure your device's audio output/input settings are configured to use the hub's audio port if it doesn't switch automatically.

Apejuwe aworan: A pair of headphones connected to the 3.5mm audio jack of the HyperDrive Next USB-C Hub, demonstrating its support for wired audio peripherals.
Ibamu
The HyperDrive Next 10 Port USB-C Hub is compatible with a wide range of devices that feature a USB-C port with DisplayPort Alternate Mode (Alt Mode) and Power Delivery capabilities. This includes:
- Mac: MacBook Pro, MacBook Air, iMac, Mac mini, and other Mac models with USB-C/Thunderbolt 3/4 ports.
- PC Windows: Laptops and desktops with USB-C ports supporting DisplayPort Alt Mode and Power Delivery.
- Chromebook: Devices with USB-C ports supporting DisplayPort Alt Mode and Power Delivery.
For optimal performance, ensure your device's USB-C port supports the necessary features for video output and power delivery.
Itọju ati Itọju
- Ninu: Lo asọ ti o rọ, ti o gbẹ lati nu oju oju ibudo naa. Yago fun lilo olomi ose tabi aerosols.
- Ibi ipamọ: Tọju ibudo naa ni itura, aye gbigbẹ kuro lati orun taara ati awọn iwọn otutu to gaju.
- Mimu: Avoid dropping the hub or subjecting it to strong impacts. Do not attempt to disassemble the device.
- Idaabobo ibudo: When not in use, consider using port covers (if available) to prevent dust and debris from entering the ports.
Laasigbotitusita
- Ko si Ijade ifihan nipasẹ HDMI:
- Rii daju pe ibudo USB-C ẹrọ agbalejo rẹ ṣe atilẹyin Ipo Alt DisplayPort.
- Check the HDMI cable connection at both the hub and the monitor.
- Gbiyanju okun HDMI ti o yatọ tabi atẹle ti o ba ṣeeṣe.
- Tun ẹrọ ogun rẹ bẹrẹ.
- Ṣàtúnṣe àwọn ètò ìfihàn nínú ẹ̀rọ ìṣiṣẹ́ rẹ.
- Awọn ẹrọ USB Ko Wa:
- Rii daju pe ibudo naa ti sopọ ni aabo si ẹrọ agbalejo rẹ.
- Gbiyanju lati so ẹrọ USB pọ taara si ẹrọ agbalejo rẹ lati jẹrisi pe o ṣiṣẹ.
- If using a high-power USB device (e.g., external hard drive), ensure the hub is connected to a power source via the PD port.
- Try a different USB port on the hub.
- Awọn iyara Gbigbe Data lọra:
- Ensure you are using the correct USB 3.2 (10Gbps) ports for maximum speed.
- The speed is also dependent on the connected device's capabilities.
- Avoid transferring multiple large files simultaneously if performance is critical.
- Ẹ̀rọ Alejo Kò Gba Agbara Nípasẹ̀ Ibudo PD:
- Ensure your USB-C power adapter is connected to the hub's 140W PD 3.1 port.
- Verify that your power adapter is functional and provides sufficient wattage (140W recommended for full pass-through).
- Confirm your host device supports USB-C Power Delivery.
Awọn pato
| Ẹya ara ẹrọ | Ẹ̀kúnrẹ́rẹ́ |
|---|---|
| Nọmba awoṣe | 5785587 |
| Awọn ibudo | 1x 4K60Hz HDMI, 1x USB-A 10Gbps, 1x USB-A 5Gbps, 2x USB-C 10Gbps, 1x USB-C 140W PD 3.1, 1x SD Card Reader (312MB/s), 1x microSD Card Reader (312MB/s), 1x Gigabit Ethernet, 1x 3.5mm Audio Jack Combo |
| HDMI Ijade | Titi di 4K @ 60Hz |
| Iyara Gbigbe data USB | Titi di 10Gbps (USB 3.2) |
| Ifijiṣẹ Agbara | 140W PD 3.1 pass-through (up to 125W to host) |
| Iyara Kaadi Kaadi | 312MB/s (SD 4.0 and microSD 4.0) |
| Àjọlò | Gigabit Ethernet (10/100/1000 Mbps) |
| Awọn ẹrọ ibaramu | Mac, Windows PC, Chromebook with USB-C (DisplayPort Alt Mode & PD) |
| Awọn iwọn | 7.83 x 4.06 x 1.42 inches |
| Iwọn Nkan | 5.7 iwon |
| Ohun elo | 100% Recycled Aluminum, 85% Recycled Plastic |
Atilẹyin ọja ati Support
Hyper products are designed with quality and reliability in mind. For information regarding warranty coverage, technical support, or to register your product, please visit the official Hyper webojula tabi kan si wọn onibara iṣẹ taara.
Hyper Osise Webojula: www.hyper.com
For additional assistance, refer to the product's Amazon listing or contact Amazon customer support.
Ask a question about this manual
Ask about setup, troubleshooting, compatibility, parts, safety, or missing instructions. Manuals+ will review the question and use this page’s manual context to help answer it.