1. Ọja Ipariview
The Retrospiler LP-602 is a versatile 3-speed record player designed to bring the classic vinyl experience into the modern era. It features built-in stereo speakers for immediate playback and a range of connectivity options including Bluetooth for wireless streaming, FM radio, USB, and SD card playback. The unit also supports vinyl-to-MP3 encoding, allowing for digital preservation of your record collection. Its retro wooden design complements various home decors.
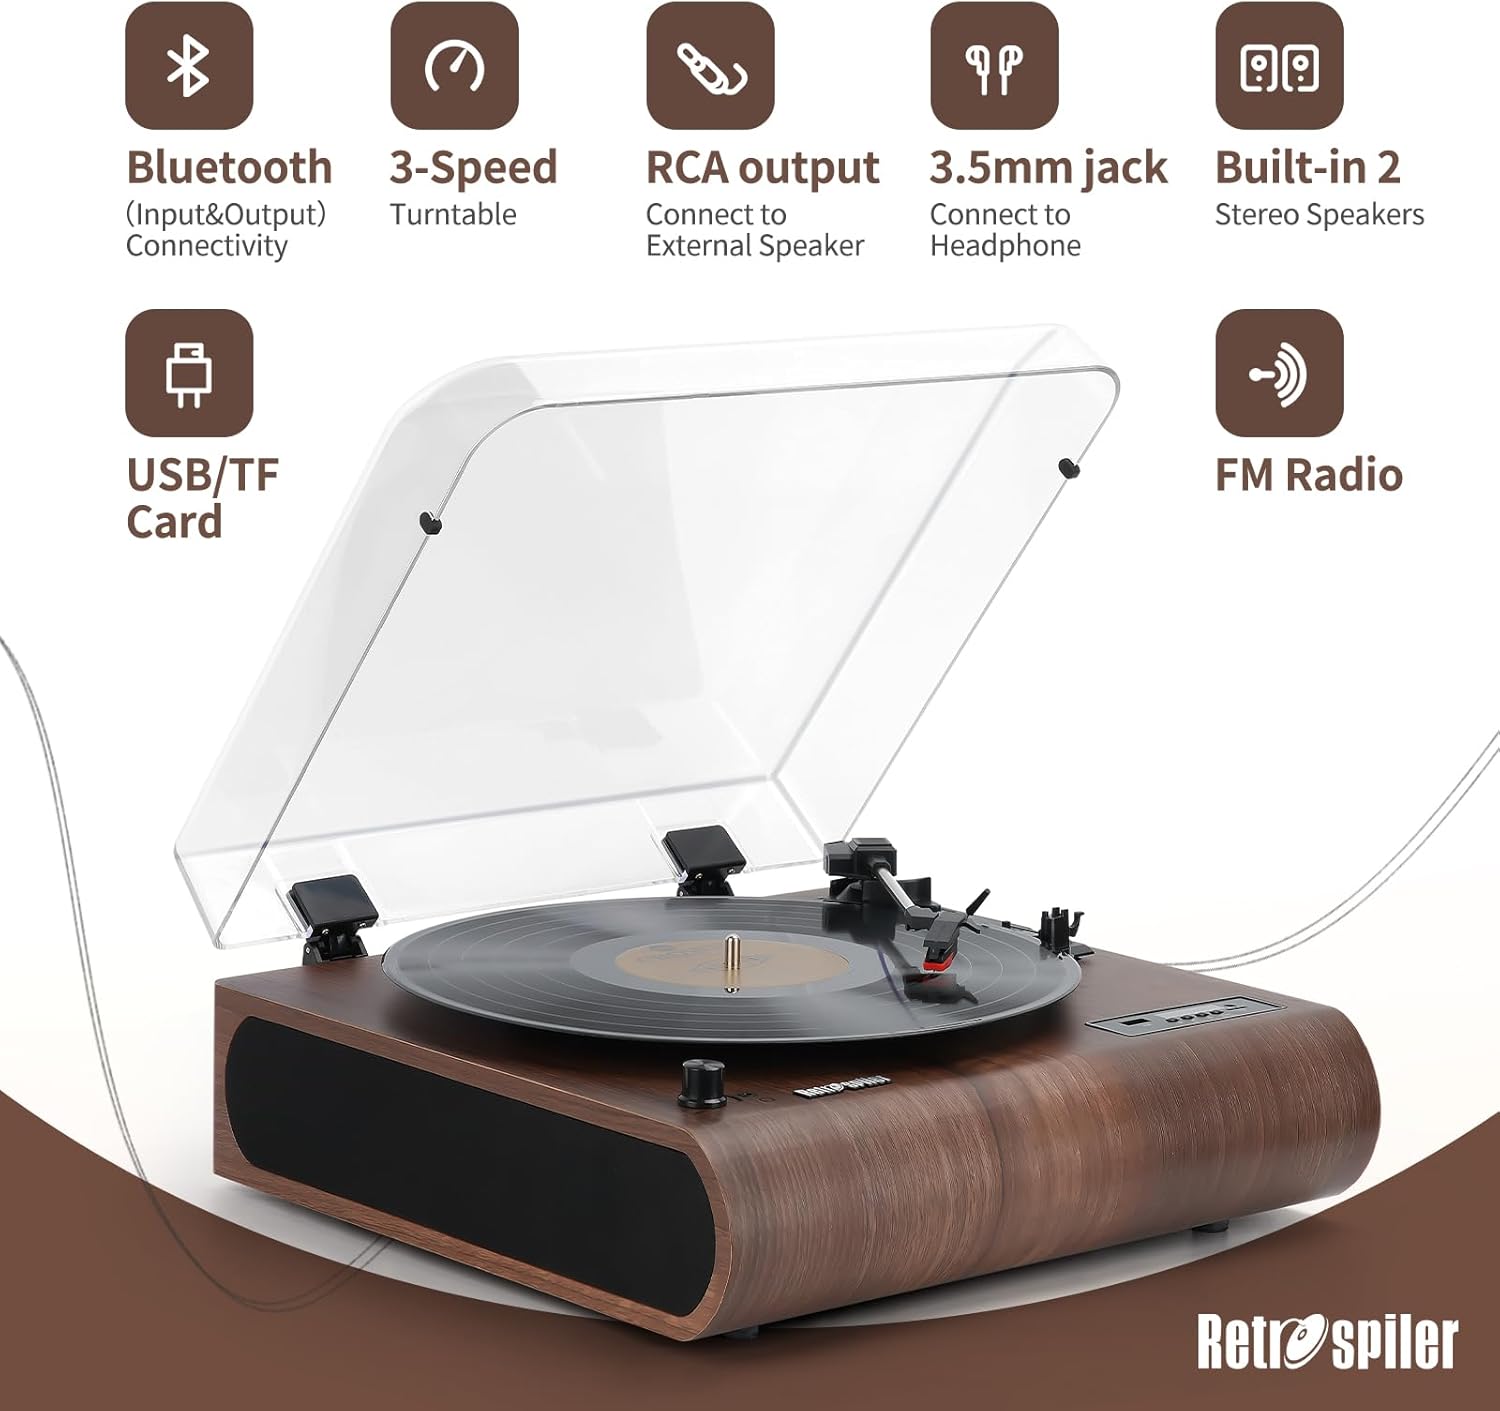
Aworan 1.1: Pariview of the Retrospiler LP-602 Record Player, showcasing its key features including Bluetooth, 3-speed turntable, RCA output, 3.5mm jack, built-in speakers, USB/TF card slot, and FM Radio.
Awọn ẹya pataki:
- Tábìlì Ìyípadà Ìyára Mẹ́ta: Ṣe atilẹyin fun awọn igbasilẹ RPM 33 1/3, 45, ati 78.
- Asopọmọra Bluetooth: Both input and output for seamless music streaming from devices or to external Bluetooth speakers.
- Awọn Agbọrọsọ Sitẹrio ti a ṣe sinu: Dual speakers for direct audio playback.
- Redio FM: Integrated FM tuner for radio listening.
- Vinyl-MP3 Encoding: Digitize your vinyl records directly to USB drives or TF cards.
- USB & SD Playback: Mu ohun oni-nọmba ṣiṣẹ files from USB flash drives and TF (Micro SD) cards.
- Iboju LED: Provides clear display for mode selection and track information.
- Aux-in & Headphone Jack: Additional wired connectivity options.
- Ṣiṣe RCA: Sopọ si ita amplifiers tabi agbara agbohunsoke.
- Ideri Ekuru: Protects the turntable from dust and debris.
2. Ohun ti o wa ninu Apoti
Upon unboxing your Retrospiler LP-602 Record Player, please ensure all the following components are present:
- Retrospiler LP-602 Turntable Unit
- Adapter agbara
- Adapter RPM 45
- Ilana Afowoyi (iwe yii)
3. Product Controls and Components
Familiarize yourself with the various controls and components of your record player for optimal use.
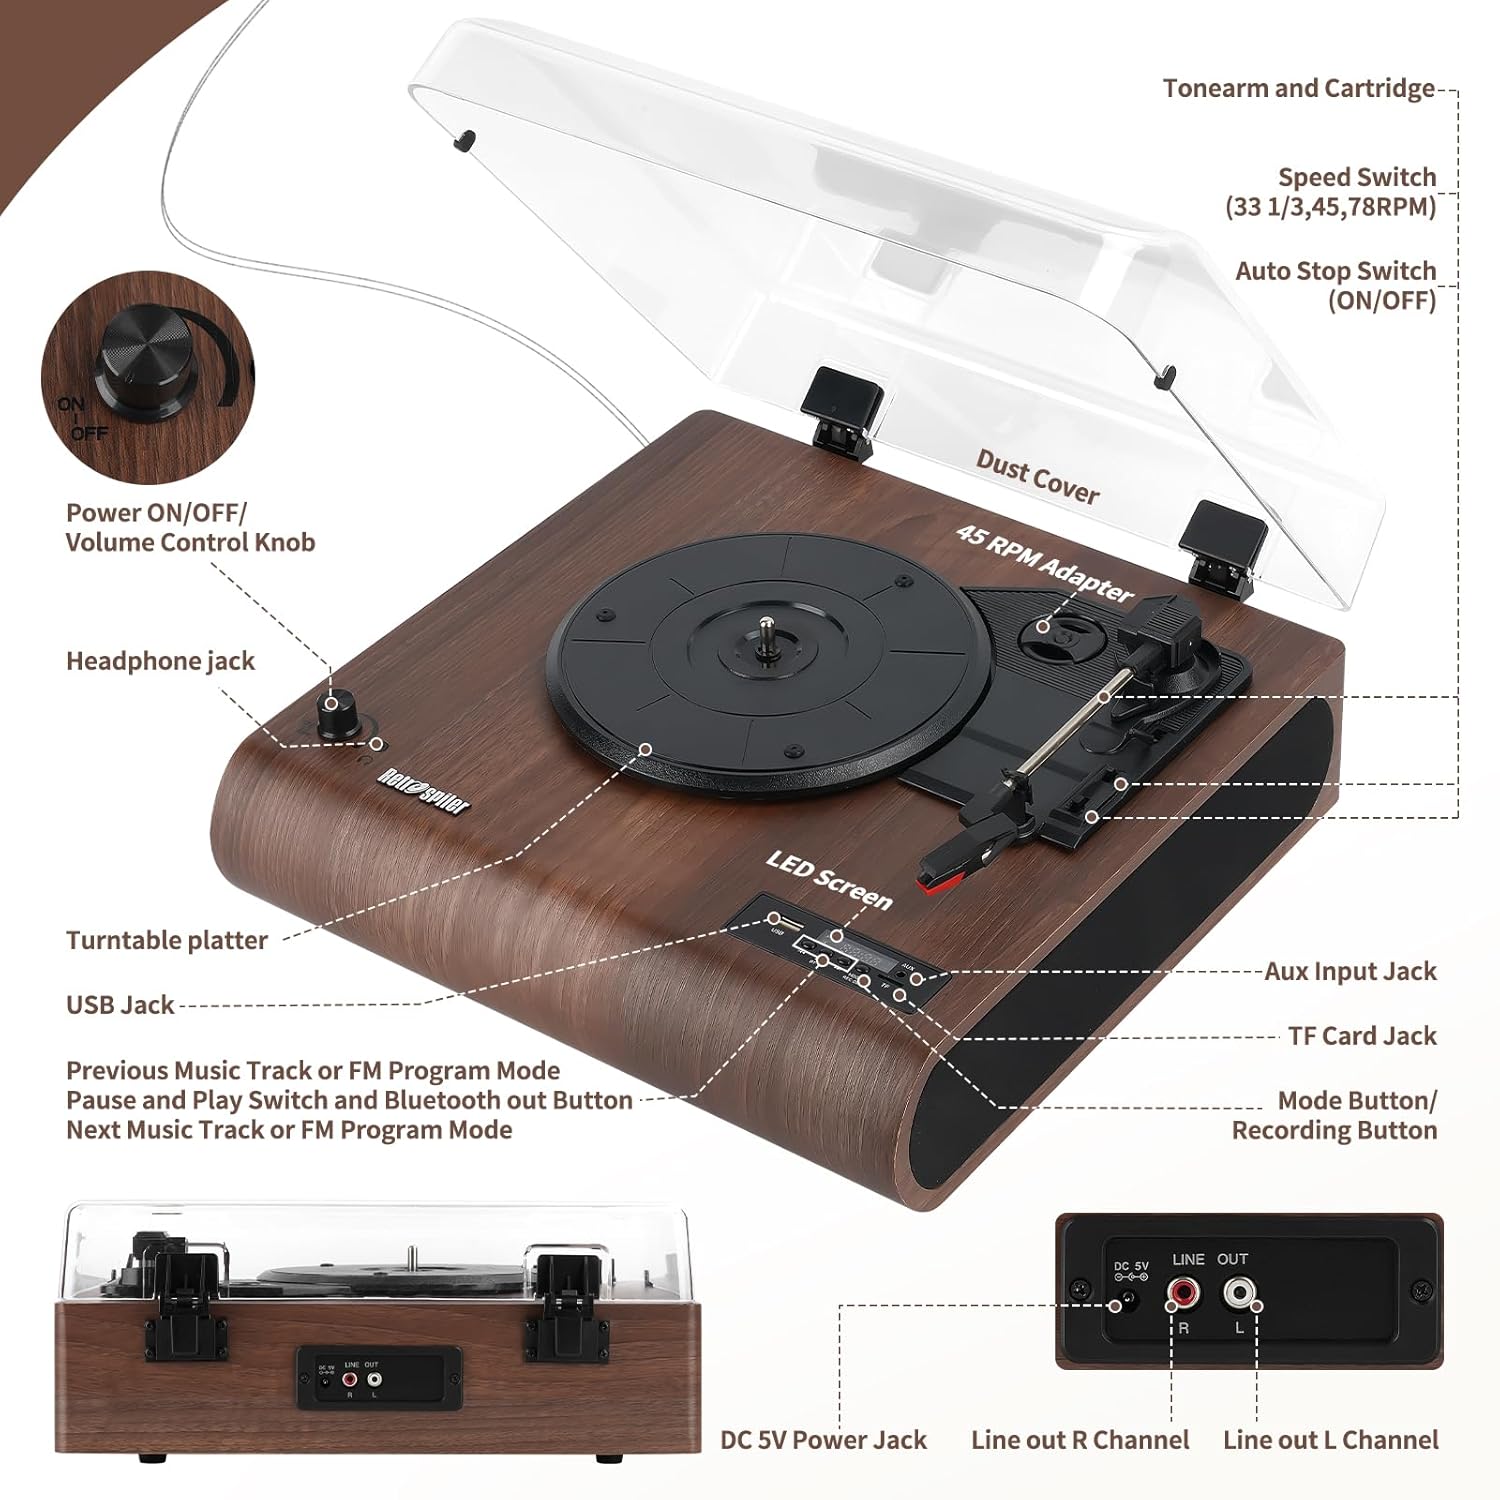
Image 3.1: Detailed diagram illustrating the location and function of all controls and ports on the Retrospiler LP-602 record player.
- Power ON/OFF/Volume Control Knob: Turn clockwise to power on and increase volume; turn counter-clockwise to decrease volume and power off.
- Jack agbekari: So awọn agbekọri pọ fun igbọran aladani.
- Turterable Platter: Place your vinyl records here.
- Jack USB: Insert a USB flash drive for MP3 playback or recording.
- Previous Music Track or FM Program Mode Button: Navigate tracks or FM presets.
- Pause and Play Switch and Bluetooth Out Button: Controls playback and initiates Bluetooth output pairing.
- Next Music Track or FM Program Mode Button: Navigate tracks or FM presets.
- Iboju LED: Displays current mode, track number, or FM frequency.
- Aux Input Jack: Connect external audio devices via a 3.5mm cable.
- TF Card Jack: Insert a TF (Micro SD) card for MP3 playback or recording.
- Mode Button/Recording Button: Switches between modes (Phono, Bluetooth, FM, USB, TF, Aux) and initiates recording.
- Ideri Ekuru: Protects the turntable when not in use.
- Tone Arm and Cartridge: Holds the stylus for playing records.
- Speed Switch (33 1/3, 45, 78 RPM): Select the appropriate playback speed for your record.
- Auto Stop Switch (ON/OFF): Enables or disables automatic stopping of the platter at the end of a record.
- 45 RPM Adapter: A lo fun ṣiṣere awọn igbasilẹ 7-inch pẹlu iho aarin nla kan.
- Jack 5V agbara: So ohun ti nmu badọgba agbara ti a pese.
- Line Out R Channel (RCA): Ijade ohun ikanni ọtun.
- Line Out L Channel (RCA): Ijade ohun afetigbọ ikanni osi.
4. Awọn ilana iṣeto
- Ṣii silẹ: Carefully remove the record player from its packaging. Remove any protective films or ties from the unit, especially from the dust cover and tone arm.
- Ibi: Place the record player on a stable, level surface away from direct sunlight, heat sources, and excessive dust.
- Asopọ agbara: Connect the provided power adapter to the DC 5V Power Jack on the back of the unit, then plug the adapter into a wall outlet.
- Agbara Ibẹrẹ Tan: Turn the Power ON/OFF/Volume Control Knob clockwise to power on the unit. The LED screen will light up.
- Tone Arm Preparation: Gently unlock the tone arm clip. Remove the stylus protector from the needle.
5. Awọn ilana Iṣiṣẹ
5.1. Playing Vinyl Records
- Agbara Tan: Turn the Power ON/OFF/Volume Control Knob clockwise to power on the unit.
- Yan Ipo Foonu: Press the Mode button until "PHON" appears on the LED screen.
- Àkọsílẹ̀ Ibi: Place a vinyl record on the turntable platter. If playing a 7-inch record with a large center hole, use the 45 RPM adapter.
- Yan Iyara: Set the Speed Switch to the correct RPM (33 1/3, 45, or 78) for your record.
- Duro Aifọwọyi: Set the Auto Stop Switch to ON if you want the platter to stop automatically at the end of the record. Set to OFF for continuous play or if your record has a non-standard run-out groove.
- Bẹrẹ Sisisẹsẹhin: Gently lift the tone arm using the cue lever. Position the tone arm over the desired starting point of the record. Slowly lower the tone arm onto the record using the cue lever. The platter will begin to spin, and music will play through the built-in speakers or connected audio output.
- Ṣatunṣe Iwọn didun: Use the Power ON/OFF/Volume Control Knob to adjust the listening volume.
- End Playback: At the end of the record (if Auto Stop is ON), the platter will stop. If Auto Stop is OFF, manually lift the tone arm using the cue lever and return it to the tone arm rest. Secure the tone arm with the clip.
Video 5.1: Demonstration of unboxing and basic operation of the Retrospiler record player, including placing a record and starting playback.
5.2. Bluetooth Operation (Input)
Stream music wirelessly from your smartphone, tablet, or other Bluetooth-enabled devices to the record player's built-in speakers.
- Agbara Tan: Turn the Power ON/OFF/Volume Control Knob clockwise to power on the unit.
- Select Bluetooth Input Mode: Press the Mode button until "BT IN" appears on the LED screen. The unit will enter pairing mode, indicated by a flashing Bluetooth icon.
- Ohun elo Pàpọ: On your external Bluetooth device, enable Bluetooth and search for "Retrospiler" in the list of available devices. Select it to pair.
- Mu Orin: Once paired, you can play music from your device, and it will sound through the record player's speakers.

Image 5.2: The Retrospiler LP-602 record player demonstrating wireless music streaming from a smartphone.
5.3. Bluetooth Operation (Output)
Stream audio from the record player (e.g., vinyl playback) to external Bluetooth headphones or speakers.
- Agbara Tan: Turn the Power ON/OFF/Volume Control Knob clockwise to power on the unit.
- Yan Orisun: Choose your desired audio source (e.g., Phono, USB, TF, Aux).
- Mu Bluetooth Output ṣiṣẹ: Press and hold the Pause and Play Switch and Bluetooth Out Button for a few seconds until "BT OUT" appears on the LED screen and the Bluetooth icon flashes.
- Pair External Device: Put your external Bluetooth headphones or speaker into pairing mode. The record player will automatically search and connect to the nearest available Bluetooth device.
- Jẹrisi Asopọmọra: Once connected, the Bluetooth icon on the LED screen will stop flashing. Audio from the record player will now be routed to your external Bluetooth device.

Image 5.3: The Retrospiler LP-602 record player illustrating its Bluetooth output capability, connecting to various external audio devices like headphones, speakers, and soundbars.
5.4. FM Radio isẹ
- Agbara Tan: Turn the Power ON/OFF/Volume Control Knob clockwise to power on the unit.
- Yan Ipo FM: Press the Mode button until "FM" appears on the LED screen.
- Ṣiṣayẹwo Aifọwọyi: Press and hold the Play/Pause button to initiate an automatic scan for FM stations. The unit will scan and save available stations.
- Àwọn Ibùdó Tune: Use the Previous/Next Track buttons to navigate through the saved FM stations.
5.5. Sisisẹsẹhin Kaadi USB/TF
- Agbara Tan: Turn the Power ON/OFF/Volume Control Knob clockwise to power on the unit.
- Fi Media sii: Insert a USB flash drive into the USB port or a TF (Micro SD) card into the TF card slot.
- Yan Ipo: Press the Mode button until "USB" or "TF" appears on the LED screen. The unit will automatically begin playing MP3 files lati media ti a fi sii.
- Iṣakoso Sisisẹsẹhin: Use the Previous/Next Track buttons to skip tracks and the Play/Pause button to pause or resume playback.
5.6. Vinyl-to-MP3 Encoding
Digitize your vinyl records directly to a USB flash drive or TF card.
- Mura Media: Insert a USB flash drive or TF card into the corresponding slot. Ensure it has sufficient free space.
- Yan Ipo Foonu: Press the Mode button until "PHON" appears on the LED screen.
- Start Record Playback: Begin playing your vinyl record as described in section 5.1.
- Bẹrẹ Gbigbasilẹ: Press the Mode/Record button. "REC" will appear on the LED screen, indicating that recording has started.
- Duro Gbigbasilẹ: Press the Mode/Record button again to stop recording. The recorded audio file will be saved to your USB drive or TF card.
6. Itọju
- Ninu Ẹka naa: Wipe the exterior of the record player with a soft, dry cloth. Do not use abrasive cleaners or solvents.
- Ideri Ekuru: Keep the dust cover closed when the unit is not in use to prevent dust accumulation on the platter and stylus.
- Itọju Stylus: Handle the stylus (needle) with extreme care. Avoid touching it with your fingers. Use a soft brush designed for stylus cleaning to gently remove dust from the tip, brushing from back to front. Replace the stylus if you notice a decrease in sound quality or visible damage.
- Ìtọ́jú Àkọsílẹ̀: Jẹ́ kí àkọsílẹ̀ rẹ mọ́ tónítóní, kí eruku má sì sí níbẹ̀. Tọ́jú wọn sí ara wọn ní ìdúróṣinṣin kí ó má baà yí padà.
7. Laasigbotitusita
| Isoro | Owun to le Fa | Ojutu |
|---|---|---|
| Ko si agbara | Power adapter not connected; Power knob off. | Ensure power adapter is securely connected and plugged into a working outlet. Turn the Power ON/OFF/Volume Control Knob clockwise to power on. |
| Ko si ohun tabi iwọn didun kekere | Volume too low; Incorrect mode selected; Stylus protector still on; External speakers not connected/powered. | Increase volume. Ensure correct mode (e.g., PHON for vinyl) is selected. Remove stylus protector. Check connections and power for external speakers if used. |
| Àwọn ìfò sílẹ̀ tàbí ìyípadà ohùn | Dirty or damaged record; Dirty or worn stylus; Unit not on a stable surface. | Nu àkọsílẹ̀ náà mọ́. Fọ tàbí rọ́pò stylus náà. Gbé ẹ̀rọ náà sí orí ilẹ̀ tí ó dúró ṣinṣin, tí ó tẹ́jú. |
| Awọn oran sisopọ Bluetooth | Incorrect Bluetooth mode; Device too far; External device not in pairing mode. | Ensure "BT IN" or "BT OUT" mode is selected. Keep devices within range (approx. 10 meters). Put external device in pairing mode. |
| Vinyl-to-MP3 recording not working | USB/TF card full or not inserted correctly; Recording not initiated. | Ensure USB/TF card is inserted correctly and has free space. Press the Mode/Record button to start recording (LED shows "REC"). |
8. Awọn pato
- Brand: Retrospiler
- Orukọ awoṣe: Gba Player silẹ
- Nọmba Awoṣe Nkan: LP-602
- Awọn iwọn idii: 17.13 x 16.22 x 8.35 inches
- Ìwọ̀n Nkan: 9.26 iwon
- Ohun elo: Igi
- Àwọ̀: Wolinoti
- Iyara Yiyi to pọju: 78 RPM (ṣe atilẹyin fun 33 1/3, 45, 78 RPM)
- Iru mọto: AC mọto
- Awọn ẹya pataki: Adjustable Speed, Built-In Speaker, Built-In Bluetooth Receiver (Input & Output), Dust Cover, RCA Output
- Awọn ẹrọ ibaramu: Headphone, Smartphone, Speaker, Tablet
9. Atilẹyin ọja ati Support
For warranty information, technical support, or service inquiries, please refer to the contact details provided with your purchase documentation or visit the official Retrospiler webojula. Tọju iwe-ẹri rira rẹ bi ẹri rira fun awọn iṣeduro atilẹyin ọja.