
1. Ifihan
This manual provides essential information for the proper installation, operation, and maintenance of your Calix 726GE-I Indoor Gigabit Optical Network Terminal (ONT). The 726GE-I is designed to deliver high-speed internet, voice, and video services over a fiber optic network. Please read this manual thoroughly before using the device to ensure optimal performance and safety.

Figure 1: Calix 726GE-I ONT with included AC power adapter.
2. Alaye Aabo
Observe the following safety precautions to prevent injury and damage to the device:
- Aabo Itanna: Use only the provided AC adapter (12VDC, 1.5A) with the device. Do not expose the device to water or excessive humidity. Ensure proper ventilation to prevent overheating.
- Aabo lesa: This product contains a Class 1 Laser. Do not look directly into the optical port when the device is powered on or when the fiber optic cable is disconnected. Invisible laser radiation may be present.
- Mimu: Mu ẹrọ naa pẹlu itọju. Yago fun sisọ silẹ tabi tẹriba si awọn ipa to lagbara.
- Ibi: Place the device on a stable, flat surface away from direct sunlight, heat sources, and areas with high dust or moisture.

Figure 2: Optical port with Class 1 Laser Product warning label.
3. Ọja Ipariview
The Calix 726GE-I ONT features various ports and LED indicators for connectivity and status monitoring.
3.1. Àwọn Àmì Pánẹ́lì Iwájú

Figure 3: Front panel LED indicators.
- RF: Indicates the status of the RF video service.
- LAN 1-4: Indicate activity and link status for the respective Ethernet ports.
- Foonu: Indicates the status of the voice service.
- FẸ: Indicates the status of the Wide Area Network (fiber optic) connection.
- Sipiyu: Indicates the operational status of the device's central processing unit.
- Agbara: Indicates if the device is receiving power.
3.2. Ru Panel Ports
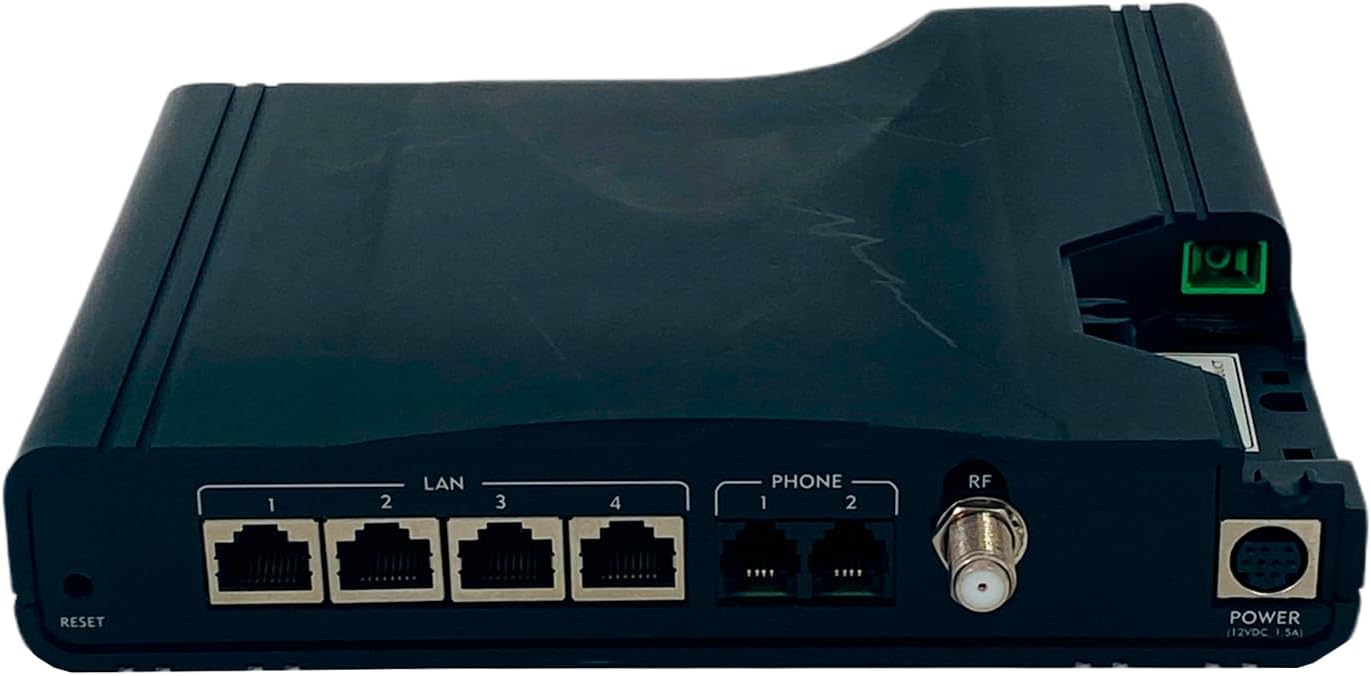
olusin 4: Ru nronu Asopọmọra ibudo.
- Tun: A recessed button used to reset the device to factory default settings.
- LAN 1-4: Four Gigabit Ethernet ports for connecting wired devices such as computers, routers, or network switches.
- PHONE 1-2: Two RJ-11 ports for connecting analog telephones or fax machines.
- RF: Coaxial F-connector for RF video output.
- POWER (12VDC, 1.5A): Power input port for connecting the AC adapter.
- Port Optical: Located on the side, this port is for connecting the fiber optic cable from your service provider. Caution: Class 1 Laser Product. Do not look directly into the port.
4. Awọn ilana iṣeto
Follow these steps to set up your Calix 726GE-I ONT:
- Connect the Fiber Optic Cable: Carefully connect the fiber optic cable from your service provider to the optical port on the side of the ONT. Ensure the connector is clean and properly seated. WARNING: Do not look into the optical port.
- So ohun ti nmu badọgba agbara: Plug the provided AC power adapter into the POWER port on the rear of the ONT, then plug the other end into a standard electrical outlet. The Power LED on the front panel should illuminate.
- So awọn ẹrọ Nẹtiwọọki pọ:
- For wired internet access, connect an Ethernet cable from any of the LAN 1-4 ports on the ONT to your computer or home router.
- For voice services, connect your analog telephone(s) to the PHONE 1 or PHONE 2 ports.
- If applicable, connect a coaxial cable from the RF port to your television or RF distribution system for video services.
- Verify Connection Status: Once powered on, allow a few minutes for the ONT to establish a connection with your service provider's network. Observe the LED indicators:
- Awọn WAN LED should turn solid green, indicating a successful fiber connection.
- Awọn Sipiyu LED should be solid green, indicating normal operation.
- LAN LEDs will illuminate when a device is connected and active.
- Foonu ati RF LEDs will illuminate when their respective services are active.
5. Awọn ilana Iṣiṣẹ
The Calix 726GE-I ONT operates largely automatically once configured by your service provider. Here are some general operating guidelines:
- Titan/Apapa: To power off the device, simply disconnect the power adapter. Reconnect to power it on.
- Abojuto Ipo LED: Regularly check the LED indicators on the front panel to monitor the device's status. Refer to Section 3.1 for LED descriptions.
- Atunto Ẹrọ naa: In some troubleshooting scenarios, your service provider may instruct you to reset the device. Use a paperclip or similar pointed object to press and hold the recessed RESET button on the rear panel for approximately 10-15 seconds until the LEDs flash. This will restore the device to its factory default settings. Note: This may require re-provisioning by your service provider.
6. Itọju
Minimal maintenance is required for the Calix 726GE-I ONT:
- Ninu: Lo asọ ti o tutu, ti o gbẹ lati nu ita ti ẹrọ naa. Maṣe lo awọn olutọpa olomi tabi awọn aerosols.
- Afẹfẹ: Ensure that the ventilation openings on the device are not blocked to prevent overheating.
- Iṣakoso USB: Keep cables neatly organized and avoid sharp bends, especially with the fiber optic cable.
7. Laasigbotitusita
If you encounter issues with your Calix 726GE-I ONT, try the following steps. For persistent problems, contact your Internet Service Provider (ISP).
| Isoro | Owun to le Fa | Ojutu |
|---|---|---|
| Ko si Agbara (Agbara LED Pipa) | Power adapter disconnected or faulty outlet. | Ensure power adapter is securely connected to the ONT and a working electrical outlet. Try a different outlet. |
| No Internet Connection (WAN LED Off or Blinking) | Fiber optic cable disconnected or service issue. | Check if the fiber optic cable is securely connected. Do not attempt to re-seat the fiber cable if you are unsure. Contact your ISP. |
| No Dial Tone (Phone LED Off) | Phone cable disconnected or voice service issue. | Ensure phone cables are securely connected. Contact your ISP. |
| Wired Device Not Connecting (LAN LED Off) | Ethernet cable disconnected or device issue. | Check Ethernet cable connection. Try a different LAN port or cable. Ensure the connected device is powered on. |
| Iyara Ayelujara ti o lọra | Network congestion, service issue, or device configuration. | Restart the ONT by unplugging and replugging the power. If using a separate router, restart it as well. Contact your ISP if the issue persists. |
8. Awọn pato
Key technical specifications for the Calix 726GE-I ONT:
| Ẹya ara ẹrọ | Apejuwe |
|---|---|
| Nọmba awoṣe | 726GE-I |
| Manufacturer Part Number (MPN) | 380-00559 R13 |
| Brand | Kikọti |
| Asopọmọra Technology | Fiber Optic (WAN), RF, Ethernet (LAN), Phone (RJ-11) |
| Àjọlò Ports | 4 x Gigabit Ethernet (RJ-45) |
| Awọn ibudo foonu | 2 x RJ-11 |
| RF ibudo | 1 x Coaxial F-connector |
| Agbara Input | 12VDC, 1.5A |
| Awọn irinše to wa | Modem with Power Supply |
| Pataki Ẹya | Access Point Mode (Note: Functionality depends on ISP configuration) |
| Alailowaya Ibaraẹnisọrọ Alailowaya | 802.11a (Note: This device primarily functions as an ONT; internal Wi-Fi capabilities may vary or be disabled by ISP.) |
| Igbohunsafẹfẹ Band Class | Nikan-Band |

Figure 5: Device bottom label with model and regulatory details.
Relevant link: Calix Product Information
9. Atilẹyin ọja ati Support
Alaye Atilẹyin ọja: Warranty coverage for the Calix 726GE-I ONT is typically provided by your Internet Service Provider (ISP) or the original vendor from whom you acquired the device. Please refer to your service agreement or purchase documentation for specific warranty terms and conditions. Calix, as the manufacturer, generally provides support to service providers, not directly to end-users.
Oluranlowo lati tun nkan se: For any technical issues, service disruptions, or questions regarding your Calix 726GE-I ONT, please contact your Internet Service Provider (ISP) directly. They are responsible for the installation, configuration, and ongoing support of the device as part of your service.