1. Ifihan
This manual provides detailed instructions for the safe and effective operation, maintenance, and care of your Singer C5650 and C5655 sewing machines. Please read this guide thoroughly before using your machine to ensure proper function and to prevent injury or damage.

Image: Front cover of the Singer C5650 / C5655 Instruction Manual, displaying the machine outline and Singer logo.
Awọn Itọsọna Aabo pataki
When using an electrical appliance, basic safety precautions should always be followed, including:
- Always unplug the machine from the electrical outlet immediately after use and before cleaning, removing covers, lubricating, or when making any other user servicing adjustments mentioned in this instruction manual.
- Do not operate the machine with a damaged cord or plug. If it is not working properly, if it has been dropped or damaged, or dropped into water, return the machine to the nearest authorized service dealer for examination, repair, electrical or mechanical adjustment.
- Keep ventilation openings of the sewing machine clear.
- Use only attachments specified by the manufacturer in this manual.
- Maṣe ju silẹ tabi fi ohunkan sinu ṣiṣi eyikeyi.
- Do not use aerosol (spray) products where oxygen is being administered.

Image: A page from the instruction manual detailing important safety instructions for the sewing machine.
Video: A flip-through of the Singer C5650 Sewing Machine User's Manual, showcasing its contents and layout. This video is provided by TabSynth Design Works.
2. Eto
Ẹrọ Loriview
Familiarize yourself with the main components of your sewing machine. Understanding each part's function is crucial for efficient operation.

Image: A diagram illustrating the main components of the Singer C5650/C5655 sewing machine, with numbered callouts for identification.
Agbegbe abẹrẹ Loriview ati Awọn ẹya ẹrọ
The needle area is where most of the sewing action occurs. Proper understanding of its parts and the available accessories will enhance your sewing experience.

Aworan: A alaye view of the needle area components, including the needle plate, feed teeth, and presser foot, along with illustrations of various included accessories like bobbins, spool pins, and screwdrivers.
Yikaka awọn Bobbin
Before you begin sewing, the bobbin must be properly wound with thread.
- Gbe awọn spool spool lori spool pin.
- Guide the thread through the thread guide and around the bobbin winding tension disc.
- Place the bobbin on the bobbin winding spindle.
- Titari ọpa yiyi bobbin si ọtun.
- Start winding by gently pressing the foot controller. Stop when the bobbin is full.
Fifi sii Bobbin
Once wound, the bobbin needs to be correctly inserted into the bobbin case and then into the shuttle.
- Ṣii ideri bobbin.
- Insert the bobbin into the bobbin case, ensuring the thread unwinds in the correct direction.
- Pull the thread through the tension spring.
- Insert the bobbin case into the shuttle.
Picking Up Bobbin Thread
After inserting the bobbin, you need to bring the bobbin thread up through the needle plate.
- Gbe ẹsẹ titẹ soke.
- Hold the needle thread loosely with your left hand.
- Turn the hand wheel towards you, lowering and then raising the needle. This will catch the bobbin thread.
- Pull both threads to the back under the presser foot.
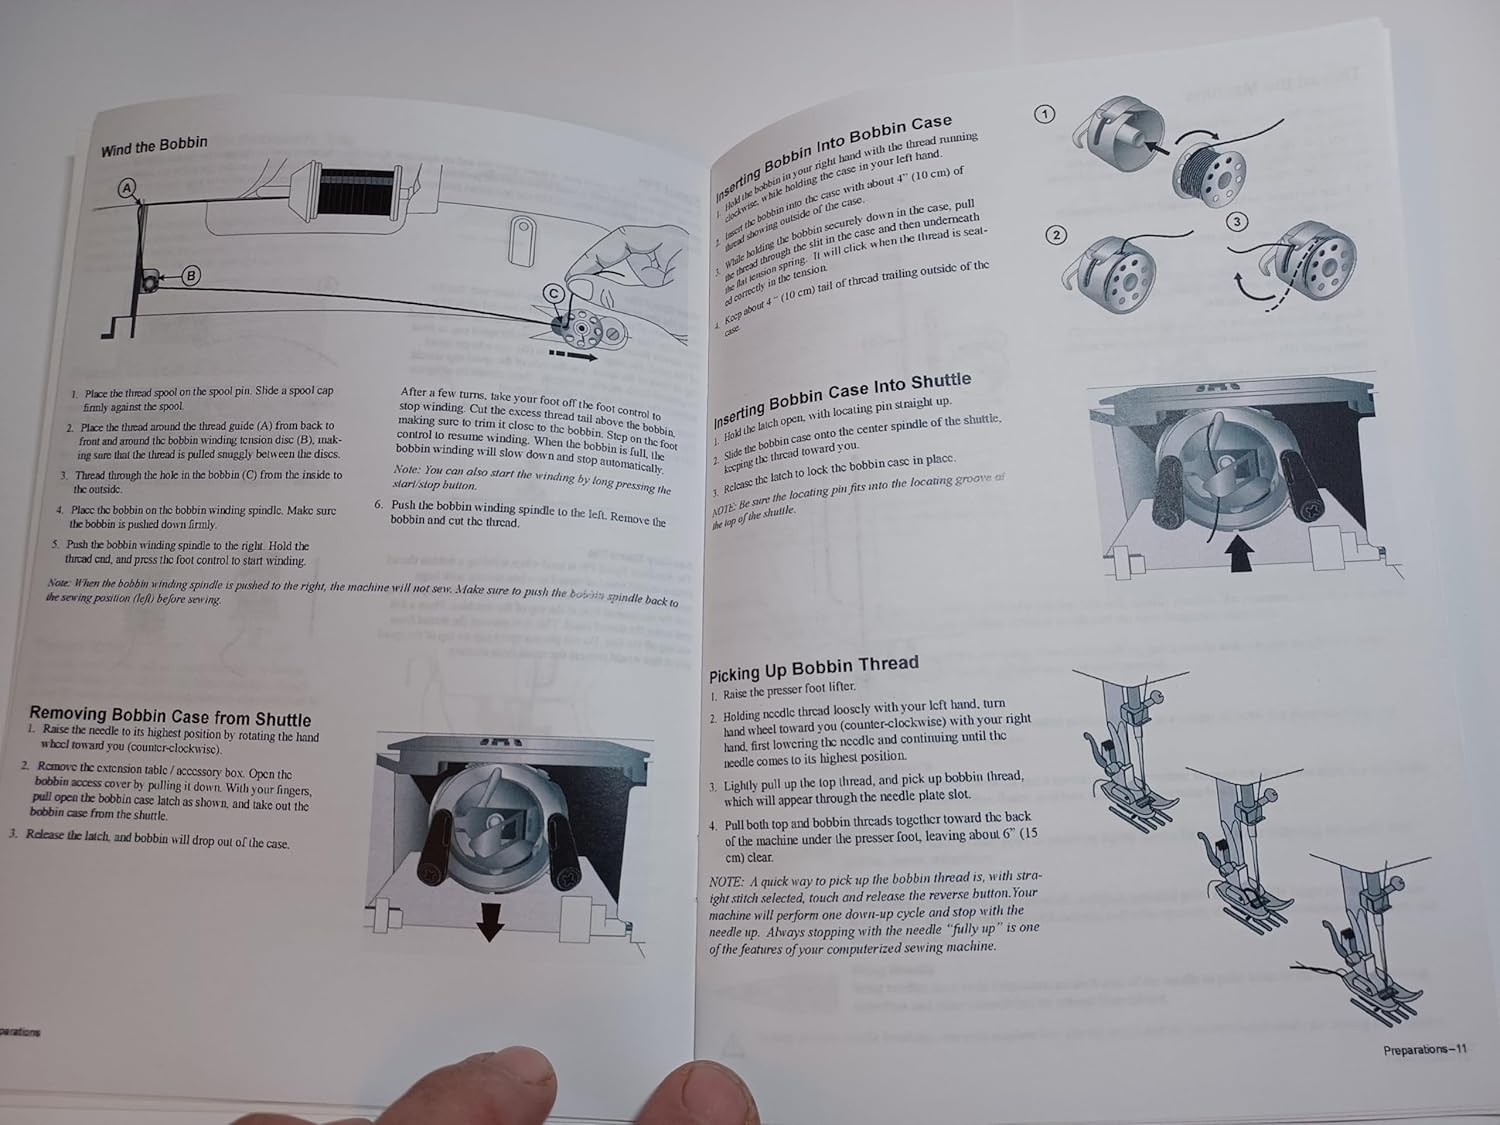
Image: Step-by-step diagrams illustrating how to wind the bobbin, insert the bobbin into the shuttle, and pick up the bobbin thread for the Singer C5650/C5655 sewing machine.
3. Ṣiṣẹ ẹrọ rẹ
Awọn iṣakoso iṣẹ ẹrọ
Your Singer C5650/C5655 machine features an intuitive control panel for selecting stitches and adjusting settings.
- Bọtini Yipada: Used to sew in reverse, typically for securing stitches at the beginning and end of a seam.
- Tie-Off Button: Automatically ties off stitches for a neat finish.
- Àwọn bọ́tìnì yíyàn ara: Use the arrow buttons to navigate and select your desired stitch pattern from the available options.
- Stitch Length and Width Adjustment: Buttons to modify the length and width of selected stitches, allowing for customization.
- Ipo Abẹrẹ: Adjusts the needle position for specific sewing tasks.

Image: A close-up of the Singer C5650/C5655 control panel, showing the display, stitch selection buttons, and other operational controls.
4. Riran
Basic Stitch Functions
Your machine offers a variety of stitches for different sewing needs.
- Aranpo Taara: The most common stitch, used for basic seams and topstitching. Adjust length as needed.
- Aṣọ ìfọṣọ Zigzag: Ideal for finishing raw edges, appliqué, and decorative stitching. Adjust width and length for desired effect.
- Overlock Stitch: Provides a professional finish to seams, preventing fraying.
- Bọtini iho: The machine can create various buttonhole styles automatically. Follow the specific instructions in the manual for precise buttonhole creation.
5. Itọju
Ninu ẹrọ rẹ
Regular cleaning is essential to keep your sewing machine running smoothly and extend its lifespan.
- Yiyọ kuro: Use a small brush to remove lint and dust from the bobbin area, feed teeth, and needle plate.
- Epo: Refer to your manual for specific oiling points and frequency. Use only recommended sewing machine oil.
Rirọpo abẹrẹ
Replace the needle regularly, especially when it becomes dull or bent, to prevent skipped stitches and fabric damage.
- Pa a ati yọọ ẹrọ naa.
- Loosen abẹrẹ clamp dabaru.
- Yọ abẹrẹ atijọ kuro.
- Insert a new needle with the flat side facing the back, pushing it up as far as it will go.
- Mu abẹrẹ clamp dabaru.
6. Laasigbotitusita
If you encounter issues with your sewing machine, consult this section for common problems and solutions.
| Isoro | Owun to le Fa | Ojutu |
|---|---|---|
| Skitches Stitches | Abẹrẹ ti ko tọ, abẹrẹ ti tẹ, okun ti ko tọ. | Replace needle, rethread machine. |
| O tẹle Fifọ | Aifokanbale ti ko tọ, okun didara ti ko dara, burr lori awo abẹrẹ. | Ṣatunṣe ẹdọfu, lo okun didara, ṣayẹwo fun awọn burrs. |
| Awọn aranpo aiṣedeede | Incorrect tension, improper presser foot pressure. | Adjust tension, adjust presser foot pressure. |
| Jamming ẹrọ | Thread tangled in bobbin area, fabric caught. | Clear bobbin area, remove tangled thread/fabric. |
7. Awọn pato
Key technical specifications for the Singer C5650/C5655 sewing machine:
- Awọn iwọn ọja: 0.1 x 5.5 x 8.5 inches
- Ìwọ̀n Nkan: 3.2 iwon
- Ohun elo: Paper (for the manual)
- Àwọ̀: Funfun
- Orisun Agbara: AC
- Ṣe Itanna: Bẹẹni
- Nọmba Awoṣe Nkan: C5650
8. Atilẹyin ọja ati Support
Specific warranty information for the Singer C5650 and C5655 sewing machines is typically provided with the original product purchase. This instruction manual is a reprint and does not contain warranty details. For warranty claims or technical support, please refer to the official Singer website or contact Singer customer service directly.