1. Ifihan
This manual provides comprehensive instructions for the FTDI TTL-232R-3V3 USB to UART cable. This cable offers a simple and reliable solution for connecting devices with +3.3V TTL level UART signals to a computer via a USB port. It is designed for engineers, hobbyists, and developers working with embedded systems, microcontrollers, and other serial communication applications.
2. Alaye Aabo
- Ṣe idaniloju vol to daratage levels (+3.3V) are maintained to prevent damage to connected devices.
- Do not expose the cable to extreme temperatures, moisture, or corrosive environments.
- Avoid bending or twisting the cable excessively, as this may damage internal wires.
- Disconnect the cable from both the computer and the target device before performing any maintenance or modifications.
3. Package Awọn akoonu
Daju pe gbogbo awọn nkan wa ninu apo rẹ:
- 1 x FTDI TTL-232R-3V3 USB to UART Cable
- (Optional: Driver CD or link to driver download, if applicable. Refer to manufacturer's website for latest drivers.)
4. Ọja Ipariview
The FTDI TTL-232R-3V3 is a USB to serial UART (Universal Asynchronous Receiver/Transmitter) converter cable. It provides a USB-A connector on one end and a 6-pin SIL (Single In-Line) connector with 0.1" pitch on the other, offering +3.3V TTL level signals. The cable integrates an FT232R IC, handling all USB signaling and protocols.
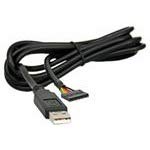
Nọmba 1: FTDI TTL-232R-3V3 USB to UART Cable. This image shows the black USB-A connector on one end and the 6-pin header on the other, with the cable coiled.
4.1 Pinout Apejuwe
The 6-pin SIL connector provides the following signals:
| Pin | Ifihan agbara | Apejuwe |
|---|---|---|
| 1 | GND | Ilẹ |
| 2 | CTS | Clear To Send (Input to FT232R) |
| 3 | VCC | +5V power output from USB |
| 4 | TXD | Transmit Data (Output from FT232R) |
| 5 | RXD | Receive Data (Input to FT232R) |
| 6 | RTS | Request To Send (Output from FT232R) |
Note: The VCC pin (Pin 3) provides +5V from the USB port, which can be used to power external circuitry up to 75mA. The data signals (TXD, RXD, CTS, RTS) operate at +3.3V TTL levels.
5. Eto
5.1 Driver fifi sori
The FTDI TTL-232R-3V3 cable requires specific drivers to function correctly on your computer. These drivers are often automatically installed by modern operating systems (Windows 10/11, macOS, Linux) when the cable is first connected. If automatic installation fails, or for older operating systems, manual installation may be necessary.
- Ṣe igbasilẹ Awọn Awakọ: Visit the official FTDI webAaye (www.ftdichip.com/Drivers/VCP.htm) to download the latest Virtual COM Port (VCP) drivers for your operating system.
- Fi Awọn awakọ sii: Follow the instructions provided with the downloaded driver package. This typically involves running an executable file or following on-screen prompts.
- Okun So pọ: Plug the USB-A end of the TTL-223R-3V3 cable into an available USB port on your computer.
- Jẹrisi fifi sori ẹrọ:
- Windows: Open Device Manager (search for "Device Manager" in the Start menu). Look under "Ports (COM & LPT)" for an entry like "USB Serial Port (COMx)", where 'x' is a number.
- MacOS: Open Terminal and type
ls /dev/tty.usbserial*. You should see an entry corresponding to the cable. - Lainos: Open Terminal and type
ls /dev/ttyUSB*. You should see an entry corresponding to the cable.
5.2 Connecting to a Target Device
Connect the 6-pin SIL connector to your target device's UART interface. Ensure correct pin alignment:
- Connect the cable's TXD (Pin 4) to the target device's RXD.
- Connect the cable's RXD (Pin 5) to the target device's TXD.
- Connect the cable's GND (Pin 1) to the target device's GND.
- If hardware flow control is used, connect CTS (Pin 2) to target's RTS ati RTS (Pin 6) to target's CTS.
- If powering the target device from the cable, connect the cable's VCC (Pin 3) to the target device's + 5V input (ensure the target device can accept 5V and its current draw does not exceed 75mA).
Iṣọra: Always double-check the pinout of your target device to avoid damage due to incorrect connections.
6. Awọn ilana Iṣiṣẹ
Once the drivers are installed and the cable is connected to your target device, you can use a serial terminal program to communicate.
- Open Terminal Program: Use a serial terminal application such as PuTTY (Windows), CoolTerm (macOS/Windows), or Minicom/screen (Linux).
- Yan Ibudo COM: In the terminal program settings, select the COM port number identified during driver installation (e.g., COM3, /dev/ttyUSB0).
- Configure Serial Settings:
- Oṣuwọn Baud: Set to match your target device's baud rate (e.g., 9600, 115200, up to 3MBaud).
- Data Bits: Ni deede 8
- Iṣọkan: Ko si
- Duro Awọn idinku: Ni deede 1
- Iṣakoso Sisan: None, or Hardware (RTS/CTS) if enabled on your target device.
- Ṣeto Asopọmọra: Open the serial connection in your terminal program. You should now be able to send and receive data from your target device.
7. Itọju
- Ninu: Lo aṣọ rírọrùn tí ó gbẹ láti nu okùn àti àwọn asopọ̀ náà. Má ṣe lo àwọn ohun ìfọmọ́ omi tàbí àwọn ohun èlò ìfọ́mọ́.
- Ibi ipamọ: Store the cable in a cool, dry place, away from direct sunlight and extreme temperatures. Avoid tangling the cable.
- Ayewo: Periodically inspect the cable for any signs of damage, such as frayed wires, bent pins, or cracked insulation. Discontinue use if damage is found.
8. Laasigbotitusita
8.1 Wọpọ Oran ati Solusan
- No COM Port Detected:
- Ensure drivers are correctly installed (refer to Section 5.1).
- Gbiyanju ibudo USB ti o yatọ lori kọnputa rẹ.
- Tun kọmputa rẹ bẹrẹ.
- Check the cable for physical damage.
- Ko si Gbigbe data/Gbigba:
- Verify the pinout connections between the cable and your target device (TXD to RXD, RXD to TXD, GND to GND).
- Confirm that the serial settings (baud rate, data bits, parity, stop bits, flow control) in your terminal program match those of your target device.
- Ensure the target device is powered on and functioning correctly.
- Check if the target device's UART is enabled and configured.
- Asopọmọra Laarin:
- Check for loose connections at both the USB and 6-pin ends.
- Avoid electromagnetic interference from other devices.
- Ensure the cable is not excessively bent or stressed.
9. Awọn pato
| Nọmba apakan | TTL-232R-3V3 |
| Iyara USB | Iyara ni kikun (12Mbps) |
| UART Signal Levels | +3.3V TTL |
| Awọn oṣuwọn data | Up to 3 MBaud |
| Asopọ USB | Iru A |
| Ipari Asopọmọra | 6 pin SIL, 0.1" pitch |
| USB Ipari | 1.8m |
| Awọn alaye USB | 6 core, 5mm UL2464 24 AWG |
| I/O Voltage | 3.3V |
| Max Power Output (VCC) | + 5V / 75mA |
| Internal IC | FT232R |
| Awọn iwọn otutu ti nṣiṣẹ | -40°C si +85°C |
| Ibamu Awọn ọna ṣiṣe | Windows, MacOS, Lainos, Android |
10. Atilẹyin ọja ati Support
For warranty information and technical support, please refer to the official FTDI website or contact your point of purchase. FTDI provides extensive documentation and support resources for their products.
- FTDI Webojula: www.ftdichip.com
- Atilẹyin Awakọ: www.ftdichip.com/Drivers/VCP.htm