1. Alaye Aabo
Jọwọ ka gbogbo awọn ilana aabo ni pẹkipẹki ṣaaju lilo ọja yii. Ikuna lati tẹle awọn ilana wọnyi le ja si mọnamọna, ina, tabi awọn eewu miiran.
- Ma ṣe fi pirojekito han si ojo tabi ọrinrin lati dena ina tabi mọnamọna.
- Ma ṣii pirojekito casing. Ko si awọn ẹya ti olumulo-iṣẹ ninu. Tọkasi gbogbo iṣẹ si awọn oṣiṣẹ iṣẹ ti o peye.
- Rii daju pe fentilesonu to dara. Ma ṣe dina awọn ṣiṣi atẹgun.
- Lo oluyipada agbara nikan ti a pese pẹlu pirojekito.
- Yẹra fún fífi ojú hàn sí lẹ́ńsì àwòjìji nígbà tí ó bá jẹ́ péamp wa lori.
- Jẹ́ kí ẹ̀rọ ìwádìí náà jìnnà sí àwọn orísun ooru àti oòrùn tààrà.
2. Package Awọn akoonu
Daju pe gbogbo awọn nkan ti a ṣe akojọ rẹ si isalẹ wa ninu package rẹ:
- 1 x Jectse Mini LED Projector
- 1 x Remote Control (2 AAA batteries not included)
- 1 x AV Line (3-in-1 RCA cable)
- 1 x Ilana itọnisọna
- 1 x Agbara Adapter

Figure 2.1: Contents of the Jectse Mini LED Projector package.
3. Ọja Ipariview
The Jectse Mini LED Projector is a compact and portable device designed for various multimedia applications. It features a 1080P resolution, LED light source, and multiple connectivity options.

Àwòrán 3.1: Iwájú àti òkè view of the Jectse Mini LED Projector.
3.1 pirojekito irinše

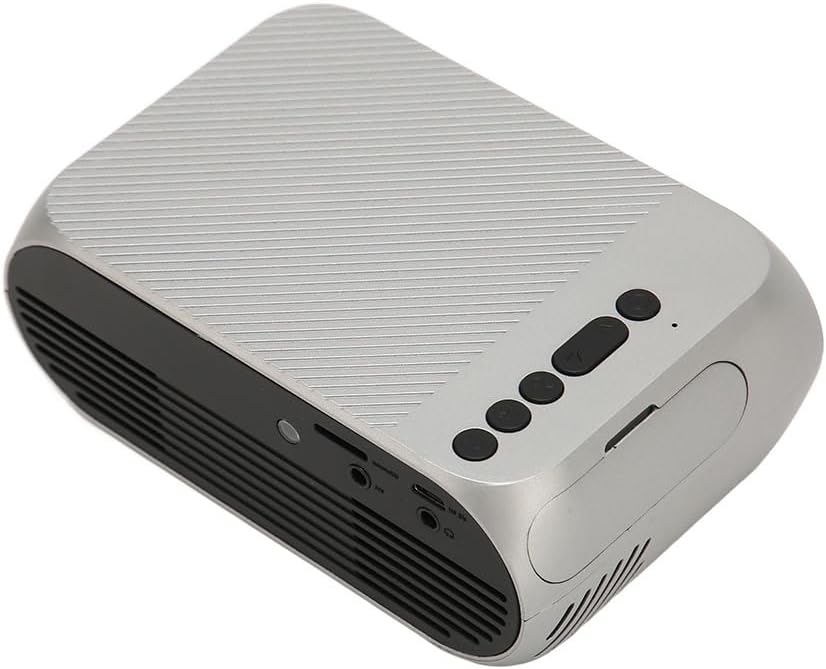
Figure 3.2: Top panel controls of the Jectse Mini LED Projector.
- Lẹnsi: O gbe aworan naa si oju iboju.
- Afẹfẹ Grille: Ó ń rí i dájú pé afẹ́fẹ́ tó yẹ máa ń tàn kálẹ̀.
- Awọn bọtini Iṣakoso: (Refer to Figure 3.2) For basic navigation and power control.
- Kẹkẹ Idojukọ: Ó ń ṣe àtúnṣe sí kedere àwòrán.
Àwòrán 3.3: Ẹ̀yìn àti ẹ̀gbẹ́ view with input/output ports.
3.2 Input / o wu Ports
- HD Multimedia Interface (HDMI): For connecting devices like laptops, gaming consoles, and media players.
- Ibudo AV: For connecting older devices using the included AV cable.
- Ibudo USB: Fun sisopọ awọn awakọ USB lati mu media ṣiṣẹ files taara.
- Iṣagbewọle agbara: Fun sisopọ ohun ti nmu badọgba agbara.
- Ìjáde ohùn (Jack 3.5mm): Fun sisopọ awọn agbohunsoke ita tabi agbekọri.
4. Eto
4.1 Ibi
Place the projector on a stable, flat surface. Ensure there is adequate space around the projector for ventilation. The ideal projection distance is between 1.5 to 2 meters for optimal image size and clarity.

Figure 4.1: Recommended projection distance and screen sizes.
4.2 Asopọ agbara
- So ohun ti nmu badọgba agbara si awọn pirojekito ká agbara input ibudo.
- Plug the power adapter into a suitable electrical outlet (100-240V).
4.3 Nsopọ Awọn orisun Input
The projector supports HD Multimedia Interface, AV, and USB inputs.

Figure 4.2: Projector compatibility with various devices.
- HD Multimedia Interface: Connect an HD Multimedia Interface cable from your source device (e.g., laptop, game console) to the projector's HD Multimedia Interface port.
- TI: Connect the included AV cable to the projector's AV port and the corresponding audio/video output ports on your source device.
- USB: Insert a USB flash drive into the projector's USB port.
4.4 Atunṣe idojukọ
After powering on the projector, rotate the focus wheel (usually located near the lens) until the projected image appears clear and sharp.
5. Awọn ilana Iṣiṣẹ
5.1 Titan / Pa a
- Lati Fi agbara: Press the Power Switch button on the projector or the power button on the remote control.
- Lati Paarẹ: Press the Power Switch button again. The projector will shut down.
5.2 Orisun Aṣayan
After powering on, use the "Signal Source Button" on the projector or the "Source" button on the remote control to cycle through available input sources (HD Multimedia Interface, AV, USB).
5.3 Lilọ kiri Akojọ aṣyn
Use the Direction Buttons and Confirm Button on the projector or the arrow keys and OK button on the remote control to navigate through the projector's on-screen menu for settings adjustments (e.g., picture mode, aspect ratio, sound settings).
5.4 Latọna Iṣakoso Lilo
Insert two AAA batteries (not included) into the remote control. Point the remote control towards the projector's IR receiver to operate functions such as power, source selection, volume, and menu navigation.
6. Itọju
6.1 Ninu awọn lẹnsi
Lo aṣọ rirọ, ti ko ni lint ti a ṣe apẹrẹ pataki fun awọn lẹnsi opitika lati nu lẹnsi projector naa ni rọra. Maṣe lo awọn ohun elo afọmọ tabi agbara pupọ, nitori eyi le fa lẹnsi naa.
6.2 Gbogbogbo Cleaning
Wipe the exterior of the projector with a soft, dry cloth. Do not use liquid cleaners or solvents. Ensure the ventilation grilles are free from dust and debris to maintain optimal cooling.
7. Laasigbotitusita
| Isoro | Owun to le Fa | Ojutu |
|---|---|---|
| Ko si aworan akanṣe |
|
|
| Aworan jẹ blurry |
|
|
| Ko si ohun |
|
|
| Isakoṣo latọna jijin ko ṣiṣẹ |
|
|
8. Awọn pato
| Ẹya ara ẹrọ | Ẹ̀kúnrẹ́rẹ́ |
|---|---|
| Brand | Jectse |
| Nọmba awoṣe | Jectse3giz17bkpy |
| Ipinnu | 1920*1080p |
| Orisun Imọlẹ | LED |
| LED Life | wakati meji 3000 |
| Ijinna asọtẹlẹ | 1.5-2m |
| Iwọn Isọtẹlẹ | 1.6:1 |
| Apakan Ipin | 16:9 |
| Agbara Input | 100-240V |
| Iwọn ọja | 13 x 8.5 x 5 cm (isunmọ. 5.1 x 3.3 x 2 inches) |
| Iwọn Nkan | 1.1 iwon |
| Asopọmọra Technology | HD Multimedia Interface, AV, USB |
| Pataki Awọn ẹya ara ẹrọ | Adjustable, Portable Design |
9. Atilẹyin ọja ati Support
For warranty information or technical support, please refer to the contact details provided with your purchase or visit the official Jectse webojula. Jeki ẹri rira rẹ fun awọn iṣeduro atilẹyin ọja.