
1. Ifihan
This manual provides detailed instructions for the installation, operation, and maintenance of your CNBINGO 2-Gang 2-Way Touch Switch. Please read this manual thoroughly before installation and use to ensure safe and correct operation.
The CNBINGO 2-Gang 2-Way Touch Switch is designed to control a light from two different locations. It features a touch-sensitive glass panel and an LED status indicator.
2. Alaye Aabo
IKILO: Electrical installation should only be performed by a qualified electrician. Always turn off the main power supply at the circuit breaker before performing any electrical work.
- Rii daju pe ipese agbara ti ge asopọ ṣaaju fifi sori ẹrọ tabi itọju.
- Do not touch the internal circuit board before installing the glass panel. This can prevent proper function.
- This switch is not a dimmer switch and is not compatible with smart home systems like Alexa or Google Home.
- This is a 2-way switch for controlling a single light from two locations. It is not a Wi-Fi switch.
- The glass panel is fire-resistant, scratch-resistant, and shock-resistant. It is safe to touch even with wet hands.
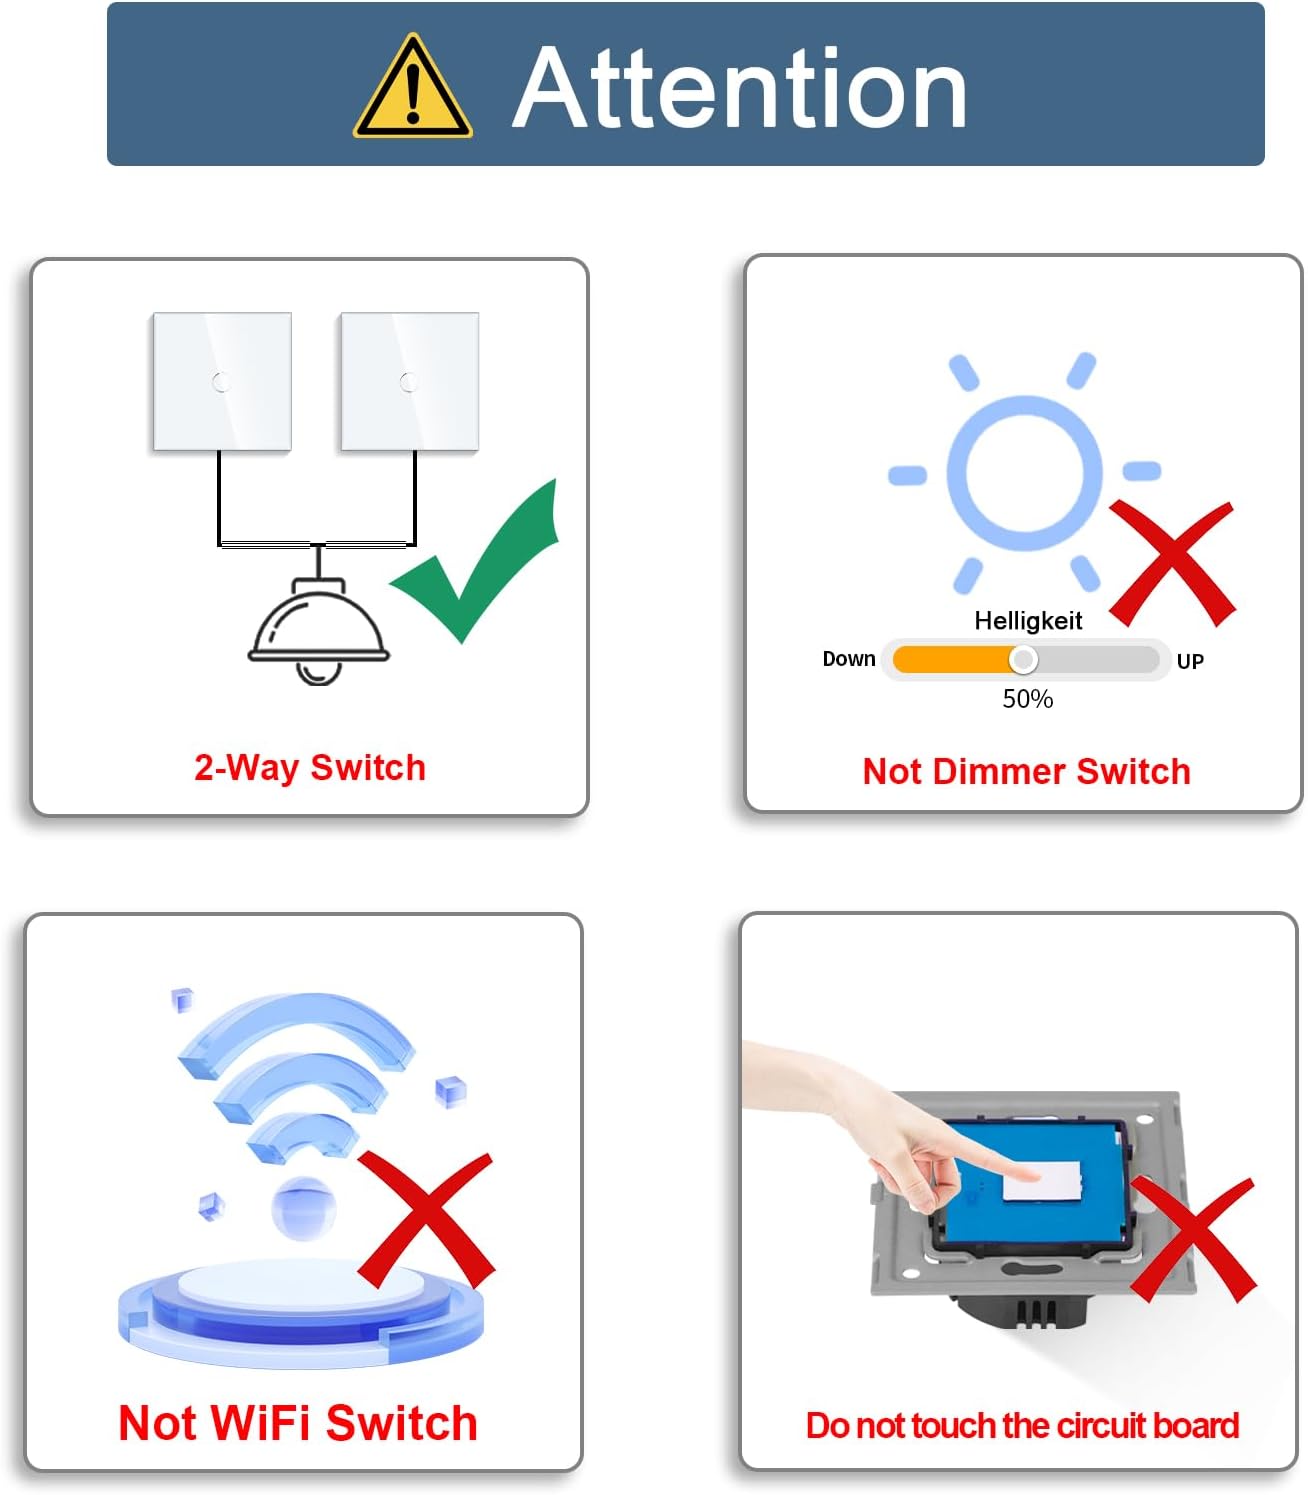
Image: Important safety and functional notes for the CNBINGO touch switch. It highlights that it is a 2-way switch, not a dimmer, not a Wi-Fi switch, and warns against touching the circuit board before glass panel installation.
3. Eto & Fifi sori
3.1. Pre-Fifi sọwedowo
- Verify that your existing wiring supports a 2-way switch configuration.
- Ensure the wall box has a depth of at least 25mm and a diameter of 60mm for proper fitting.
- No neutral wire is required for installation.

Image: Diagram showing the product dimensions (86mm x 86mm, 26mm depth) and illustrating compatible wall box types with a minimum depth of 30mm and 60mm diameter.
3.2. Aworan aworan
For 2-way switching, a communication wire must be connected between the two switches. Follow the diagram below carefully.
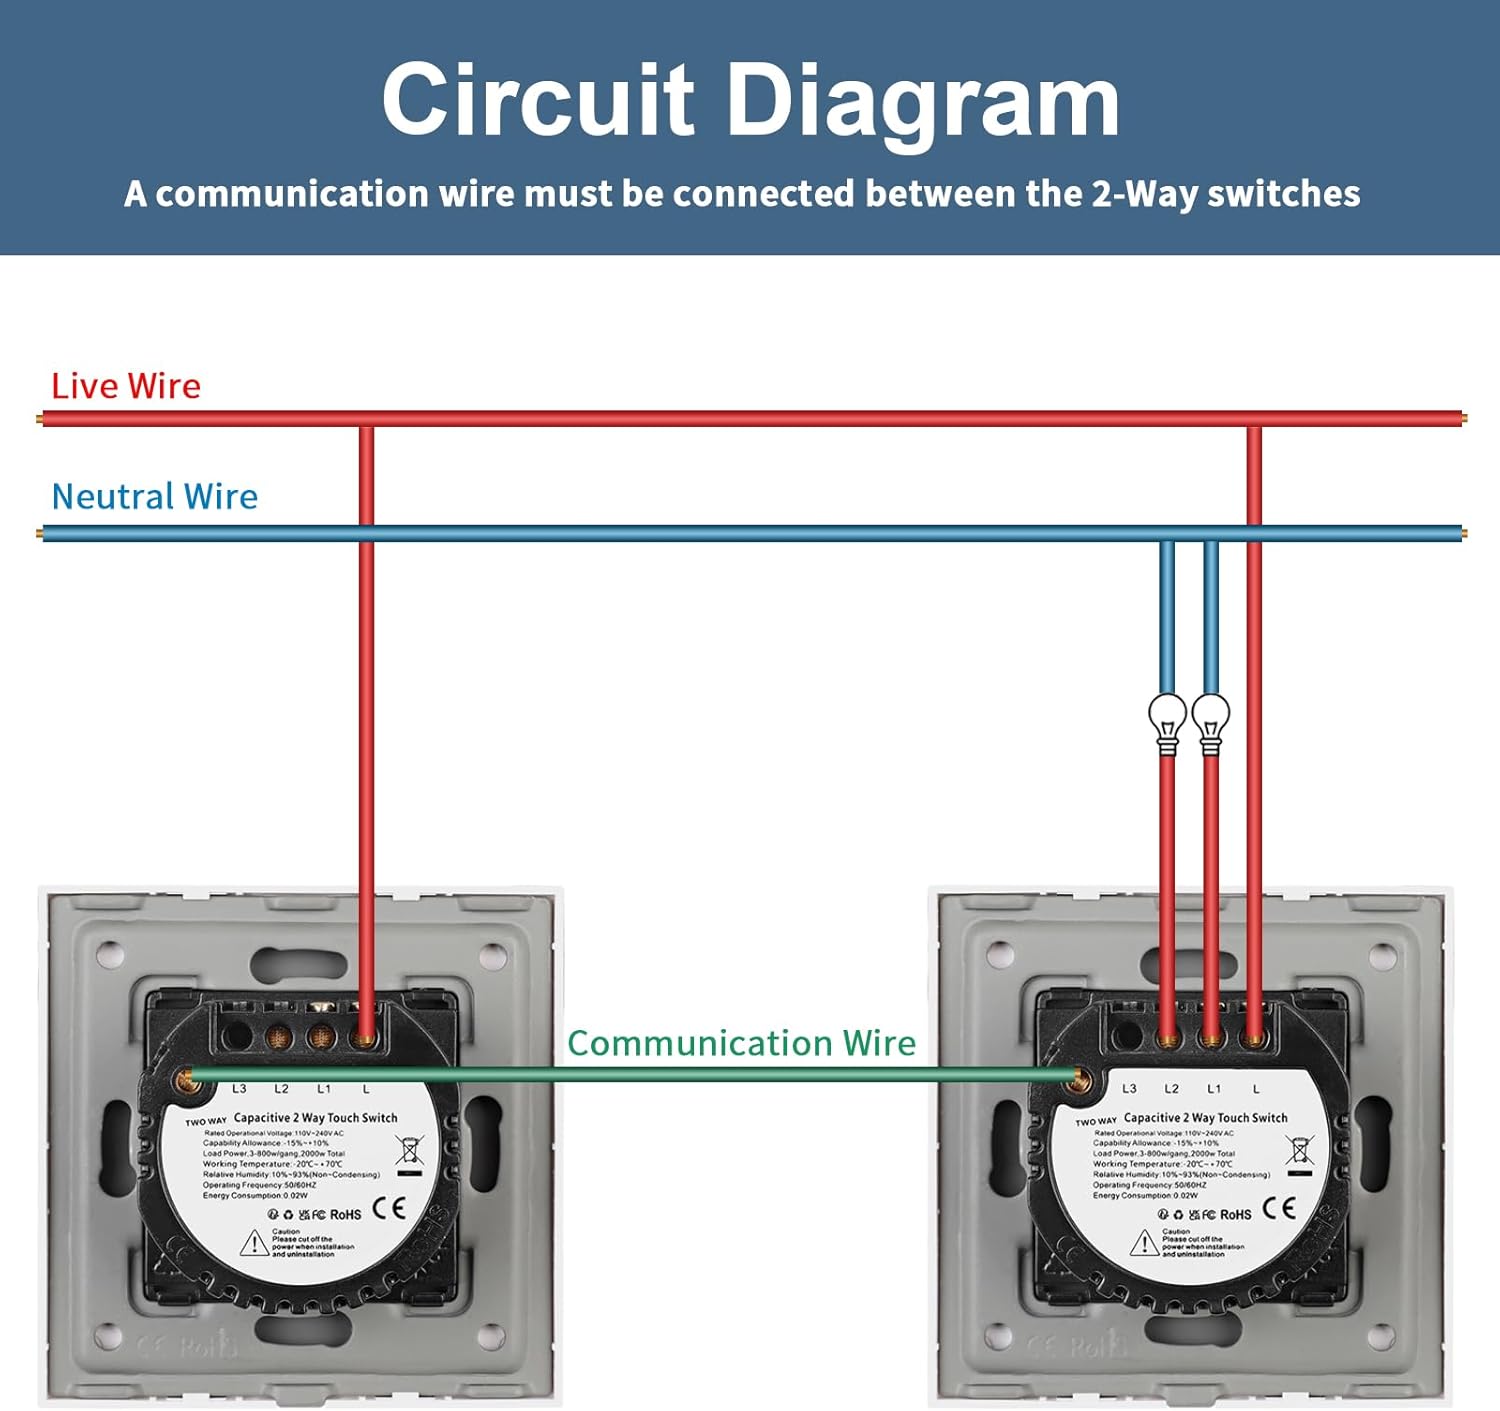
Image: Detailed wiring diagram for a 2-way touch switch setup, showing connections for Live Wire, Neutral Wire, and the Communication Wire between two switches to control a single light.
3.3. Fifi sori Igbesẹ
- Ge Agbara: Turn off the main power supply at your circuit breaker before starting.
- So awọn onirin: Connect the Live, Neutral, and Communication wires to the corresponding terminals on the switch module as shown in the wiring diagram. Ensure all connections are secure.
- Mount Switch Module: Carefully place the switch module into the wall box and secure it with screws.
- Attach Glass Panel: Align the glass panel with the switch module and press firmly until it clicks into place. Pataki: Do not touch the touch button on the switch module before the glass panel is installed.
- Pada Agbara pada: Tan ipese agbara akọkọ pada si titan.


Image: Visual guide for installing the switch, showing the wiring process and how to securely attach the glass panel to the switch module.
4. Isẹ
4.1. Basic On/Off Function
To turn the light on or off, simply touch the corresponding button on the glass panel. The touch system responds quickly, within 40 milliseconds.

Image: A hand touching the CNBINGO 2-way touch switch to control a light in a bedroom, demonstrating its functionality.
4.2. 2-Way Switching
This switch supports 2-way control. After a prolonged press on the button of one switch to pair it with another switch of the same series, a single light can be controlled from two different locations.

Image: A schematic diagram showing two switches connected to control one light, representing the 2-way switching capability.
4.3. Atọka Ipo LED
Each button on the switch is equipped with a backlight. A strong or weak blue light indicates the ON/OFF status of the light. This indicator is visible in the dark but is designed not to disturb sleep.

Image: Close-up of the touch switch showing the LED backlight indicating ON/OFF status, with an inset image of the touch sensor microchip.
5. Itọju
- Ninu: The glass panel can be cleaned with a soft, damp cloth. Avoid abrasive cleaners or solvents that may damage the surface.
- Ayewo: Periodically check the switch for any signs of damage or loose connections. If any issues are found, disconnect power and consult a qualified electrician.
6. Laasigbotitusita
| Isoro | Owun to le Fa | Ojutu |
|---|---|---|
| Switch does not respond or light does not turn on/off. |
|
|
| LED indicator is not working. | Faulty LED or internal component. | Kan si atilẹyin alabara fun iranlọwọ. |
| Switch is not pairing for 2-way control. | Incorrect pairing procedure or incompatible switches. | Ensure both switches are of the same series and follow the prolonged press pairing procedure as described in the operation section. |
7. Awọn pato
| Ẹya ara ẹrọ | Ẹ̀kúnrẹ́rẹ́ |
|---|---|
| Brand | CNBINGO |
| Nọmba awoṣe | M1-202B |
| Awọn iwọn Ọja (L x W x H) | 8.6 x 8.6 x 3.6 cm |
| Iwọn | 400 giramu |
| Àwọ̀ | Dudu |
| Ohun elo | Gilasi |
| Agbara Iru | AC |
| Voltage | 240 Volt (AC) |
| Ti isiyi Rating | 10 A |
| Nọmba ti Awọn nkan | 2 (2-Pack) |
| Yipada Iru | Fọwọkan |
| Iṣagbesori Iru | Ògiri Ògiri |
| Iyipada Yipada | 2-Way Switch (Va-et-vient) |
| Ijẹrisi | IP67 |
| Ipo Iṣiṣẹ | ON-PA-ON |
| Olubasọrọ Iru | Ṣii ni deede |
| Asopọmọra Iru | Dabaru |
8. Atilẹyin ọja & Atilẹyin
For warranty information or technical support, please refer to the documentation included with your purchase or contact CNBINGO customer service directly. Keep your purchase receipt as proof of purchase.
CNBINGO is committed to providing high-quality products and reliable service.