
Ọrọ Iṣaaju
This manual provides detailed instructions for the installation, operation, and maintenance of your DYISLAND LD-210S Hydraulic Disc Brakes Set. This 2-PIN/Power-Off hydraulic brake kit is designed for electric scooters, offering reliable stopping power and an electric induction control system for enhanced safety. Please read this manual thoroughly before installation and use to ensure proper function and safety.
Awọn irinše to wa
Your DYISLAND LD-210S Hydraulic Disc Brakes Set includes the following:
- One set of hydraulic brake levers (front and rear)
- One set of hydraulic brakes (front and rear calipers)
- Iṣagbesori skru
- Two sets of brake hose connectors
- Auxiliary fittings
- Pre-filled brake hoses (front: 1300mm / 51 in, rear: 2100mm / 83 in) with environmentally friendly mineral oil
- Detachable power-off sensor with 300mm (11.8in) cable and 2-pin waterproof connector
Akiyesi: The brake lever types are typically rear brakes controlled by the left hand and front brakes controlled by the right hand. Please verify compatibility with your scooter's wiring port for the power-off sensor.

Aworan: Pariview of the DYISLAND LD-210S Hydraulic Disc Brakes Set components.
Eto ati fifi sori
Proper installation is crucial for the safe and effective operation of your hydraulic disc brakes. The hoses are pre-filled with mineral oil, so bleeding is generally not required immediately after installation.
1. Determine Brake Type Compatibility
Before installation, identify the correct brake type (L-L, L-R, R-R) needed for your scooter. This depends on the brake rotor position on your front and rear wheels.

Image: Guide for selecting the correct L or R brake based on rotor position.
Video: Step 1: How to Tell Which Brakes Are Right for You
Video Description: This video explains how to identify the correct brake configuration (left or right) for your electric scooter based on the brake rotor's mounting position.
2. Brake Lever Installation
The brake lever can be installed without removing the grip due to its split design. Remove the screw on the brake handle, position it on the handlebar, and then tighten the screw to secure it.
Video: Electric scooter hydraulic brake installation tutorial (Part 1 - Lever)
Video Description: This tutorial demonstrates the initial steps of installing the hydraulic brake levers on an electric scooter's handlebar.
3. okun Asopọ
The LD-210S brakes feature an outer 360° rotating heat dissipation universal joint and a hose split design, making installation easier. Carefully connect the brake hoses to the levers and calipers. Ensure a clearance of 0.5 to 0.8 millimeters when fitting the copper bushing, then tighten the screw with 80 kg torque and put on a protective rubber sleeve.

Image: Illustrates the split type design and flexible rotation of the brake hose connection.
Video: Hose Connection Guide
Video Description: A guide on properly connecting the hydraulic brake hoses, emphasizing careful handling to prevent oil leakage.
4. Caliper Installation
The hole spacing on the brake kit meets industry standard dimensions (74 mm / 2.91 in). Use the provided M6*18mm screws to connect the adapter and the frame, ensuring the parts are coordinated. You may add gaskets between parts if needed. Tighten the screws with a 5mm wrench.
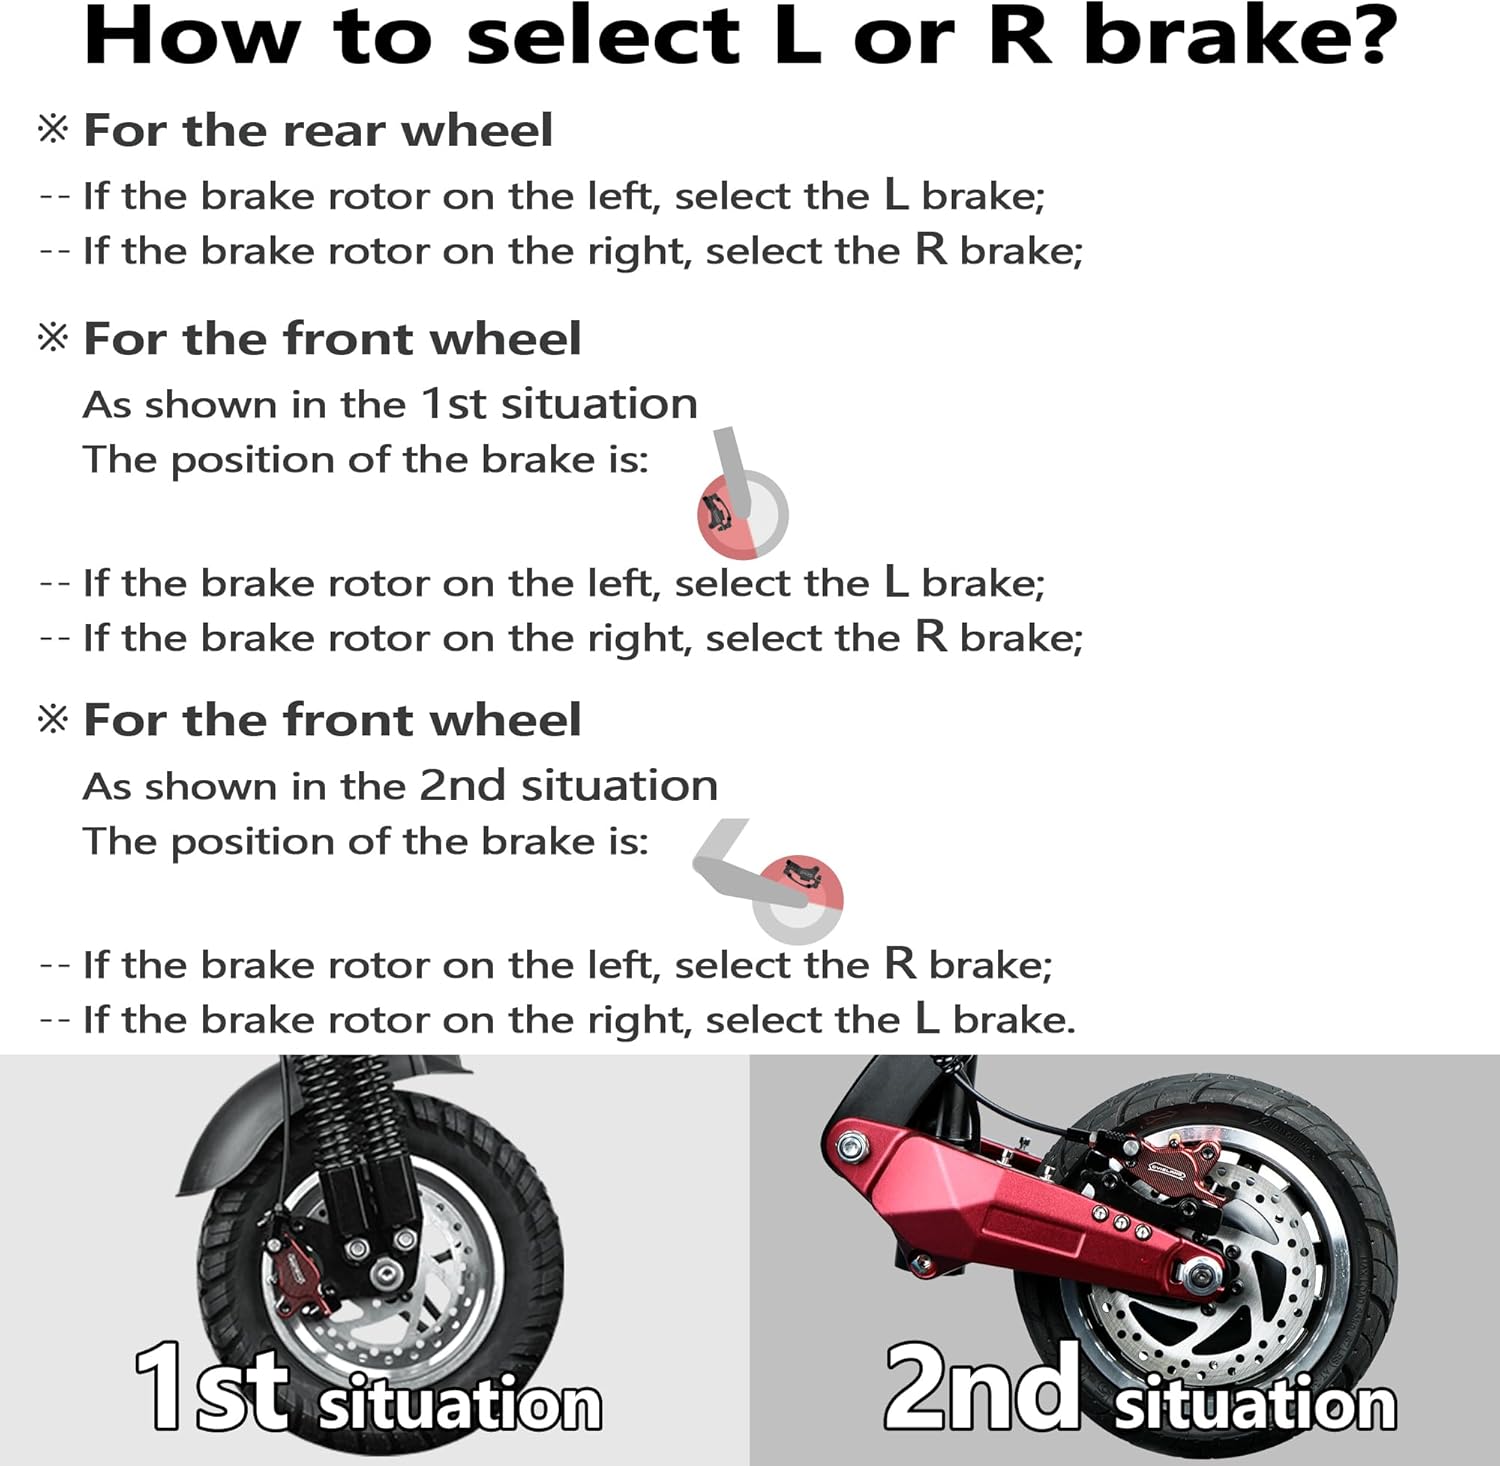
Image: Close-up of the brake caliper installed on a scooter wheel.
Video: Step 3: Electric scooter brake installation process (Part 2 - Caliper)
Video Description: This video details the process of installing the brake caliper onto the scooter frame and aligning it with the disc.
5. Power-Off Sensor Connection
The electric induction control system features a detachable power-off sensor. This sensor cuts off motor power output when braking, ensuring safe riding. The cable length is 300mm (11.8in) and uses a 2-pin waterproof connector. Ensure the wiring port matches your scooter.
Awọn ilana Iṣiṣẹ
The DYISLAND LD-210S hydraulic disc brakes provide responsive and controlled stopping power for your electric scooter.
Tolesese Brake Lever
The brake handle features a screw adjustment function. This allows you to customize the travel distance of the brake lever to suit your personal preference, providing a comfortable and flexible braking operation for optimal braking feel.
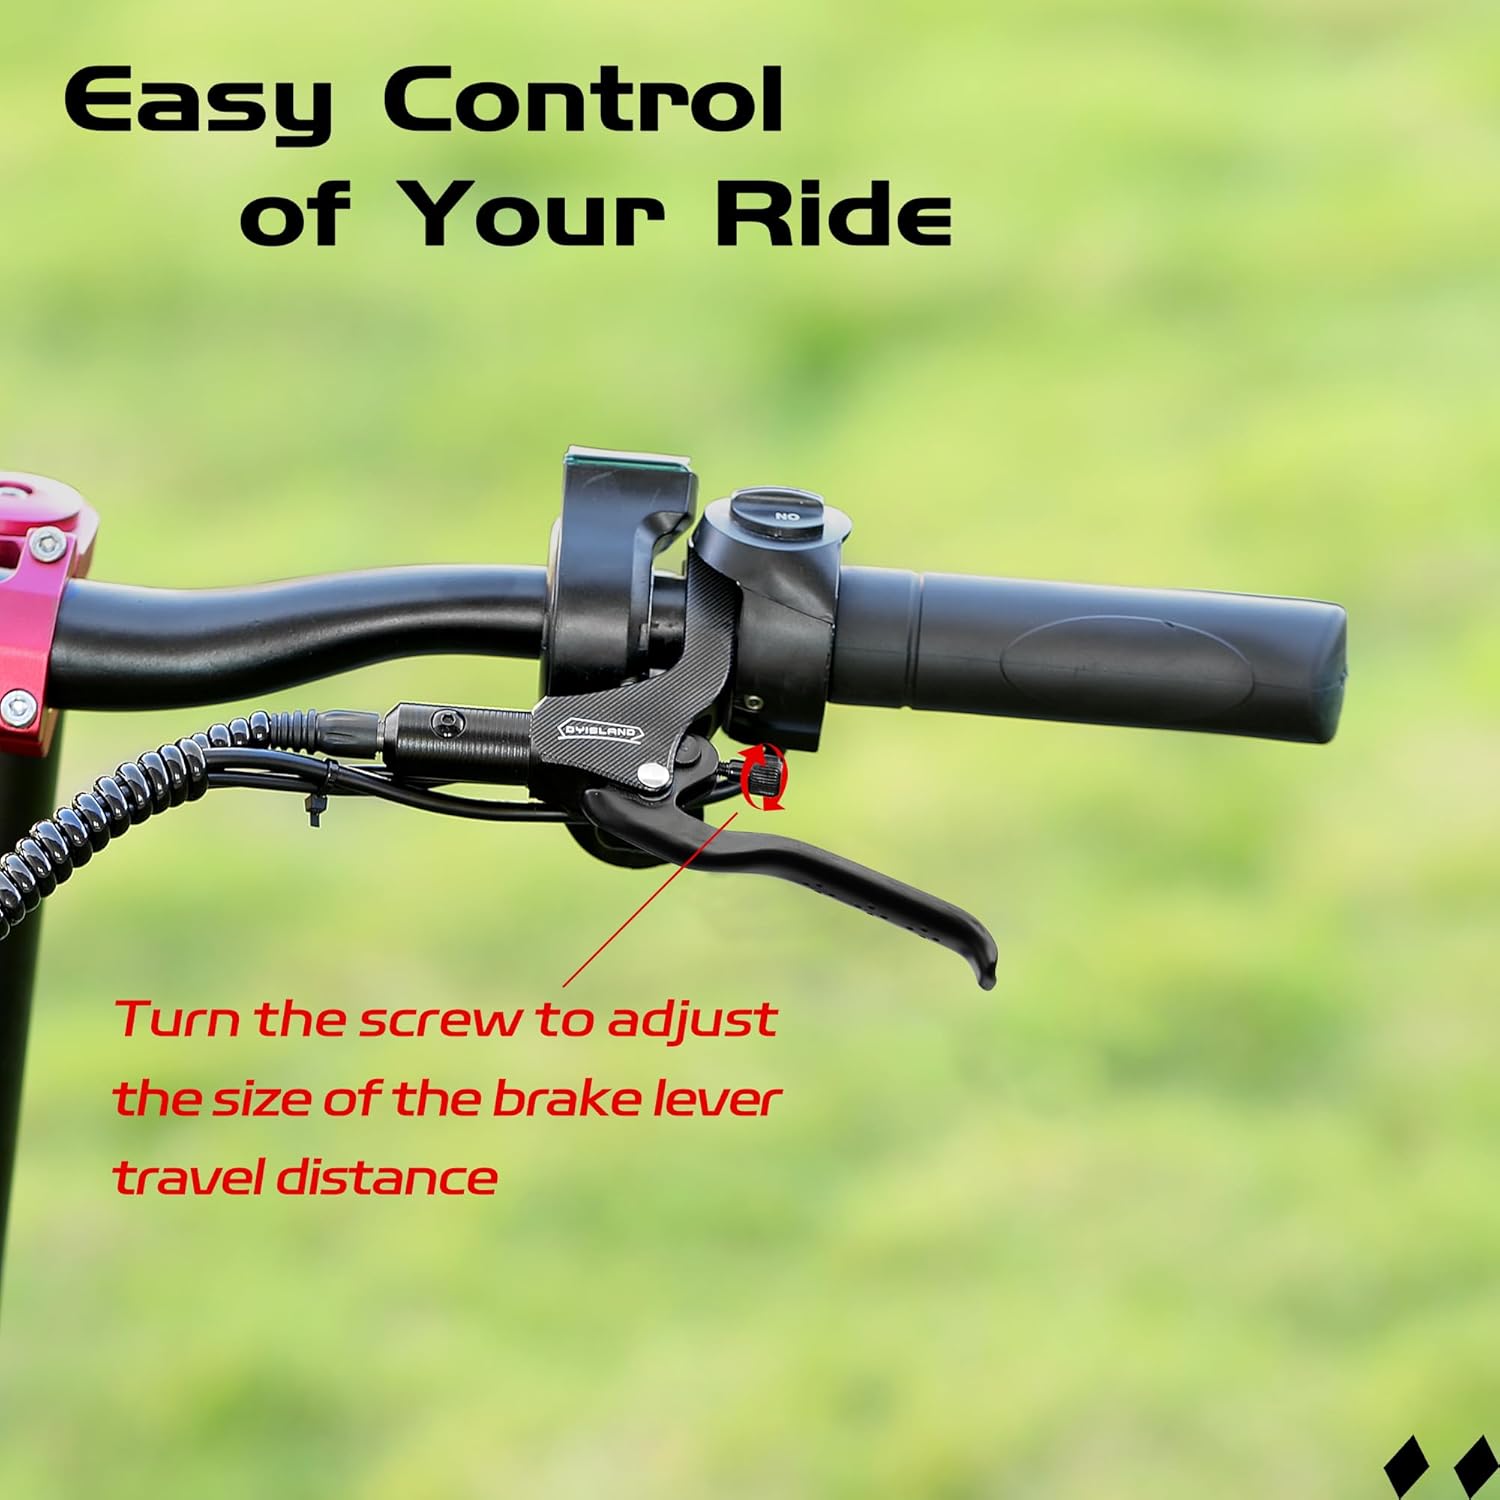
Image: Close-up of the brake lever showing the adjustment screw for travel distance.

Image: Diagram highlighting the adjusting screw on the brake lever for fine-tuning.
Itoju
Regular maintenance ensures the longevity and performance of your hydraulic disc brakes.
Atunṣe paadi Brake
When brake pads wear out, rotate the adjusting knob on the caliper to adjust the distance between the brake pads and the brake disc. This helps maintain optimal brake feel and performance.

Image: Illustrates the brake adjustment knob on the caliper and anti-slip particles on the lever.
Ẹjẹ Brake
While your brakes come pre-filled, over time, air may enter the hydraulic system, leading to a spongy brake feel. Bleeding the brakes removes air and restores firm lever feel.
Video: Bleeding Tutorial Video
Video Description: A detailed tutorial on how to bleed the hydraulic disc brakes to remove air from the system and restore optimal performance.
Laasigbotitusita
If you encounter issues with your DYISLAND LD-210S Hydraulic Disc Brakes, refer to the following common problems and solutions:
- Spongy Brake Lever: This usually indicates air in the hydraulic system. Refer to the "Bleeding Tutorial Video" in the Maintenance section to bleed your brakes.
- Brake Rubbing/Friction Sound: This can occur if the caliper is not properly aligned with the brake disc. Re-adjust the brake position as shown in the installation videos in the Setup section. Ensure all mounting screws are tightened correctly.
- Weak Braking Performance: Check for worn brake pads (adjust or replace if necessary) or air in the system (bleed brakes). Ensure the brake lever travel distance is adjusted to your preference.
- Power-Off Sensor Malfunction: Verify that the 2-pin waterproof connector is securely attached and that the wiring port matches your scooter's specifications.
Awọn pato
| Ẹya ara ẹrọ | Ẹ̀kúnrẹ́rẹ́ |
|---|---|
| Orukọ awoṣe | LD-210S Hydraulic brakes set for electric scooter |
| Brand | DYISLAND |
| Ohun elo | Aluminum (CNC aluminum alloy body, aluminum alloy hand bar) |
| Caliper Type | CNC aluminum alloy caliper (dual piston) |
| Omi Brake | Non-corrosive mineral brake fluid (pre-filled) |
| Brake Disc Material | High manganese 410 stainless steel |
| Front Brake Hose Length | 1300mm (51 in) |
| Rear Brake Hose Length | 2100mm (83 in) |
| Iho aye | 74 mm (2.91 in) |
| Power-Off Sensor Cable Length | 300mm (11.8ni) |
| Power-Off Sensor Connector | 2-pin waterproof connector |
| Awọn iwọn Package Nkan | 10 x 8.03 x 2.76 inches |
| Package iwuwo | 0.9 kilo |

Image: Detailed product size diagram for the LD-210S brake components.
Atilẹyin ọja ati Support
The DYISLAND LD-210S Hydraulic Disc Brakes Set comes with a one-month warranty. For any questions, troubleshooting assistance, or support, please visit the official DYISLAND store or contact customer service.
Official DYISLAND Store: Ṣabẹwo Ile-itaja