
1. Ifihan
This manual provides detailed instructions for the installation, operation, and maintenance of your GAMEON Midnight I Series Mid Tower Gaming PC Case. Please read this manual thoroughly before beginning installation to ensure proper setup and to maximize the performance and lifespan of your product. Keep this manual for future reference.
2. Alaye Aabo
- Always disconnect the power supply from the wall outlet before performing any installation or maintenance inside the PC case.
- Handle the tempered glass panels with care. Tempered glass, while durable, can shatter if dropped or subjected to sharp impacts.
- Avoid exposing the case to extreme temperatures or high humidity.
- Do not attempt to modify the case or its components. Unauthorized modifications may void your warranty and pose safety risks.
- Pa awọn ẹya kekere ati awọn skru kuro lati ọdọ awọn ọmọde.
3. Package Awọn akoonu
Jọwọ rii daju pe gbogbo awọn ohun ti a ṣe akojọ si isalẹ wa ninu apo rẹ:
- GAMEON Midnight I Series Mid Tower Gaming PC Case
- 7 x 120mm ARGB PWM Cooling Fans (pre-installed)
- Accessory Box (containing screws, cable ties, and other mounting hardware)
- ARGB/PWM Fan Controller and Remote Control
- Afowoyi Olumulo (iwe-ipamọ yii)
4. Ọja Ipariview
The GAMEON Midnight I Series PC case is designed for optimal cooling and aesthetic appeal, featuring tempered glass panels and pre-installed ARGB PWM fans.

Figure 4.1: Internal layout of the PC case, highlighting the spacious interior for component installation.

Figure 4.2: Rear and top internal view, illustrating fan placement and overall structure.
4.1 ARGB+PWM Case Fans
The case comes with 7 pre-installed 120mm ARGB PWM fans, providing efficient cooling and customizable lighting. The fans are controlled via an included ARGB/PWM controller and remote.

Figure 4.3: ARGB+PWM fan features and fan mounting support. The front supports 360mm water cooling. Fan mounts include 3x120mm for PSU cover, 3x120mm for bottom, 3x120mm for top, and 1x120mm for rear.
4.2 Iwaju Mo / Eyin Ports
The front panel provides convenient access to essential ports for connectivity.
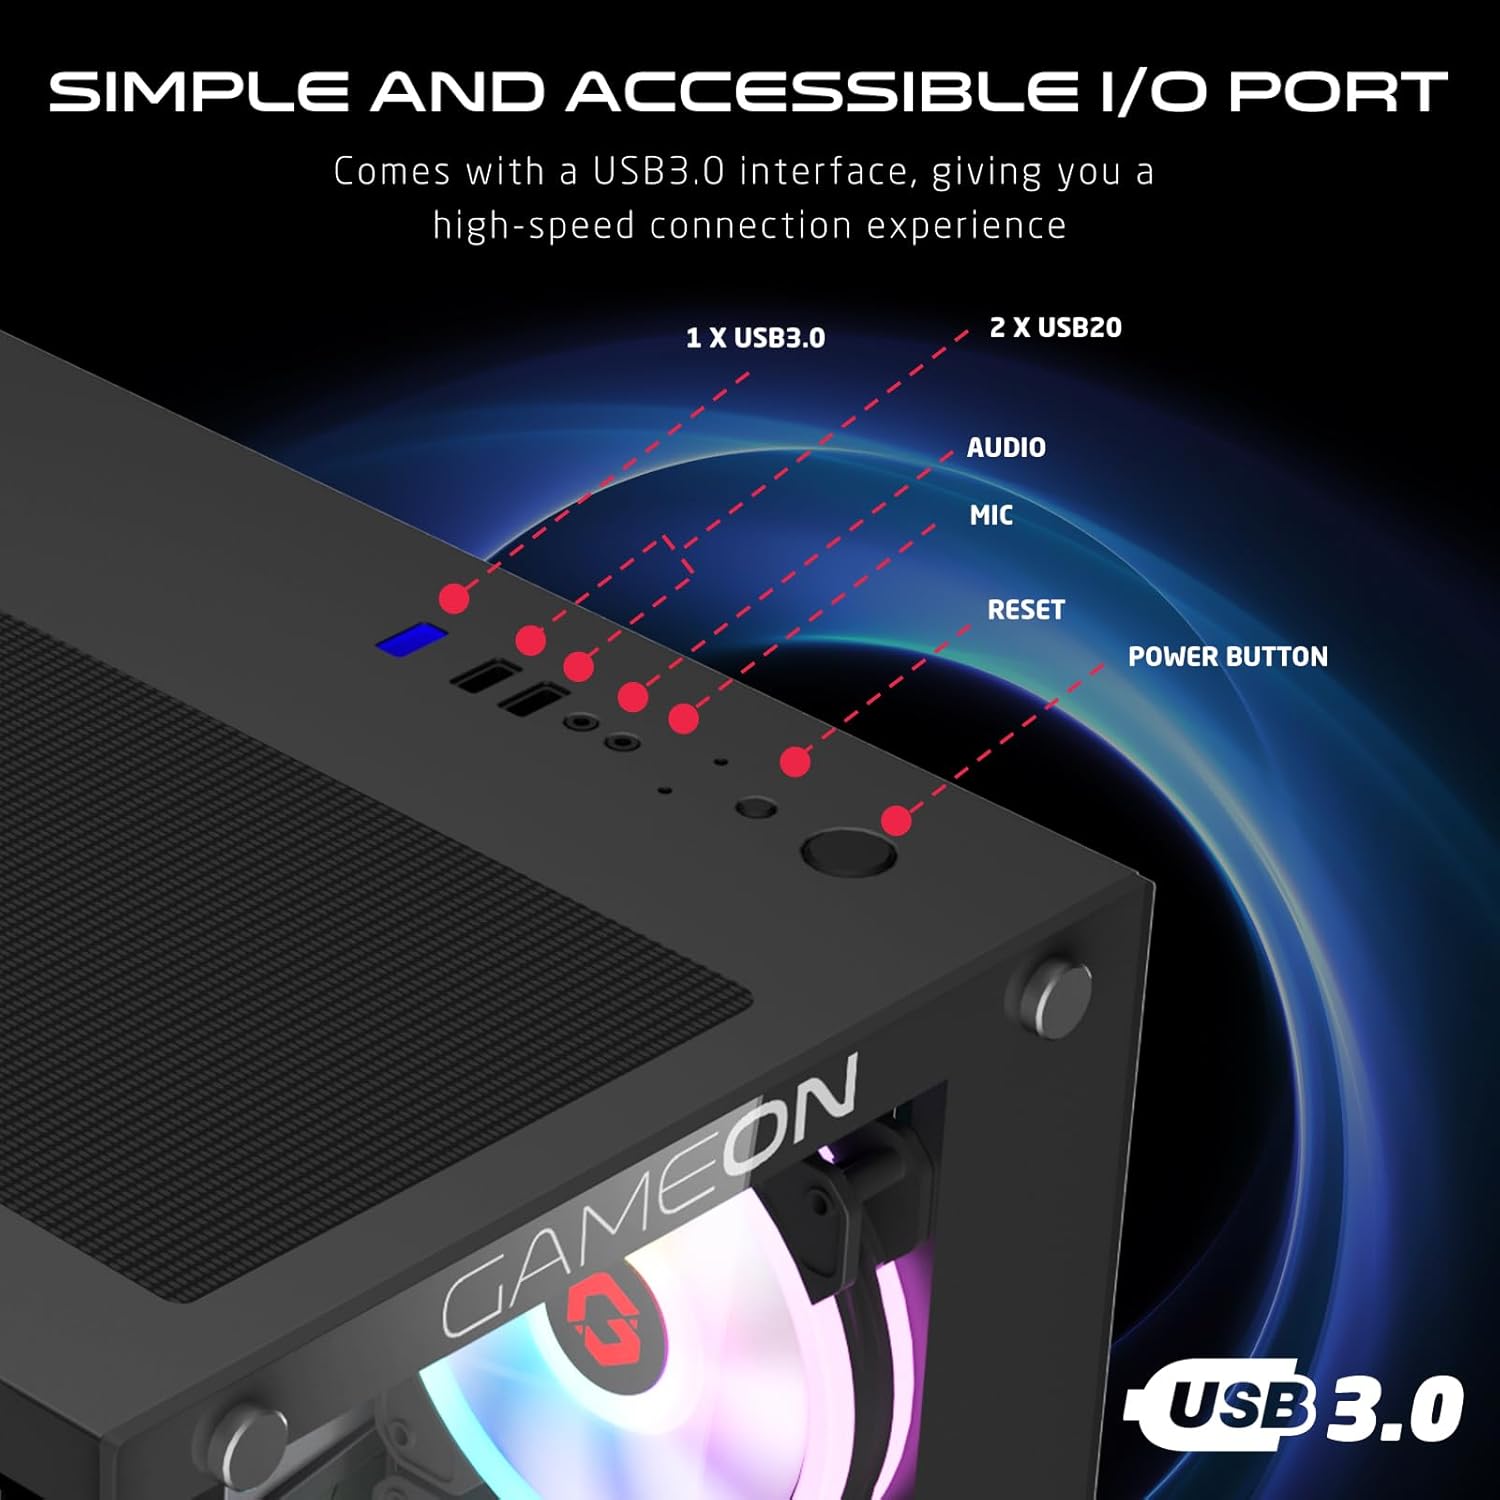
Figure 4.4: Front I/O ports, including 1x USB 3.0, 2x USB 2.0, Audio jack, Microphone jack, Reset button, and Power button.
4.3 Cooling and Construction
The case is designed with an optimized cooling solution, featuring multiple fan mounts and durable tempered glass panels.

Figure 4.5: Optimized cooling solution with massive air intake and exhaust. Features 7 pre-installed fans and durable tempered glass construction.
4.4 Compatibility and Drive Support
The case offers wide compatibility for various motherboard form factors and ample drive bay support.

Figure 4.6: Motherboard compatibility includes ATX, M-ATX, and ITX. Drive bay support for 2x HDD and 2x SSD. Also shown are the front panel header connections.
5. Awọn ilana iṣeto
Follow these steps to install your components into the GAMEON Midnight I Series PC case.
5.1 Ngbaradi Ọran naa
- Gbe ọran naa sori alapin, dada iduroṣinṣin.
- Carefully remove the tempered glass side panel(s) by unscrewing the thumb screws and gently sliding the panel off. Set them aside in a safe place.
- Yọọ awọn ohun elo iṣakojọpọ inu eyikeyi kuro.
5.2 Fifi sori modaboudu
- Install the I/O shield (if not pre-installed on your motherboard) into the rear opening of the case.
- Align your motherboard with the standoffs inside the case. Ensure the standoffs match your motherboard's form factor (ATX, M-ATX, ITX).
- Ṣe aabo modaboudu pẹlu awọn skru ti a pese.
5.3 Power Ipese Unit (PSU) fifi sori
- Wa agbegbe fifi sori ẹrọ PSU ni isalẹ ẹhin apoti naa.
- Slide your PSU into position from the rear of the case.
- Secure the PSU with the provided screws.
5.4 Fi sori ẹrọ awakọ (HDD/SSD)
The case supports 2x 3.5" HDDs and 2x 2.5" SSDs.
- Fun awọn HDD 3.5": Locate the drive cage, typically near the PSU shroud. Slide the HDD into the drive bay and secure it with screws.
- Fun awọn SSD 2.5": Mount the SSDs to the designated mounting points, usually on the back of the motherboard tray or within the drive cage, using the provided screws.
5.5 Fifi Kaadi Aworan ati Kaadi Imugboroosi sori ẹrọ
- Yọ awọn ideri PCIe pataki ti o yẹ lati ẹhin ọran naa.
- Insert your graphics card or other expansion cards into the appropriate PCIe slots on your motherboard.
- So awọn kaadi naa mọ pẹlu awọn skru.
5.6 USB Management
Lo àwọn ibi tí a ti gé àwọn okùn ìtọ́sọ́nà àti àwọn ibi tí a ti so mọ́ ẹ̀yìn àtẹ motherboard láti ṣàkóso àwọn okùn. Èyí mú kí afẹ́fẹ́ àti ẹwà wọn sunwọ̀n síi.
5.7 Connecting Front Panel I/O and Fans
- Connect the front panel cables (Power SW, Reset SW, HDD LED, Power LED, USB 3.0, USB 2.0, HD Audio) to their corresponding headers on your motherboard. Refer to your motherboard manual for header locations.
- Ensure the pre-installed ARGB fans are connected to the included ARGB/PWM controller. Connect the controller to a SATA power connector from your PSU and a 3-pin ARGB header (if available) and a 4-pin PWM header on your motherboard for software control, or use the remote for standalone control.
6. Awọn ilana Iṣiṣẹ
6.1 Titan / Pa a
- After all components are installed and cables connected, replace the side panels.
- So monitor, keyboard, mouse, ati okùn agbara rẹ pọ mọ PSU.
- Press the Power button on the front panel to turn on your PC.
- To turn off, use the operating system's shutdown function or press and hold the Power button for several seconds.
6.2 Iṣakoso Fẹ́ẹ́fù ARGB
A le ṣakoso awọn onijakidijagan ARGB ti a ti fi sii tẹlẹ ni awọn ọna meji:
- Isakoṣo latọna jijin: Use the included remote to cycle through various lighting effects, adjust brightness, and change fan speed.
- Sọfitiwia modaboudu: If the ARGB controller is connected to a compatible 3-pin ARGB header on your motherboard, you can synchronize lighting effects with your motherboard's RGB software (e.g., ASUS Aura Sync, MSI Mystic Light Sync, ASRock Polychrome RGB, Gigabyte RGB Fusion).
7. Itọju
Itọju deedee n ṣe iranlọwọ lati rii daju pe iṣẹ ṣiṣe to dara julọ ati igba pipẹ ti apoti PC rẹ.
7.1 eruku Filter Cleaning
The case includes dust filters to prevent dust buildup. It is recommended to clean them every 1-3 months, depending on your environment.
- Locate the dust filters (e.g., top, bottom, front).
- Fi pẹ̀lẹ́pẹ̀lẹ́ yọ àwọn àlẹ̀mọ́ náà kúrò.
- Clean them using compressed air, a soft brush, or by rinsing with water (ensure they are completely dry before re-installing).
- Re-attach the dust filters.
7.2 Gbogbogbo Cleaning
- Lo asọ, damp asọ lati mu ese si isalẹ awọn ode roboto ti awọn irú. Yago fun abrasive ose.
- For tempered glass panels, use a glass cleaner and a microfiber cloth to avoid streaks.
7.3 Fan Cleaning
Periodically inspect the fan blades for dust accumulation. Use compressed air to gently clear dust from the fan blades and grilles.
8. Laasigbotitusita
If you encounter issues with your PC case, refer to the following common problems and solutions.
8.1 Fans Not Spinning or ARGB Not Working
- Ṣayẹwo Asopọ agbara: Ensure the ARGB/PWM controller is properly connected to a SATA power connector from your PSU.
- Check Fan Connections: Verify that all fans are securely connected to the ARGB/PWM controller.
- Batiri Iṣakoso Latọna jijin: If using the remote, check if its battery needs replacement.
- Sọfitiwia modaboudu: If using motherboard software for control, ensure the controller is connected to the correct ARGB header and the software is installed and configured correctly.
- Itọsọna Fan: Rii daju pe awọn onijakidijagan wa ni iṣalaye deede fun ṣiṣan afẹfẹ ti o dara julọ (gbigba / eefi).
8.2 Front I/O Ports Not Functioning
- Ṣàyẹ̀wò àwọn ìsopọ̀ Modabọọdu: Ensure all front panel cables (USB 3.0, USB 2.0, HD Audio) are correctly and securely connected to their respective headers on the motherboard. Refer to your motherboard manual.
8.3 PC Not Powering On
- Power Button Connection: Verify the Power SW cable from the front panel is correctly connected to the motherboard's front panel header.
- PSU Connection: Rii daju pe PSU ti sopọ daradara si iṣan ogiri ati iyipada agbara lori PSU wa ni ipo 'ON'.
- Internal Power Cables: Check that all necessary power cables (24-pin ATX, CPU, GPU) are securely connected to the motherboard and components.
9. Awọn pato
| Ẹya ara ẹrọ | Sipesifikesonu |
|---|---|
| Orukọ awoṣe | GO-EMPERORII-M (Midnight I Series) |
| Iru Irú | Ile-iṣọ Mid |
| Ohun elo | Gilasi ibinu |
| Àwọ̀ | Dudu |
| Awọn iwọn Ọja (L x W x H) | 44 x 28 x 42.7 cm |
| Iwọn Nkan | 6.45 kg |
| Modaboudu Support | ATX, Micro ATX, ITX |
| Awọn onijakidijagan ti a ti fi sii tẹlẹ | 7 x 120mm ARGB PWM Fans |
| Fan Iwon | 120mm |
| Ọna Itutu | Air, Water (supports up to 360mm radiator in front) |
| Wakọ Bays | 2 x 3.5" HDD, 2 x 2.5" SSD |
| Iwaju Awọn Ibudo I / O | 1 x USB 3.0, 2 x USB 2.0, Audio, Mic, Reset, Power |
| Afikun Awọn ẹya ara ẹrọ | Dust Filters, ARGB Controller with Remote |
10. Atilẹyin ọja ati Support
This product comes with a standard manufacturer's warranty. For specific warranty terms and conditions, please refer to the documentation provided with your purchase or contact GAMEON customer support. For technical assistance or further inquiries, please visit the official GAMEON webaaye tabi kan si awọn ikanni atilẹyin wọn.