
1. Ọja Ipariview
The VIVOTEK FD9383-HTV is a high-performance 5-megapixel outdoor network dome camera designed for robust surveillance applications. It features a 2.8-12mm motorized varifocal lens, providing flexibility in field of view, and integrated IR LEDs for clear night vision up to 98 feet. This camera is built to withstand harsh outdoor conditions with IP66 and IK10 ratings, ensuring protection against dust, water, and vandalism. It also includes a built-in microphone for audio monitoring.
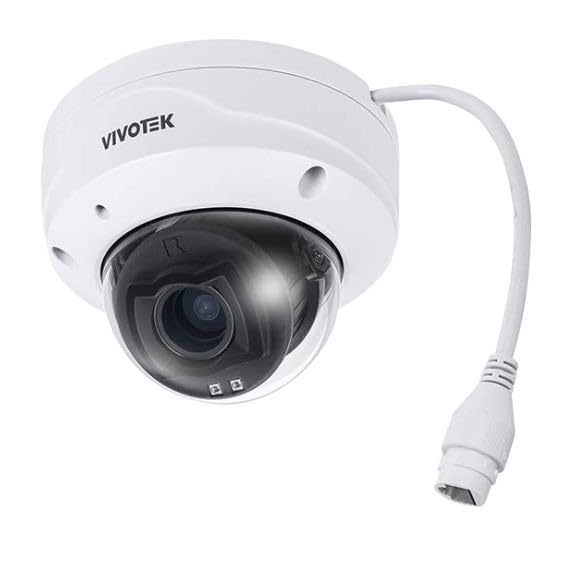
Aworan 1.1: Iwaju view of the VIVOTEK FD9383-HTV 5MP Outdoor Network Dome Camera.
Awọn ẹya pataki:
- 2560 x 1920 Resolution at 30 fps for high-quality video.
- IR LEDs for Night Vision up to 98 feet (30 meters).
- 2.8-12mm Motorized Varifocal Lens for flexible viewing awọn igun.
- 95.4 to 28.7° Horizontal Angle of View.
- Built-In Microphone for audio capture.
- IP66-Rated for outdoor use, protecting against dust and water.
- IK10-Rated for vandal resistance.
- Supports microSD Cards up to 1TB for local storage.
- RJ45 Ethernet with Power over Ethernet (PoE) Technology.
- Complies with ONVIF Profiles G, S, T for broad compatibility.
2. Package Awọn akoonu
Rí i dájú pé gbogbo nǹkan wà níbẹ̀, wọ́n sì wà ní ipò tó dára. Tí ohunkóhun bá sọnù tàbí ó bàjẹ́, kàn sí olùtajà rẹ lẹ́sẹ̀kẹsẹ̀.
- VIVOTEK FD9383-HTV Network Dome Camera
- Mounting Screw Kit (screws, wall anchors)
- Ohun elo Asopọ Omi ti ko ni omi
- Alignment Sticker/Drill Template
- Awọn ọna fifi sori Itọsọna
- Software CD (or download link information)
3. Alaye Aabo
Please read these safety instructions carefully before operating the device to prevent injury to yourself or others and to avoid damage to the device. Keep this manual for future reference.
- Fifi sori: Installation should be performed by qualified personnel only and must comply with all local codes.
- Orisun Agbara: Use only the specified power source (PoE or 12V DC adapter, if applicable) to avoid fire or electric shock.
- Ayika: Má ṣe fi kámẹ́rà náà hàn sí àwọn iwọn otutu tó le koko, ọriniinitutu, tàbí àwọn àyíká tó lè ba nǹkan jẹ́ ju àwọn ipò iṣẹ́ tí a ti sọ tẹ́lẹ̀ lọ.
- Ninu: Ge asopọ agbara ṣaaju ṣiṣe mimọ. Lo asọ asọ ti o gbẹ. Ma ṣe lo olomi tabi awọn olutọpa aerosol.
- Ṣiṣẹ: Maṣe gbiyanju lati ṣiṣẹ ọja yi funrararẹ. Tọkasi gbogbo iṣẹ si oṣiṣẹ oṣiṣẹ ti o peye.
4. Eto
4.1 Fifi sori ti ara
The FD9383-HTV camera is designed for wall or ceiling mounting. Ensure the mounting surface is strong enough to support the camera's weight.
- Mura Ilẹ Iṣagbesori: Use the provided drill template to mark the screw holes on the desired mounting location.
- Awọn iho iho: Drill pilot holes for the mounting screws and, if necessary, for the network cable. Insert wall anchors if mounting on drywall or masonry.
- So akọmọ iṣagbesori: So bracket fifi sori kamera naa mọ oju rẹ nipa lilo awọn skru ti a pese.
- Awọn okun Sopọ: Route the Ethernet cable through the mounting surface or cable entry point. Connect the RJ45 connector to the camera's network port. If not using PoE, connect a 12V DC power adapter (sold separately) to the power input. Ensure waterproof connections for outdoor installations.
- Secure Camera Body: Attach the camera body to the mounting bracket. Adjust the camera's orientation and angle as needed.
- Pari fifi sori ẹrọ: Secure all covers and ensure the camera is firmly mounted and protected from the elements.

Image 4.1: Illustrative diagram of camera mounting and cable connection.
4.2 Asopọ Nẹtiwọọki
The camera supports Power over Ethernet (PoE) for simplified installation, allowing both power and data to be transmitted over a single Ethernet cable.
- Connect the camera to a PoE-enabled switch or a PoE injector using a standard Ethernet cable.
- Alternatively, connect to a standard network switch and use a separate 12V DC power adapter.
- Ensure your network is configured to assign an IP address to the camera (DHCP recommended for initial setup).
4.3 Iṣeto ni ibẹrẹ
After physical installation and network connection, you need to access the camera's web ni wiwo fun ni ibẹrẹ iṣeto ni.
- Ṣawari Kamẹra naa: Use VIVOTEK's IP Search utility (available on their website) or a network scanner to find the camera's IP address on your network.
- Wiwọle Web Ni wiwo: Ṣii a web aṣàwákiri (fún àpẹẹrẹ, Chrome, Firefox) kí o sì tẹ àdírẹ́sì IP kámẹ́rà náà sí ibi àdírẹ́sì.
- Wo ile: The default username is typically 'root' and the password is 'pass'. You will be prompted to change the password upon first login for security reasons.
- Eto ipilẹ: Configure essential settings such as date/time, network settings (if not using DHCP), and user accounts.
5. Ṣiṣẹ
5.1 Accessing the Camera Interface
Once configured, you can access the camera's live view and settings through its web interface or compatible VIVOTEK software/NVR systems.
- Enter the camera's IP address in your web kiri ayelujara.
- Log in with your configured username and password.
- The interface provides access to live video, recording settings, motion detection, and other advanced features.
5.2 Adjusting Lens and Focus
The FD9383-HTV features a motorized varifocal lens, allowing remote adjustment of zoom and focus.
- Navigate to the 'Video' or 'Lens' settings section in the web ni wiwo.
- Use the zoom controls to adjust the focal length (2.8mm to 12mm) to achieve the desired field of view.
- Utilize the focus controls to sharpen the image. Many VIVOTEK cameras offer a one-touch focus feature for automatic adjustment.
5.3 Night Vision Settings
The camera automatically switches to night vision mode in low-light conditions using its IR LEDs.
- In the 'Image' or 'IR' settings, you can configure the IR illuminator's behavior (e.g., auto, manual on/off).
- Adjust IR intensity if available, to prevent overexposure or underexposure in specific scenarios.
5.4 Gbigbasilẹ ati Ibi ipamọ
The camera supports various recording methods, including local storage on a microSD card and network video recording (NVR).
- Kaadi MicroSD: Insert a compatible microSD card (up to 1TB) into the camera's slot. Format the card via the web interface. Configure recording schedules and triggers (e.g., continuous, motion-triggered).
- NVR/NAS: Connect the camera to a VIVOTEK NVR or a compatible Network Attached Storage (NAS) device. Configure recording settings on the NVR/NAS.
5.5 Wiwa išipopada
Configure motion detection to trigger recordings, send alerts, or activate other actions.
- Access the 'Event' or 'Motion Detection' settings in the web ni wiwo.
- Define detection zones within the camera's field of view.
- Ṣatunṣe awọn ipele ifamọ lati dinku awọn itaniji eke.
- Set up actions to be taken when motion is detected (e.g., record video, send email notification).
6. Itọju
6.1 Ninu
Fífọmọ́ déédéé ń ran lọ́wọ́ láti mú kí àwòrán dára síi, ó sì ń mú kí kámẹ́rà náà pẹ́ sí i.
- Lẹnsi: Gently wipe the lens with a soft, lint-free cloth. For stubborn dirt, use a lens cleaning solution specifically designed for optical surfaces. Avoid abrasive materials.
- Ibugbe: Pa ile kamẹra nu pẹlu ipolowoamp asọ. Ma ṣe lo awọn ifọsẹ ti o lagbara tabi awọn nkanmimu.
- Dome Cover: If applicable, carefully clean the dome cover to ensure clear visibility.
6.2 famuwia imudojuiwọn
Periodically check the VIVOTEK website for firmware updates. Firmware updates often include bug fixes, performance improvements, and new features.
- Download the latest firmware for your FD9383-HTV model from the official VIVOTEK support page.
- Wọle si kamẹra naa web interface and navigate to the 'System' or 'Maintenance' section.
- Follow the on-screen instructions to upload and install the firmware. Do not power off the camera during the update process.
7. Laasigbotitusita
This section provides solutions to common issues you might encounter with your VIVOTEK FD9383-HTV camera.
| Isoro | Owun to le Fa | Ojutu |
|---|---|---|
| Kamẹra ko ṣiṣẹ | No power from PoE switch/injector; faulty power adapter; loose cable connection. | Check PoE status on switch; verify power adapter functionality; ensure all cables are securely connected. |
| Cannot access camera via network | Incorrect IP address; network cable issue; firewall blocking access; camera not receiving an IP address. | Verify IP address; check network cable integrity; temporarily disable firewall; use IP Search utility to find camera. |
| Didara aworan ti ko dara (blurry, dudu) | Lens out of focus; dirty lens/dome; insufficient lighting; incorrect image settings. | Adjust focus via web interface; clean lens/dome; check IR settings; reset image settings to default. |
| Wiwa išipopada ko ṣiṣẹ | Detection zones not configured; sensitivity too low; event actions not set up. | Configure detection zones; increase sensitivity; ensure event actions (e.g., record, notify) are enabled. |
| Kaadi MicroSD kii ṣe igbasilẹ | Card not formatted; card full; recording schedule not active; faulty card. | Format microSD card in camera settings; check recording schedule; replace card if faulty. |
8. Awọn pato
Detailed technical specifications for the VIVOTEK FD9383-HTV camera.
| Ẹya ara ẹrọ | Sipesifikesonu |
|---|---|
| Sensọ Aworan | 1/2.8" Type CMOS |
| Ipinnu | 2560 x 1920 ni 30 fps |
| Ifojusi Gigun | 2.8 to 12mm Motorized Varifocal Lens |
| Petele Igun ti View | 95.4 si 28.7° |
| Alẹ Iranran | IR LEDs up to 98 feet (30 meters) |
| Ohun | Gbohungbohun ti a ṣe sinu |
| Ibi ipamọ | Supports microSD Cards up to 1TB |
| Ọlọpọọmídíà Nẹtiwọọki | 1x RJ45 Input (PoE) |
| Ayika Rating | IP66 (Eruku ati Omi Resistant) |
| Vandal Resistance | IK10-Rated |
| ONVIF Compliance | Profiles G, S, T |
| Ọja Mefa | 5.3 x 4.1 x 4.1 inches (13.5 x 10.4 x 10.4 cm) |
| Iwọn Nkan | 1.9 poun (0.86 kg) |
9. Atilẹyin ọja ati Support
VIVOTEK products are covered by a limited warranty. For specific warranty terms and conditions, please refer to the warranty card included with your product or visit the official VIVOTEK webojula.
For technical support, product documentation, and software downloads, please visit the VIVOTEK official support portal:
https://www.vivotek.com/support
When contacting support, please have your camera's model number (FD9383-HTV) and serial number ready.