1. Ifihan
Thank you for choosing the Mcezdy H6C-5-Core Ebike LCD Display. This advanced cycling computer is designed to provide essential riding data and enhance your electric bike experience. Featuring a colorful display, robust construction, and a convenient charging port for mobile devices, it is compatible with 24V-60V ebike systems utilizing the UART No. 2 communication protocol.

Image 1.1: The Mcezdy H6C-5-Core Ebike LCD Display, showcasing its vibrant interface with speed, battery charge, voltage, and pedal-assist system (PAS) level indicators.
2. Alaye Aabo
- Always ensure the display is securely mounted and all connections are firm before riding.
- Do not attempt to open or modify the display unit, as this may void the warranty and cause damage.
- Avoid prolonged exposure to direct sunlight or extreme temperatures to prevent damage to the LCD screen.
- The display has an IPX65 waterproof rating, protecting against water splashes and rain. However, avoid submerging the unit in water.
- Always prioritize road safety. Do not operate display settings while riding.
3. Package Awọn akoonu
Daju pe gbogbo awọn nkan wa ninu apo rẹ:
- Mcezdy H6C-5-Core LCD Display Unit
- Iṣagbesori akọmọ ati Hardware
- 5-Core Common Cable (SM-5Y, 1800mm length)
- Iwe afọwọkọ olumulo (iwe yii)
- Fault Code Description (separate document or section in physical manual)
4. Eto ati fifi sori
4.1. Ayẹwo ibamu
Pataki: This H6C-5-Core ebike display operates using the UART No. 2 protocol. Ensure your ebike controller is compatible with this protocol for proper functionality. Additionally, confirm your ebike controller is compatible with a 5-core connector.
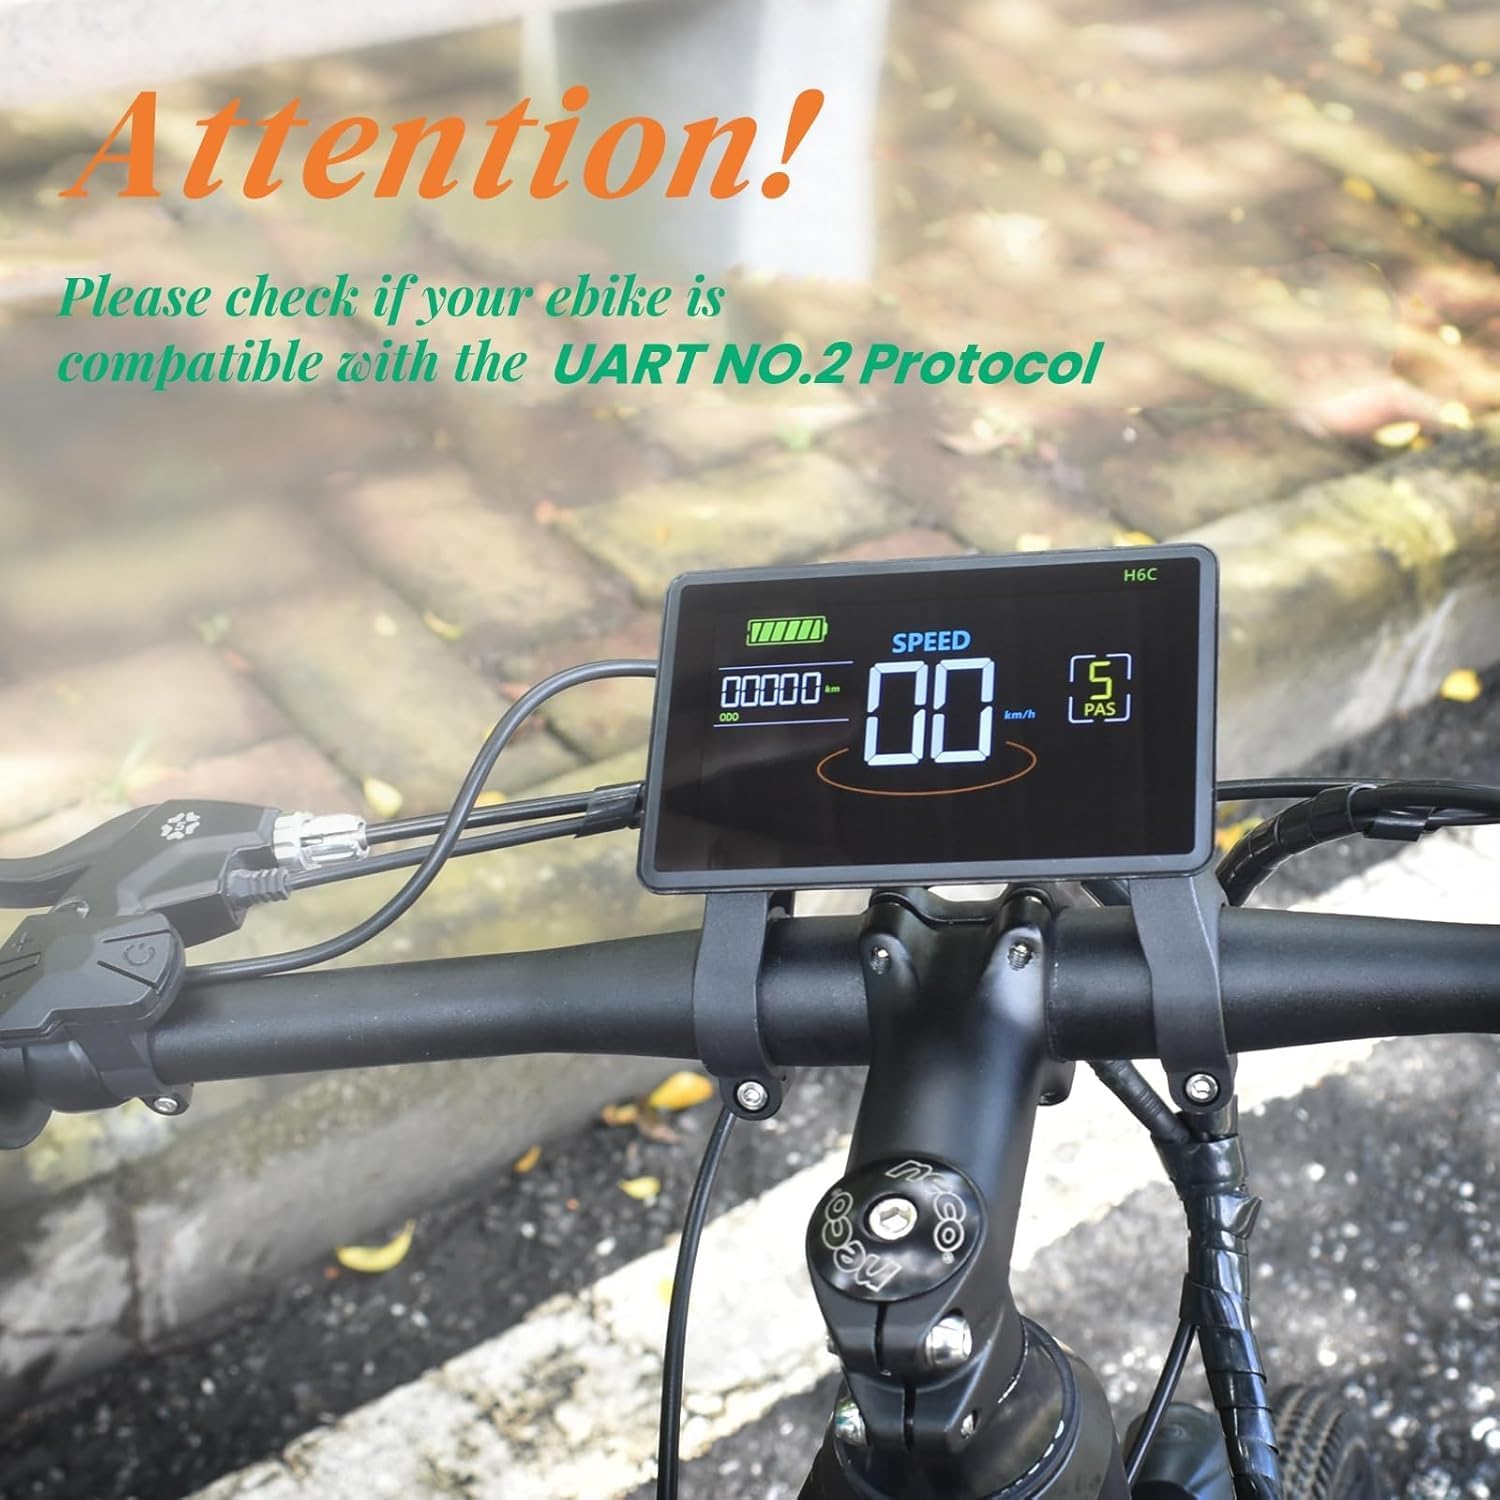
Image 4.1: A visual reminder to verify your ebike's compatibility with the UART No. 2 protocol before installation.
4.2. Ṣíṣe Ìfihàn náà
- Select a suitable position on your handlebar for optimal visibility and access to controls.
- The flexible bracket is designed to fit handlebar diameters of 22.2mm, 25.4mm, 29.8mm, and 31.8mm.
- Attach the mounting bracket to the handlebar using the provided hardware, ensuring it is secure but not overtightened.
- Slide the display unit onto the bracket until it clicks into place. Adjust the angle for best viewing.

Image 4.2: The display mounted on an ebike handlebar, illustrating its universal fit for different handlebar diameters.
4.3. Wiring Asopọ
Connect the 5-core common cable (SM-5Y) from the display to the corresponding port on your ebike controller. Ensure the connection is firm and secure. The cable length is approximately 1800mm.
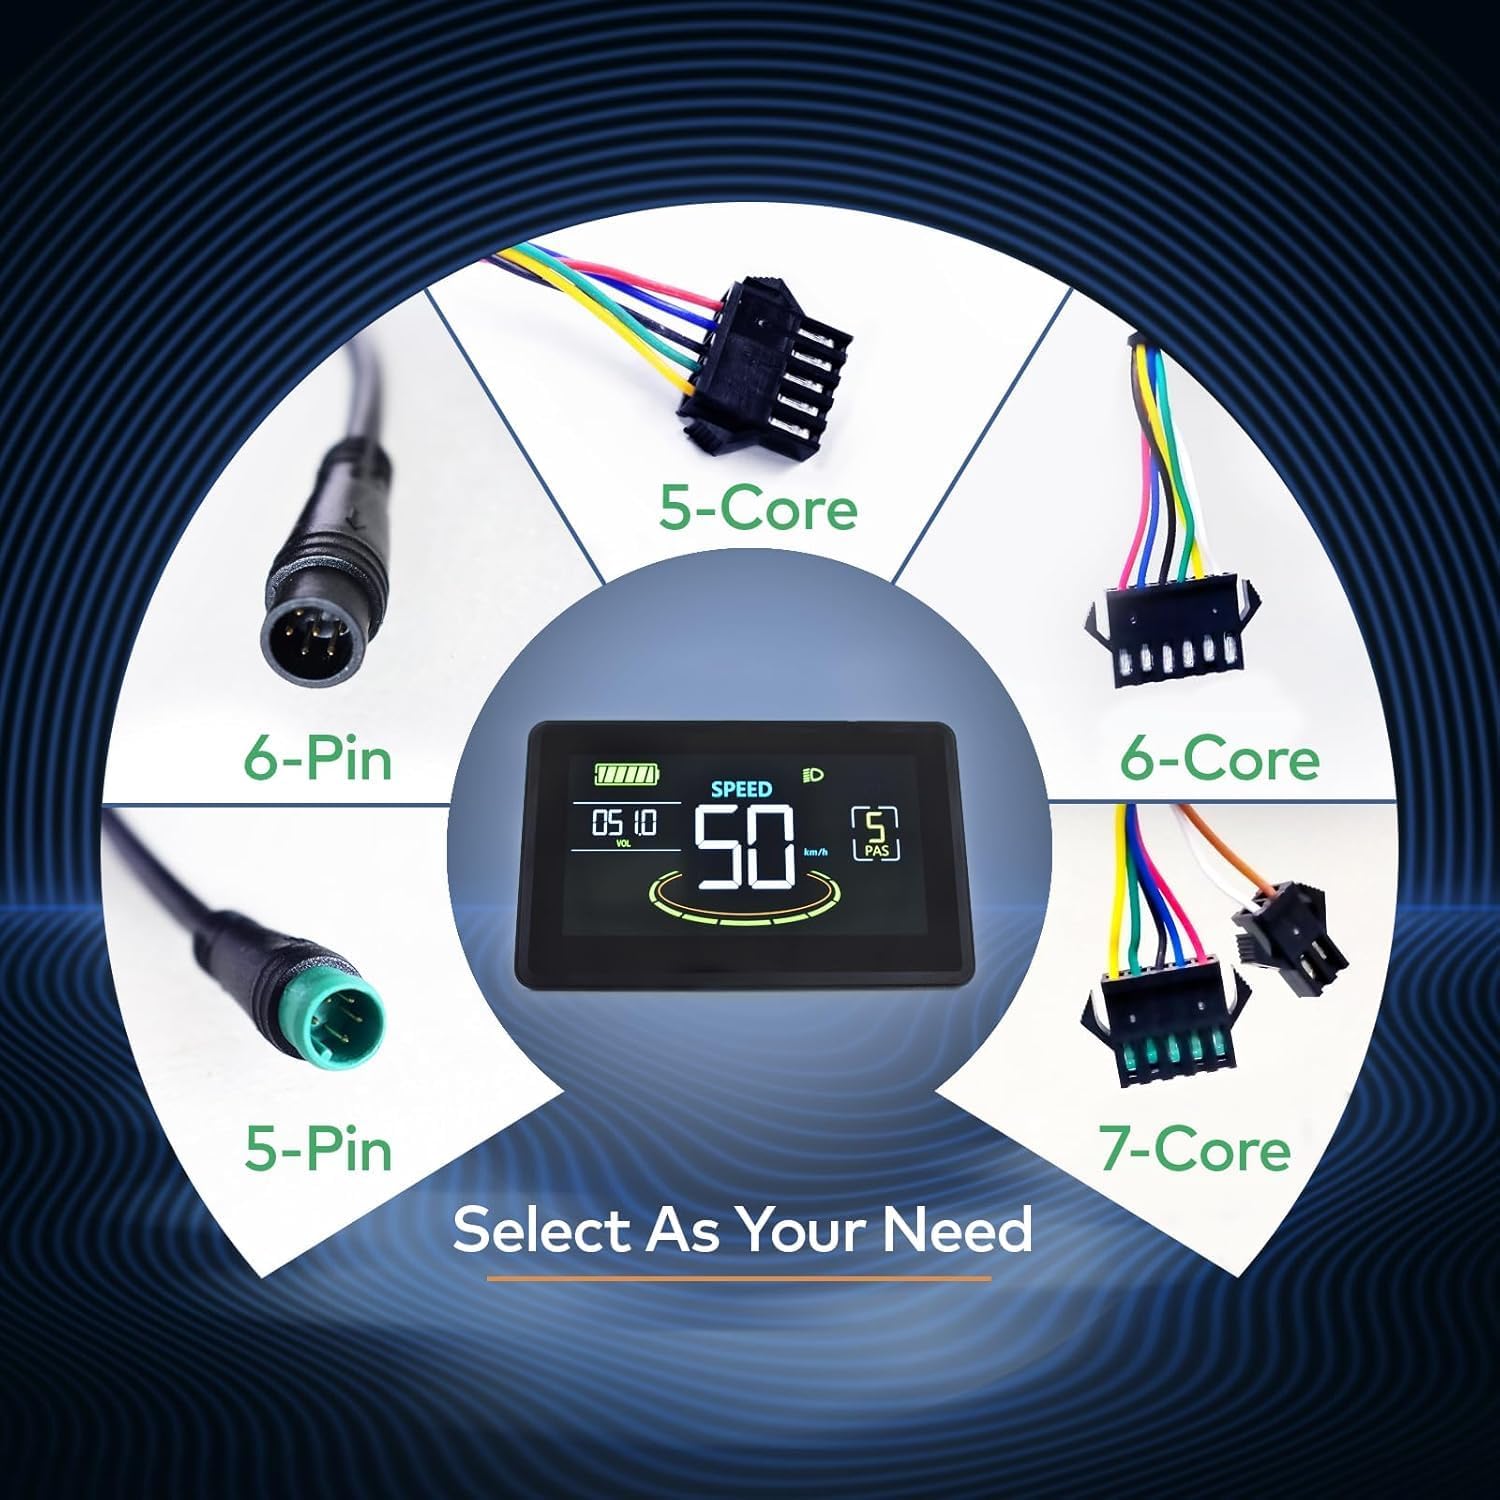
Image 4.3: An illustration of different connector types. Ensure you use the 5-Core connector for the H6C-5-Core model.
5. Awọn ilana Iṣiṣẹ
5.1. Agbara Tan / Paa
- To power on the display, press and hold the power button on the keypad for a few seconds.
- Lati pa agbara, tẹ mọlẹ bọtini agbara lẹẹkansi titi ti ifihan yoo wa ni pipa.
5.2. Awọn iṣẹ bọtini foonu
The display is controlled via an external keypad, typically mounted near your thumb for easy access.

Image 5.1: The H6C-5-Core display alongside its dedicated keypad for intuitive control and setting adjustments.
- Bọtini agbara: Yi ifihan si tan/pa.
- Up (+) Button: Increases pedal-assist level, navigates menus upwards, or increases values.
- Down (-) Button: Decreases pedal-assist level, navigates menus downwards, or decreases values.
- Mode/Set Button: Cycles through display modes (e.g., trip distance, total distance) or enters/confirms settings.
5.3. Walk-Assist Mode
To activate walk-assist mode (typically 6 km/h), press and hold the Down (-) button. Release the button to exit this mode.
5.4. oko Iṣakoso
Refer to your ebike controller's manual or the display's advanced settings for specific instructions on activating and using cruise control, as implementation may vary.
6. Display Functions and Metrics
The H6C-5-Core display provides a comprehensive overview of your riding data:

Image 6.1: Detailed breakdown of the H6C-5-Core display interface, highlighting each metric and its location.
- Ipele Batiri: Graphical indicator showing remaining battery charge.
- Voltage (VOL): Real-akoko batiri voltage ifihan.
- Iyara: Current riding speed (km/h or mph, depending on settings).
- Pẹpẹ Iyara: Visual representation of current speed.
- Ipele PAS: Current Pedal Assist System level (0-5 or 0-9, configurable).
- Atọka Imọlẹ iwaju: Illuminates when headlights are active.
- Ijinna: Toggle between single trip distance and total mileage.
- Ibudo Gbigba agbara USB: A 5V/500mA USB port is built-in for charging mobile devices.
7. Eto Eto
The display allows customization of various parameters to match your ebike and preferences. Accessing and modifying these settings typically involves a sequence of button presses (e.g., holding Up and Down buttons simultaneously) to enter a settings menu. Refer to the detailed instructions in the physical user manual for specific steps.
- Wheel Iwọn: Set the correct wheel diameter for accurate speed and distance readings.
- Opin Sisare: Adjust the maximum assisted speed according to local regulations and personal preference.
- Eto Ẹyọ: Switch between metric (km/h) and imperial (mph) units.
- Batiri Voltage: Configure the display for 24V, 36V, 48V, or 60V battery systems.
- Imọlẹ ẹhin: Adjust the display's backlight intensity.
8. Itọju
- Ninu: Lo asọ, damp cloth to clean the display screen. Avoid abrasive cleaners or solvents.
- Omi Resistance: The IPX65 rating protects against splashes. If the display gets wet, wipe it dry promptly. Do not use high-pressure water jets directly on the display.
- Ibi ipamọ: When not in use for extended periods, store the ebike and display in a dry, temperate environment.
- Ayẹwo USB: Lojoojumọ, ṣayẹwo gbogbo awọn okun waya ati awọn asopọ fun awọn ami ti ibajẹ tabi ibajẹ.
9. Laasigbotitusita
If you encounter issues with your Mcezdy H6C-5-Core display, consider the following:
- Ifihan Ko Tii:
- Check if the ebike battery is charged and powered on.
- Ensure all cable connections are secure and undamaged.
- Verify the display's compatibility with your ebike's voltage (24V-60V) and UART No. 2 protocol.
- Inaccurate Speed/Distance Readings:
- Confirm the wheel diameter setting in the display parameters is correct.
- Check the speed sensor on your ebike for proper alignment and function.
- Àfihàn Àwọn Kóòdù Àṣìṣe:
- Refer to the 'Fault Code Description' document included with your product for specific error code meanings and troubleshooting steps.
- Ngba agbara USB Ko Ṣiṣẹ:
- Ensure the display is powered on.
- Check the USB cable and the mobile device for proper connection.
If problems persist, contact Mcezdy customer support for assistance.
10. Awọn pato
| Ẹya ara ẹrọ | Sipesifikesonu |
|---|---|
| Nọmba awoṣe | H6C-5-Core |
| Ifihan Iru | LCD awọ |
| Ilana ibaraẹnisọrọ | UART No. 2 |
| Ibamu Voltage | DC 24V, 36V, 48V, 60V |
| Asopọmọra Iru | 5-Core (SM-5Y) |
| Cable Length (Exposed) | 1800mm |
| Ibamu Handlebar | 22.2mm, 25.4mm, 29.8mm, 31.8mm |
| Ohun elo | ABS+PC Housing, Tempered Glass Screen, Nylon Bracket |
| Mabomire Rating | IPX65 |
| Ibudo Ngba agbara USB | 5V / 500mA |
| Iwọn Nkan | 308 g |
| Parcel Mefa | 12.6 x 10.39 x 7.9 cm |
Image 10.1: Visual representation of the display's dimensions and a summary of key specifications.
11. Atilẹyin ọja ati Support
For warranty information and customer support, please refer to the documentation provided with your purchase or contact Mcezdy directly through their official channels. Keep your proof of purchase for warranty claims.