
Ọrọ Iṣaaju
This manual provides comprehensive instructions for the safe and proper installation, operation, and maintenance of your Kuat Sherpa 2.0 2-Bike Aluminum Hitch Rack. Please read this manual thoroughly before use and retain it for future reference.
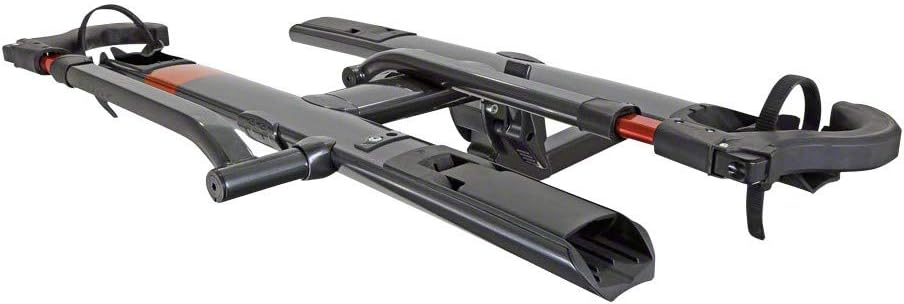
Image: The Kuat Sherpa 2.0 2-Bike Aluminum Hitch Rack.
Alaye Aabo
- Always ensure the rack is securely installed in the hitch receiver before loading bikes.
- Do not exceed the maximum weight capacity of 40 lbs (18.1 kg) per bike, or 80 lbs (36.3 kg) total for two bikes.
- Verify that all straps, cradles, and locking mechanisms are properly engaged before driving.
- Ṣàkíyèsí bí gígùn àti fífẹ̀ ọkọ̀ rẹ ṣe pọ̀ sí i nígbà tí a bá fi pákó náà sí i tí a sì kó ẹrù rẹ̀.
- Máa ṣe àyẹ̀wò àpótí náà déédéé fún àwọn àmì ìbàjẹ́, ìbàjẹ́, tàbí àwọn ohun èlò tí ó bàjẹ́.
- Keep hands and clothing clear of moving parts during installation and operation.
- Refer to your vehicle's owner's manual for specific towing and hitch capacity guidelines.
Ohun ti o wa ninu Apoti
The Kuat Sherpa 2.0 2-Bike Aluminum Hitch Rack package includes the following components:
- Sherpa 2.0 Main Rack Assembly
- Foot-actuated pivot lever
- Folding tire cradles
- Semi-integrated bike lock with cable
- All necessary hardware for installation
Eto ati fifi sori
Follow these steps to properly install your Kuat Sherpa 2.0 hitch rack onto your vehicle's 2-inch hitch receiver.
- Prepare the Hitch Receiver: Ensure your vehicle's 2-inch hitch receiver is clean and free of obstructions.
- Insert the Rack: Slide the main rack assembly into the hitch receiver.
- Secure with Hitch Cam: Use the integrated hand-tightening hitch cam to secure the rack firmly in place. No additional tools are required. Turn the knob clockwise until the rack is snug and does not wobble.
- Ṣí Àpótí náà: If the rack is in its folded position, use the foot-actuated pivot lever to lower it into the operational position.
- Adjust Tire Cradles: Ensure the folding front and rear tire cradles are in the open position, ready to receive bikes.

Image: A person installing the Kuat Sherpa 2.0 bike rack into a vehicle's hitch receiver.

Image: A foot pressing the pivot lever to adjust the rack's position.

Image: Detail of the folding front tire cradle.
Awọn ilana Iṣiṣẹ
Awọn keke ikojọpọ
- Position the Bike: Lift your bicycle and place its wheels into the front and rear tire cradles. The rack accommodates wheelbases up to 47 inches (119.4 cm) and tires up to 3 inches (7.6 cm) wide.
- Kẹkẹ Iwaju to ni aabo: Lower the front tire hook over the front wheel. Ensure it is snug against the tire.
- Secure Rear Wheel: Use the molded strap on the rear cradle to secure the rear wheel. Thread the strap through the wheel and fasten it securely.
- Engage Bike Lock: Utilize the semi-integrated bike lock cable to secure your bikes to the rack. Thread the cable through the bike frames and wheels, then lock it into the rack.
- Jẹrisi Aabo: Gently shake each bike to ensure it is firmly secured and does not move excessively.

Image: A bike's rear wheel secured by the molded strap.

Image: The semi-integrated bike lock cable in use.
Accessing Rear Hatch (Tilt Feature)
The Kuat Sherpa 2.0 features a tilt-away function for convenient access to your vehicle's rear hatch, even with bikes loaded.
- Locate Pivot Lever: Identify the foot-actuated pivot lever at the base of the rack.
- Activate Tilt: While supporting the rack and bikes, press the foot-actuated pivot lever.
- Apoti isalẹ: Gently lower the rack away from the vehicle until it rests in the tilted position.
- Access Hatch: Open your vehicle's rear hatch as needed.
- Return to Upright: After closing the hatch, lift the rack back into its upright, locked position. Ensure it clicks securely into place.
Agbo fun Ibi ipamọ
When not in use, the Sherpa 2.0 can be folded for compact storage.
- Remove Bikes: Ensure all bikes are removed from the rack.
- Activate Pivot Lever: Use the foot-actuated pivot lever to fold the rack upwards towards the vehicle.
- Secure in Folded Position: Ensure the rack locks securely in its upright, folded position.
Itoju
- Ninu igbagbogbo: Clean the rack periodically with mild soap and water to remove dirt, road grime, and salt. Rinse thoroughly and dry.
- Lubrication: Apply a silicone-based lubricant to moving parts, such as the pivot points and locking mechanisms, every few months or as needed to ensure smooth operation.
- Ṣe ayẹwo awọn okun ati awọn pẹlẹbẹ: Check tire straps and cradles for any signs of wear, cuts, or damage. Replace if necessary.
- Ṣayẹwo Hardware: Periodically inspect all bolts and fasteners to ensure they are tight. Re-tighten as needed.
- Ibi ipamọ: When not in use, store the rack in a dry, protected area to prolong its lifespan.
Laasigbotitusita
| Oro | Owun to le Fa | Ojutu |
|---|---|---|
| Rack wobbles in hitch receiver | Hitch cam not fully tightened | Ensure the hand-tightening hitch cam knob is fully tightened clockwise. |
| Bikes are not secure | Tire hooks or straps not properly engaged | Re-position bikes, ensure front tire hooks are snug, and rear wheel straps are tightly fastened. |
| Rack is difficult to tilt | Pivot mechanism requires lubrication or is obstructed | Clean the pivot area and apply a silicone-based lubricant. Check for any debris. |
| Bike lock cable is stiff | Lack of lubrication or dirt | Clean the cable and lock mechanism. Apply a light lubricant to the lock cylinder and cable. |
Awọn pato
- Awoṣe: Kuat Sherpa 2.0
- Agbara: Kẹ̀kẹ́ méjì
- Agbara iwuwo: Up to 40 lbs (18.1 kg) per bike
- Hitch Receiver Size: 2 inches
- Wheelbase Accommodation: Titi di inṣi 47 (119.4 cm)
- Tire Width Accommodation: Titi di inṣi 3 (7.6 cm)
- Ohun elo: Aluminiomu
- A le ṣe pọ: Bẹẹni
- Ìwọ̀n Nkan: Isunmọ 42.1 lbs (19.1 kg)
- Awọn iwọn Ọja (L x W x H): 45 x 15 x 11 inches (114.3 x 38.1 x 27.9 cm)
- Nọmba Abala Olupese: AR1744
- UPC: 896581002782
Atilẹyin ọja ati Support
For warranty information, product registration, or technical support, please visit the official Kuat website or contact Kuat customer service directly. Retain your proof of purchase for warranty claims.
Kuat Official Webojula: www.kuatracks.com
Ibi iwifunni: Refer to the Kuat webAaye fun awọn alaye olubasọrọ lọwọlọwọ julọ.