
Ọja Pariview
The Odokee UE268 is a versatile bedside device combining a digital alarm clock, Qi-certified fast wireless charger, 10W stereo Bluetooth speaker, FM radio, and dimmable nightlight. It is designed to streamline your nightstand with multiple functionalities.

Image: The Odokee UE268 device highlighting its multiple integrated features.
Key Awọn ẹya ara ẹrọ
- Apẹrẹ Gbogbo-ni-Ọkan: Integrates wireless charging, Bluetooth speaker, FM radio, and nightlight into a single unit.
- 10W Stereo Bluetooth Speaker: Delivers clear and powerful audio for seamless music streaming.
- Qi-Certified Fast Wireless Charging: Provides 10W wireless charging for compatible devices and includes a USB charging port for additional devices.
- Redio FM: Access local radio stations with a built-in FM tuner and sleep timer function.
- Dimmable Digital Display: Adjustable brightness from 0-100% for personalized comfort.
- 8-Color Nightlight: Offers adjustable brightness and multiple color options to create a tranquil ambiance.
Eto Itọsọna
Follow these steps to set up your Odokee UE268 device.
1. Asopọ agbara
- Locate the DC 9V power input port on the back of the device.
- So ohun ti nmu badọgba agbara ti a pese si ibudo DC 9V.
- Plug the power adapter into a standard wall outlet. The display will illuminate, indicating the device is powered on.

Image: The Odokee UE268 demonstrating both wireless and USB charging capabilities.
2. Eriali Redio
- Locate the radio antenna wire on the back of the device.
- Fully extend the antenna for optimal FM radio reception.
Video: An official product video demonstrating the features and design of the Odokee Wireless Charging Alarm Clock Radio.
Awọn ilana Iṣiṣẹ
1. Ṣiṣeto Akoko naa
- Press the 'Time Set' button on the back panel.
- Use the 'AL VOL-' and 'AL VOL+' buttons on the top panel to adjust the hour.
- Press 'Time Set' again to confirm the hour and move to minutes.
- Use the 'AL VOL-' and 'AL VOL+' buttons to adjust the minutes.
- Press 'Time Set' one more time to save the time.
- To switch between 12-hour and 24-hour format, press the '12H/24H' button on the back panel.
2. Ṣiṣeto Itaniji
- Press the 'Alarm Set' button on the back panel.
- Use the 'AL VOL-' and 'AL VOL+' buttons on the top panel to adjust the alarm hour.
- Press 'Alarm Set' again to confirm the hour and move to alarm minutes.
- Use the 'AL VOL-' and 'AL VOL+' buttons to adjust the alarm minutes.
- Press 'Alarm Set' one more time to save the alarm time.
- To activate or deactivate the alarm, press the 'Alarm On/Off' button (bell icon) on the top panel. A bell icon on the display indicates the alarm is active.
- When the alarm sounds, press the 'SNOOZE/LIGHT' button to snooze for 9 minutes. To turn off the alarm completely, press the 'Alarm On/Off' button.
3. Wireless and USB Charging
The device features a Qi-certified wireless charging pad on top and a USB-A charging port on the back.
- Gbigba agbara Alailowaya: Place your Qi-compatible smartphone or earbuds on the 'Qi' symbol on the top surface. Ensure the device is centered for optimal charging. A lightning bolt icon on the display will indicate active charging.
- Ngba agbara USB: Connect your device's USB cable to the USB port on the back panel to charge.
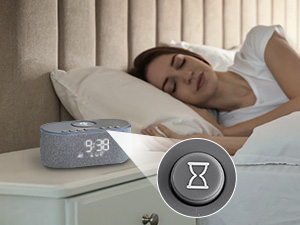
Image: A close-up of the wireless charging area with a notice about metal objects.
Wireless Charging Notice: Do not place metal phone cases or metal objects in the wireless charging area to prevent interference or damage.
4. Bluetooth Agbọrọsọ
- Press the 'BT' button on the top panel to enter Bluetooth pairing mode. The display will show 'BT' and flash.
- On your smartphone or other Bluetooth-enabled device, search for 'UE268' in the Bluetooth settings.
- Select 'UE268' to pair. Once connected, the 'BT' indicator on the display will stop flashing.
- You can now play audio from your device through the Odokee UE268 speaker.
- Adjust volume using the 'FM/BT Volume' slider on the back panel or your connected device.
5. Redio FM
- Press the 'Music Note' button on the top panel to switch to FM radio mode.
- Press and hold the 'Music Note' button to auto-scan and save available FM stations.
- Use the 'AL VOL-' and 'AL VOL+' buttons to navigate between saved stations.
- Adjust volume using the 'FM/BT Volume' slider on the back panel.
- Akoko oorun: Press the 'Hourglass' button on the top panel to set a sleep timer (e.g., 15, 30, 60, 90 minutes). The radio will automatically turn off after the set time.

Image: The Odokee UE268 in use, demonstrating its FM radio function.
6. Nightlight and Display Dimmer
- Imọlẹ alẹ: Press the 'SNOOZE/LIGHT' button on the top panel to cycle through 8 different nightlight colors. Press and hold to turn the nightlight off.
- Nightlight Dimmer: Use the 'Night Light Dimmer' buttons on the back panel to adjust the brightness of the nightlight.
- Ṣe afihan Dimmer: Use the 'Display Dimmer' slider on the back panel to adjust the brightness of the digital time display from 0-100%.

Image: The Odokee UE268 demonstrating its adjustable display brightness.
Awọn pato ọja
| Ẹya ara ẹrọ | Sipesifikesonu |
|---|---|
| Brand | Odokee |
| Nọmba awoṣe | UE268 |
| Àwọ̀ | Grẹy |
| Ifihan Iru | Oni-nọmba |
| Orisun agbara | Corded (DC 9V) |
| O wu Ngba agbara Alailowaya | 10W (Qi Certified) |
| Ibudo Ngba agbara USB | Bẹẹni |
| Ẹya Bluetooth | 5.0 |
| Ijade Agbọrọsọ | 10W Sitẹrio Ohun |
| Redio FM | Bẹẹni |
| Nightlight Colors | 8 colors, adjustable brightness |
| Ifihan Imọlẹ | 0-100% Dimmable |
| Ọja Mefa | 2.96"W x 7.28"H |
| Iwọn Nkan | 1.16 poun (525 Giramu) |
| Ohun elo | Aṣọ, Ṣiṣu |
Itoju ati Itọju
- Jeki ẹrọ naa gbẹ ki o si kuro ninu ọrinrin.
- Nu ẹrọ naa pẹlu asọ ti o tutu, ti o gbẹ. Ma ṣe lo abrasive ose tabi epo.
- Yago fun gbigbe awọn nkan ti o wuwo si oke ẹrọ naa.
- Rii daju pe fentilesonu to dara ni ayika ẹrọ lati ṣe idiwọ igbona.
Laasigbotitusita
1. Ẹrọ Ko Nṣiṣẹ Tan-an
- Rí i dájú pé ohun tí a fi ń so agbára pọ̀ mọ́ ẹ̀rọ náà àti ibi tí ó ń ṣiṣẹ́ lórí ògiri.
- Daju pe iṣan agbara n ṣiṣẹ nipa pilogi sinu ẹrọ miiran.
2. Wireless Charging Not Working
- Rii daju pe ẹrọ rẹ jẹ ibaramu Qi.
- Remove any thick phone cases, metal plates, or magnetic attachments from your phone, as these can interfere with wireless charging.
- Make sure your device is centered on the Qi charging pad.
- Check if the lightning bolt icon appears on the display, indicating active charging.
3. Digital Clock Display Issues
- If digits appear faulty or incomplete, try unplugging the device for a few minutes and then plugging it back in to reset.
- Adjust the 'Display Dimmer' on the back panel to ensure the brightness is set appropriately for visibility.
4. Alarm Functionality Concerns
- Ensure the 'Alarm On/Off' button (bell icon) is pressed and the bell icon is visible on the display.
- Verify that the alarm time is correctly set.
- Be mindful of the placement of the 'Alarm On/Off' button relative to the 'SNOOZE/LIGHT' button to avoid accidentally turning off the alarm instead of snoozing.
5. Gbigba redio FM ti ko dara
- Ensure the radio antenna wire on the back is fully extended.
- Try repositioning the antenna or the device to improve signal reception.
Atilẹyin ọja ati Support
The Odokee UE268 Wireless Charging Alarm Clock Radio comes with an 18-month warranty.
For any product inquiries, technical support, or warranty claims, please contact Odokee customer service through the retailer's platform or the official Odokee webojula.