
1. Ifihan
The Gustard H26 is a high-performance, fully balanced discrete Class A headphone amplifier designed to deliver exceptional audio fidelity. It incorporates advanced features and robust construction to provide a superior listening experience for audiophiles.
Awọn ẹya pataki:
- Fully balanced discrete Class A amplifier with 8 pairs of power tubes for powerful and controlled sound.
- Seamless switching of preamplifier output, allowing the device to function as a pure pre-stage jade.
- Pre-stage utilizes two direct-insert LME49720 dual op-amps.
- Matrix relay volume control for consistent and unbiased 4-way volume accuracy.
- Equipped with two custom 50W audio-specific toroidal transformers, one for each channel, ensuring minimal interference.
- Fully balanced input stage, enhancing clarity and richness for both balanced and single-ended RCA inputs.
2. Alaye Aabo
Please read and follow these safety guidelines to ensure safe operation and to prevent damage to the device or injury to yourself.
- Ma ṣe fi ẹrọ naa han si ojo, ọrinrin, tabi awọn iwọn otutu to gaju.
- Rii daju dara fentilesonu ni ayika amplifier lati se overheating.
- Maṣe ṣii casing; tọka gbogbo iṣẹ si oṣiṣẹ ti o peye.
- Lo adapter agbara ti a sọ tẹlẹ ati awọn okun waya nikan.
- Ge agbara kuro ṣaaju ki o to nu tabi gbe ẹrọ naa.
3. Package Awọn akoonu
Jẹrisi pe gbogbo awọn ohun kan wa ninu package:
- Gustard H26 Headphone Ampitanna
- Okun agbara
- Isakoṣo latọna jijin
- Afowoyi Olumulo (iwe-ipamọ yii)
4. Ọja Ipariview
4.1 Igbimọ iwaju
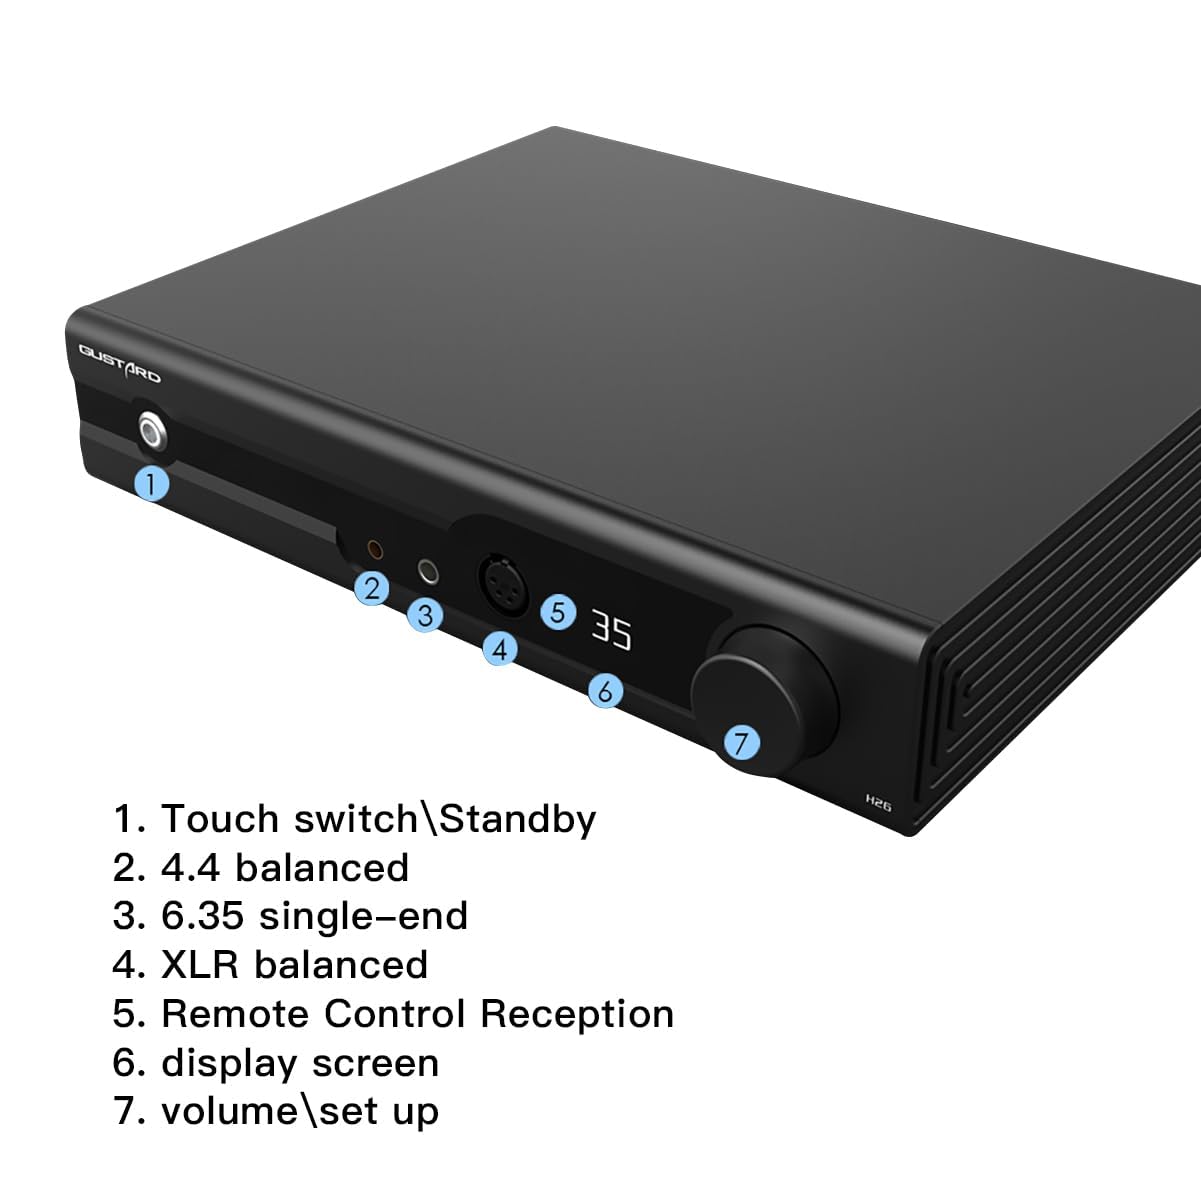
The front panel provides access to essential controls and headphone outputs.
- Touch Switch/Standby: Power on/off or place the unit in standby mode.
- 4.4 Balanced Output: Headphone output for 4.4mm balanced connectors.
- 6.35 Single-End Output: Headphone output for 6.35mm single-ended connectors.
- Ìjáde Ìwọ̀n Ìwọ̀n XLR: Headphone output for 4-Pin XLR balanced connectors.
- Remote Control Reception: Olugba infurarẹẹdi fun isakoṣo latọna jijin.
- Iboju ifihan: Shows current settings such as volume, input, and gain.
- Volume/Setup Knob: Adjusts volume and navigates setup menus.
4.2 ru Panel

The rear panel houses all input and output connections, along with power controls.
- Balanced Input XLR 1 & 2 (Left/Right): For balanced audio sources.
- Single Input RCA (Left/Right): For single-ended audio sources.
- Ṣaajuamp Output XLR (Left/Right): Iwontunwonsi ṣaajuampiṣelọpọ lifier.
- Ṣaajuamp Output RCA (Left/Right): Nikan-pari ṣaajuampiṣelọpọ lifier.
- Voltage Aṣayan: Switch to select appropriate input voltage (e.g., 115V/230V).
- Input Agbara AC: So okùn agbara pọ mọ ibi.
- Agbara Yi pada: Agbara akọkọ yipada fun ẹrọ naa.
- Fiusi: Replaceable fuse for electrical protection.
4.3 ti abẹnu irinše
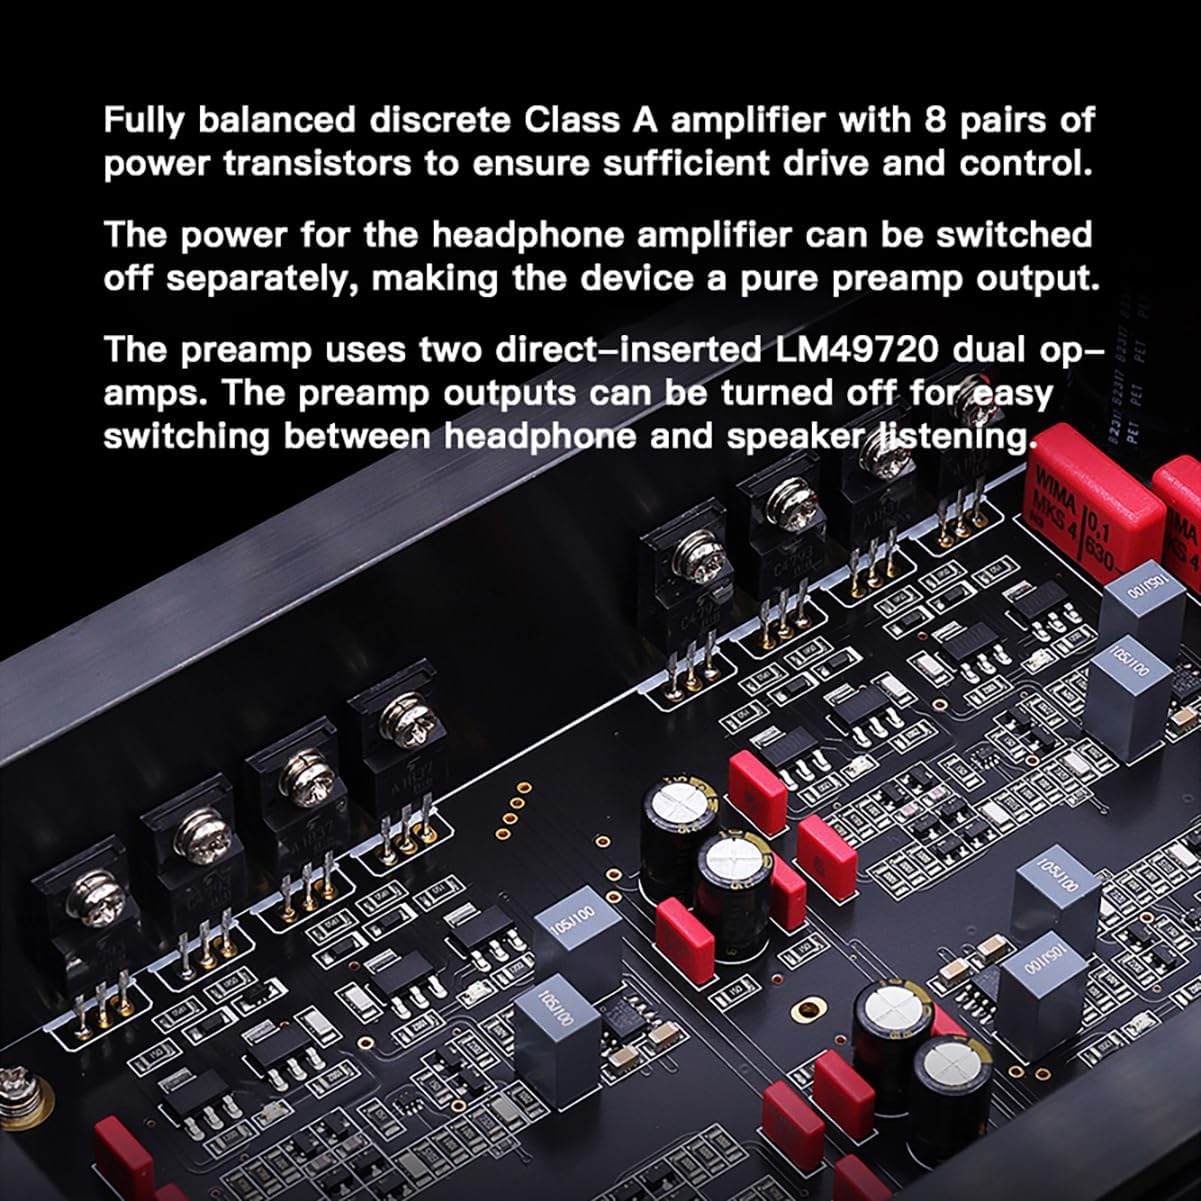
The Gustard H26 features a fully balanced discrete Class A amplifier design, utilizing 8 pairs of power transistors to ensure robust driving capability and precise control. The use of discrete components allows for fine-tuning of each stage, optimizing performance. The pre-stage incorporates two LME49720 dual op-amps.
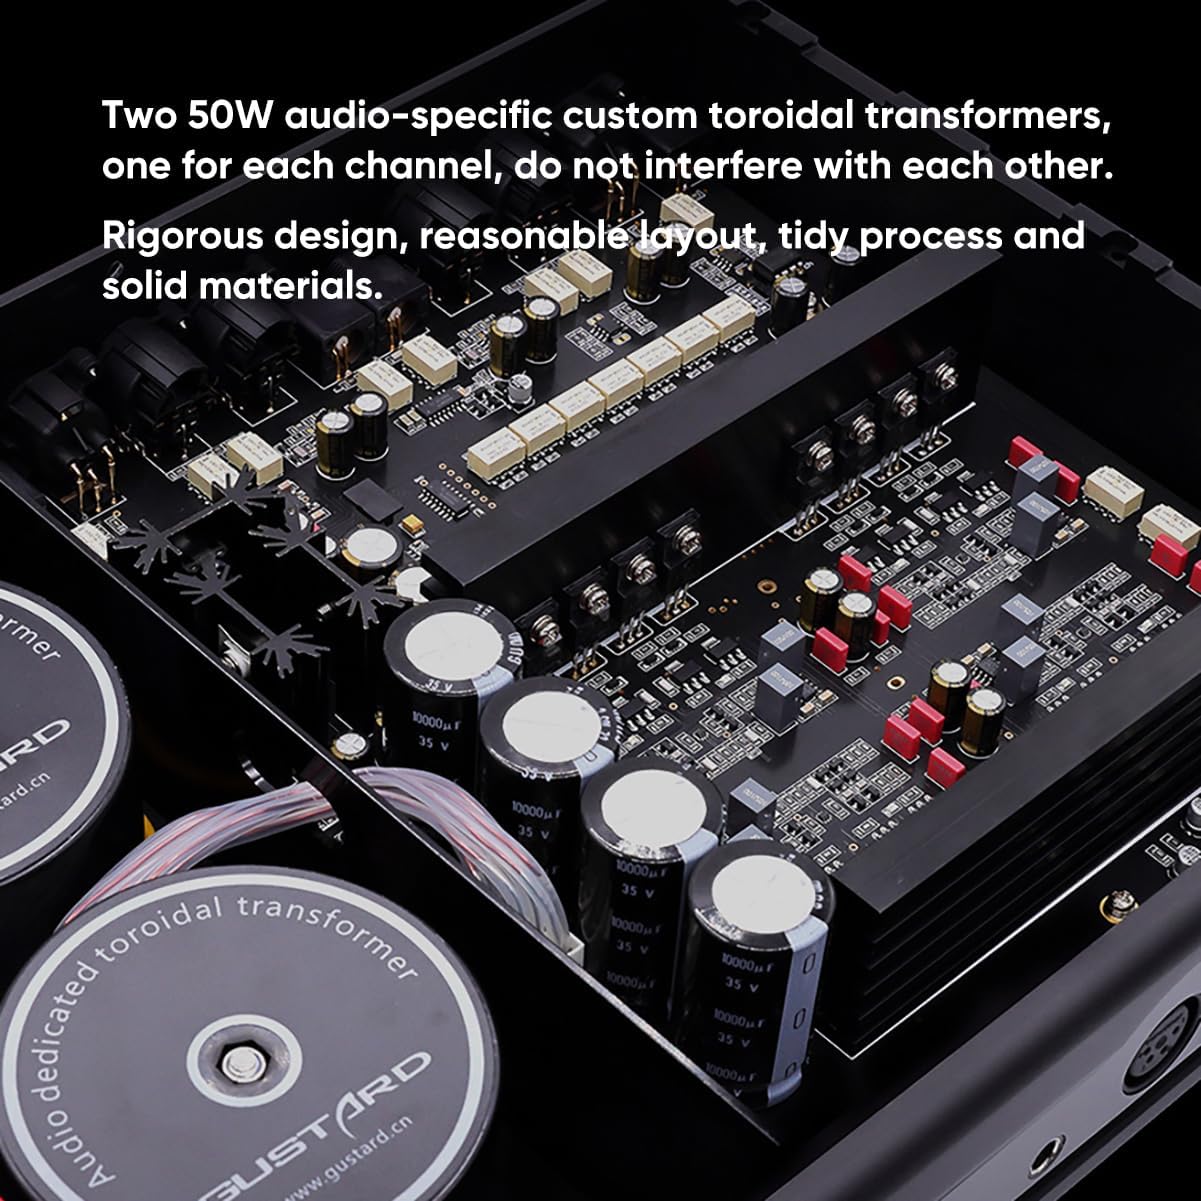
The power supply section is equipped with two custom 50W audio-specific toroidal transformers, one dedicated to each channel. This design minimizes cross-channel interference and ensures stable power delivery. Multiple low-noise regulators and Nichicon capacitors contribute to the unit's clean power and overall audio quality.
4.4 Awọn iwọn
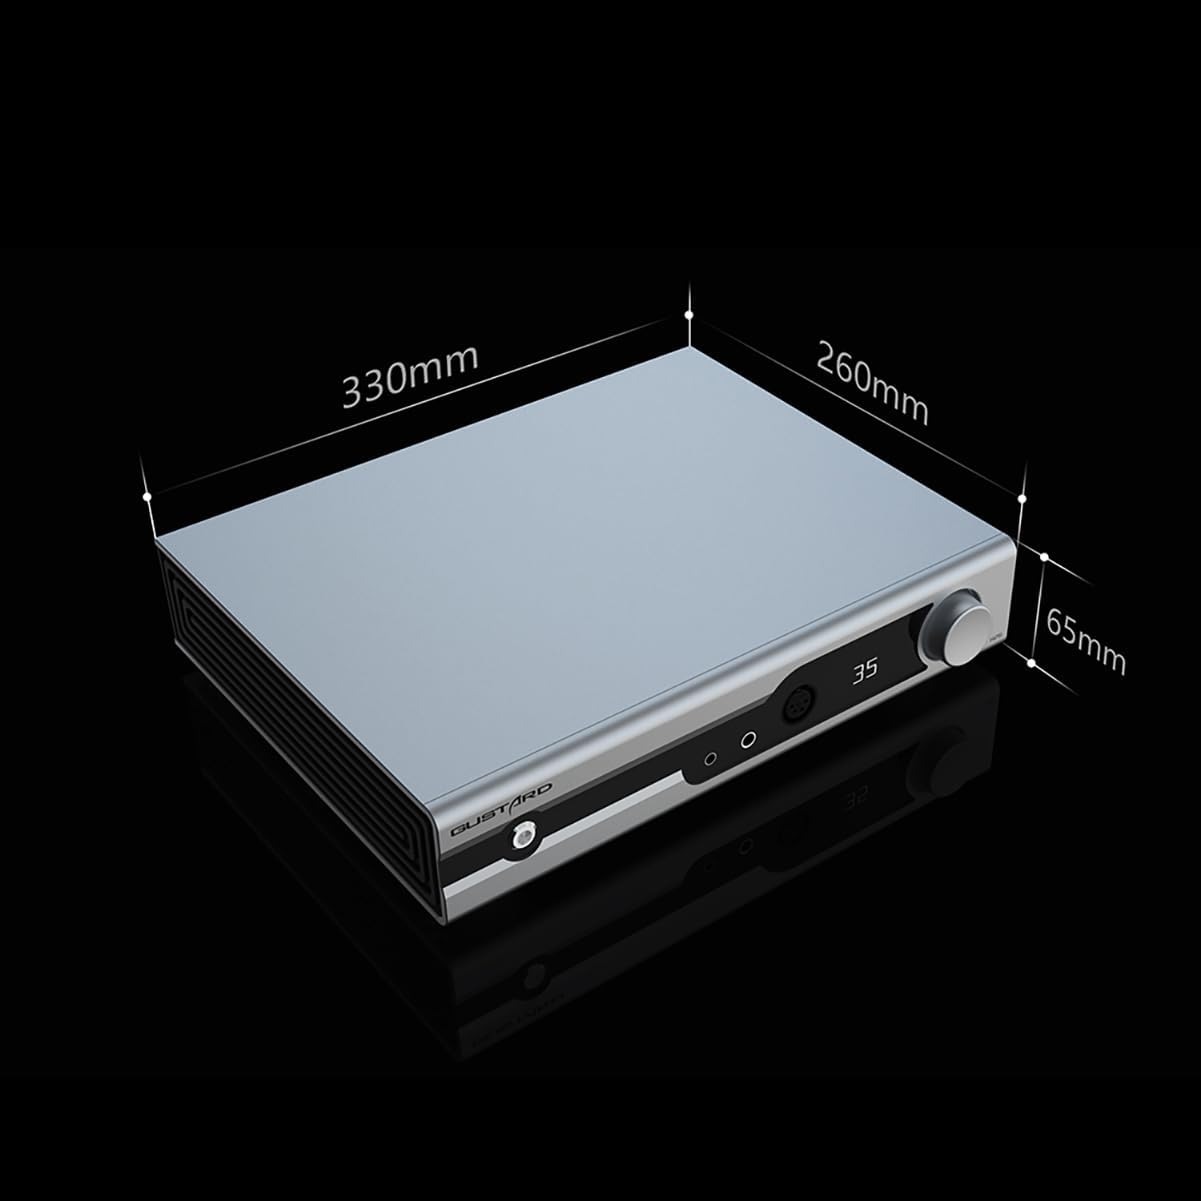
The physical dimensions of the Gustard H26 are approximately 330mm (width) x 260mm (depth) x 65mm (height).
5. Eto
5.1 Nsopọ Agbara
- Ensure the main power switch on the rear panel is in the OFF position.
- Jẹrisi voltage selection switch on the rear panel matches your local power supply (e.g., 115V or 230V).
- Connect the provided power cord to the AC Power Input on the rear panel and then to a suitable wall outlet.
5.2 Nsopọ Awọn orisun ohun
The H26 supports both balanced (XLR) and single-ended (RCA) audio inputs.
- For Balanced Sources: Connect your audio source's balanced outputs to the XLR 1 or XLR 2 inputs on the rear panel.
- For Single-Ended Sources: Connect your audio source's RCA outputs to the RCA inputs on the rear panel.
5.3 Nsopọ Awọn agbekọri
The H26 offers multiple headphone output options on the front panel.
- 4.4mm Balanced: For headphones with a 4.4mm balanced connector.
- 6.35mm Single-Ended: For headphones with a standard 6.35mm (1/4 inch) single-ended connector.
- 4-Pin XLR Balanced: For headphones with a 4-pin XLR balanced connector.
5.4 .aajuamplifier Ijade
The H26 can also function as a preamplifier. Connect the XLR or RCA Preamp Outputs on the rear panel to your power amplifier or active speakers. The headphone amplifier section can be turned off separately when using the preampiṣelọpọ lifier.
6. Isẹ
6.1 Agbara Tan / Pa
- Flip the main power switch on the rear panel to the ON position.
- Press the front panel Touch Switch (1) to power on the unit from standby, or to put it back into standby.
6.2 Iṣakoso iwọn didun
Rotate the Volume/Setup Knob (7) on the front panel clockwise to increase volume and counter-clockwise to decrease volume. The matrix relay volume control ensures precise and balanced adjustments across all channels.
6.3 Aṣayan titẹ sii
Single press the Volume/Setup Knob (7) to cycle through available input sources (XLR 1, XLR 2, RCA). The selected input will be shown on the Display Screen (6).
6.4 Gain Level Adjustment
Long press the Volume/Setup Knob (7) to switch between low and high gain levels. This allows for optimal matching with various headphones and In-Ear Monitors (IEMs).
6.5 Quiescent Current Adjustment
Double press the Volume/Setup Knob (7) to toggle between 50mA and 100mA quiescent current settings. This feature allows for fine-tuning the Class A operation.
6.6 Lilo isakoṣo latọna jijin

Iṣakoso latọna jijin ti o wa ninu rẹ pese iwọle si gbogbo awọn iṣẹ akọkọ lati ijinna kan.
6.7 Operational Demonstration Video
This video demonstrates the operational controls, including volume adjustment, input selection, gain level, and quiescent current settings. While the video features a similar product (Aune S17 Pro), the control principles and functions are analogous to the Gustard H26.
7. Itọju
7.1 Ninu
To clean the unit, disconnect it from the power source. Use a soft, dry cloth to wipe the exterior surfaces. Avoid using abrasive cleaners, solvents, or chemical sprays, as these can damage the finish.
7.2 Ibi ipamọ
Nigbati o ko ba wa ni lilo fun awọn akoko ti o gbooro sii, tọju awọn amplifier in a cool, dry place, away from direct sunlight and excessive dust. It is recommended to keep the original packaging for protection during storage or transport.
8. Laasigbotitusita
If you encounter issues with your Gustard H26, refer to the following common problems and solutions:
- Ko si Agbara: Ensure the power cord is securely connected to both the unit and the wall outlet. Check the rear panel power switch and the front panel touch switch. Verify the voltage selection switch is set correctly.
- Ko si Ohun: Confirm that the correct input source is selected. Check all audio cable connections (source to ampolutayo, amplifier to headphones/speakers). Ensure headphone cables are fully inserted. Adjust the volume level.
- Ohun Yiyi: Check audio cable integrity. Ensure the input source is not overdriving the amplifier. Try adjusting the gain level to match your headphones.
- Iṣakoso latọna jijin Ko Ṣiṣẹ: Check the batteries in the remote control. Ensure there are no obstructions between the remote and the unit's remote reception window.
Ti iṣoro naa ba wa lẹhin igbiyanju awọn iṣeduro wọnyi, jọwọ kan si atilẹyin alabara.
9. Awọn pato
- Nọmba awoṣe:
- H26
- Brand:
- Gustard
- Orisi Asopọmọra:
- RCA, XLR
- Ijade Wattage:
- 50 Wattis
- Orisun Agbara:
- Okun Itanna
- Àwọ̀:
- Dudu
- Number of Bands:
- 4
10. Atilẹyin ọja ati Support
10.1 atilẹyin ọja Alaye
All Gustard products purchased from authorized retailers are covered by a warranty. The standard warranty period is 1 year or more from the date of purchase, depending on the specific product and regional regulations. Please retain your proof of purchase for warranty claims.
10.2 Onibara Support
For technical assistance, troubleshooting, or warranty inquiries, please contact your retailer or the manufacturer's customer service. Support is typically available online, and inquiries are addressed promptly.


