
PCsensor B0DHHG29DW
Ìtọ́sọ́nà Olùlò Kọ́fíìdì Aláìlókùn Kọ́fíìdì PCsensor 4 Key Mini
1. Ifihan
This manual provides comprehensive instructions for the PCsensor 4 Key Mini Keypad, model B0DHHG29DW. It covers product features, setup procedures for both wired USB and Bluetooth wireless connections, key programming, operational guidelines, maintenance, and troubleshooting. Please read this manual thoroughly to ensure proper use and optimal performance of your device.
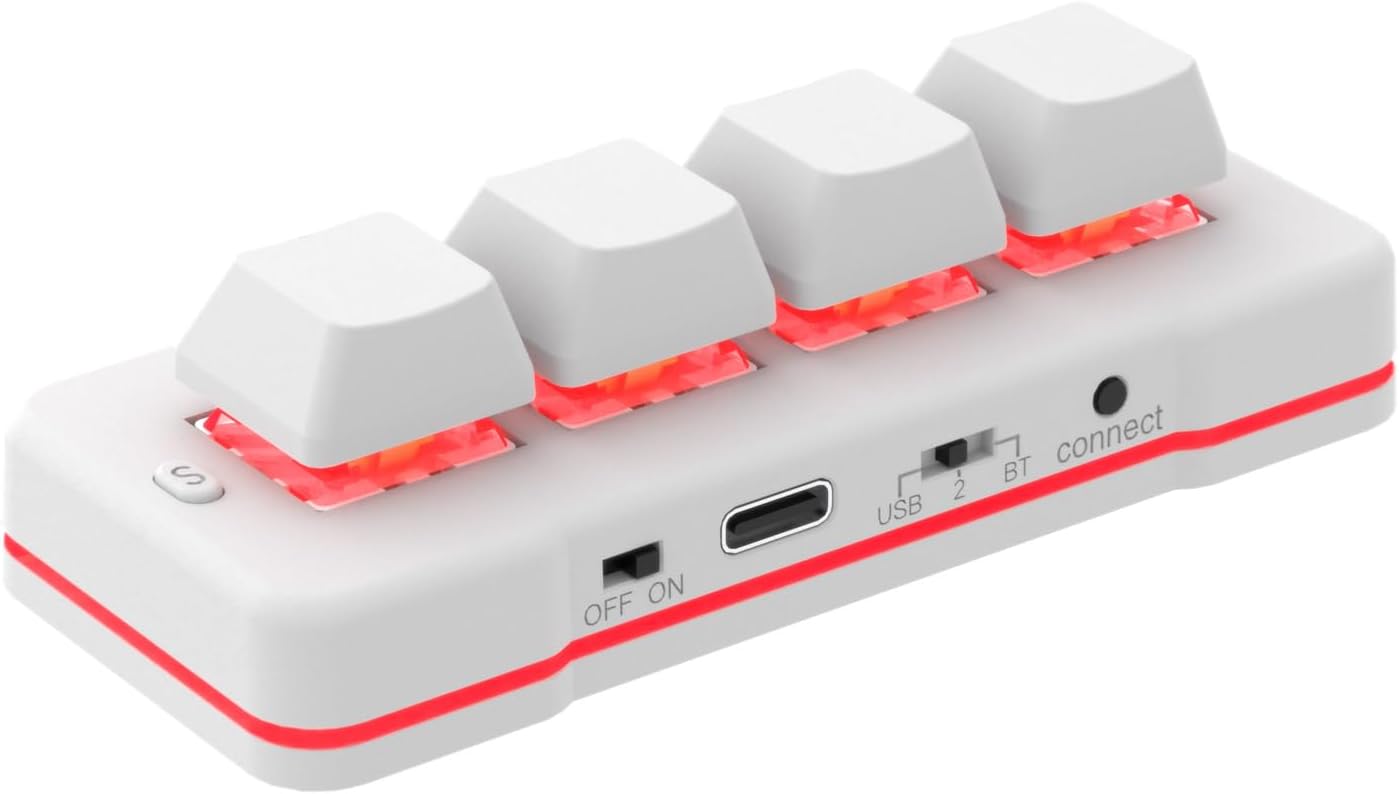
Àwòrán 1.1: Páádì Kékeré Kékeré Kékeré 4, showcasing its compact design and illuminated keys.
2. Awọn ẹya Ọja
- Asopọmọra Meji: Supports both wired USB and Bluetooth wireless connections for versatile use.
- Awọn bọtini eto: Each of the four keys can be configured for various functions including single key presses, key combinations, hotkeys, shortcuts, mouse actions, multimedia controls, video game commands, and string inputs.
- Batiri gbigba agbara: Equipped with a built-in rechargeable battery, offering extended use on a single charge. An LED indicator signals low battery status.
- Ibamu gbooro: Configurable on Windows or macOS systems, then usable across multiple operating systems including iOS, Android, Windows, Linux, and Mac.
- Apẹrẹ Iwapọ: Small form factor suitable for various applications such as gaming, office work, sheet music page turning, and industrial control.

Image 2.1: The PCsensor 4 Key Mini Keypad available in both black and white variants.
3. Eto
3.1. Charging the Keypad
The keypad features a rechargeable battery. Before initial use, or when the low battery indicator flashes, connect the keypad to a USB power source using the provided USB-C cable. A full charge typically takes approximately 2 hours and can provide up to 3 months of use, depending on usage patterns.
3.2. Asopọ USB onirin
- Ensure the keypad's power switch is in the 'ON' position.
- Connect the provided USB-C cable to the Type-C Port on the keypad.
- So opin okun USB pọ si ibudo USB ti o wa lori kọnputa rẹ.
- The keypad will be recognized as a standard HID device and is ready for use. In wired mode, the backlight may display a blue light.
3.3. Asopọ Alailowaya Bluetooth
- Ensure the keypad's power switch is in the 'ON' position.
- Slide the toggle switch to the 'BT' position.
- Press the 'connect' button (located near the BT switch) to initiate pairing mode. The 'connect mode LED' will indicate pairing status.
- On your host device (computer, smartphone, tablet), navigate to Bluetooth settings and search for new devices.
- Select the PCsensor keypad from the list of available devices to pair. The default PIN code for Bluetooth pairing is 1234.
- Once paired, the keypad is ready for wireless operation. In Bluetooth mode, the backlight may display a red light.

Image 3.1: Labeled components of the keypad, including the S key, OFF/ON switch, Type-C Port, USB/BT toggle switch, connect button, and connect mode LED.
4. Isẹ
4.1. Awọn bọtini siseto
The PCsensor 4 Key Mini Keypad requires dedicated software for key configuration. This software is typically available for Windows and macOS. Once configured, the settings are stored on the keypad and will function across compatible operating systems without the need for the software to be running.
- Download and install the programming software from the official PCsensor webojula.
- Connect the keypad to your computer via USB.
- Launch the software. You will see an interface allowing you to assign functions to each of the four keys.
- Select a key and choose its desired function:
- Iṣẹ Keyboard: Assign single keys, key combinations (e.g., Ctrl+C), or hotkeys.
- Iṣẹ́ Asin: Assign mouse clicks (left, right, middle), scroll up/down, or mouse movement.
- Ìtẹ̀síwájú okùn: Program a sequence of characters or text to be typed with a single press.
- Iṣakoso Media: Assign functions like play/pause, volume up/down, next/previous track.
- Ìtumọ̀ Mákróọ̀kì: Create complex sequences of actions.
- Configure the 'OutMode' for each key (e.g., single output, continuous output while held, retrigger, loop, double trigger).
- Save your configuration to the keypad. The settings are now stored on the device.

Image 4.1: The PCsensor software interface for programming the keypad's functions.

Image 4.2: A closer look at the software's key configuration section, highlighting different output modes.
4.2. Key Functions and Applications
The programmable nature of the keypad allows for diverse applications:
- Ere: Assign complex in-game actions, macros, or frequently used commands for quick execution.
- Iṣẹ ọfiisi: Create shortcuts for common tasks like copy, paste, undo, or launching applications.
- Iṣakoso Media: Easily manage music and video playback, adjust volume, or switch tracks.
- Sheet Music Page Turner: Program keys to advance or rewind pages in digital sheet music applications.
- Specialized Control: Useful for equipment image capture, factory machine control, or piano keyboard testing.

Aworan 4.3: Examples of keypad applications including keyboard functions, multimedia control, video games, medical equipment image collection, and string/mouse functions.

Image 4.4: The keypad being used in a gaming scenario with a laptop, demonstrating its utility for quick actions.
4.3. Ibamu
The PCsensor 4 Key Mini Keypad is designed as a Human Interface Device (HID). Once configured on a Windows or macOS system, its programmed functions are stored internally and can be used with a wide range of devices and operating systems without requiring driver installation or software to be running on the target device. Compatible operating systems include:
- Windows (all versions)
- macOS
- Lainos
- Android
- iOS

Image 4.5: Visual representation of the keypad's broad operating system compatibility.
5. Itọju
5.1. Itọju batiri
To prolong battery life, avoid fully discharging the keypad frequently. Recharge the device when the low battery indicator appears. If storing the keypad for an extended period, ensure it has a partial charge (around 50%) and recharge it every few months.
5.2. Ninu
Use a soft, dry cloth to clean the exterior of the keypad. For stubborn dirt, a slightly damp cloth with mild soap can be used, ensuring no moisture enters the device. Avoid using harsh chemicals or abrasive materials.
6. Laasigbotitusita
- Keypad not powering on: Ensure the power switch is in the 'ON' position and the battery is charged. Connect via USB to check if it powers on.
- A ko mọ asopọ onirin: Gbiyanju ibudo USB tabi okun USB miiran. Rii daju pe okun naa ti wa ni kikun.
- Awọn oran sisopọ Bluetooth: Ensure the keypad is in pairing mode (connect button pressed, BT switch engaged). Check your device's Bluetooth settings and try re-scanning. Ensure the keypad is sufficiently charged.
- Keys not performing programmed functions: Reconnect the keypad to the programming software and verify the key assignments. Ensure the configuration was saved to the device.
- Asopọmọra igba diẹ: For wireless mode, ensure the keypad is within range of the host device and there are no significant obstructions. For wired mode, check the USB cable and port for damage.
7. Awọn pato
| Ẹya ara ẹrọ | Ẹ̀kúnrẹ́rẹ́ |
|---|---|
| Awoṣe | B0DHHG29DW |
| Asopọmọra Technology | Bluetooth, USB-C |
| Nọmba ti Awọn bọtini | 4 |
| Batiri Iru | 1 Batiri Litiumu Irin (pẹlu) |
| Iwọn Nkan | 3.2 iwon (nipa 90.7 giramu) |
| Package Mefa | 2 x 1.2 x 1 inches (iwọn 5.08 x 3.05 x 2.54 cm) |
| Olupese | PC sensọ |
| Compatible OS Family | Windows, MacOS, Lainos, Android, iOS |
| Pataki Ẹya | Awọn bọtini eto |

Image 7.1: Physical dimensions of the keypad and the length of the charging cable.
8. Atilẹyin ọja ati Support
PCsensor provides lifetime technical support and 24/7 service for its products. All PCsensor products have obtained relevant certifications, ensuring quality and reliability. For technical assistance or warranty inquiries, please contact PCsensor customer service through their official channels or the retailer where the product was purchased.
Ask a question about this manual
Ask about setup, troubleshooting, compatibility, parts, safety, or missing instructions. Manuals+ will review the question and use this page’s manual context to help answer it.