1. Ifihan
O ṣeun fun riraasing the MLWSHR Digital LED Alarm Clock Model 8808. This device combines a digital alarm clock with a thermo-hygrometer, offering dual alarms, snooze function, date and year display, 12/24 hour switch, weekday settings, Daylight Saving Time (DST) functionality, auto-dimmable display with three brightness levels, and a convenient 5V1A USB output for charging other devices. Please read this manual carefully to ensure proper use and maintenance of your new alarm clock.
2. Alaye Aabo
- Jeki ẹrọ naa kuro ni omi ati awọn agbegbe ọriniinitutu giga.
- Ma ṣe fi ẹrọ naa han si awọn iwọn otutu to gaju tabi imọlẹ orun taara fun awọn akoko ti o gbooro sii.
- Use only the provided USB Type-C cable for power.
- Ma ṣe gbiyanju lati tunto tabi tun ẹrọ naa funrararẹ. Kan si atilẹyin alabara ti awọn ọran ba dide.
- Ensure proper ventilation when using the USB output to charge other devices.
3. Package Awọn akoonu
- MLWSHR Digital LED Alarm Clock Model 8808
- USB Iru-C Power Cable
- Itọsọna olumulo
4. Ọja Ipariview
Mọ ara rẹ pẹ̀lú àwọn ohun pàtàkì àti àwọn ìṣàkóso aago ìkìlọ̀ rẹ.
This image displays the front of the MLWSHR Digital LED Alarm Clock, highlighting the time display, weekday indicators, temperature in Celsius, humidity percentage, and dual alarm icons. It also points to the Daylight Saving Time (DST) indicator.

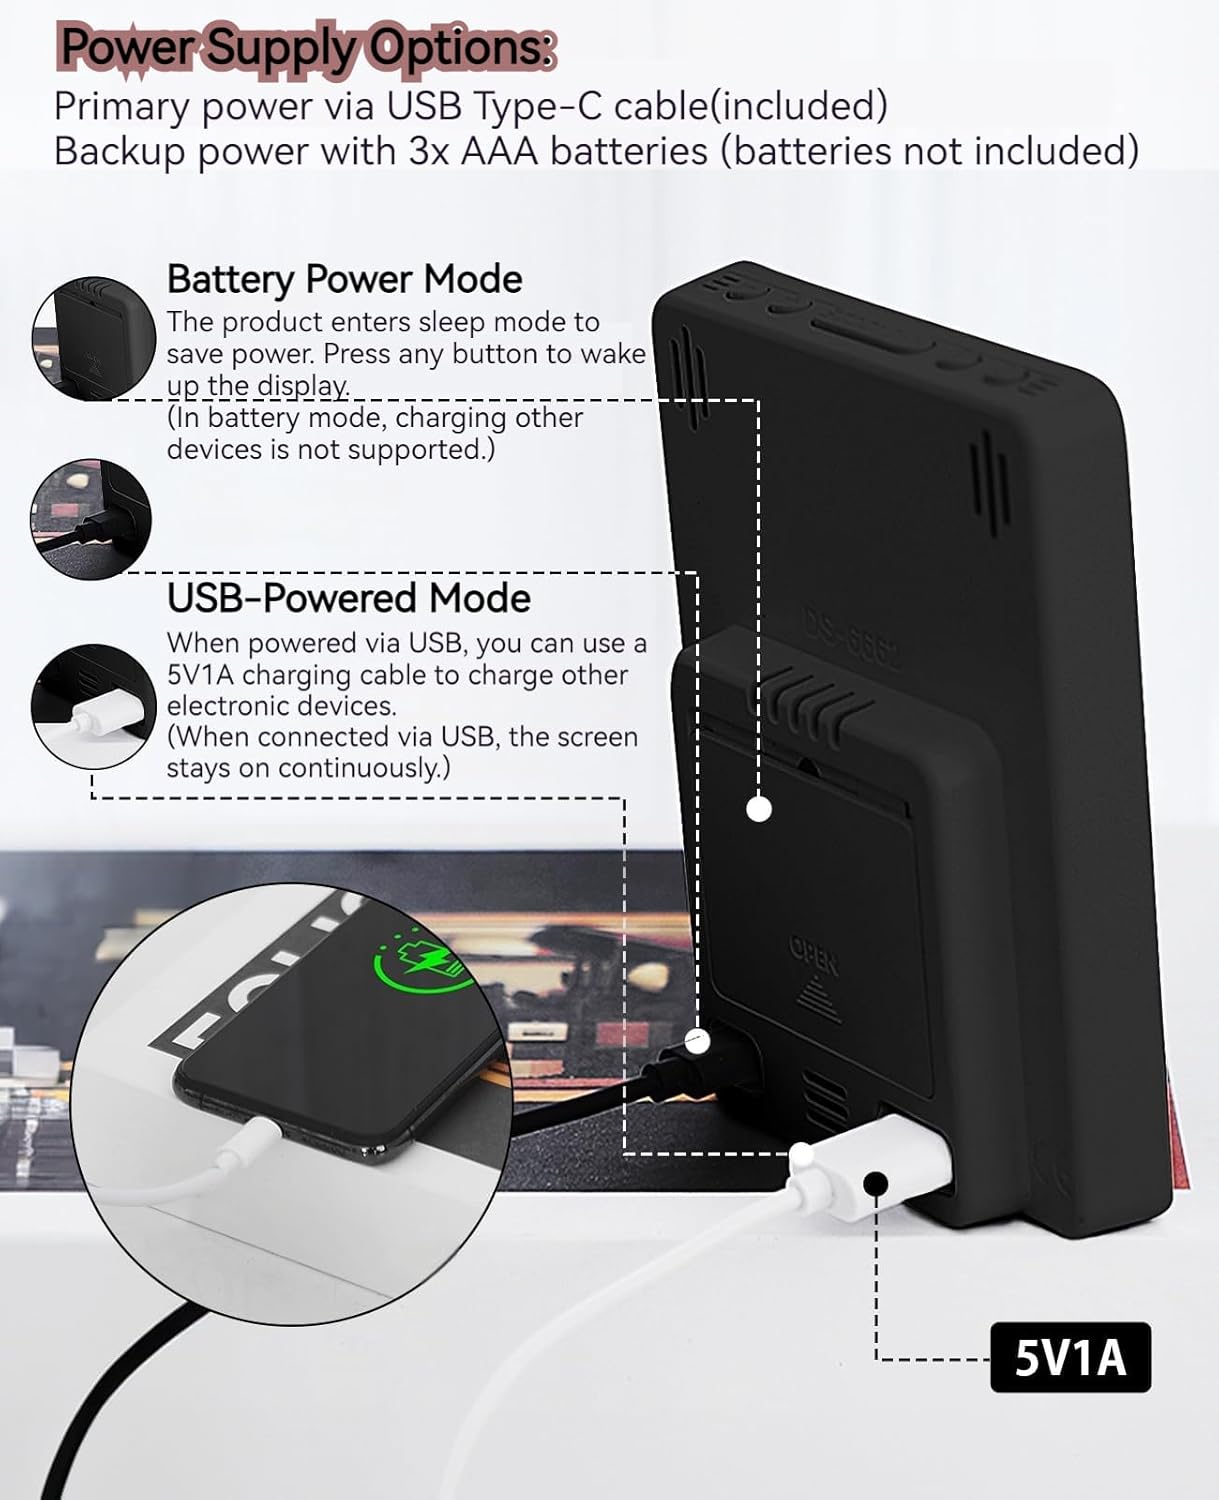
This image illustrates the side and back of the alarm clock, detailing the USB Type-C input for primary power, the battery compartment for 3x AAA backup batteries (not included), and the USB-A output (5V1A) for charging other devices. It also shows the control buttons located on the top edge.
Awọn iṣakoso:
- Ṣeto Bọtini: Enters setting mode for time, date, and alarms.
- UP (+) Button: Increases values during setting, adjusts brightness.
- DOWN (-) Button: Decreases values during setting, adjusts brightness.
- Bọtini SINOOZE/Imọlẹ: Ó mú kí oorun sun, ó sì ń ṣàtúnṣe ìmọ́lẹ̀ ìfihàn.
- ALARM 1 Button: Activates/deactivates Alarm 1, enters Alarm 1 setting.
- ALARM 2 Button: Activates/deactivates Alarm 2, enters Alarm 2 setting.
- 12/24HR Button: Yípadà láàrín àwọn ọ̀nà ìgbà wákàtí méjìlá àti wákàtí mẹ́rìnlélógún.
- Bọtini C/°F: Switches between Celsius and Fahrenheit temperature display.
5. Eto
5.1 Ipese Agbara
The MLWSHR Digital LED Alarm Clock can be powered in two ways:
- Primary Power (USB Type-C): Connect the provided USB Type-C cable to the clock's input port and plug the other end into a 5V1A USB power adapter (not included). When powered via USB, the display will remain continuously on.
- Backup Power (3x AAA Batteries): Insert 3 AAA batteries (not included) into the battery compartment on the back of the clock. In battery-only mode, the display will enter sleep mode to conserve power. Press any button to temporarily activate the display. Note that the USB output for charging other devices is not supported when operating on battery power alone.
5.2 Aago Ibẹrẹ ati Eto Ọjọ
After connecting power, the clock will typically display a default time. To set the correct time and date:
- Tẹ mọlẹ SET bọ́tìnì fún ìṣẹ́jú-àáyá mẹ́ta láti tẹ ipò ìṣètò àkókò wọlé. Àwọn nọ́mbà wákàtí náà yóò máa tàn yanranyanran.
- Lo awọn SOKE (+) or Isalẹ (-) awọn bọtini lati ṣatunṣe awọn wakati.
- Tẹ SET lẹ́ẹ̀kan síi láti jẹ́rìí wákàtí náà kí o sì gbé e sí ìṣètò ìṣẹ́jú náà. Àwọn nọ́mbà ìṣẹ́jú náà yóò máa tàn yanranyanran.
- Lo awọn SOKE (+) or Isalẹ (-) awọn bọtini lati ṣatunṣe awọn iṣẹju.
- Tesiwaju titẹ SET to cycle through and set the Year, Month, and Day using the SOKE (+) or Isalẹ (-) buttons for adjustment.
- After setting the Day, press SET ìgbà ìkẹyìn láti jáde kúrò ní ipò ìṣètò.
6. Awọn ilana Iṣiṣẹ
6.1 12/24 Hour Format Switch
Tẹ awọn 12/24HR button to toggle between 12-hour (with AM/PM indicator) and 24-hour time formats.
This video demonstrates various features of the MLWSHR Digital LED Alarm Clock, including the time, temperature, humidity, weekday display, auto/manual brightness adjustment, 12/24 hour switch, and the easy-to-use buttons and USB-C input/USB-A output.
6.2 Ṣíṣeto Awọn Itaniji (Alarm 1 & Itaniji 2)
The clock features two independent alarms. Each alarm can be set for specific days of the week (Monday-Friday, Monday-Saturday, or Monday-Sunday).

This image illustrates the dual alarm functionality, showing how each alarm can be customized to ring on specific days of the week: Monday to Friday, Monday to Saturday, or every day. It highlights the alarm icons and weekday indicators on the display.
- Tẹ awọn OOGUN 1 or OOGUN 2 button to select the desired alarm. The alarm icon will appear on the display.
- Press and hold the selected Itaniji button for 3 seconds to enter alarm setting mode. The hour digits will flash.
- Lo awọn SOKE (+) or Isalẹ (-) awọn bọtini lati ṣatunṣe aago itaniji.
- Tẹ awọn Itaniji bọtini lẹẹkansi lati jẹrisi wakati naa ki o si gbe si eto iṣẹju.
- Lo awọn SOKE (+) or Isalẹ (-) awọn bọtini lati ṣatunṣe awọn iṣẹju itaniji.
- Tẹ awọn Itaniji button again to set the alarm frequency (e.g., Mon-Fri, Mon-Sat, Mon-Sun). Use SOKE (+) or Isalẹ (-) lati yan.
- Tẹ awọn Itaniji button one last time to exit alarm setting mode.
- To turn an alarm ON or OFF, simply press the corresponding OOGUN 1 or OOGUN 2 button briefly. The alarm icon will appear (ON) or disappear (OFF) from the display.
6.3 Iṣiṣẹ Snooze
When an alarm sounds, you can activate the snooze function for a temporary delay.

This image shows the clock's snooze button and how it functions. When the alarm rings, a brief press of the snooze button will delay the alarm for 5 minutes. Holding the button for more than two seconds will turn off the alarm for that day.
- Nigbati itaniji ba ndun, tẹ awọn SNOOZE / LIGHT button briefly. The alarm will pause and ring again after 5 minutes.
- To turn off the alarm for the current day, press and hold the SNOOZE / LIGHT button for more than 2 seconds, or press any other button (except SNOOZE / LIGHT).
6.4 Atunṣe Imọlẹ
The clock features an auto-dimmable display and three manual brightness levels.
- Aifọwọyi Dimmable: The built-in light sensor automatically adjusts the display brightness based on ambient light conditions. This is the default setting.
- Manual Brightness: Ni soki tẹ awọn SNOOZE / LIGHT button to cycle through 3 manual brightness levels (L-01, L-02, L-03).
- To return to auto-dimmable mode, continue pressing the SNOOZE / LIGHT button until 'L-AU' appears on the display.
6.5 Thermometer & Hygrometer
The clock displays indoor temperature and humidity levels.

This image highlights the temperature and humidity readings on the clock's display. It also provides guidance on ideal humidity levels and suggests actions (humidifier/dehumidifier) if levels are too low or too high. The temperature detection range is 23°F to 122°F (-5°C to 50°C) with an error margin of ±2°F.
- Yipada Iwọn otutu: Tẹ awọn ° C / ° F button to switch between Celsius and Fahrenheit temperature display.
- The temperature range is 23°F to 122°F (-5°C to 50°C) with an error margin of ±2°F.
- The humidity measurement error is within ±5%.
6.6 USB Power Output (5V1A)
The clock features a USB-A output port (5V1A) that can be used to charge other electronic devices.

This image demonstrates the use of the clock's USB-A output port to charge a smartphone. The clock provides a 5V1A output, making it a convenient charging station. This feature is only available when the clock is powered via its USB Type-C input.
- Connect your device's charging cable to the USB-A output port on the back of the alarm clock.
- Ensure the alarm clock is powered via its USB Type-C input for this feature to function. The USB output is not active when the clock is running on battery power alone.
6.7 Akoko Ifipamọ Oju-ọjọ (DST)
The clock supports Daylight Saving Time adjustment.
- To activate or deactivate DST, press and hold the DST button (if available, or refer to the SET button sequence for DST in specific models). The DST indicator will appear or disappear.
7. Itọju
- Fi aṣọ rírọrùn tó gbẹ nu aago náà. Má ṣe lo àwọn ohun ìfọṣọ tàbí àwọn ohun èlò ìfọṣọ.
- Tí aago náà kò bá ní lò fún ìgbà pípẹ́, yọ àwọn bátírì AAA kúrò kí ó má baà jẹ́ kí ó jò.
- Keep the USB ports free from dust and debris.
8. Laasigbotitusita
| Isoro | Owun to le Fa | Ojutu |
|---|---|---|
| Display is off or intermittent. | Running on battery power in sleep mode, or no power. | Press any button to activate display in battery mode. Connect USB Type-C cable for continuous display. Check USB power source. |
| Ìjáde USB kìí ṣe àwọn ẹ̀rọ gbigba agbara. | Clock is running on battery power, or USB cable is faulty. | Ensure the clock is connected to primary USB Type-C power. Try a different USB cable. |
| Itaniji ko dun. | Itaniji ko mu ṣiṣẹ tabi ṣeto ti ko tọ. | Check if the alarm icon is displayed. Re-set the alarm time and frequency. |
| Kika iwọn otutu ko pe. | Environmental factors or sensor error. | Allow time for the sensor to stabilize. Ensure the clock is not near heat sources or vents. Note the ±2°F error margin. |
| Cannot set time/date. | Not in setting mode, or buttons are unresponsive. | Press and hold the SET button for 3 seconds. Ensure the clock has stable power. |
9. Awọn pato
- Brand: MLWSHR
- Nọmba awoṣe: 8808
- Iru ifihan: LED
- Orisun Agbara: USB Type-C (5V1A) / 3x AAA Batteries (backup)
- Awọn iwọn ọja: 3.54"W x 4.72"H
- Awọn ẹya: Dual Alarms, Snooze, Thermo-Hygrometer, Date & Year Display, 12/24 Hour Switch, Weekdays, DST, Auto Dimmable (3 levels), USB Output (5V1A)
- Ohun elo: Ṣiṣu ti o ni ore-ayika
- Lilo inu ile/ita gbangba: Ninu ile
10. Atilẹyin ọja & Atilẹyin
The MLWSHR Digital LED Alarm Clock Model 8808 comes with a 2-odun atilẹyin ọja lati ọjọ ti o ra. Atilẹyin ọja yi ni wiwa awọn abawọn iṣelọpọ ati ailagbara labẹ lilo deede.
For technical support, warranty claims, or any questions regarding your product, please contact MLWSHR customer service through the retailer's platform or visit our official website for contact information. Please have your purchase receipt and model number ready when contacting support.