
1. Ifihan
Thank you for choosing the elejoy 15A MPPT Step-Up Solar Charge Controller EL-MU400SP. This device is designed to efficiently charge 24V-85V lead-acid and lithium batteries from solar panels, maximizing energy harvest through its advanced MPPT (Maximum Power Point Tracking) technology. It is suitable for various applications including home solar systems, camping setups, and RVs. This manual provides essential information for safe installation, operation, and maintenance of your solar charge controller.
2. Awọn ilana aabo
- Ka gbogbo awọn ilana ni pẹkipẹki ṣaaju fifi sori ẹrọ ati ṣiṣẹ.
- Ensure all wiring is correctly polarized and securely connected to prevent damage to the controller or battery.
- Always connect the battery first, then the solar panel. Disconnect in the reverse order: solar panel first, then battery.
- Má ṣe tú tàbí gbìyànjú láti tún olùdarí náà ṣe. Kan sí àwọn òṣìṣẹ́ tó mọ̀ nípa iṣẹ́ náà fún iṣẹ́ náà.
- Fi sori ẹrọ oluṣakoso ni agbegbe ti o ni itunnu daradara, kuro lati awọn ohun elo ina ati imọlẹ orun taara.
- Wọ ohun elo aabo ti ara ẹni ti o yẹ (PPE) nigbati o n ṣiṣẹ pẹlu awọn batiri ati awọn panẹli oorun.
- Ensure the solar panel's open-circuit voltage (Voc) ko koja awọn oludari ká pọju input voltage.
3. Ọja Ipariview
3.1 Key Awọn ẹya ara ẹrọ
- Jakejado Voltage Ibiti: Supports 24V-85V lead-acid and lithium batteries.
- Step-Up MPPT Technology: Charges high-voltage batteries from lower-voltage solar panels.
- High PV Utilization: Achieves ≥99% maximum PV utilization efficiency.
- Robust Heat Dissipation: Features an aluminum heat sink and unique structural design for optimal thermal management.
- HD LED Display: Real-akoko monitoring ti isiyi, voltage, and other data.
- Multi-Mode Control: Offers various load control modes for flexible energy management.
3.2 irinše
The elejoy EL-MU400SP controller features a durable aluminum casing with an integrated heat sink for efficient cooling. The front panel includes an HD LED display and control buttons for easy operation.

Nọmba 3.2.1: Iwaju view of the controller showing the LED display and control buttons. The display indicates input PV voltage and current, and output battery voltage and current. Control buttons include 'OK', '-', and '+' for setting output voltage.

Nọmba 3.2.2: Igun view of the controller, illustrating the robust aluminum heat sink design and the secure input/output wiring terminals.
4. Eto ati fifi sori
4.1 Iṣagbesori Adarí
- Yan ibi ti o gbẹ, ti o ni afẹfẹ daradara, aabo lati orun taara, awọn iwọn otutu giga, ati ọrinrin.
- Ensure sufficient clearance around the controller for proper airflow and heat dissipation.
- Mount the controller vertically on a non-flammable surface using appropriate screws.
4.2 Awọn isopọ onirin
Follow the wiring diagram carefully. Incorrect wiring can damage the controller and connected devices. Always connect the battery first, then the solar panel. Disconnect in the reverse order.
- So batiri pọ: Connect the positive (+) and negative (-) terminals of your battery to the "OUTPUT" terminals of the controller. Ensure correct polarity.
- Solar Panel: Connect the positive (+) and negative (-) terminals of your solar panel(s) to the "INPUT" terminals of the controller. Ensure correct polarity.
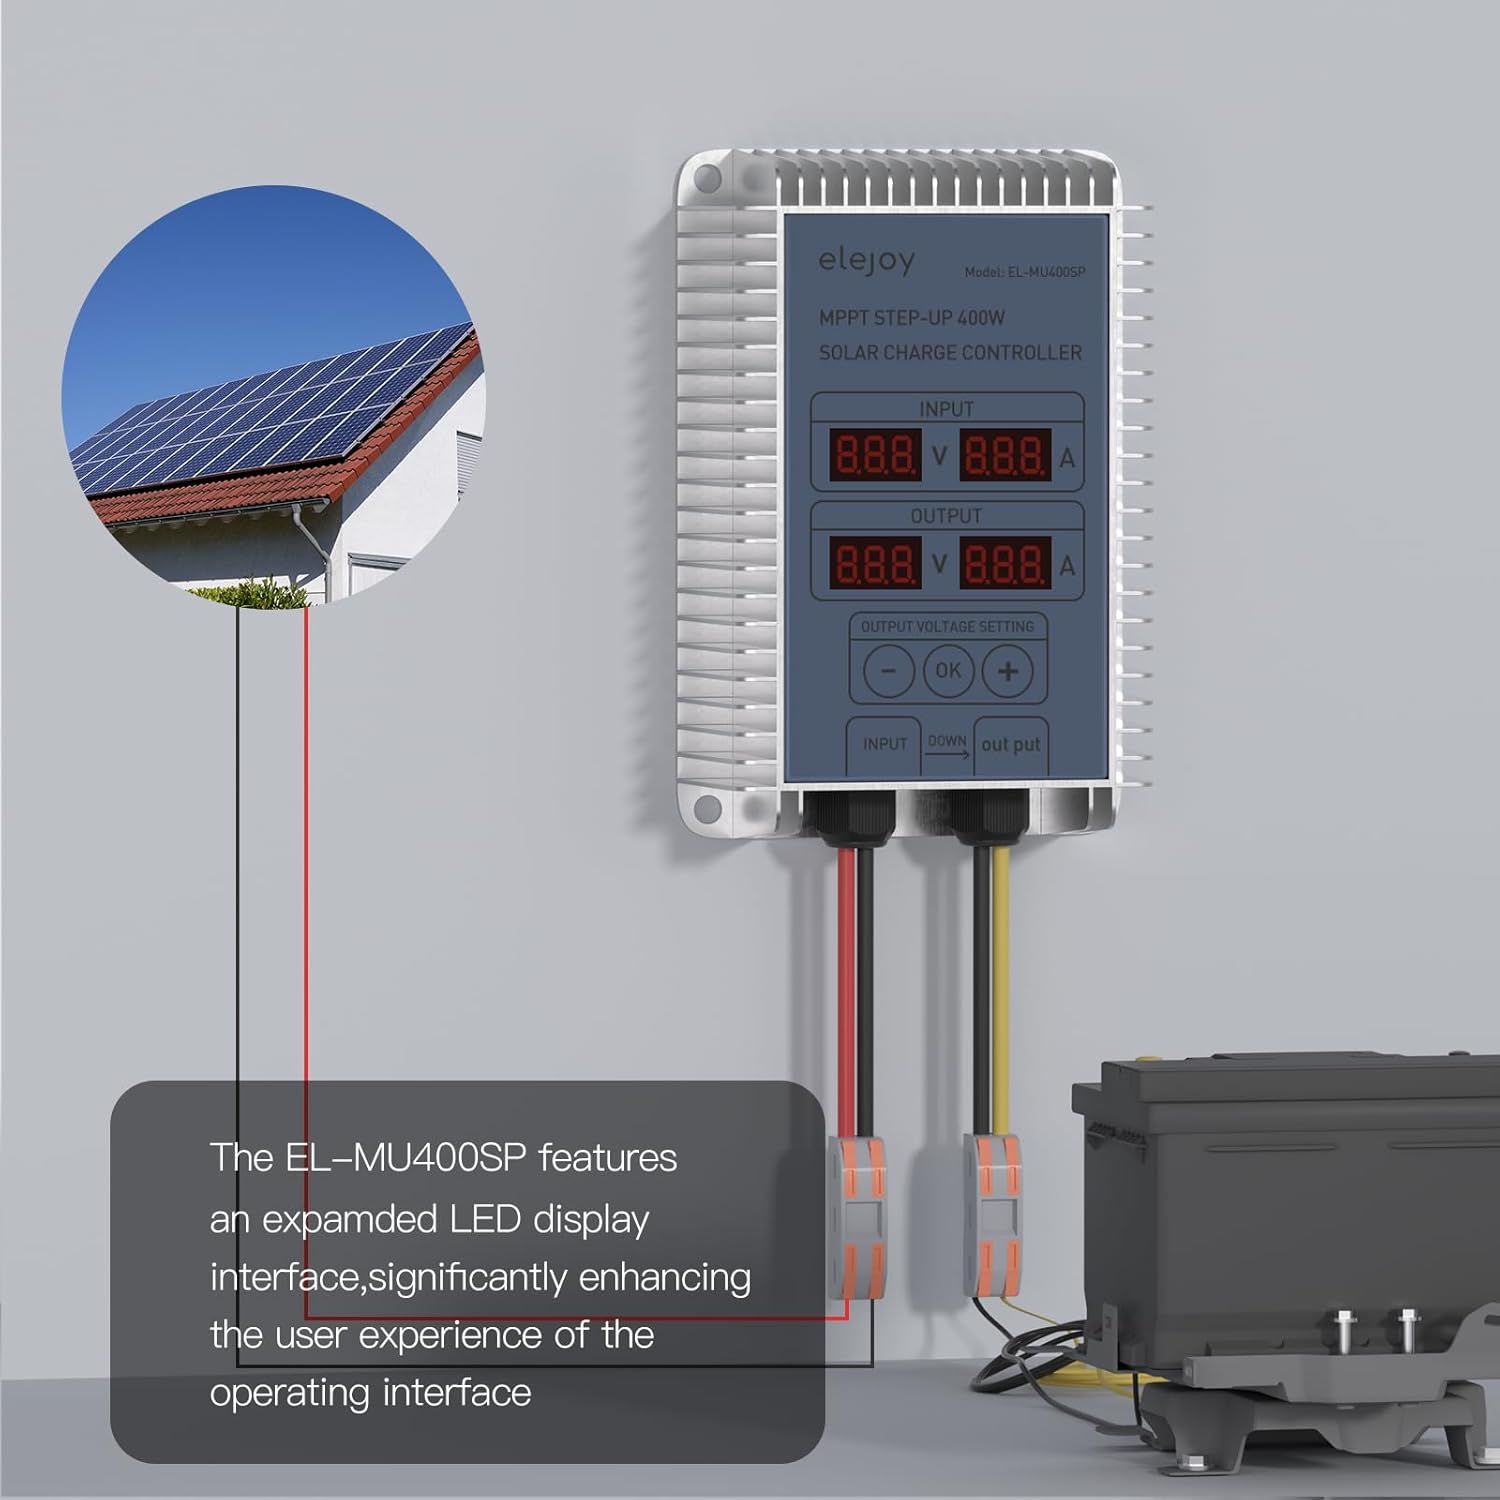
Nọmba 4.2.1: Typical wiring setup for the elejoy MPPT Step-Up Solar Charge Controller. Solar panels connect to the input, and the battery connects to the output.

Nọmba 4.2.2: Detailed connection diagram, emphasizing the PV input range and the connection points for solar panel and battery.
5. Awọn ilana Iṣiṣẹ
5.1 Ibẹrẹ Agbara-soke
Once the battery and solar panel are connected, the controller will automatically power on. The HD LED display will show real-time input (PV) and output (battery) voltage ati awọn iye lọwọlọwọ.
5.2 Alaye Ifihan
The LED display provides critical operational data:
- Fi sii: Ṣe afihan voltage (V) and current (A) from the solar panel.
- O wu: Ṣe afihan voltage (V) and current (A) being delivered to the battery.
Nọmba 5.2.1: The LED display interface, indicating input and output electrical parameters and the output voltage setting controls.
5.3 Setting Output Voltage
The controller allows adjustment of the output voltage to match your battery's charging requirements. Use the '-', 'OK', and '+' buttons:
- Press the 'OK' button to enter the output voltagipo eto e.
- Use the '-' and '+' buttons to adjust the desired output voltage.
- Press 'OK' again to confirm and save the setting.
The controller automatically detects 24V-85V lithium battery activation. It is compatible with various battery types including LiFePO4, SLD, FLD, GEL, and AGM.

Nọmba 5.3.1: Battery compatibility and automatic detection feature for 24-85V lithium batteries.
6. Itọju
- Ayẹwo igbagbogbo: Lokọọkan ṣayẹwo gbogbo awọn asopọ onirin fun wiwọ ati ipata.
- Ninu: Keep the controller clean and free from dust and debris. Use a dry cloth to wipe the casing. Má ṣe lo àwọn ohun olómi tàbí àwọn ohun olómi.
- Afẹfẹ: Ensure the area around the controller remains unobstructed to allow for proper heat dissipation.
- Ṣayẹwo Ayika: Daju pe agbegbe iṣiṣẹ wa laarin iwọn otutu ti a sọ ati awọn sakani ọriniinitutu.
7. Laasigbotitusita
| Isoro | Owun to le Fa | Ojutu |
|---|---|---|
| Alakoso ko ṣiṣẹ lori | Batiri ko sopọ mọ tabi kekere voltage; incorrect wiring. | Ṣayẹwo awọn asopọ batiri ati voltage. Ensure battery is connected first. |
| Ko si gbigba agbara lọwọlọwọ | Solar panel not connected or insufficient sunlight; incorrect solar panel wiring. | Verify solar panel connections and ensure adequate sunlight. Check solar panel voltage. |
| O wu voltage ko tọ | O wu voltage setting is wrong. | Satunṣe o wu voltage using the control buttons as described in Section 5.3. |
| Gbigbona pupọ | Afẹ́fẹ́ tí kò dára; ẹrù púpọ̀. | Ensure proper airflow around the controller. Reduce load if necessary. |
8. Awọn pato
| Paramita | Iye |
|---|---|
| Awoṣe | EL-MU400SP |
| Brand | elejoy |
| Max PV Input Power | 400W |
| Ti o pọju PV Input Voltage (VOC) | 55V |
| Ti won won idiyele Lọwọlọwọ | 15A |
| Batiri Voltage Ibiti | 24V-85V (Lead-Acid, LiFePO4, Lithium) |
| PV Utilization Efficiency | ≥99% |
| Ohun elo | Aluminiomu |
| Awọn iwọn Ọja (L x W x H) | 4.72" x 3.15" x 1.57" |
| Iwọn Nkan | 0.48 kg |
| Ifihan Iru | LED |
| Awọn iwọn otutu ti nṣiṣẹ | -20°C si 50°C |

Nọmba 8.1: Physical dimensions of the elejoy EL-MU400SP controller.
9. Atilẹyin ọja ati Support
elejoy products are manufactured to high-quality standards. For warranty information, technical support, or service inquiries, please contact elejoy customer support through their official website or the retailer from whom the product was purchased. Please have your model number (EL-MU400SP) and purchase details ready when contacting support.
Fun alaye diẹ sii, ṣabẹwo si osise naa elejoy Store on Amazon.