
Bietrun DX-GAC2000W
Bietrun 2000W Pure Sine Wave Inverter User Manual
Model: DX-GAC2000W
1. Ifihan
This manual provides essential information for the safe and efficient operation of your Bietrun 2000W Pure Sine Wave Inverter. Please read it thoroughly before installation and use, and retain it for future reference.
Package Awọn akoonu
Jẹrisi pe gbogbo awọn ohun kan wa ninu package:
- 1 x Bietrun 2000W Pure Sine Wave Inverter
- 2 x 10AWG 3-foot Battery Cables (Red and Black)
- 1 x Ground Cable
- 1 x Isakoṣo latọna jijin
- 4 x Fuses
- 1 x Small Wrench
- Iṣagbesori skru

Image 1.1: The Bietrun 2000W Pure Sine Wave Inverter with its remote control, battery cables, ground cable, fuses, and wrench.
2. Awọn ilana aabo
Observe the following safety precautions to prevent injury and damage to the inverter or connected devices:
- Maṣe ṣii inverter casing. Ko si awọn ẹya ti o le lo ninu.
- Rí i dájú pé afẹ́fẹ́ ń tàn káàkiri inverter. Má ṣe dí àwọn afẹ́fẹ́ ìtútù.
- Keep the inverter away from water, moisture, flammable materials, and direct sunlight.
- So inverter pọ mọ orisun agbara DC 12V nikan.tages le fa ipalara.
- Ensure correct polarity when connecting battery cables (Red to Positive, Black to Negative). Reverse polarity will cause damage.
- Always connect the ground cable to a proper earth ground.
- Do not exceed the inverter's rated continuous power output (2000W) or peak surge power (4000W).
- Ge asopọ inverter kuro ninu batiri ṣaaju ṣiṣe eyikeyi itọju tabi mimọ.
Ese Idaabobo Awọn ẹya ara ẹrọ
The inverter includes multiple protection mechanisms:
- Apọju Idaabobo
- Kekere Voltage Idaabobo
- GFCI Idaabobo
- Apọjutage Idaabobo
- Overtemperature Idaabobo
- Kukuru Circuit Idaabobo
- Yipada Asopọmọra Idaabobo
- Lori Idaabobo lọwọlọwọ

Image 2.1: Visual representation of the inverter's comprehensive safety protection system.
3. Awọn ẹya Ọja
The Bietrun 2000W Pure Sine Wave Inverter is designed for reliable power conversion with advanced features:
- Ijade Sine Wave Pure: Provides high-quality AC power (THD < 3%) suitable for sensitive electronics, ensuring stable operation and minimizing damage risk.
- Iṣiṣẹ to gaju: Conversion efficiency exceeding 90% reduces energy loss.
- Lemọlemọfún Agbara: Delivers 2000W continuous power with a 4000W peak surge capacity.
- Ijade ti o pọ: Features 4 AC outlets, 1 AC wiring terminal, 2 USB ports (5V/2.1A), and 1 Type-C port (5V/2.1A).
- HD LED Display: Provides real-time status updates including input/output voltage, charging status, battery status, current power, and fault codes.
- Isakoṣo latọna jijin: Allows for convenient power management from a distance.
- Isẹ idakẹjẹ: High-efficiency cooling system with a low-noise fan maintains optimal operating temperature.
- Iwapọ ati Apẹrẹ ti o tọ: Encased in rugged Aluminum Alloy, with dimensions of 19 x 10 x 7 inches and a weight of 12.5 lbs.

Image 3.1: Key features of the Bietrun 2000W Pure Sine Wave Inverter.
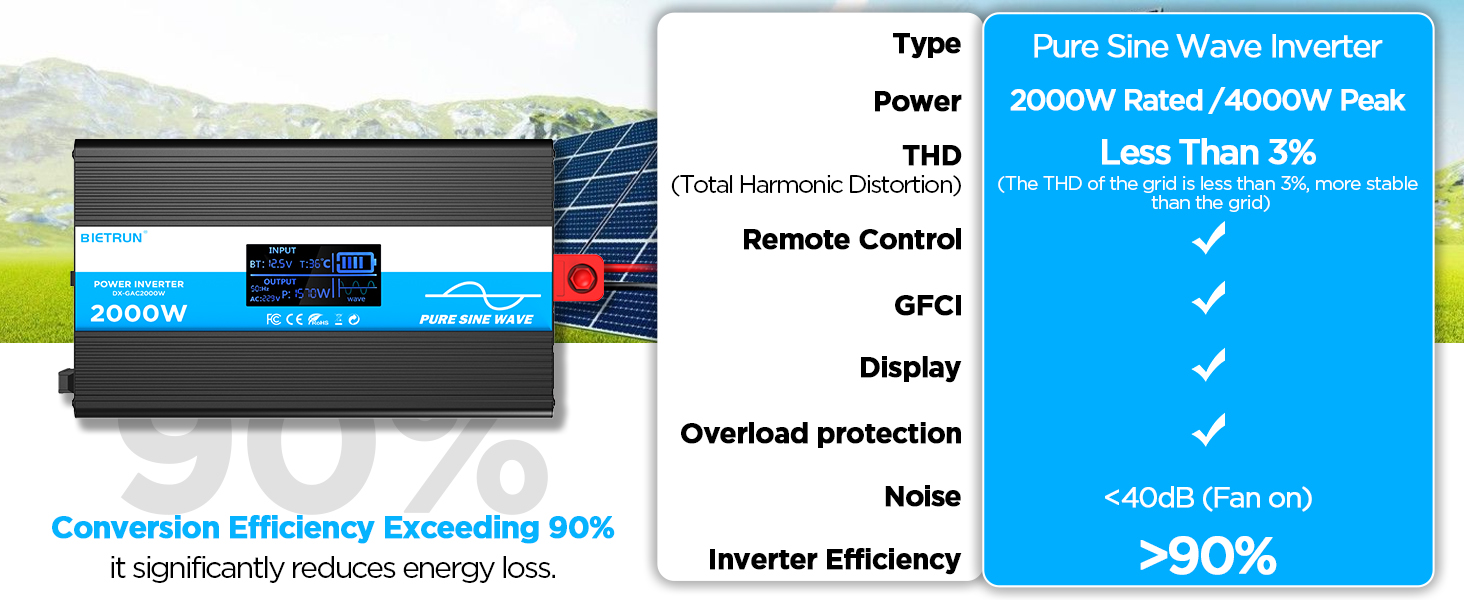
Image 3.2: Illustrates the stable, grid-like output of a pure sine wave inverter compared to unstable power from other types.
4. Eto ati fifi sori
Ipo ati iṣagbesori
Choose a dry, well-ventilated location away from direct sunlight, heat sources, and flammable materials. The inverter can be wall-mounted using the provided screws.
Ibamu batiri
The inverter is compatible with various 12V battery types, including LiFePO4, LI, SLD, GEL, FLD, and AGM batteries.

Image 4.1: The inverter supports multiple 12V battery chemistries.
Awọn Igbesẹ Asopọmọra
- Ṣetan Awọn okun: Use the provided 10AWG 3-foot cables. Ensure all connections are secure.
- Connect Ground Cable: Attach the green/yellow ground cable to the inverter's ground terminal and to a reliable earth ground point.
- So awọn okun batiri pọ:
- Sopọ awọn pupa battery cable to the inverter's rere (+) ebute.
- Sopọ awọn dudu battery cable to the inverter's odi (-) ebute.
- So awọn miiran opin ti awọn pupa cable to the battery's rere (+) ebute.
- So awọn miiran opin ti awọn dudu cable to the battery's odi (-) ebute.
Pataki: Ensure correct polarity. A spark may occur during the final connection, which is normal due to capacitor charging.
- Awọn isopọ to ni aabo: Double-check all connections for tightness to prevent loose contacts and overheating.
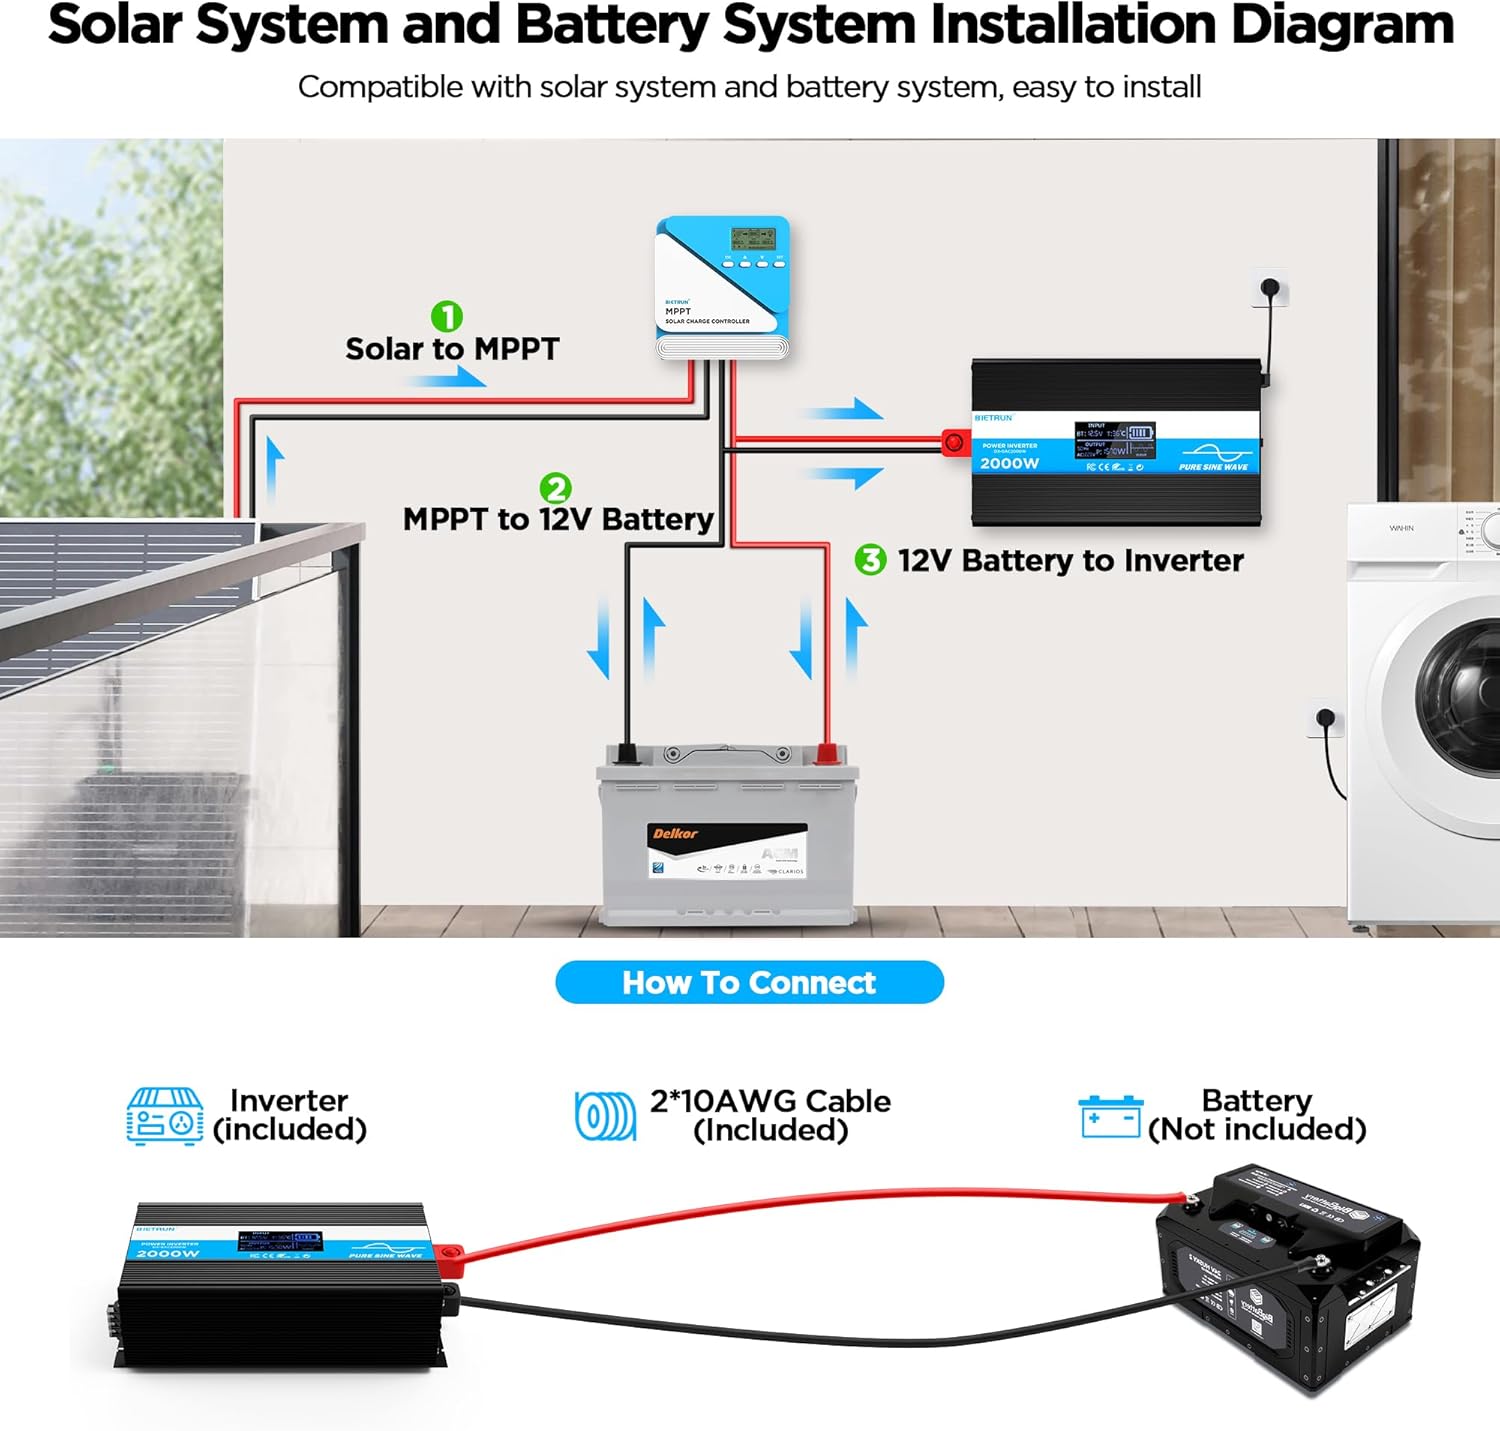
Image 4.2: Basic wiring diagram for connecting the inverter to a 12V battery.
Inverter Interface Overview

Image 4.3: Front panel layout with output interfaces and controls.

Image 4.4: Rear panel layout with battery input terminals and cooling fans.
5. Isẹ
Titan / Pipa agbara
- Isẹ afọwọṣe: Flip the ON/OFF switch on the inverter to the 'ON' position to power on. Flip to 'OFF' to power off.
- Isẹ Iṣakoso Latọna jijin: Ensure the inverter's 'REMOTE' switch is in the 'ON' position. Use the ON/OFF buttons on the remote control to operate the inverter.
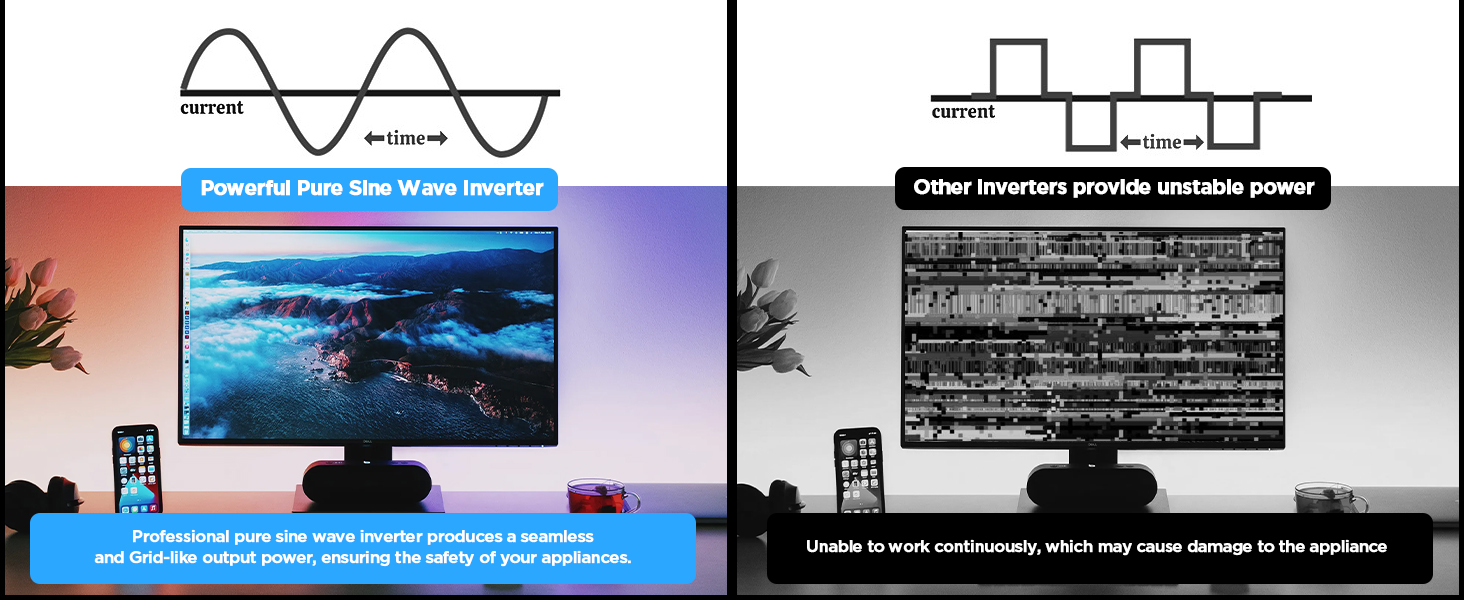
Image 5.1: The remote control allows for convenient operation.
Awọn ẹrọ Nsopọ
Once the inverter is powered on, plug your AC devices into the AC outlets or connect to the AC wiring terminal. USB devices can be connected to the USB or Type-C ports.
Ensure the total power consumption of all connected devices does not exceed 2000W continuously.
6. HD Display Information
The integrated HD display provides real-time operational data and fault indications:
- Iṣawọle: Han batiri voltage (BT) and internal temperature (T).
- Abajade: Shows output frequency (Hz), AC voltage (AC), and current power consumption (P).
- Ipo Batiri: Visual indicator of battery charge level.
- Ipele Waveform: Ó fi hàn pé ìgbì omi sínì tó mọ́ ló ń jáde.
- Awọn koodu aṣiṣe: Numeric codes appear for specific issues, aiding in troubleshooting.

Image 6.1: The HD display provides comprehensive status updates and fault codes.
Awọn apejuwe koodu aṣiṣe
- 2: Kekere Voltage Ikilo
- 3: Apọjutage Idaabobo
- 4: Kekere Voltage Idaabobo
- 5: Apọju Ikilọ
- 6: Apọju Idaabobo
- 7: Overtemperature Idaabobo
- 8: O wu Kukuru Circuit Idaabobo
7. Laasigbotitusita
If the inverter is not functioning correctly, refer to the display for fault codes and consult the table below:
| Isoro | Owun to le Fa | Ojutu |
|---|---|---|
| Inverter ko tan | Loose batiri awọn isopọ, kekere batiri voltage, asise fiusi. | Check battery cable connections. Recharge or replace battery. Check and replace fuses if blown. |
| No AC output (Fault Code 8) | O wu kukuru Circuit. | Disconnect all AC loads. Check for short circuits in connected devices or wiring. Reconnect one by one. |
| Overload warning/protection (Fault Code 5/6) | Ẹrù tí a so pọ̀ ju agbára inverter lọ. | Reduce the total power of connected devices. Disconnect high-power appliances. |
| Vol kekeretage warning/protection (Fault Code 2/4) | Batiri voltage kere ju. | Recharge the battery. Check battery health. |
| Apọjutage protection (Fault Code 3) | Iwọn titẹ siitage ga ju. | Daju batiri voltage is within the 12V range. Disconnect from charging source if overcharging. |
| Overtemperature protection (Fault Code 7) | Inverter is overheating. | Ensure adequate ventilation. Reduce load. Allow inverter to cool down. Clean fan vents if obstructed. |
If the fault persists after attempting the solutions, contact customer support.
8. Awọn pato
| Ẹya ara ẹrọ | Sipesifikesonu |
|---|---|
| Nọmba awoṣe | DX-GAC2000W |
| Agbara Tesiwaju | 2000W |
| Tente agbara gbaradi | 4000W |
| Iṣagbewọle Voltage | DC 12V |
| O wujade Voltage | AC 110V-120V |
| Iwajade Waveform | Wave Sine Sure |
| Lapapọ Idarudapọ ti irẹpọ (THD) | <3% |
| Imudara Iyipada | > 90% |
| AC iletslets | 4 |
| Awọn ibudo USB | 2 (5V/2.1A) |
| Iru-C Port | 1 (5V/2.1A) |
| Awọn iwọn (L x W x H) | 19 x 10 x 7 inches |
| Iwọn Nkan | 11.13 iwon |
| Itutu System | Meji itutu egeb |
9. Itọju
Regular maintenance ensures optimal performance and longevity of your inverter:
- Ninu: Periodically clean the exterior of the inverter with a dry, soft cloth. Ensure cooling vents are free from dust and debris. Do not use liquid cleaners.
- Ṣayẹwo Asopọmọra: Máa ṣe àyẹ̀wò àwọn ìsopọ̀ okùn bátírì déédéé fún bí ó ṣe le tó àti bí ó ṣe le tó. Fi búrọ́ọ̀ṣì wáyà àti omi ìpara baking soda nu èyíkéyìí ìbàjẹ́.
- Afẹfẹ: Ensure the inverter always has adequate airflow. Do not operate in enclosed spaces without ventilation.
- Rirọpo Fuse: If a fuse blows, replace it only with a fuse of the same type and rating as specified in the package contents.
10. Atilẹyin ọja ati Support
For warranty information or technical support, please refer to the contact details provided with your purchase or visit the official Bietrun webojula. Tọju iwe-ẹri rira rẹ bi ẹri rira.
Ask a question about this manual
Ask about setup, troubleshooting, compatibility, parts, safety, or missing instructions. Manuals+ will review the question and use this page’s manual context to help answer it.