1. Alaye Aabo pataki
To ensure safe operation and prevent damage to the projector, observe the following precautions:
- Ibi ti ina elekitiriki ti nwa: Use only the power cord and adapter specified for this projector. Ensure the power outlet matches the projector's voltage ibeere.
- Afẹfẹ: Do not block the ventilation openings. Ensure adequate space around the projector for proper airflow to prevent overheating.
- Omi ati Ọrinrin: Keep the projector away from water or other liquids. Do not operate in high humidity environments.
- Awọn nkan ajeji: Do not insert any objects into the projector's openings.
- Lens Warning: Ma wo taara sinu pirojekito lẹnsi nigbati awọn lamp ó ń ṣiṣẹ́, nítorí pé ìmọ́lẹ̀ tó mọ́lẹ̀ lè fa ìpalára ojú.
- Ninu: Ge asopọ okun agbara ṣaaju ṣiṣe mimọ. Lo asọ asọ ti o gbẹ. Yago fun olomi tabi aerosol ose.
- Iṣẹ: Má ṣe gbìyànjú láti ṣe iṣẹ́ fún ẹ̀rọ ìṣiṣẹ́ náà fúnra rẹ. Tọ́ka gbogbo iṣẹ́ náà sí àwọn òṣìṣẹ́ iṣẹ́ tó péye.
2. Ọja Ipariview
Familiarize yourself with the various parts and controls of your Casio XJ-A155V projector.
2.1 Iwaju View

The front of the projector features the projection lens and front ventilation grilles. The lens is where the image is projected from.
2.2 Ẹyìn View ati Asopọmọra

The rear panel provides all the necessary ports for connecting external devices.

Ports include:
- TI: For composite video and audio input.
- COMPUTER/YCbCr/YPbPr: VGA port for computer connection, also supports component video.
- HDMI: High-Definition Multimedia Interface for digital video and audio input.
- USB: Fun sisopọ awọn ẹrọ USB.
- Tẹlentẹle: For control and service connections.
2.3 Top Panel idari

The top panel houses the main control buttons for operating the projector.
- AGBARA/Iduro: Yi pirojekito tan tabi pa.
- Fi sii: Selects the input source (HDMI, Computer, AV, etc.).
- LATIO: Automatically adjusts the image.
- Ikun: Ṣe atunṣe iwọn aworan.
- IKILO: Adjusts the image clarity.
- Akojọ: Opens the on-screen display (OSD) menu.
- Tẹ: Jẹrisi awọn aṣayan ninu akojọ aṣayan.
- ESC: Jade ni ti isiyi akojọ aṣayan tabi iṣẹ.
- Arrow Keys (< ^ v >): Lilọ kiri nipasẹ awọn aṣayan akojọ aṣayan ati ṣatunṣe awọn eto.
2.4 Isalẹ View and Product Label

The bottom of the projector includes adjustable feet for tilt and stability, along with the product information label.
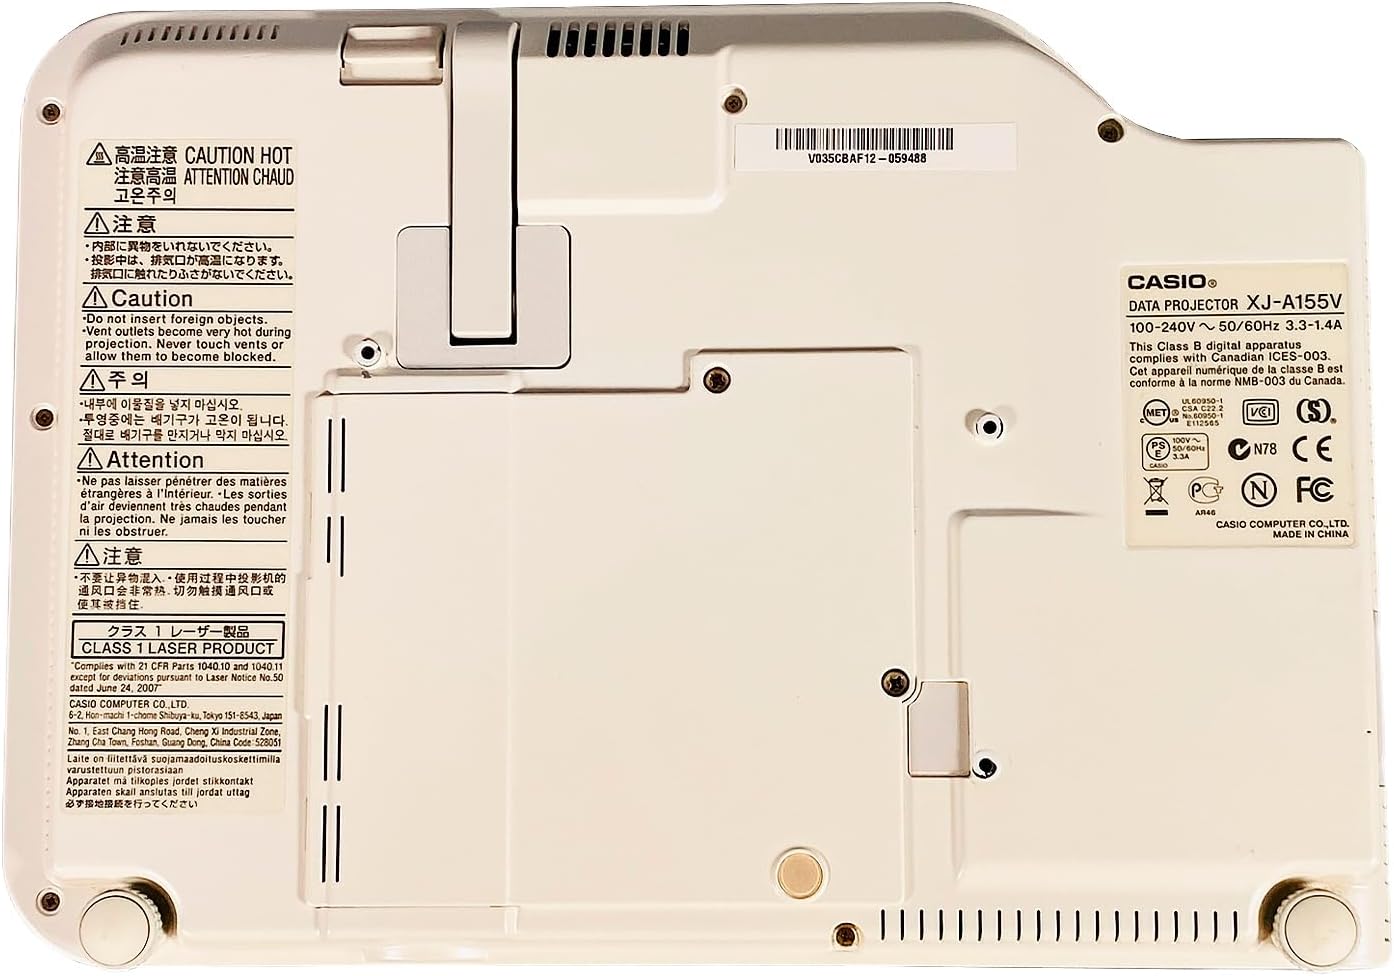
The product label provides important details such as the model number (XJ-A155V), power requirements (100-240V ~ 50/60Hz), and various compliance certifications.
3. Eto
3.1 Ṣiṣii silẹ
Carefully remove the projector and all accessories from the packaging. Retain the packaging for future transport or storage.
3.2 Ibi
Place the projector on a stable, level surface. Ensure there is sufficient space around the projector for ventilation. Adjust the projector's feet to achieve the desired projection angle and image alignment.
3.3 Nsopọ Agbara
- So okun agbara pọ si ibudo titẹ agbara pirojekito.
- Pulọọgi opin miiran ti okun agbara sinu iṣan itanna to dara.
3.4 Nsopọ Awọn orisun Input
Connect your desired video and audio sources to the appropriate ports on the rear of the projector.
- HDMI: For high-quality digital video and audio from devices like Blu-ray players, laptops, or gaming consoles.
- COMPUTER (VGA): For connecting to a computer's VGA output.
- TI: For standard definition video and stereo audio from devices like DVD players or older video sources.
- USB: For connecting USB storage devices or for certain control functions.
4. Ṣiṣẹ Pirojekito
4.1 Agbara Tan / Pa
- Lati Fi agbara: Tẹ awọn AGBARA/Iduro button on the top panel or remote control. The power indicator light will illuminate.
- Lati Paarẹ: Tẹ awọn AGBARA/Iduro button again. Confirm power off if prompted. The projector will enter a cool-down cycle before fully shutting down.
4.2 Aṣayan titẹ sii
Tẹ awọn ÀWỌN Ọ̀RỌ̀ button on the top panel or remote control to cycle through available input sources (HDMI, Computer, AV, etc.) until your desired source is displayed.
4.3 Ṣíṣe àtúnṣe Ìfojúsùn àti Sún-ún
- Idojukọ: Lo awọn Idojukọ buttons (or corresponding controls on the remote) to sharpen the image until it is clear.
- Sun-un: Lo awọn Sún buttons (or corresponding controls on the remote) to adjust the size of the projected image.
4.4 Lilọ kiri Akojọ aṣyn
Tẹ awọn Akojọ button to open the On-Screen Display (OSD) menu. Use the arrow keys to navigate through options and WOLE lati yan. Tẹ ESC lati jade ni akojọ.
4.5 Awọn atunṣe Aworan
Within the OSD menu, you can adjust various image settings such as Brightness, Contrast, Color, Aspect Ratio, and Keystone Correction to optimize your viewiriri iriri.
5. Itọju
5.1 Ninu Pirojekito
- Lẹnsi: Gently wipe the lens with a soft, lint-free cloth specifically designed for optical surfaces. Do not use abrasive cleaners.
- Casing: Nu pirojekito naa nu casing with a soft, dry cloth. For stubborn dirt, dampen the cloth slightly with water, then wipe dry.
- Awọn Grilles Afẹfẹ: Use a soft brush or a vacuum cleaner with a brush attachment to remove dust from the ventilation grilles.
5.2 Air Filter Itọju
Regularly check and clean the air filter (if accessible) to maintain optimal cooling and projector performance. Refer to the on-screen prompts or specific model documentation for filter location and cleaning instructions.
6. Laasigbotitusita
Ti o ba pade awọn ọran pẹlu pirojekito rẹ, tọka si awọn iṣoro ti o wọpọ ati awọn ojutu wọnyi:
- Ko si Aworan:
- Ensure the projector is powered on and the power indicator is lit.
- Verify the input source is correctly selected and the source device is on.
- Check all cable connections (HDMI, VGA, etc.) are secure.
- Aworan blurry:
- Adjust the focus using the Idojukọ awọn bọtini.
- Ensure the projection surface is flat and the projector is at an appropriate distance.
- Ko si Ohun:
- Check the volume settings on both the projector and the source device.
- Ensure audio cables are correctly connected (if not using HDMI for audio).
- Iṣakoso latọna jijin Ko Ṣiṣẹ:
- Rọpo awọn batiri ni isakoṣo latọna jijin.
- Rii daju pe ko si awọn idena laarin isakoṣo latọna jijin ati olugba IR pirojekito.
7. Awọn pato
Key technical specifications for the Casio XJ-A155V DLP Projector:
| Ẹya ara ẹrọ | Sipesifikesonu |
|---|---|
| Brand | Casio |
| Awoṣe | XJ-A155V |
| Imọlẹ | 3,000 ANSI Lumens |
| Ipinnu | 1024x768 (XGA) |
| Ipin Itansan | 1800:1 |
| Ifihan Iru | DLP |
| Orisun Imọlẹ | Laser/LED Hybrid |
| Asopọmọra Technology | HDMI, USB, VGA, AV, Serial |
| Pataki Ẹya | Gbigbe |
| Ọja Mefa | 8 x 11.7 x 1.7 inches |
8. Atilẹyin ọja ati Support
For warranty information and technical support, please refer to the documentation provided with your purchase or contact the retailer. Keep your proof of purchase for warranty claims.