1. Alaye Aabo
Please read and understand all instructions before operating the Outfunny 24V Electric Kids Ride-On Car Toy. Keep this manual for future reference.
- Ibiti ọjọ ori: Dara fun awọn ọmọde ti o wa ni oṣu 24 si ọdun 5.
- Ikojọpọ ti o pọju: Do not exceed 66 lbs (30 kg).
- Awọn ẹya Aabo: Always ensure the child is secured with the seat belt and that doors are locked during operation. The vehicle is equipped with an all-wheel suspension system for a smoother ride.
- Abojuto Agba: Constant adult supervision is required during operation.
- Ayika Ṣiṣẹ: Use on flat, dry surfaces. Avoid slopes, uneven terrain, and public roads.
2. Eto ati Apejọ
The Outfunny 24V Electric Kids Ride-On Car Toy comes partially assembled. Follow these steps for complete setup.
2.1 Unboxing ati Ṣayẹwo paati
Carefully remove all components from the packaging. Verify that all parts listed in the user manual are present and undamaged.
2.2 Initial Assembly Steps
Begin by attaching the wheels and axles. Ensure all connections are secure. The included nut driver tools are helpful for tightening components.

Aworan: Underside view of the ride-on car showing the wheels and axle being attached. The axle rod is inserted through the chassis, and wheels are secured with nuts and caps.
2.3 Steering Wheel and Dashboard Installation
Connect the steering wheel to the steering column. Ensure all wiring connections are properly seated before securing the dashboard components.

Image: A person attaching the steering wheel to the steering column, ensuring proper alignment and connection.
2.4 batiri Asopọ
Locate the battery compartment, typically under the seat. Connect the red and black battery terminals securely. Ensure the main power connector is firmly plugged in.

Image: Close-up of hands connecting the battery terminals within the battery compartment of the ride-on car.
2.5 Seat and Roll Bar Installation
Install the seat(s) and secure them with screws. Attach the roll bar and any additional accessories like mirrors or decorative lights.

Image: A person installing the seat into the ride-on car, ensuring it clicks into place or is screwed down securely.

Image: A person attaching the roll bar, which includes integrated lights, to the rear of the ride-on car.
2.6 Watch Assembly Video
For a detailed visual guide on assembly, please refer to the official installation video:
Video: Outfunny 24V Kids Ride on Car Toy Installation Video. This video provides step-by-step instructions for assembling the ride-on car, covering all major components and connections.
3. Awọn ilana Iṣiṣẹ
Familiarize yourself with the controls before allowing a child to operate the vehicle.
3.1 Titan / Pa a
Press the 'Start/Stop' button on the dashboard to turn the vehicle on or off. The LED display will illuminate when powered on.

Aworan: A alaye view of the ride-on car's dashboard, showing the power button, media controls, and various indicators.
3.2 Wíwakọ̀ ọkọ̀ ayọ́kẹ́lẹ́
The vehicle can be operated manually by the child using the steering wheel and foot pedal, or by an adult using the remote control.
- Isẹ afọwọṣe: Press the foot pedal to accelerate. Release the pedal to brake. Use the steering wheel to change direction.
- Eto Iyara: The vehicle features 3-speed modes (2.7-4.1 Mph). Adjust the speed using the controls on the dashboard or remote.

Aworan: Ẹyin view of the black Outfunny 24V Electric Kids Ride-On Car Toy, highlighting its robust design and rear lights.
3.3 Iṣẹ iṣakoso latọna jijin
The parental remote control allows adults to steer, control speed, and stop the vehicle. This is ideal for younger children or for safety intervention.
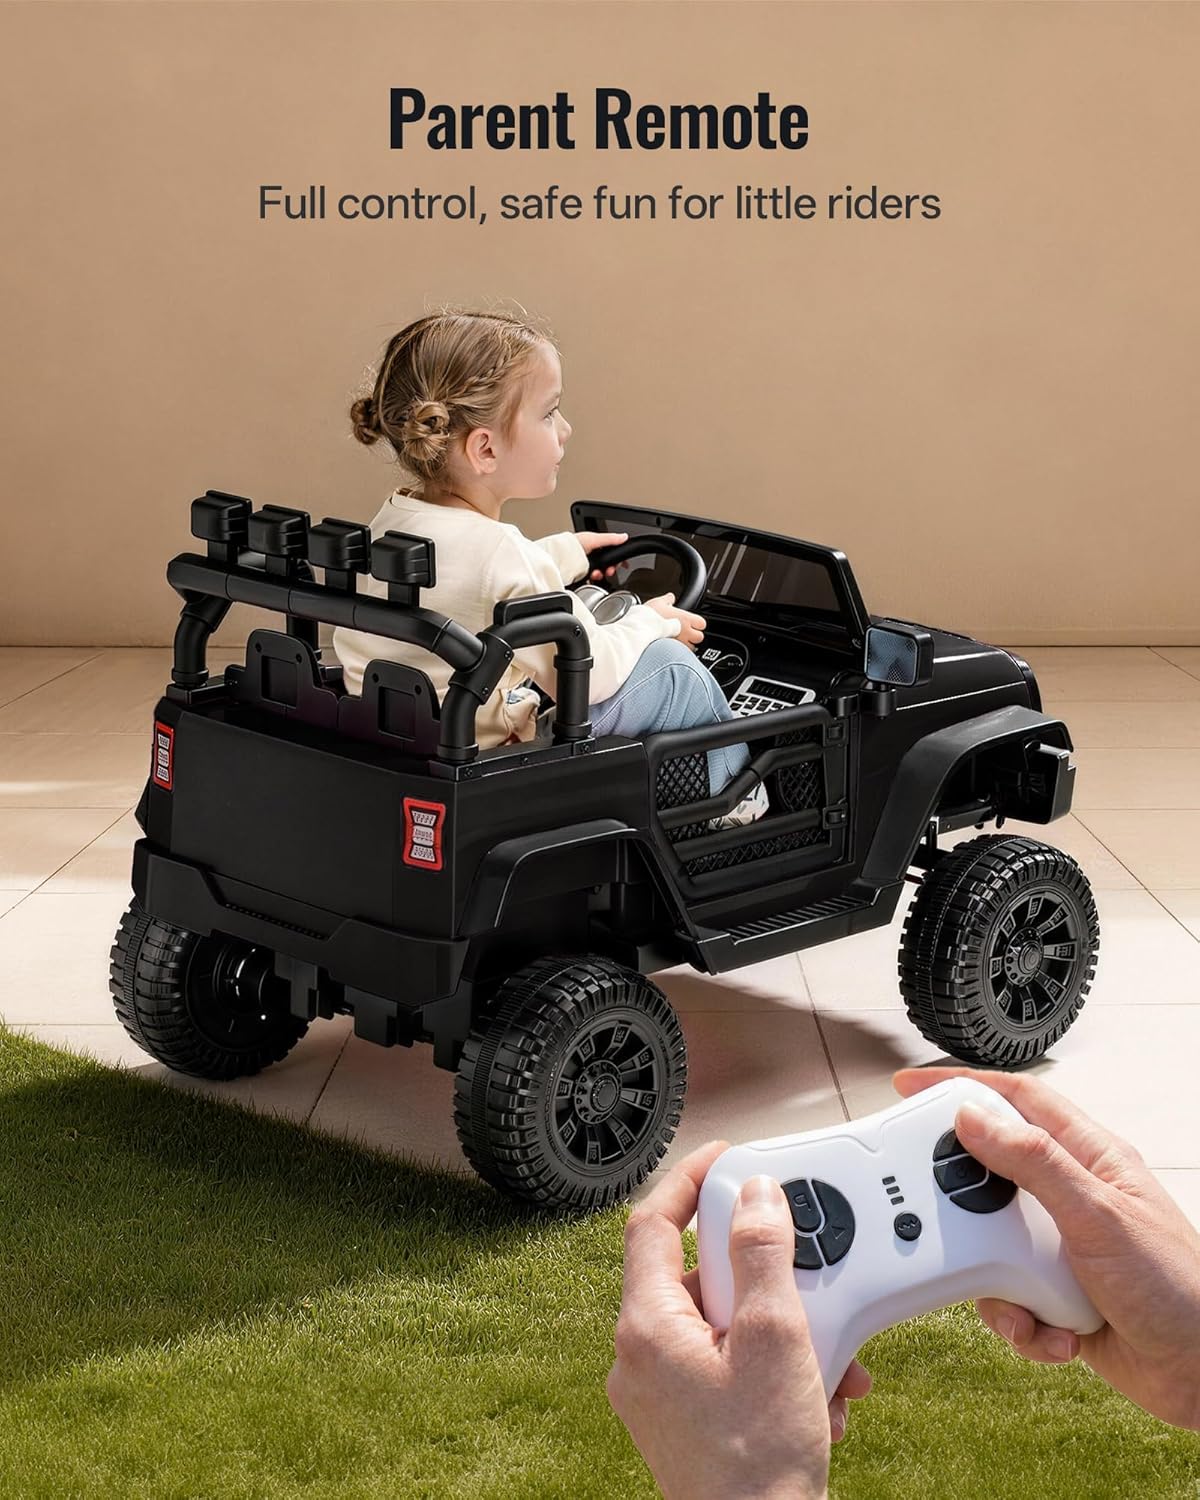
Image: A child seated in the ride-on car while a parent uses the remote control to guide the vehicle, demonstrating parental control functionality.
3.4 Media Functions
The vehicle includes a built-in music player and Bluetooth connectivity.
- Mimuuṣiṣẹpọ Bluetooth: Activate Bluetooth on the dashboard and pair with your mobile device to play your child's favorite music.
- Ẹrọ orin: Use the dashboard controls to navigate pre-loaded songs or adjust volume.

Image: A hand holding a smartphone, showing a successful Bluetooth connection to the ride-on car's media system on the dashboard.
3.5 Watch Operating Video
See the vehicle in action and learn about its features:
Video: Outfunny Ride on Car - Let's Have Fun! This video showcases the ride-on car's various features and demonstrates its operation in a fun and engaging way.
4. Itọju
4.1 Ngba agbara si Batiri naa
The 24V battery provides approximately 1-1.5 hours of continuous playtime. For optimal battery life, charge the battery for 8-12 hours before first use and after each use. Do not charge for more than 20 hours.
4.2 Ninu ati Ibi ipamọ
Fi ìpolówó nu ọkọ̀ náàamp cloth to clean. Avoid using harsh chemicals. Store the vehicle in a dry, covered area away from direct sunlight and moisture when not in use.
5. Laasigbotitusita
- Vehicle Not Moving: Check if the battery is fully charged and properly connected. Ensure the power button is on and the remote control is not overriding manual operation.
- Reduced Power/Speed: This may indicate a low battery charge. Recharge the battery fully. If the issue persists, the battery may need replacement.
- Iṣakoso Latọna jijin Ko Dahun: Ensure the remote control has fresh batteries and is properly paired with the vehicle.
6. Awọn pato
| Ẹya ara ẹrọ | Ẹ̀kúnrẹ́rẹ́ |
|---|---|
| Nọmba awoṣe | J303C |
| Ọja Mefa | 39.4 x 24.8 x 25.6 inches |
| Iwọn Nkan | 36.2 iwon |
| Niyanju Ọjọ ori | 24 osu - 5 ọdun |
| O pọju fifuye Agbara | 66 lbs |
| Batiri | 24V |
| Awọn ọkọ ayọkẹlẹ | 2 x200W |
| Akoko ere | 1-1.5 Hours (continuous) |
7. Atilẹyin ọja ati Support
For warranty information, technical support, or replacement parts, please contact Outfunny customer service. Refer to your purchase documentation for specific contact details.
