Ọrọ Iṣaaju
This manual provides instructions for the Oraimo FlowMotion Smart 3-Axis Gimbal Stabilizer. This advanced accessory is designed to enhance your content creation by providing smooth, professional-quality video recording. It features smart face tracking technology to keep your subject in focus and a 3-axis stabilization system to eliminate camera shake. The compact and durable design makes it suitable for various filming needs, from vlogging to live streaming.
Ohun ti o wa ninu Apoti
- Oraimo FlowMotion Smart 3-Axis Gimbal Stabilizer
- Itọsọna olumulo
- Ipele Oke
- Okun Ngba agbara USB
Ọja Pariview
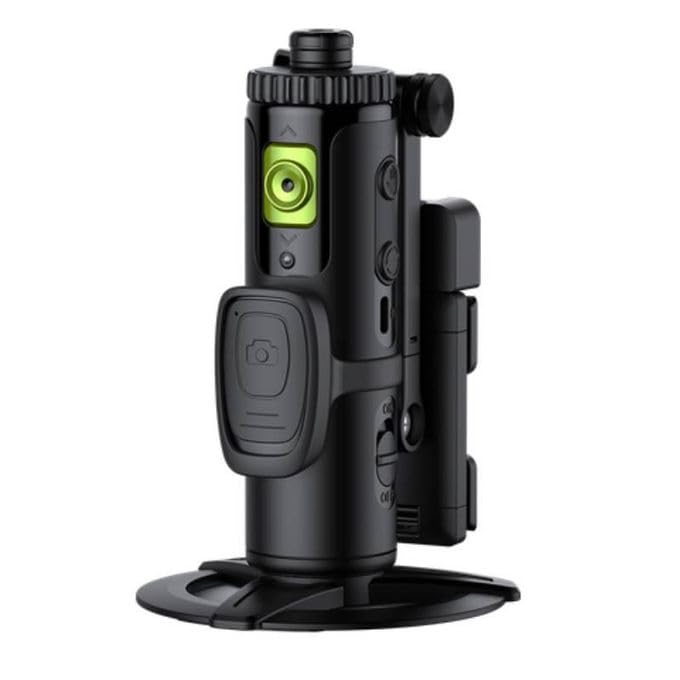
Nọmba 1: Oraimo FlowMotion Smart 3-Axis Gimbal Stabilizer OAT-201A with a smartphone mounted and an LED light accessory. The gimbal is shown on a table, highlighting its smart tracking and multi-angle shooting capabilities.
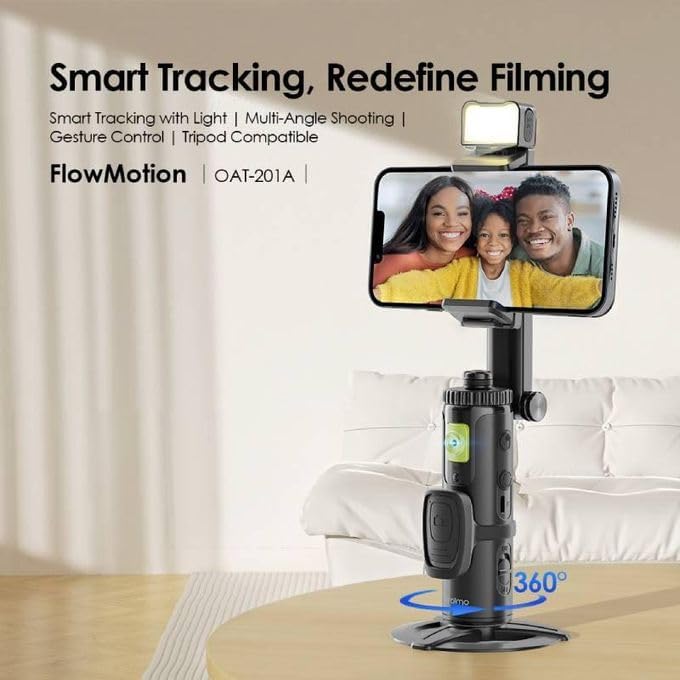
Nọmba 2: Oraimo FlowMotion Smart 3-Axis Gimbal Stabilizer OAT-201A demonstrating multi-angle shooting. This image illustrates the gimbal's ability to rotate 360 degrees around the phone and 360 degrees at its base, as well as 180 degrees for vertical shooting, offering versatile recording angles.
Ṣeto
- Gba agbara Gimbal naa: Before first use, fully charge the gimbal using the provided USB charging cable. Connect the cable to the gimbal's charging port and a suitable USB power source. The LED indicator will show charging status.
- So Foonu Foonu Rẹ So: Fa foonu klamp and carefully place your smartphone in it, ensuring it is securely centered. The gimbal supports phones up to 500g.
- Agbara Tan: Press and hold the power button for a few seconds until the LED indicator lights up, indicating the gimbal is powered on.
- Sopọ nipasẹ Bluetooth: Enable Bluetooth on your smartphone. Open your phone's Bluetooth settings and search for the gimbal (e.g., "Oraimo Gimbal"). Pair the devices. This connection is necessary for smart tracking and remote control features.
- Install the App (Optional): For enhanced features and control, download and install the dedicated Oraimo gimbal app from your smartphone's app store.
Awọn ilana Iṣiṣẹ
- Awọn iṣakoso ipilẹ: The control panel features intuitive buttons for various functions. Refer to the specific button layout on your device for detailed functions such as mode switching, recording start/stop, and zoom control.
- Smart Face Tracking: Once connected via Bluetooth and with the app (if used), activate face tracking. Position yourself or your subject in front of the camera, and the gimbal will automatically follow their movement, keeping them centered in the frame.
- Ipo Yipada: Press the mode button to cycle through different operating modes (e.g., Pan Follow, Lock Mode, POV). Each mode offers a unique stabilization behavior for different shooting scenarios.
- Atunṣe Afọwọṣe: You can manually adjust the gimbal's angle using the joystick or by gently moving the phone clamp si ipo ti o fẹ.
- Agbara Pa: Tẹ mọlẹ bọtini agbara titi ti itọkasi LED yoo wa ni pipa.
Itoju
- Ninu: Use a soft, dry cloth to clean the gimbal. Avoid using harsh chemicals or abrasive materials that could damage the surface.
- Ibi ipamọ: Store the gimbal in a cool, dry place away from direct sunlight and extreme temperatures. When not in use for extended periods, ensure the battery is partially charged (around 50%) to prolong its lifespan.
- Itọju Batiri: Do not expose the battery to high temperatures or disassemble it. Charge the gimbal regularly, even if not in frequent use, to maintain battery health.
Laasigbotitusita
- Gimbal Kò Ṣiṣẹ́: Ensure the gimbal is fully charged. If the issue persists, try connecting it to a different charging cable or power adapter.
- Foo tí kò dúró ṣinṣintage: Verify that your smartphone is securely mounted and balanced in the clamp. Ensure the gimbal is calibrated correctly (refer to app instructions if applicable).
- Face Tracking Not Working: Confirm that Bluetooth is connected and the Oraimo app (if used) has the necessary permissions. Ensure the subject's face is clearly visible to the camera.
- Awọn oran Asopọ Bluetooth: Try restarting both the gimbal and your smartphone. Ensure no other devices are interfering with the Bluetooth signal.
- Gimbal Not Responding: Power off the gimbal and restart it. If unresponsive, allow the battery to fully discharge and then recharge it.
Awọn pato
| Ẹya ara ẹrọ | Ẹ̀kúnrẹ́rẹ́ |
|---|---|
| Orukọ Brand | Oraimo |
| Orukọ awoṣe | OAT-201A |
| Nọmba awoṣe / Nọmba apakan | Ofm-g01 |
| Àwọ̀ | Dudu |
| Awọn ẹrọ ibaramu | Mobile Phone, Smartphone |
| Pataki Awọn ẹya ara ẹrọ | Smart Àtòjọ |
| Ohun elo | Irin |
| Iwọn Nkan | 278 giramu |
| O pọju iwuwo Agbara | 500 giramu |
| Awọn iwọn Ọja (D x W x H) | 8.5 cm x 8 cm x 20 cm |
| Ti ṣe pọ Iwon | 15.0 cm x 8.0 cm x 5.0 cm |
| Iduroṣinṣin Aworan | 3-axis Gimbal Stabilization |
| Fidio Yaworan kika | MP4 |
| Ipinnu Yaworan fidio | 4K (3840 x 2160) |
| Gbigbasilẹ ohun | Rara |
| Awọn ipo iyaworan | Ipasẹ Oju |
| Ifihan Iṣakoso Iru | Laifọwọyi |
| File Ọna kika | Video (4K) |
| Media Iru | Fidio |
Atilẹyin ọja ati Support
This Oraimo FlowMotion Smart 3-Axis Gimbal Stabilizer comes with a ọkan-odun atilẹyin ọja from the date of purchase. This warranty covers manufacturing defects and ensures reliable performance under normal use. Please retain your proof of purchase for warranty claims.
For technical support, troubleshooting assistance, or warranty inquiries, please contact Oraimo customer service through their official website or the contact information provided in your product packaging. Always refer to the official Oraimo resources for the most accurate and up-to-date support information.