
1. Ifihan
The ACASIS USB C to Dual HDMI DisplayLink Adapter (Model DS0602) is designed to expand your laptop's display capabilities, allowing connection to two external 4K@60Hz monitors via a single USB-C or USB-A port. This adapter also provides additional USB-A ports for peripherals and 100W Power Delivery (PD) charging for your laptop.
It is compatible with a wide range of systems, including Mac (M1/M2/M3) and Windows PCs. This device utilizes DisplayLink technology, which requires a driver installation for full functionality.

Figure 1.1: The ACASIS USB C to Dual HDMI DisplayLink Adapter, showcasing apẹrẹ kekere rẹ ati awọn ibudo pupọ.
2. Package Awọn akoonu
Daju pe gbogbo awọn nkan wa ninu apo rẹ:
- ACASIS USB C to Dual HDMI DisplayLink Adapter (Model DS0602)
- Itọsọna olumulo

Figure 2.1: Illustration of the package contents, including the adapter and user manual.
3. Awọn pato
| Ẹya ara ẹrọ | Ẹ̀kúnrẹ́rẹ́ |
|---|---|
| Nọmba awoṣe | DS0602 |
| Ọja Mefa | 2.95 x 2.32 x 0.63 inches |
| Iwọn Nkan | 4.2 iwon |
| Awọn ẹrọ ibaramu | Desktop, Laptop (Mac M1/M2/M3, Windows) |
| Asopọmọra Iru | USB Iru C, USB Iru A |
| Ijade fidio | 2x HDMI (up to 4K@60Hz) |
| Awọn ibudo USB-A | 3x USB-A 2.0 (480Mbps) |
| Ifijiṣẹ Agbara | 100W USB-C PD Charging |
| Chipset | DisplayLink DL6950 |
| Ohun elo | Aluminiomu |

olusin 3.1: Ti abẹnu view highlighting the DisplayLink DL6950 smart chip, designed for higher speed and efficiency.
4. Awọn ilana iṣeto
Follow these steps to set up your ACASIS DisplayLink Adapter:
- Fi DriveLink sori ẹrọ: Before connecting the adapter, it is crucial to install the DisplayLink driver for your operating system. Refer to Section 6 for detailed driver installation instructions.
- Sopọ si Kọǹpútà alágbèéká:
- If your laptop has a USB-C port, connect the adapter's integrated USB-C cable directly to your laptop.
- If your laptop only has USB-A ports, use the included USB-C to USB-A adapter to connect the main cable to a USB-A port on your laptop.
- Connect HDMI Monitors: Plug your HDMI cables from your external monitors into the "HDMI 1" and "HDMI 2" ports on the ACASIS adapter.
- Sopọ Agbara (Aṣayan ṣugbọn a ṣe iṣeduro): For optimal performance and to charge your laptop, connect your laptop's USB-C power adapter to the "PD 100W" port on the ACASIS adapter. This will pass through up to 90W of power to your laptop.
- Awọn Agbeegbe Sopọ: Plug your USB devices (e.g., mouse, keyboard, flash drives) into the available USB-A 2.0 ports on the adapter.

Figure 4.1: Diagram illustrating the connection of the adapter to a laptop, two monitors, power, and USB peripherals.
Video 4.1: An introduction to the ACASIS USB C to Dual HDMI DisplayLink Adapter, demonstrating its physical connections and setup process.
5. Ṣiṣẹ Adapter
Once the DisplayLink driver is installed and the adapter is connected, your system should detect the external monitors. You can configure your display settings through your operating system.
5.1 Ifihan Awọn ipo
The adapter supports two primary display modes:
- Fa Ipo: Each monitor displays a different desktop, allowing for increased workspace. This is ideal for multitasking.
- Ipo digi: All connected monitors display the same content as your primary screen. This is useful for presentations.
You can switch between these modes and arrange your displays in your operating system's display settings (e.g., System Preferences > Displays on macOS, Display Settings on Windows).

Figure 5.1: Visual representation of Mirror Mode and Extend Mode functionality across Windows and Mac operating systems.

Figure 5.2: A setup demonstrating dual 4K@60Hz extended displays, particularly suitable for Mac M1/M2/M3 users after driver installation.
5.2 Ifijiṣẹ agbara
The 100W USB-C PD port allows you to charge your laptop while using the adapter. Connect your laptop's original USB-C power adapter to the PD port on the ACASIS adapter. The adapter will pass through up to 90W of power to your laptop, ensuring it remains charged during use.

Figure 5.3: Illustration of the 100W Power Delivery feature, showing power flow from an external adapter through the ACASIS device to a laptop.
5.3 Awọn ibudo USB-A
The three USB-A 2.0 ports (480Mbps) are suitable for connecting standard peripherals such as a mouse, keyboard, or USB flash drives. These ports are designed for convenience in office setups rather than high-speed data transfers of large files.

Figure 5.4: A laptop setup demonstrating the use of the three USB-A 2.0 ports for connecting a keyboard and mouse.
Video 5.1: A demonstration of the ACASIS USB C to Dual HDMI DisplayLink Adapter in use, showing dual monitor setup and peripheral connections.
6. DisplayLink Driver Installation
The ACASIS DisplayLink Adapter requires the installation of the DisplayLink driver to function correctly, especially for extended display modes on macOS and Windows. Follow these steps to download and install the driver:
- Access the Official Webojula: Ṣii rẹ web browser and navigate to the official DisplayLink driver download page. You can typically find this by searching for "DisplayLink drivers Synaptics" or visiting Synaptics DisplayLink Downloads.
- Yan Eto Iṣiṣẹ Rẹ: On the DisplayLink download page, locate and select the appropriate driver for your operating system (e.g., macOS, Windows).
- Ṣe igbasilẹ Awakọ naa: Click the download link for the latest stable version of the DisplayLink driver.
- Fi sori ẹrọ Awakọ naa:
- Windows: Ṣiṣe awọn gbaa lati ayelujara executable file and follow the on-screen instructions to complete the installation. Restart your computer if prompted.
- MacOS: Ṣii igbasilẹ .dmg file, run the installer, and follow the prompts. You may need to grant system permissions during installation. Restart your Mac after installation.
- Sopọ Adapter: After the driver is successfully installed and your computer has restarted (if necessary), connect the ACASIS DisplayLink Adapter to your laptop and monitors as described in Section 4.
Note: Always ensure your computer is powered off before unplugging the adapter to prevent potential data loss or system issues.
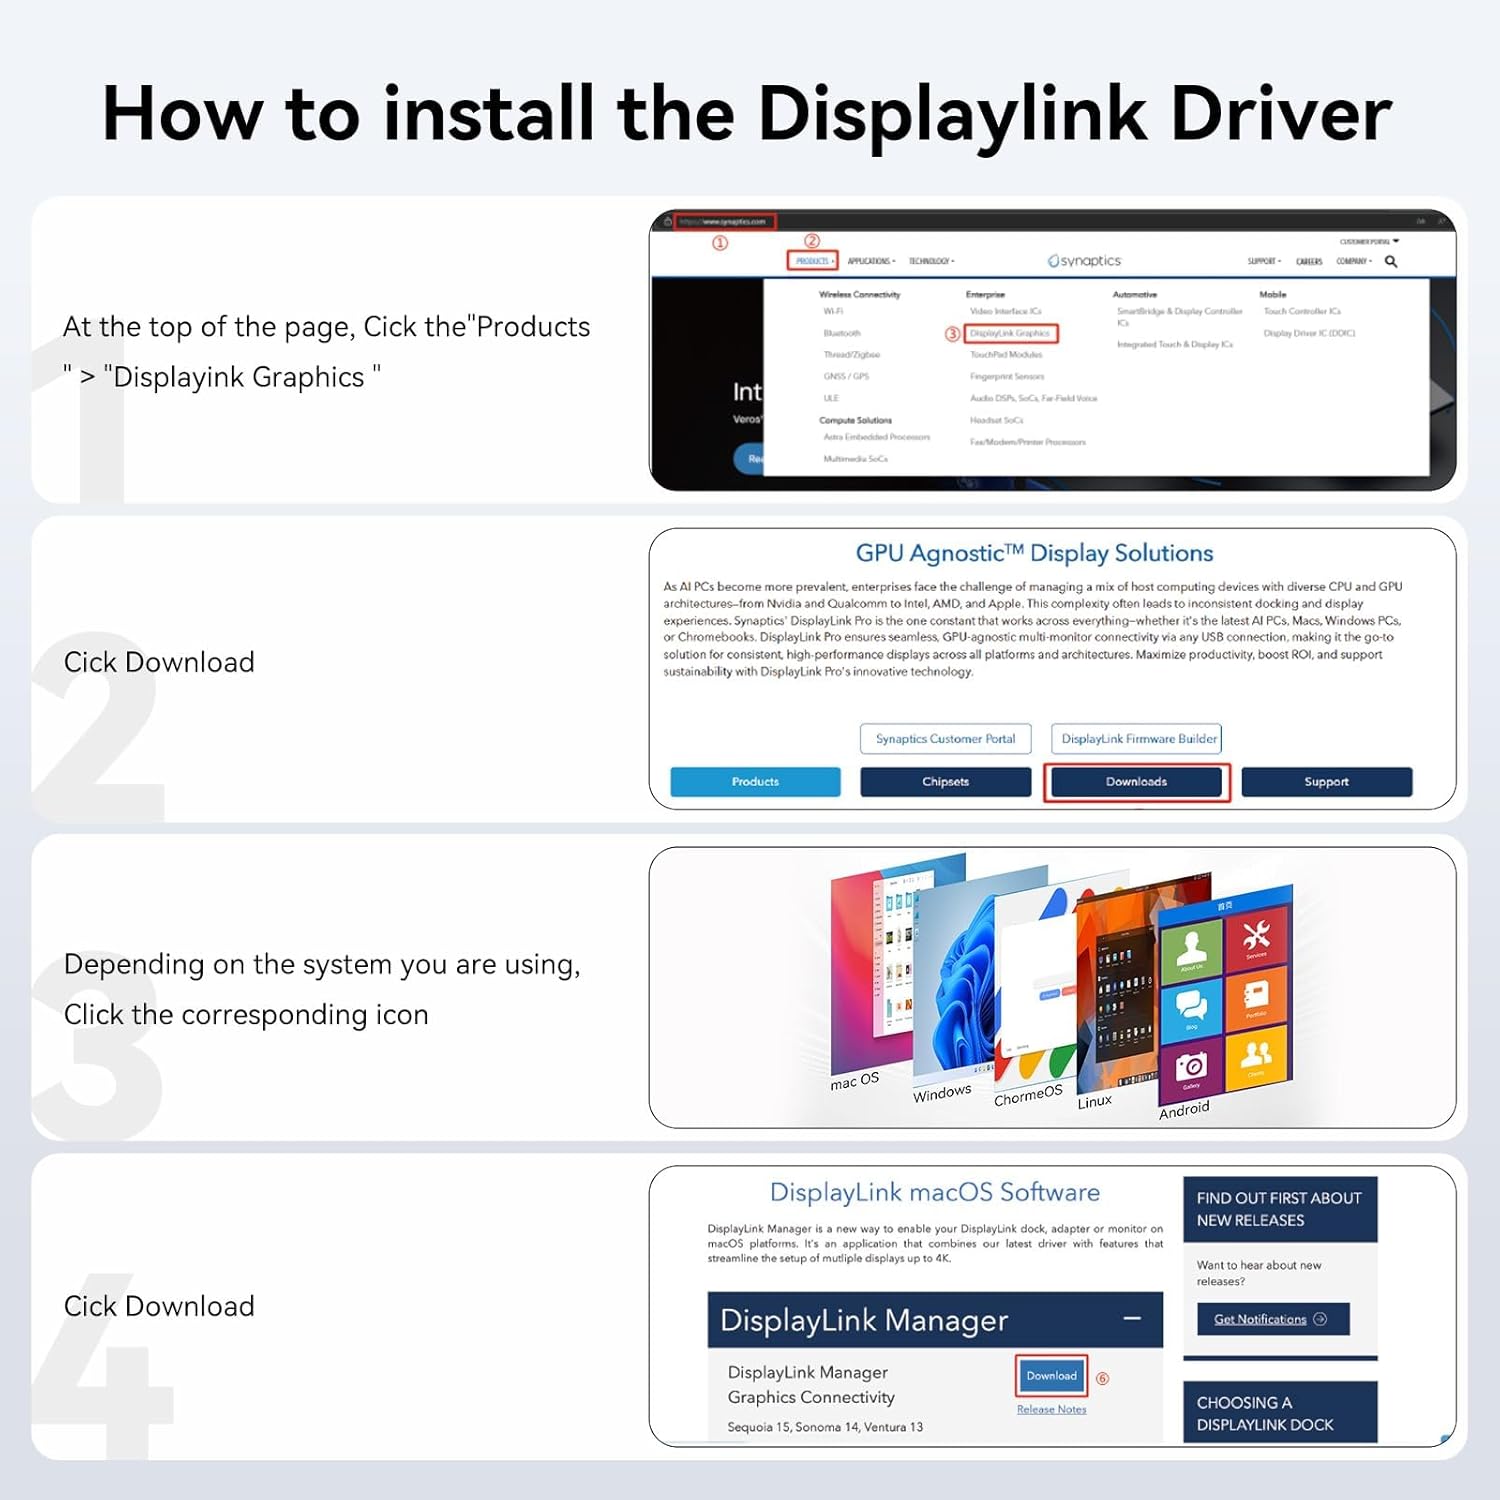
Figure 6.1: Step-by-step guide on how to download and install the DisplayLink driver from the official Synaptics webojula.
7. Laasigbotitusita
If you encounter issues with your ACASIS DisplayLink Adapter, refer to the following common solutions:
- Ko si iboji ifihan/ti n tan kiri:
- Rii daju pe awakọ DisplayLink ti fi sori ẹrọ daradara ati imudojuiwọn si ẹya tuntun.
- Verify all HDMI and USB connections are secure.
- Gbiyanju lati tun kọmputa rẹ bẹrẹ.
- Check your display settings in your operating system to ensure monitors are detected and configured correctly (e.g., resolution, refresh rate).
- Adapter O gbona:
It is normal for the adapter to feel warm during operation, especially when driving dual 4K displays, transferring data, and delivering 100W charging. The aluminum casing acts as a heat sink to dissipate heat and prevent overheating. As long as it does not become too hot to touch (typically 50-60°C for the casing) and shows no issues like frequent disconnections or screen flickering, it is operating within a safe range.
- Awọn ẹya ara ẹrọ ti ko ṣiṣẹ:
- Ensure the USB devices are properly plugged into the adapter's USB-A ports.
- Try connecting the peripheral directly to your laptop to confirm it is functional.
- Tun kọmputa rẹ bẹrẹ.
- Kọǹpútà alágbèéká Ko Ngba agbara:
- Verify your USB-C power adapter is connected to the "PD 100W" port on the ACASIS adapter.
- Ensure your power adapter is capable of delivering sufficient power (e.g., 100W).

Figure 7.1: Explanation regarding the normal operating temperature of the adapter due to its DisplayLink chip and PD fast-charge module.
8. Itọju
To ensure the longevity and optimal performance of your ACASIS DisplayLink Adapter, follow these maintenance guidelines:
- Ninu: Lo aṣọ rírọrùn tí ó gbẹ láti nu adapta náà. Yẹra fún àwọn ohun èlò ìfọmọ́ omi tàbí àwọn ohun èlò ìfọ́.
- Ibi ipamọ: Tọju ohun ti nmu badọgba ni itura, aye gbigbẹ kuro lati orun taara ati awọn iwọn otutu to gaju.
- Mimu: Yago fun sisọ ohun ti nmu badọgba silẹ tabi fifisilẹ si awọn ipa to lagbara.
- Iṣakoso USB: Do not bend or crimp the integrated cable excessively to prevent internal damage.
9. Atilẹyin ọja ati Support
For warranty information and technical support, please refer to the official ACASIS webojula tabi kan si wọn onibara iṣẹ. Tọju iwe-ẹri rira rẹ fun awọn ẹtọ atilẹyin ọja.
Manufacturer: ACASIS