
1. Ifihan
The RENESAS E2 Emulator (Model RTE0T00020KCE00000R) is a professional-grade in-circuit debugging and programming tool designed for the development of embedded systems utilizing Renesas RH850, RL78, and RX series microcontrollers. This device facilitates real-time code analysis, system optimization, and efficient firmware updates directly within the target system. It integrates seamlessly with Renesas development environments to streamline the embedded software development process.
2. Alaye Aabo
Please read and understand all safety instructions before operating the E2 Emulator. Failure to follow these instructions may result in injury, damage to the product, or damage to connected devices.
- Ibi ti ina elekitiriki ti nwa: Use only the specified power supply for the emulator and target system.
- Ayika: Operate the device in a dry, stable environment, away from extreme temperatures, humidity, and direct sunlight.
- Mimu: Handle the emulator with care. Avoid dropping or subjecting it to strong impacts.
- Awọn isopọ: Ensure all connections are secure and correctly oriented before applying power. Disconnect power before making or breaking connections.
- Ina Aimi: Take precautions against electrostatic discharge (ESD) when handling the emulator and target boards.
- Awọn atunṣe: Do not attempt to modify or disassemble the emulator. Refer all servicing to qualified personnel.
3. Package Awọn akoonu
Daju pe gbogbo awọn nkan ti a ṣe akojọ rẹ si isalẹ wa ninu package rẹ:
- RENESAS E2 Emulator (RTE0T00020KCE00000R)
- Okun USB (fun asopọ kọmputa)
- Connection Cable (for target board connection)
- Software Development Tool (on media or available for download)
- Itọsọna Ibẹrẹ kiakia (tabi awọn iwe ti o jọra)
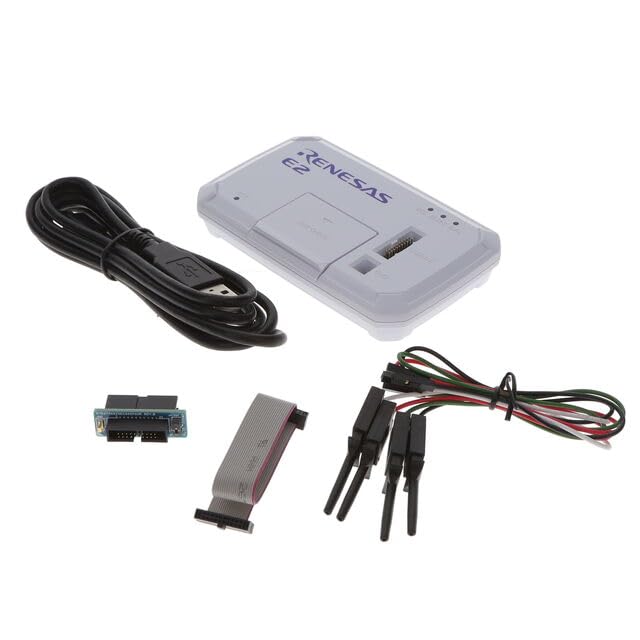
Image 1: RENESAS E2 Emulator and typical accessories. The image displays the compact E2 Emulator unit, a USB cable for connecting to a host PC, and a ribbon cable for connecting to the target microcontroller board.
4. Eto
Follow these steps to set up your E2 Emulator for use:
- Fi software sori ẹrọ: Install the necessary Renesas Integrated Development Environment (IDE) and E2 Emulator drivers on your personal computer. Refer to the software documentation for specific installation instructions.
- Sopọ si PC: Connect the E2 Emulator to your personal computer using the provided USB cable. The PC should recognize the device and install any remaining drivers automatically.
- Connect to Target Board: Connect the E2 Emulator to your target microcontroller board using the appropriate connection cable. Ensure the orientation is correct and the connection is secure. Refer to your target board's documentation for the correct debug header pinout.
- Power On Target: Apply power to your target microcontroller board. The E2 Emulator typically draws power from the USB connection, but the target board requires its own power supply.
- Jẹrisi Asopọmọra: Launch your Renesas IDE (e.g., e2 studio) and configure the debugger settings to detect and connect to the E2 Emulator and your target microcontroller.
5. Awọn ilana Iṣiṣẹ
The E2 Emulator supports various operations for developing and testing embedded applications.
5.1. Debugging Microcontrollers
To debug your application code:
- Load Program: In your IDE, load the compiled program (e.g., .elf file) onto the target microcontroller via the E2 Emulator.
- Set Breakpoints: Place breakpoints in your source code where you want execution to pause.
- Start Debugging: Initiate the debugging session from the IDE. The program will execute on the target until a breakpoint is hit.
- Step Through Code: Use the IDE's debugging controls (step over, step into, step out) to navigate through your code line by line.
- Monitor Variables: Observe the values of variables, registers, and memory contents in real-time.
- Itupalẹ akoko gidi: Utilize advanced debugging features for performance analysis and event tracing, if supported by your IDE and microcontroller.
5.2. Programming Microcontrollers
To program or re-program your microcontroller:
- Prepare Firmware: Ensure you have the final firmware image (e.g., .hex, .mot, .srec file) ready for programming.
- Yan Ẹrọ: In your IDE or dedicated programming tool, select the correct target microcontroller device.
- Configure Programmer: Configure the E2 Emulator as the programming tool.
- Erase/Program: Use the programming interface to erase the existing flash memory and then program the new firmware image onto the microcontroller.
- Jẹrisi: After programming, perform a verification step to ensure the firmware was written correctly.
5.3. Supported Microcontroller Families
The E2 Emulator is compatible with the following Renesas microcontroller families:
- RH850 jara
- RL78 jara
- RX jara
For specific device support within these families, refer to the latest documentation provided by Renesas for the E2 Emulator and your chosen IDE.
6. Itọju
Proper maintenance ensures the longevity and reliable operation of your E2 Emulator.
- Ninu: Use a soft, dry cloth to clean the exterior of the emulator. Do not use liquid cleaners or solvents.
- Ibi ipamọ: Store the emulator in a clean, dry, and dust-free environment when not in use.
- Itọju USB: Avoid bending or crimping the USB and connection cables excessively. Inspect cables regularly for damage.
- Awọn imudojuiwọn sọfitiwia: Regularly check for and install the latest firmware and software updates for the E2 Emulator and your IDE from the official Renesas webojula.
7. Laasigbotitusita
If you encounter issues with your E2 Emulator, try the following troubleshooting steps:
| Isoro | Owun to le Fa / Solusan |
|---|---|
| Emulator not detected by PC |
|
| Cannot connect to target microcontroller |
|
| Programming fails or is unstable |
|
If the problem persists, consult the detailed documentation provided by Renesas or contact Renesas technical support.
8. Awọn pato
Key technical specifications for the RENESAS E2 Emulator (RTE0T00020KCE00000R):
| Ẹya ara ẹrọ | Ẹ̀kúnrẹ́rẹ́ |
|---|---|
| Brand | RENESAS |
| Orukọ awoṣe | E2 emulator |
| Nọmba awoṣe | RTE0T00020KCE00000R |
| Asopọmọra Technology | USB |
| Awọn ẹrọ ibaramu | Personal Computer, Renesas Microcontrollers (RH850, RL78, RX series) |
| Eto isesise | Embedded (for the emulator itself) |
| -Itumọ ti Media | Ọpa Idagbasoke Software |
| Awọn Iwọn Nkan (L x W x H) | 6"L x 3"W x 1"H |
| Lapapọ Awọn ibudo USB | 1 |
| Ramu Memory sori iwọn | 1 MB |
| Agbara Ibi ipamọ Iranti | 1 Bytes (likely refers to internal storage for basic operation, not user data) |
| Ramu Memory Technology | DDR3 |
| isise Brand | Renesas |
| Iwọn ero isise | 1 |
9. Atilẹyin ọja ati Support
Atilẹyin ọja: The manufacturer's warranty description states "No". Please refer to your point of purchase or Renesas' official website for any applicable regional or reseller-specific warranty information.
Oluranlowo lati tun nkan se: For technical assistance, documentation, software downloads, and further information regarding the E2 Emulator, please visit the official RENESAS website or contact their authorized support channels.