
Vetroo M06
Vetroo M06 Micro-ATX/Mini-ITX Gaming PC Case Instruction Manual
Awoṣe: M06
Ọrọ Iṣaaju
This manual provides detailed instructions for the installation, operation, and maintenance of your Vetroo M06 Micro-ATX/Mini-ITX Gaming PC Case. Please read this manual thoroughly before beginning assembly to ensure proper setup and optimal performance.

Image: The Vetroo M06 Micro-ATX/Mini-ITX Gaming PC Case in black, showcasing its mesh front panel and side window, viewed lati igun kan.
Key Awọn ẹya ara ẹrọ
- Apẹrẹ Iwapọ: Micro-ATX / Mini-ITX form factor with a high-airflow mesh front panel, designed for space-efficient builds.
- Itutu Itutu Ti a Ṣe iṣapeye: Supports up to five 120mm fans and a 240mm top-mounted liquid radiator for efficient thermal management.
- GPU Compatibility: Accommodates graphics cards up to 355mm in length.
- Flexible PSU Mounting: Features an adjustable power supply installation area with a maximum length of 160mm.
- Igbalode Asopọmọra: Front panel includes USB Type-C and USB 3.0 ports for convenient peripheral access.
Package Awọn akoonu
Jọwọ rii daju pe gbogbo awọn eroja wa ṣaaju ki o to tẹsiwaju pẹlu fifi sori ẹrọ:
- Vetroo M06 PC Case
- Accessory Box (screws, standoffs, cable ties)
- SFX PSU Bracket (1x)
- Afowoyi Olumulo (iwe-ipamọ yii)
Awọn pato
| Ẹya ara ẹrọ | Ẹ̀kúnrẹ́rẹ́ |
|---|---|
| Orukọ awoṣe | M06 |
| Iru Irú | Ile-iṣọ kekere |
| Modaboudu Ibamu | Micro ATX, Mini ITX |
| Awọn iwọn Ọja (L x W x H) | 15.55" x 7.87" x 13.07" (395mm x 200mm x 332mm) |
| Iwọn Nkan | 13.37 poun (6.06 kg) |
| Ohun elo | Acrylonitrile Butadiene Styrene (ABS), SPCC (0.8mm metal plate) |
| Max GPU Ipari | 355mm |
| Max Sipiyu kula Iga | 165mm |
| Iye ti o ga julọ ti PSU | 160mm (Adjustable mounting) |
| Fan Support | Titi di awọn onijakidijagan 5 x 120mm |
| Radiator Support | 1 x 240mm (Top) |
| Iwaju Awọn Ibudo I / O | 1 x USB Type-C, 1 x USB 3.0, HD Audio, Power Button, Reset Button |

Image: Diagram illustrating the compact dimensions of the Vetroo M06 PC case, measuring 15.5 inches in depth, 7.8 inches in width, and 13.0 inches in height.

Image: A detailed diagram outlining the compatibility specifications for the Vetroo M06 PC case, including maximum CPU cooler height (165mm), GPU length (355mm), PSU length (160mm), and supported motherboard form factors (M-ATX/ITX).
Eto ati fifi sori
Before starting, ensure you have a clean, static-free workspace. Refer to your component manuals for specific installation details.
1. Modaboudu fifi sori
- Remove the side panel(s) of the case.
- Install the necessary motherboard standoffs into the case tray according to your motherboard's form factor (Micro-ATX or Mini-ITX).
- Fi pẹ̀lẹ́pẹ̀lẹ́ gbé mótábódì rẹ sí orí àwọn ibi tí wọ́n ti ń dì í, kí o sì ṣe àtúnṣe àwọn ihò skru náà.
- Oluso modaboudu pẹlu skru.
2. GPU fifi sori
- Remove the appropriate PCIe slot covers from the rear of the case.
- Insert your graphics card into the primary PCIe slot on your motherboard.
- Ṣe aabo kaadi awọn eya aworan si ọran pẹlu awọn skru.
- Connect any required PCIe power cables from your power supply to the GPU.
3. PSU fifi sori
- Determine the desired mounting position for your power supply. The Vetroo M06 supports adjustable PSU mounting.
- If using an SFX power supply, attach the included SFX bracket to the PSU.
- Slide the power supply into its designated bay and secure it with screws from the rear of the case.
- Route the necessary power cables to your components.

Aworan: inu view of the Vetroo M06 PC case highlighting the three adjustable mounting positions for ATX/SFX power supplies, along with an illustration of the included SFX bracket.
4. Storage Installation (HDD/SSD)
- Locate the designated mounting points for 3.5" HDDs and 2.5" SSDs.
- Secure your storage drives using the provided screws.
- Connect SATA data and power cables to each drive.
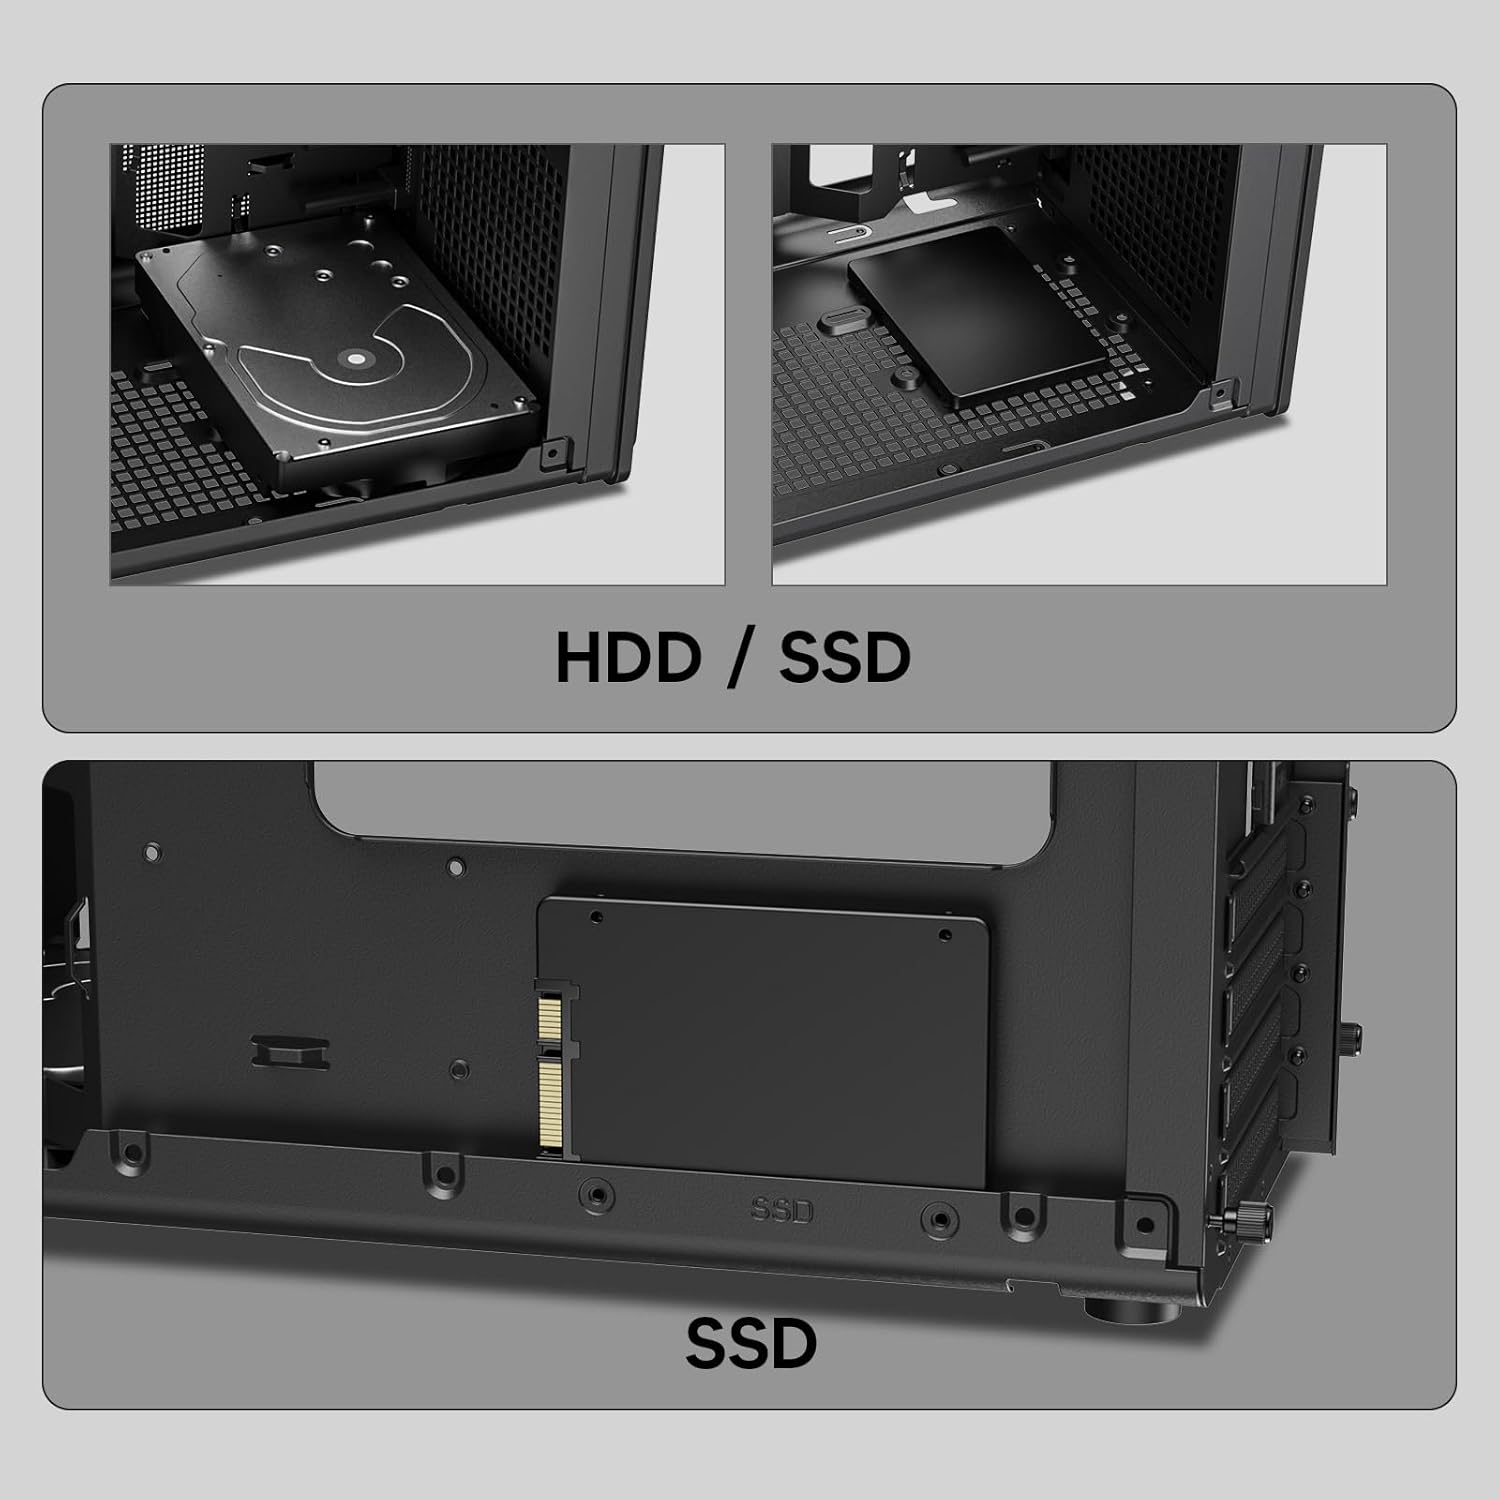
Aworan: Isunmọ views of the Vetroo M06 PC case interior, demonstrating the mounting options for both 3.5-inch Hard Disk Drives (HDDs) and 2.5-inch Solid State Drives (SSDs).
5. Cooling System Installation (Fans/Radiator)
- Identify the fan mounting locations (up to five 120mm fans).
- Mount fans using appropriate screws, ensuring correct airflow direction.
- For liquid cooling, install a 240mm radiator at the top mounting position, securing it with screws.
- Connect fan and pump cables to your motherboard or fan controller.
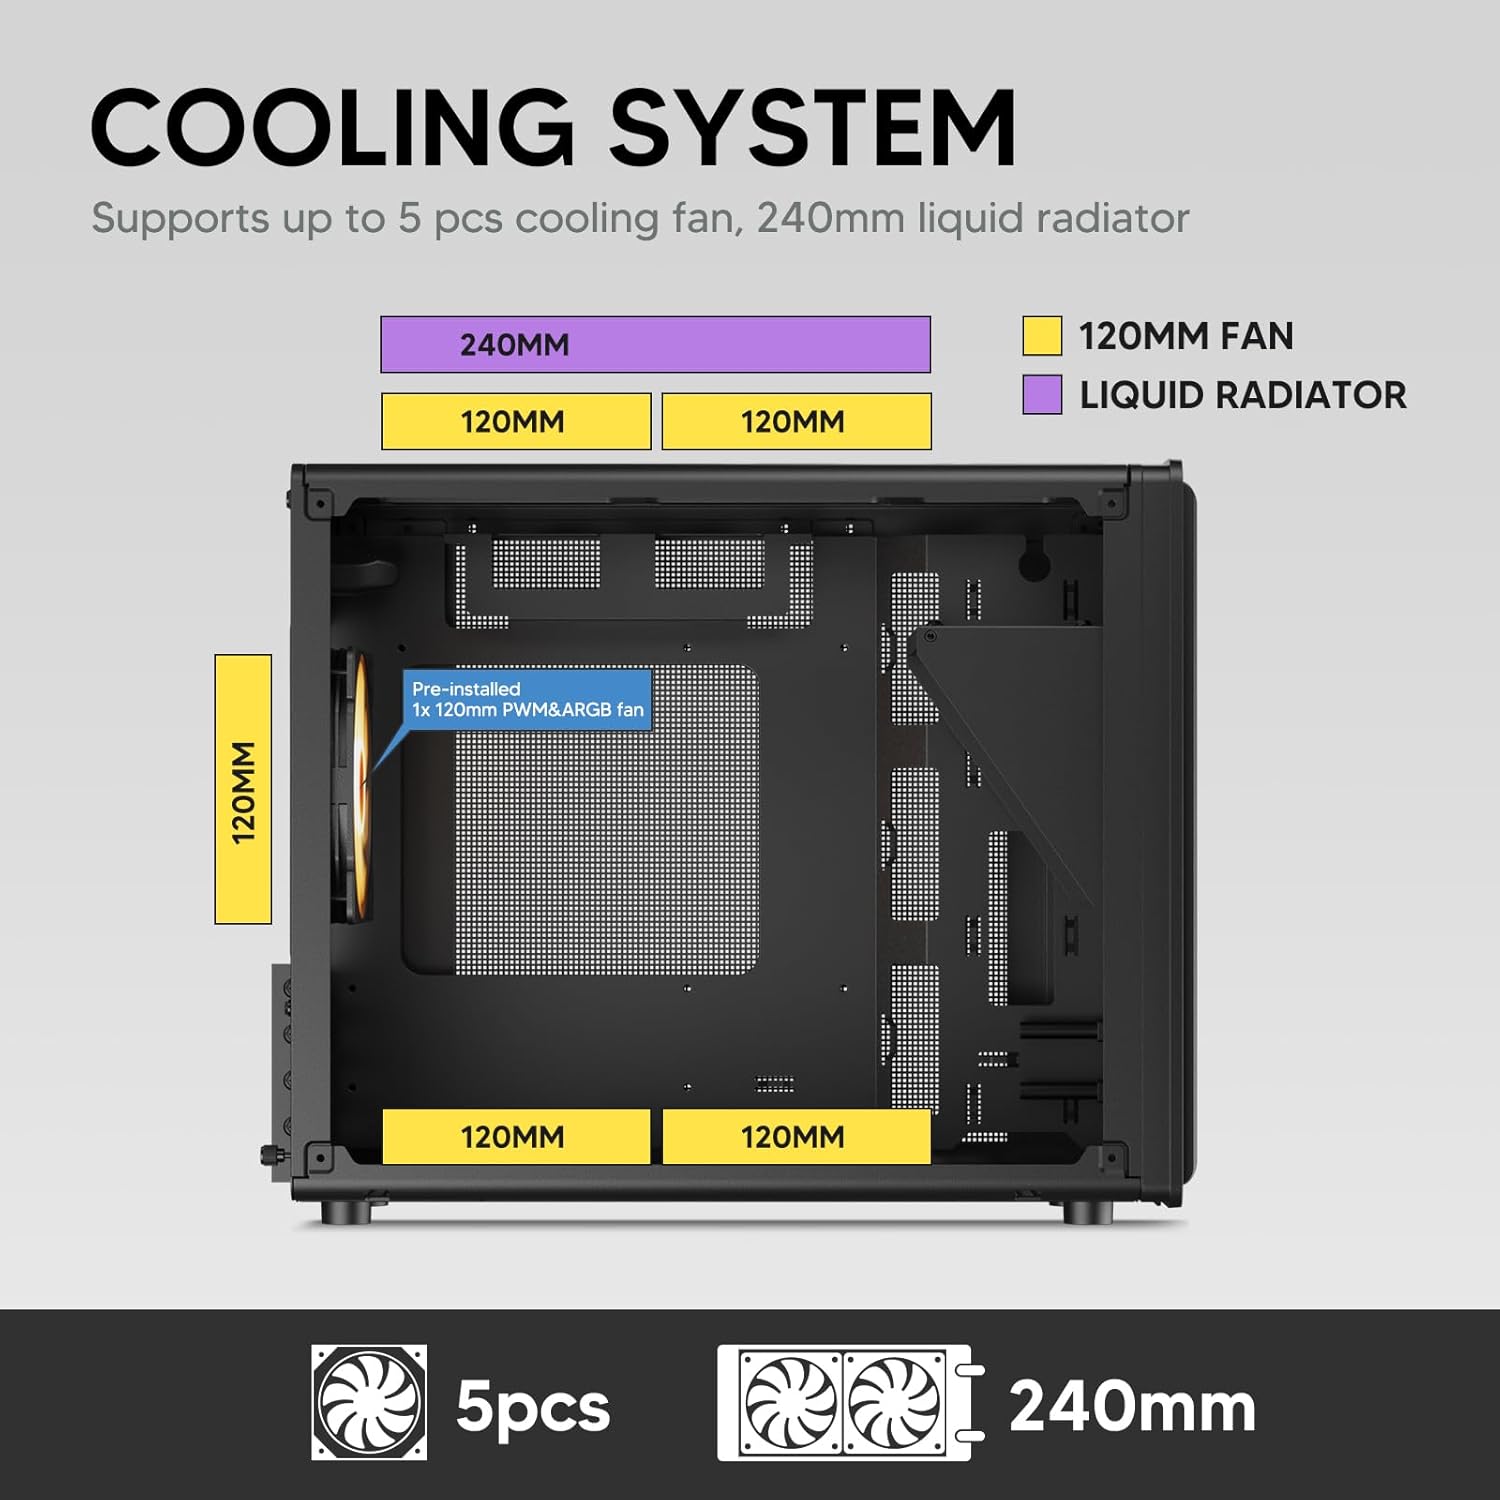
Image: A diagram illustrating the cooling system layout within the Vetroo M06 PC case, detailing the positions for up to five 120mm fans and a 240mm liquid radiator at the top.
6. Àwọn ìsopọ̀ Pánẹ́lì I/O
- Connect the front panel cables (Power, Reset, USB 3.0, USB Type-C, HD Audio) to the corresponding headers on your motherboard. Refer to your motherboard manual for header locations.

Image: A close-up of the Vetroo M06 PC case's front I/O panel, clearly labeling the Power button, Reset button, USB 3.0 port, HD Audio jack, and USB Type-C port.
Awọn ilana Iṣiṣẹ
Once all components are installed and cables are connected, replace the side panels. Connect your peripherals (monitor, keyboard, mouse) and power cable to the PSU. Press the power button on the front panel to start your system.
Afẹfẹ Isakoso
The Vetroo M06 case features an excellent airflow design with mesh panels to facilitate optimal cooling. Ensure fans are installed to create a balanced airflow, typically with intake fans at the front/bottom and exhaust fans at the rear/top.

Image: An exploded diagram of the Vetroo M06 PC case, illustrating the intended airflow patterns with blue arrows indicating cool air intake and red arrows showing warm air exhaust through its mesh panels.
Itoju
Regular maintenance helps prolong the life of your PC components and ensures optimal performance.
- Pipa eruku: Máa fọ àwọn àlẹ̀mọ́ eruku àti àwọn ohun èlò inú ilé nígbàkúgbà nípa lílo afẹ́fẹ́ tí a fún ní ìfúnpọ̀. Rí i dájú pé ẹ̀rọ náà ti pa àti pé ó ti tú agbára rẹ̀ kí o tó sọ ọ́ di mímọ́.
- Iṣakoso USB: Verify that internal cables are neatly routed and do not obstruct airflow.
- Awọn Iṣayẹwo Ẹka: Ensure all screws are tight and components are securely seated.

Image: A close-up shot of the Vetroo M06 PC case, featuring a digital caliper measuring the thickness of the metal plate, which is specified as 0.8mm, highlighting the case's robust construction.
Laasigbotitusita
Ti o ba pade awọn ọran, tọka si awọn igbesẹ laasigbotitusita ti o wọpọ wọnyi:
- Eto Ko Titan:
- Check all power connections, including the PSU to wall outlet, PSU to motherboard (24-pin and CPU 8-pin), and front panel power switch cable to motherboard.
- Rii daju pe iyipada PSU wa ni ipo 'ON'.
- Ko si Abajade Ifihan:
- Verify that your monitor is connected to the graphics card (not the motherboard's integrated graphics ports, unless you are using integrated graphics).
- Tun awọn eya kaadi ati Ramu modulu.
- Awọn oran igbona pupọ:
- Rí i dájú pé gbogbo àwọn afẹ́fẹ́ inú àpótí náà ń yípo àti pé wọ́n ń darí wọn dáadáa fún afẹ́fẹ́ tó dára jùlọ.
- Check CPU cooler installation and thermal paste application.
- Clean any dust buildup from fans and filters.
- Awọn ibudo USB Ko Ṣiṣẹ:
- Verify that the front panel USB 3.0 and USB Type-C cables are correctly connected to the motherboard headers.
Atilẹyin ọja ati Support
Vetroo products are designed for quality and reliability. For warranty information and technical support, please visit the official Vetroo webojula tabi kan si wọn onibara iṣẹ. Jeki ẹri rira rẹ fun awọn iṣeduro atilẹyin ọja.
Vetroo Official Webojula: Vetroo Store on Amazon
For further assistance, please refer to the contact information provided with your product packaging or on the official Vetroo support channels.
Ask a question about this manual
Ask about setup, troubleshooting, compatibility, parts, safety, or missing instructions. Manuals+ will review the question and use this page’s manual context to help answer it.