
1. Ifihan
Thank you for choosing the MyKaFort Remote Control City Express Train Set. This battery-powered electric train toy is designed for toddlers and is compatible with most wooden railway tracks. It features dual control modes, lights, and sounds for an engaging play experience. Please read this manual carefully before use to ensure proper setup and operation.
2. Alaye Aabo
IKILO: Ewu gige - Awọn ẹya Kekere. Not for children under 3 years. Adult supervision is recommended during play. Keep packaging for important information.
3. Package Awọn akoonu
Rii daju pe gbogbo awọn nkan wa ninu package:
- 1x Train Locomotive
- 1x Passenger Carriage
- 1x Isakoṣo latọna jijin
- 1x Posable Figure
4. Ọja Ipariview ati Awọn ẹya ara ẹrọ
The MyKaFort City Express Train Set offers a rich play experience with the following features:
- Awọn ọna Iṣakoso Meji: Operate the train using the included remote control or the buttons located on top of the engine.
- Light & Sound Effects: Functional headlights and authentic train sounds enhance the play experience.
- Magnetic Carriage: The detachable passenger carriage connects securely to the locomotive using strong magnetic connectors.
- Àwòrán tó ṣeé ṣe: An action figure is included and can be placed inside the carriage for imaginative journeys.
- Ibamu Agbaye: Designed to fit major wooden railway brands such as Brio, Thomas, KidKraft, and Chuggington.
- Ikole ti o tọ: Crafted from high-quality ABS plastic with smooth edges, suitable for children aged 3 and up.

Image 1: Dimensions of the train locomotive (7.67in long, 2in high) and remote control (3.93in wide, 3.54in high, 2.36in lever height).
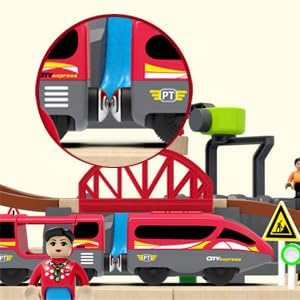
Image 2: Detail showing the magnetic connectors that link the train locomotive and passenger carriage.
5. Eto
5.1 Battery Installation (Train Locomotive)
- Locate the battery compartment on the underside of the train locomotive.
- Using a small screwdriver, unscrew the battery compartment cover.
- Insert 2 AA batteries (not included) into the compartment, ensuring correct polarity (+/-).
- Rọpo ideri ki o ni aabo pẹlu dabaru.
5.2 Fi sori ẹrọ Batiri (Iṣakoso latọna jijin)
- Locate the battery compartment on the underside of the remote control.
- Using a small screwdriver, unscrew the battery compartment cover.
- Insert 2 AAA batteries (not included) into the compartment, ensuring correct polarity (+/-).
- Rọpo ideri ki o ni aabo pẹlu dabaru.

Image 3: The bottom of the train and remote control, indicating battery compartments and the A/B channel switch for pairing.
5.3 Latọna Sisopọ
To pair the remote control with the train:
- Ensure both the train and the remote control are turned off. The switch on the train's underside should be in the middle position.
- Set both the train's channel switch (on the underside) and the remote's channel switch (on the bottom) to the same channel (A or B).
- For first-time pairing, turn the train on FIRST, then turn the remote on.
6. Isẹ
6.1 Train Controls (On-board Buttons)
The train locomotive features buttons on its top for direct control:
- Tẹ bọtini siwaju lati gbe ọkọ oju irin siwaju.
- Press the reverse button to move the train backward.
- Press the stop button to halt the train.
- These buttons also activate lights and train sounds.
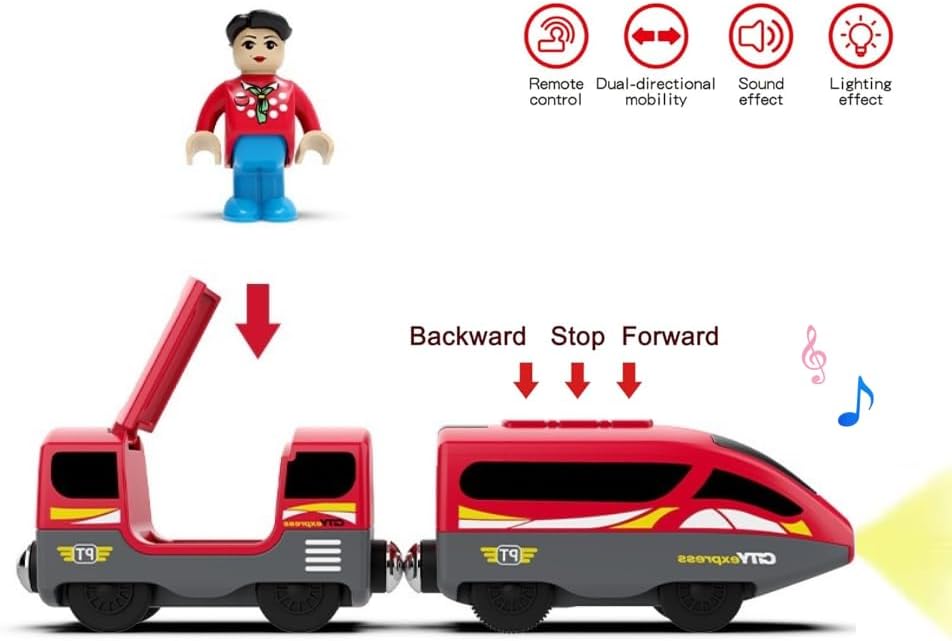
Image 4: The train locomotive highlighting the on-board buttons for controlling movement, lights, and sounds.
6.2 Latọna Iṣakoso Awọn iṣẹ
Once paired, use the remote control to operate the train:
- Siwaju: Titari lefa siwaju.
- Sẹhin: Pull the lever backward.
- Duro: Push the lever then quickly release it.
- Ohun: Press the speaker button to activate train sounds.
- Awọn imọlẹ: Press the light bulb button to activate the headlights.
6.3 Ìsopọ̀ oofa
The locomotive and carriage connect via magnetic couplers. Simply bring the ends together, and they will snap into place. To detach, gently pull them apart.

Image 5: The MyKaFort City Express Train Set running on a wooden track, demonstrating its compatibility.
6.4 Track Compatibility
This train set is designed to be compatible with most standard wooden railway tracks, allowing for integration with existing train sets and expansion possibilities.
7. Itọju
- Wipe the train and remote control with a dry cloth to remove dust and dirt. Do not immerse in water.
- If the toy will not be used for an extended period, remove the batteries from both the train and the remote control to prevent leakage.
- Store the train set in a cool, dry place away from direct sunlight.
8. Laasigbotitusita
| Isoro | Owun to le Fa | Ojutu |
|---|---|---|
| Ọkọ̀ ojú irin kò ṣí tàbí dáhùn sí àwọn ọ̀nà jíjìn. | 1. Batteries are low or incorrectly installed. 2. Remote and train are not paired. 3. Channel switches (A/B) are mismatched. | 1. Replace batteries in both train and remote. Check polarity. 2. Follow remote pairing instructions (Section 5.3). 3. Ensure both train and remote are set to the same A or B channel. |
| Ìmọ́lẹ̀ tàbí ìró kò ṣiṣẹ́. | 1. Awọn batiri ti wa ni kekere. 2. Feature not activated. | 1. Rọpo awọn batiri. 2. Press the dedicated light/sound buttons on the remote or train. |
| Ọkọ̀ ojú irin ń lọ díẹ̀díẹ̀ tàbí ó ń tiraka lórí àwọn ìtẹ̀sí. | Awọn batiri ti wa ni kekere. | Replace batteries in the train locomotive. |
9. Awọn pato
| Ẹya ara ẹrọ | Ẹ̀kúnrẹ́rẹ́ |
|---|---|
| Brand | MyKaFort |
| Nọmba awoṣe | 90098 |
| Ohun elo | ABS ṣiṣu |
| Orisun agbara | Agbara Batiri |
| Train Batteries | 2x AA (ko si) |
| Awọn batiri latọna jijin | 2x AAA (kii ṣe pẹlu) |
| Iṣeduro ọjọ ori | 36 months (3 years) and up |
| Ọna Iṣakoso | Latọna jijin, Fọwọkan |
| Awọn iwọn Nkan | 4.33 x 4.33 x 2.83 inches (packaging dimensions, actual product dimensions are shown in Image 1) |
10. Atilẹyin ọja ati Support
Specific warranty information and detailed support contacts are not provided in the available product data. For assistance, please refer to the retailer where the product was purchased or visit the official MyKaFort brand store online.
11. Awọn fidio ọja
No official seller videos are available for embedding in this manual. Please refer to the product page for any available customer-uploaded videos.