
1. Ifihan
Thank you for choosing the Antec VCX300 ARGB ATX/M-ATX PC Case. This manual provides detailed instructions for the installation, operation, and maintenance of your new computer chassis. Please read this manual thoroughly before installation to ensure proper setup and optimal performance.
2. Alaye Aabo
- Nigbagbogbo ge asopọ ipese agbara ṣaaju fifi sori ẹrọ tabi yiyọ awọn paati eyikeyi kuro.
- Handle components with care to avoid damage from electrostatic discharge. Use an anti-static wrist strap if available.
- Keep the case away from water, moisture, and direct heat sources.
- Rí i dájú pé afẹ́fẹ́ tó yẹ wà ní àyíká àpótí náà kí ó má baà gbóná jù.
- Do not attempt to open or repair the power supply unit inside the case. Refer to qualified service personnel.
3. Package Awọn akoonu
Jọwọ rii daju pe gbogbo awọn ohun kan wa ninu apo rẹ:
- Antec VCX300 ARGB ATX/M-ATX PC Case
- Accessory Box (Screws, standoffs, cable ties)
- Iwe afọwọkọ olumulo (iwe yii)
4. Ọja Ipariview
Familiarize yourself with the various parts of your Antec VCX300 ARGB PC Case.
4.1 Iwaju Panel Mo / awọn
- Bọtini agbara
- Bọtini atunto
- Awọn ibudo USB 3.0
- Awọn ibudo USB 2.0
- Ohun Jacks (Agbekọri/Agbohungbohun)
- LED Control Button (for ARGB lighting)
4.2 Ti abẹnu Layout
The VCX300ARGB case supports ATX and Micro-ATX motherboards. It features multiple drive bays for storage and ample space for cooling solutions.
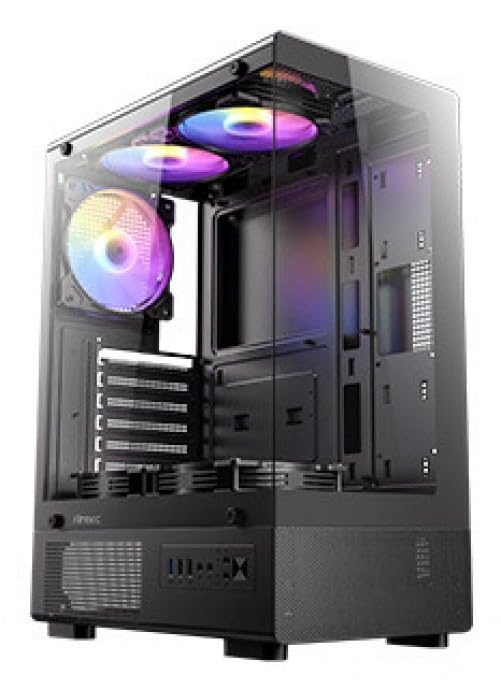
olusin 1: Iwaju view of the Antec VCX300 ARGB PC Case, showcasing the ARGB lighting elements and front panel I/O ports.
5. Eto ati fifi sori
Follow these steps to install your components into the Antec VCX300 ARGB PC Case.
5.1 Ngbaradi Ọran naa
- Gbe ọran naa sori alapin, dada iduroṣinṣin.
- Yọ awọn panẹli ẹgbẹ kuro nipa ṣi awọn skru atanpako ni ẹhin apoti naa ki o si yi awọn panẹli pada sẹhin.
5.2 Fifi sori modaboudu
- Fi I/O shield sinu ẹhin šiši ọran naa.
- Ṣe àtúnṣe sí modaboudu náà pẹ̀lú àwọn ìdènà tí a ti fi sori ẹrọ tẹ́lẹ̀. Rí i dájú pé àwọn ihò ìdènà lórí modaboudu náà bá àwọn ìdènà náà mu.
- Secure the motherboard with the provided screws from the accessory box.
5.3 Fifi sori ẹrọ Ipese Agbara
- Position the power supply unit (PSU) in the designated compartment at the bottom rear of the case.
- So PSU mọ pẹlu awọn skru lati ẹhin ita ti apoti naa.
5.4 Storage Drive Installation (HDD/SSD)
- Locate the drive bays. The VCX300ARGB typically features dedicated bays for 3.5" HDDs and 2.5" SSDs.
- For 3.5" HDDs, slide the drive into the bay and secure it with screws or tool-less clips if available.
- For 2.5" SSDs, mount the drive onto the designated brackets or trays and secure with screws.
5.5 Expansion Card Installation (GPU, etc.)
- Yọ awọn ideri aaye imugboroosi pataki kuro ni ẹhin apoti naa.
- Insert the expansion card (e.g., graphics card) into the appropriate PCIe slot on the motherboard.
- Fi skru kan so kaadi naa mọ.
5.6 USB Management
Lo àwọn ibi tí a ti gé àwọn okùn ìtọ́sọ́nà àti àwọn ibi tí a ti so mọ́ ẹ̀yìn àtẹ motherboard láti ṣàkóso àwọn okùn. Èyí mú kí afẹ́fẹ́ àti ẹwà wọn sunwọ̀n síi.
- Connect all power cables from the PSU to the motherboard and components.
- Connect front panel I/O cables (USB, audio, power/reset switches, LED) to the corresponding headers on the motherboard.
- Connect ARGB cables from the case fans/strips to the motherboard's ARGB header or the integrated ARGB controller.
6. Isẹ
6.1 Agbara Lori
- Ensure all components are correctly installed and cables are connected.
- Ti awọn panẹli ẹgbẹ naa ki o si so wọn mọ.
- So okùn agbara pọ mọ PSU ati ibudo ogiri kan.
- Flip the power switch on the PSU to the "ON" position.
- Press the Power Button on the front panel of the case.
6.2 ARGB ina Iṣakoso
The Antec VCX300 ARGB case features customizable ARGB lighting. You can control the lighting effects in two ways:
- Bọtini Iṣakoso LED: Press the dedicated LED control button on the front panel to cycle through various pre-set ARGB lighting modes and colors. Hold the button for a few seconds to turn off/on the lighting.
- Sọfitiwia modaboudu: If the ARGB cables are connected to a compatible motherboard ARGB header, you can synchronize and customize lighting effects using your motherboard's proprietary software (e.g., ASUS Aura Sync, MSI Mystic Light Sync, Gigabyte RGB Fusion, ASRock Polychrome Sync). Refer to your motherboard manual for specific instructions.
7. Itọju
Itọju deedee n ṣe iranlọwọ lati rii daju pe iṣẹ ṣiṣe to dara julọ ati igba pipẹ ti awọn paati PC rẹ.
- Awọn Ajọ Eruku: The VCX300ARGB includes dust filters. Regularly remove and clean these filters to prevent dust buildup inside the case, which can impede airflow and cooling performance. Use compressed air or a soft brush.
- Isọmọ inu: Periodically open the case and use compressed air to remove dust from fans, heatsinks, and other components. Ensure the system is powered off and unplugged before cleaning.
- Ode Ninu: Nu ita apoti naa pẹlu asọ rirọ, damp asọ. Yago fun awọn kẹmika lile tabi awọn ohun elo abrasive.
8. Laasigbotitusita
| Isoro | Owun to le Fa | Ojutu |
|---|---|---|
| PC ko ni agbara lori. | Power cable disconnected, PSU switch off, front panel power button not connected, faulty PSU. | Check power cable connections. Ensure PSU switch is ON. Verify front panel power button cable is correctly connected to motherboard. Test PSU if possible. |
| ARGB lighting not working. | ARGB cables disconnected, incompatible motherboard header, LED control button issue. | Ensure ARGB cables are securely connected to the motherboard or controller. Try cycling modes with the LED control button. Verify motherboard ARGB header compatibility. |
| Ko dara air sisan / overheating. | Dust buildup, incorrect fan orientation, obstructed vents. | Clean dust filters and internal components. Ensure fans are oriented correctly for optimal airflow (intake/exhaust). Check for any obstructions. |
9. Awọn pato
| Ẹya ara ẹrọ | Ẹ̀kúnrẹ́rẹ́ |
|---|---|
| Orukọ awoṣe | VCX300ARGB |
| Iru Irú | Ile-iṣọ Mid |
| Modaboudu Support | ATX, Micro-ATX |
| Iwọn (D x W x H) | 14.57"D x 8.07"W x 17.72"H (370mm x 205mm x 450mm ní nǹkan bí) |
| Iwọn Nkan | 3.6 kilo |
| Ti abẹnu wakọ Bays | 5 (combination of 3.5" HDD and 2.5" SSD) |
| Iwaju Awọn Ibudo I / O | USB 3.0, USB 2.0, Audio In/Out, Power, Reset, LED Control Button |
| Pataki Awọn ẹya ara ẹrọ | Built-In Fan, Dust Filter, LED Control Button, Noise Reduction Technology, Partition Plate Cooling Technology, ARGB Lighting |
| Àwọ̀ | Dudu |
10. Atilẹyin ọja ati Support
Antec products come with a limited warranty. Please refer to the official Antec website or your regional distributor for specific warranty terms and conditions applicable to your product.
For technical support, product registration, or further inquiries, please visit the official Antec support page: www.antec.com/support
Ìwífún Olùbáṣepọ̀ Olùgbéwọlé: Ariisto House, 5th Floor, Junction of N.S.Phadke Road, Telli Gali, Andheri (E), Mumbai- 400 069 Maharashtra, India