
1. Ọja Ipariview
The PGST WiFi Home Alarm System Qek-a107s-b is a comprehensive wireless security solution designed for homes and offices. It supports dual network connectivity (WiFi and GSM) and offers various alarm states for enhanced protection. The system is expandable, allowing for the addition of up to 100 wireless sensors and 3 wired sensors.

Figure 1.1: PGST WiFi Home Alarm System Qek-a107s-b main unit and included accessories.
Awọn ẹya pataki:
- Dual Network Support: Operates via WiFi (2.4G only) and GSM for reliable communication.
- Eto ti o le gbooro: Supports up to 100 wireless sensors and 3 wired sensors.
- Multiple Arming Modes: Remote arming, home arming, delayed arming, and timely arming.
- Batiri Afẹyinti: Ensures continuous operation during power outages.
- Iṣakoso Rọ: Arm/disarm via remote control, mobile app, RFID card, or phone call.
- Long-Range Signal: Integrated antenna for wide coverage, up to 2,500 square feet.
- Ko si Awọn idiyele Alabapin: Free app control without hidden costs or contracts.
2. Package Awọn akoonu
Upon unpacking, verify that all the following items are included in your PGST WiFi Home Alarm System Qek-a107s-b package:
- 1 x Alarm Host (Main Control Panel)
- 3 x Motion Detectors
- 2 x Awọn iṣakoso latọna jijin
- 6 x Door/Window Sensors
- 2 x RFID Awọn kaadi
- 1 x Wired Siren
- All necessary batteries for included components.
3. Ọja irinše
3.1 Alarm Host (Main Control Panel)
The alarm host features a 4.3-inch TFT display and capacitive touch interface for easy navigation and control. It includes an SOS button and an RFID card sensing area for quick arming/disarming.

olusin 3.1: Iwaju view of the alarm host, highlighting the 4.3 TFT display screen.
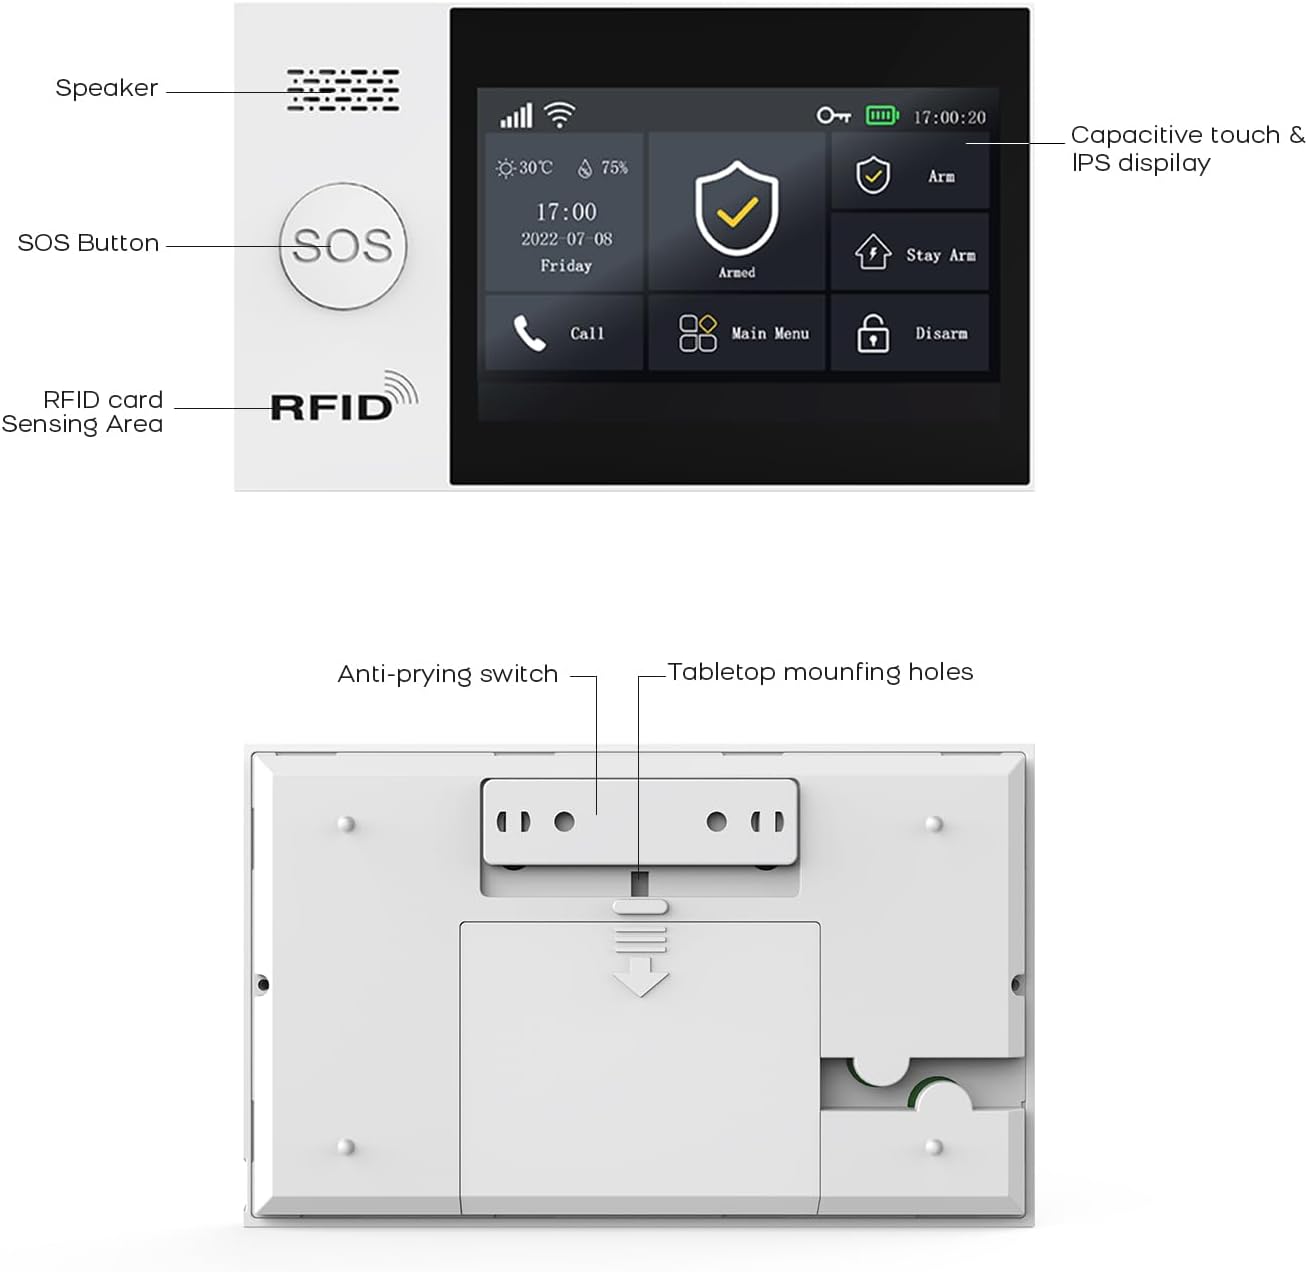
Nọmba 3.2: Alaye view of the alarm host's front panel (speaker, SOS button, RFID area) and rear panel (anti-prying switch, tabletop mounting holes).
3.2 Sensors and Accessories
The system includes various sensors and accessories to detect intrusions and provide comprehensive security. These include motion detectors, door/window sensors, remote controls, RFID cards, and a wired siren.
4. Eto ati fifi sori
The PGST alarm system is designed for easy DIY installation. Follow these steps to set up your system.
4.1 Ibẹrẹ Agbara-soke
- Connect the alarm host to a power outlet using the provided adapter.
- Ensure the backup battery is properly installed. The system will automatically switch to battery power during an outage.
4.2 Network Connection (WiFi & GSM)
- Asopọ WiFi:
- Access the network settings on the alarm host's display.
- Select your 2.4GHz WiFi network (5GHz networks are not supported).
- Enter your WiFi password to connect.
- GSM Connection:
- Insert a valid SIM card into the designated slot on the alarm host.
- The system will automatically detect and connect to the GSM network.
4.3 Fifi sori ẹrọ sensọ
Strategically place motion detectors and door/window sensors in key areas of your home or office. Ensure sensors are within range of the alarm host.

Olusin 4.1: Example of a typical alarm system installation layout in a home, showing placement of various sensors and the main unit.
- Awọn sensọ ilekun/Fẹlẹfẹlẹ: Mount the two parts of the sensor on the door/window frame and the door/window itself, ensuring they are aligned and close to each other when closed.
- Motion Detectors: Install in corners or areas with high traffic, ensuring a clear line of sight. Avoid placing near heat sources or direct sunlight.
- Awọn sensọ so pọ: Refer to the alarm host's menu for instructions on pairing new sensors with the system.
5. Awọn ilana Iṣiṣẹ
5.1 Ṣíṣe ohun ìjà àti kíkó ẹ̀rọ náà kúrò
A le di ohun ija tabi di ohun ija kuro ninu eto naa nipa lilo awọn ọna pupọ:
- Isakoṣo latọna jijin: Press the arm or disarm button on the remote.
- Ohun elo Alagbeka: Use the dedicated mobile application (SMART LIFE, TUYA) to arm or disarm remotely.
- Kaadi RFID: Tap an authorized RFID card on the sensing area of the alarm host.
- Alarm Host Panel: Use the touch screen interface to select arming or disarming modes.
- Ipe foonu: Arm or disarm the system by calling the alarm host's GSM number and following voice prompts.
5.2 Smart App Remote Control
The mobile application allows for remote control and scheduling of arming/disarming times.

Figure 5.1: The mobile application interface for programming timed arming and disarming schedules.
5.3 Voice Iṣakoso Integration
The system supports voice control via compatible smart assistants like Amazon Alexa and Google Assistant.

Figure 5.2: Demonstrating voice control integration with Amazon Alexa to arm the system.
5.4 Two-Way Voice Intercom Function
The alarm host features a two-way voice intercom function, allowing you to make and receive calls, and send voice messages through the system.

Figure 5.3: The two-way voice intercom function enables communication through the alarm system.
6. Itọju
6.1 batiri Management
The alarm host and wireless sensors are battery-powered. Regular monitoring of battery levels is crucial for uninterrupted operation.
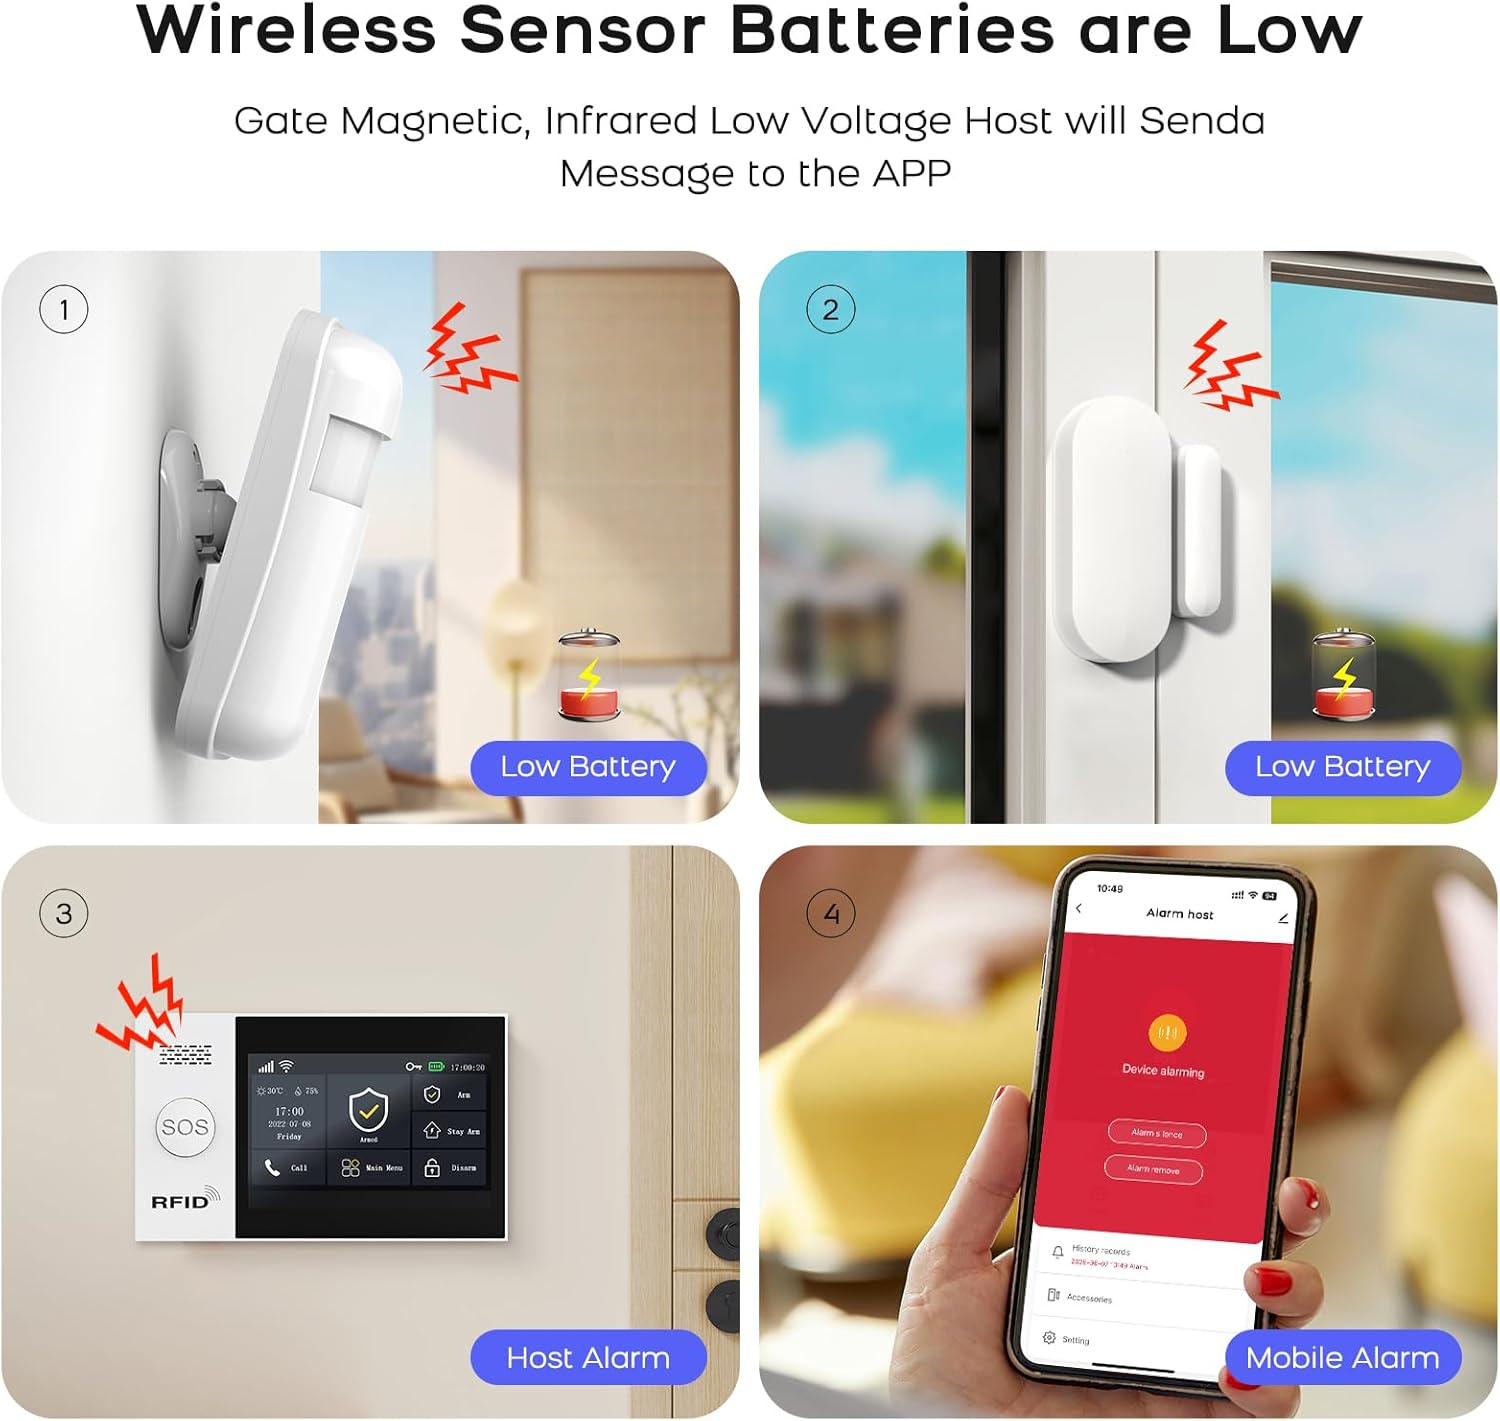
Figure 6.1: Visual representation of low battery alerts from wireless sensors and the alarm host, displayed on the host and mobile app.
- Awọn batiri sensọ Alailowaya: When a wireless sensor's battery is low, the host will send a message to the mobile app. Replace batteries promptly to ensure continuous protection.
- Batiri Afẹyinti Alariwo: The alarm host has a built-in backup battery providing approximately 5.5 hours of operation during a power failure. The system will send an SMS notification if power is interrupted and restored.

Figure 6.2: The alarm host display indicating battery status and power consumption.
6.2 Ninu
Wipe the alarm host and sensors with a soft, dry cloth. Avoid using abrasive cleaners or solvents that could damage the devices.
7. Laasigbotitusita
| Isoro | Owun to le Fa | Ojutu |
|---|---|---|
| Ètò náà kò sopọ̀ mọ́ WiFi | Incorrect WiFi password; 5GHz network selected; weak signal. | Verify password. Ensure you are connecting to a 2.4GHz network. Move the alarm host closer to the router or improve signal strength. |
| Awọn sensọ ko dahun | Low battery; out of range; not properly paired. | Replace sensor batteries. Relocate sensor closer to the alarm host. Re-pair the sensor with the alarm host. |
| No GSM network connection | SIM card not inserted correctly; invalid SIM card; no network coverage. | Ensure SIM card is correctly inserted. Verify SIM card is active and has credit. Check for GSM network coverage in your area. |
| Alarm host not powering on | Power adapter issue; backup battery depleted. | Check power adapter connection and power outlet. Allow backup battery to charge or replace if faulty. |
| Awọn itaniji eke | Improper sensor placement; environmental factors (pets, drafts). | Adjust sensor sensitivity. Reposition motion detectors to avoid pets or drafts. Ensure door/window sensors are securely mounted. |
8. Awọn pato
| Ẹya ara ẹrọ | Ẹ̀kúnrẹ́rẹ́ |
|---|---|
| Brand | PGST |
| Awoṣe | Qek-a107s-b |
| Orisun agbara | Agbara Batiri |
| Awọn ẹrọ ibaramu | SMART LIFE, TUYA, Amazon Alexa, Google Assistant |
| Awọn iwọn Nkan (LxWxH) | 18 x 12 x 3 cm (7.09 x 4.72 x 1.18 inches) |
| Ifihan | 4.3 inch TFT Capacitive Touch IPS Display |
| Alailowaya Igbohunsafẹfẹ | 2.4GHz WiFi (5GHz not supported) |
| Àwọn Sensọ Tó Pọ̀ Jùlọ Tí A Ṣe Àtìlẹ́yìn | 100 Wireless, 3 Wired |
| Siren Ijade | 120dB (Wired Siren) |
| Afẹyinti batiri Life | Isunmọ. wakati meji 5.5 |
9. Atilẹyin ọja ati Support
For warranty information and technical support, please refer to the documentation included with your product or visit the official PGST webojula. Tọju iwe-ẹri rira rẹ bi ẹri rira fun awọn iṣeduro atilẹyin ọja.
If you encounter any issues not covered in this manual, please contact PGST customer service for assistance.


