
1. Ifihan
This manual provides essential information for the safe operation and maintenance of your FINOTI RG806 MAX GPS Drone. Please read it thoroughly before operating the drone to ensure proper function and to prevent damage or injury. The RG806 MAX features a 5.6-inch integrated screen, GPS, three-sided obstacle avoidance, optical flow positioning, and a 4K camera for high-quality aerial photography and videography.
2. Awọn Itọsọna Aabo
- Ṣiṣayẹwo Ọkọ ofurufu-ṣaaju: Máa ṣàyẹ̀wò drone, propellers àti batríìjì kí o tó gbéra. Rí i dájú pé gbogbo àwọn ẹ̀yà ara rẹ̀ wà ní ìṣọ̀kan láìsí ìbàjẹ́.
- Awọn ipo Ayika: Do not fly in strong winds (above 10 km/h), rain, snow, or fog. Maintain a clear line of sight to the drone at all times.
- Agbegbe Ofurufu: Operate the drone in open areas, away from people, animals, buildings, and power lines. Avoid flying over private property without permission.
- Aabo Batiri: Keep batteries away from naked flames or direct heat sources. Use only the provided charging cable and charger. Do not overcharge or puncture batteries.
- Yẹra fun Idiwo: While the drone features three-sided visual obstacle avoidance, it is not foolproof. Always exercise caution and maintain manual control.
- Ihamọ ọjọ-ori: This product is not suitable for children under 14 years old. Adult supervision is recommended for all users.
3. Package Awọn akoonu
Daju pe gbogbo awọn nkan wa ninu apo rẹ:
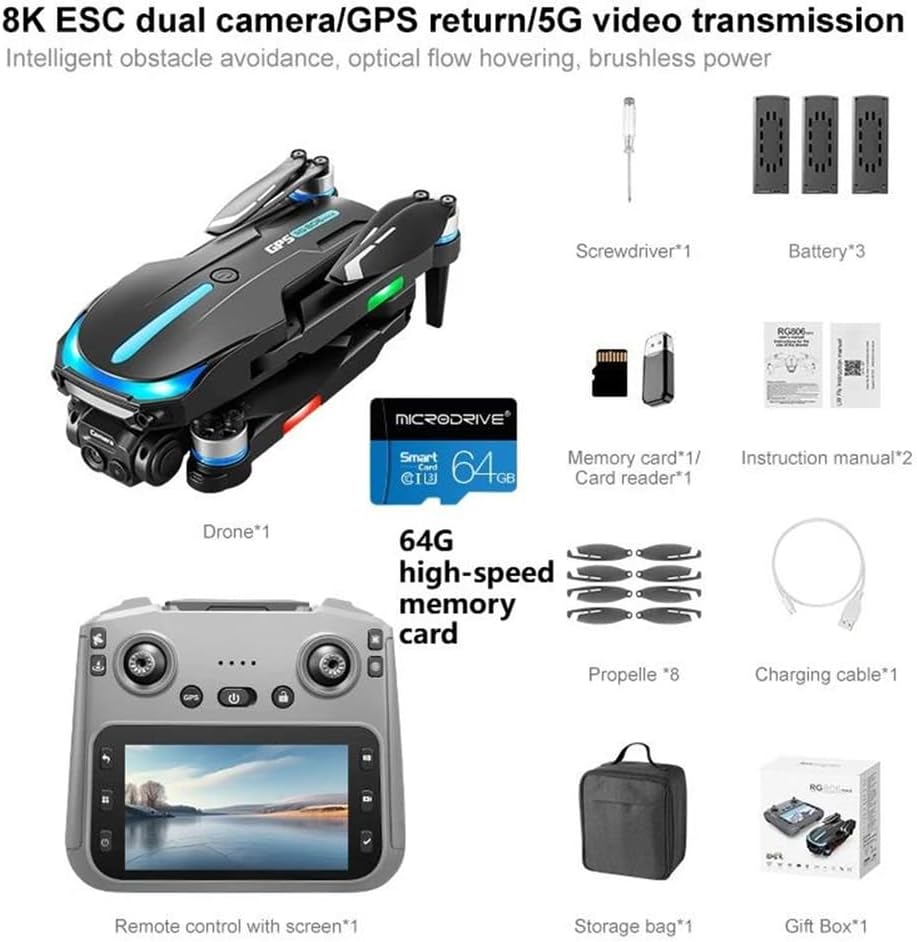
Àwòrán 3.1: Àkóónú Àpò. This image displays the drone, remote control with screen, screwdriver, one battery (for this variant), memory card, card reader, eight propellers, charging cable, storage bag, and gift box.
- Drone (x1)
- Remote Control with Integrated Screen (x1)
- Flight Battery (x1)
- Awọn ẹrọ atẹgun (x8)
- Okun gbigba agbara (x1)
- Olupilẹṣẹ (x1)
- 64GB High-Speed Memory Card (x1)
- Olùka Káàdì (x1)
- Apo ipamọ (x1)
4. Ọja Ipariview
4.1 Àwọn Ẹ̀yà Drone

Figure 4.1: Drone with Obstacle Avoidance. This image shows the drone's design and the location of its three-way intelligent perception obstacle avoidance sensors.
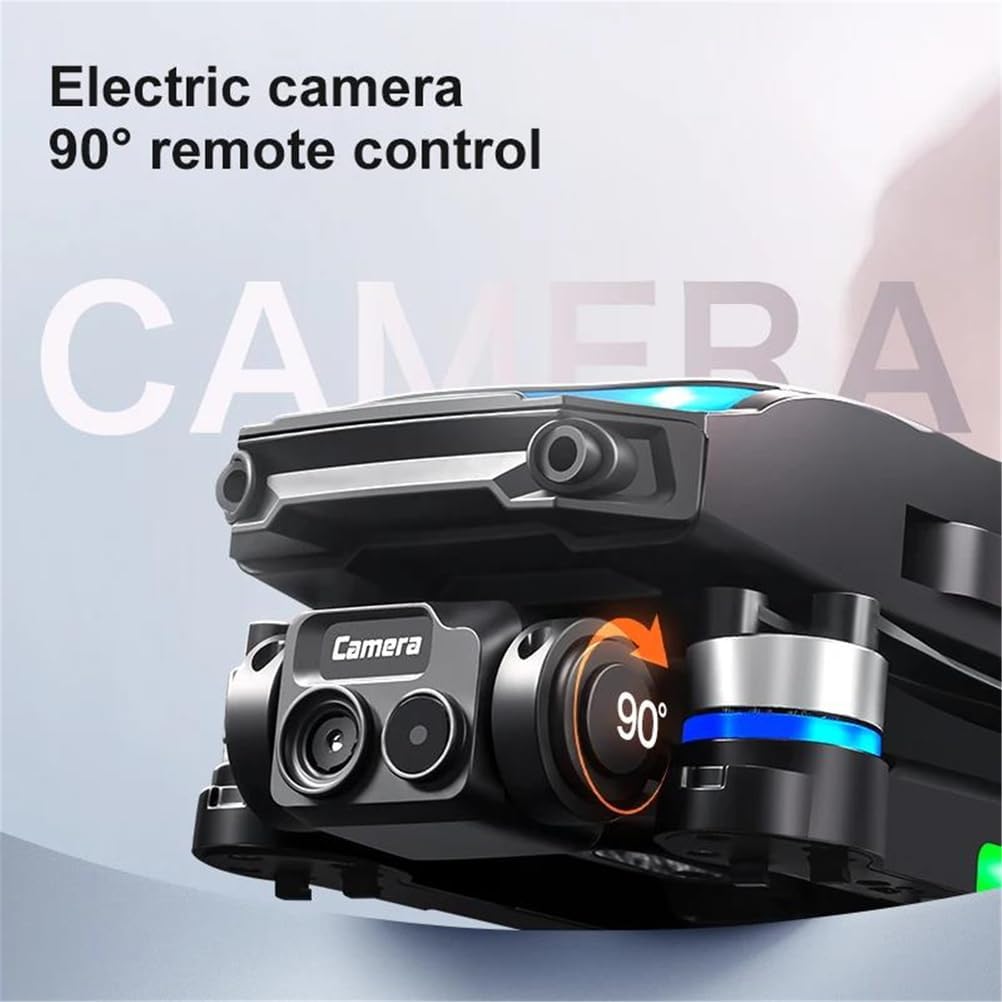
Figure 4.2: Electric Camera. This image highlights the drone's electric camera, which can be adjusted 90 degrees via remote control.
The RG806 MAX drone features a foldable design for portability. Key components include:
- Kamẹra HD 4K: Located at the front, capable of 90-degree remote adjustment.
- Àwọn Sensọ Yẹra fún Ìdènà: Integrated for three-sided intelligent perception.
- Àwọn Ẹ̀rọ Aláìfọ́: Provide stable and powerful flight.
- Modulu GPS: For precise positioning and return-to-home functions.
- Awọn imọlẹ LED: Indicate drone status and aid visibility.
4.2 Latọna Iṣakoso Layout
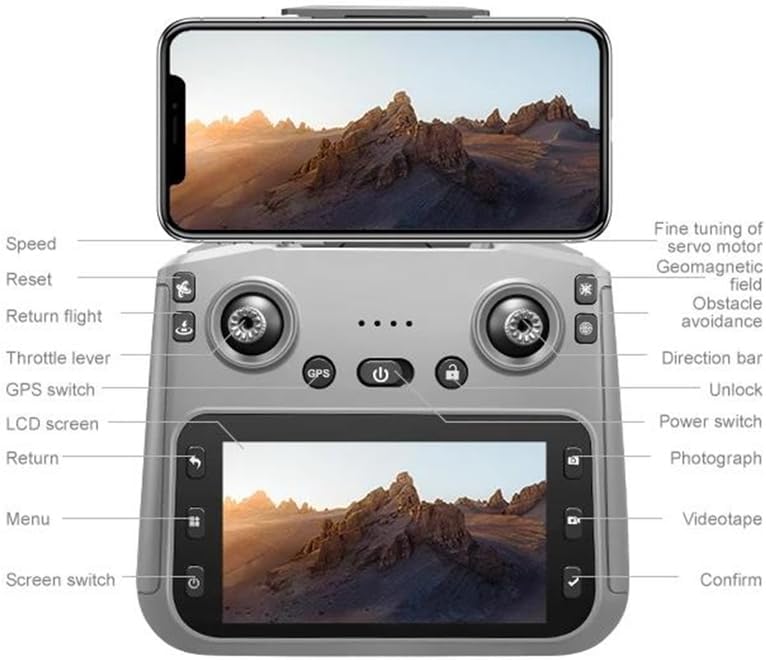
Àwòrán 4.3: Ìṣètò Ìṣàkóso Láàrin Ọ̀nà. This diagram illustrates the functions of each button and joystick on the remote control, including the integrated 5.6-inch display.
The remote control features an integrated 5.6-inch screen for real-time flight data and video feed. Key controls include:
- Joystick osi: Throttle lever (up/down), Yaw (left/right).
- Joystick Ọtun: Direction bar (forward/backward, left/right).
- Awọn bọtini: Speed, Reset, Return flight, GPS switch, LCD screen, Return, Menu, Screen switch, Unlock, Power switch, Photograph, Videotape, Confirm.
- Itanran Tun: For servo motor, geomagnetic field, and obstacle avoidance adjustments.
5. Eto
5.1 Batiri Ngba agbara ati fifi sori
- Batiri Drone: Connect the drone battery to the charging cable and a suitable USB power adapter (not included). Charge until the indicator light shows full. Insert the charged battery into the drone's battery compartment, ensuring it clicks into place.
- Batiri Iṣakoso Latọna jijin: The remote control has a built-in rechargeable battery. Connect the remote control to the charging cable and a USB power adapter. Charge until fully indicated.
5.2 Propeller fifi sori
Attach the propellers to the corresponding motor shafts. Ensure the correct propeller type (A or B) is matched with the correct motor. Use the provided screwdriver to secure them firmly.
5.3 Drone and Remote Control Pairing
- Power on the drone by pressing and holding the power button.
- Agbara lori isakoṣo latọna jijin.
- The drone and remote control will automatically attempt to pair. Wait for the indicator lights on both devices to stabilize, indicating a successful connection.
Ìṣàtúnṣe GPS 5.4
For optimal GPS performance, perform a calibration before the first flight in a new location:
- Gbe drone naa si ori ilẹ ti o rọgbọ, ti o ṣii.
- Follow the on-screen prompts on the remote control or refer to the specific calibration sequence in the included manual. This typically involves rotating the drone horizontally and vertically.
6. Awọn ilana Iṣiṣẹ
6.1 Ipilẹ ofurufu idari
Familiarize yourself with the remote control layout (Figure 4.3) before attempting flight.
- Bíbẹ̀rẹ̀/Ìbalẹ̀: Use the dedicated one-key takeoff/landing button or manually control with the throttle lever.
- Iṣakoso Giga: Ti joystick apa osi soke lati gun oke, fa si isalẹ lati sọkalẹ.
- Iṣakoso itọsọna: Push the right joystick forward/backward to move the drone forward/backward. Push left/right to move left/right.
- Yaw Control: Push the left joystick left/right to rotate the drone left/right.
6.2 GPS and Optical Flow Positioning
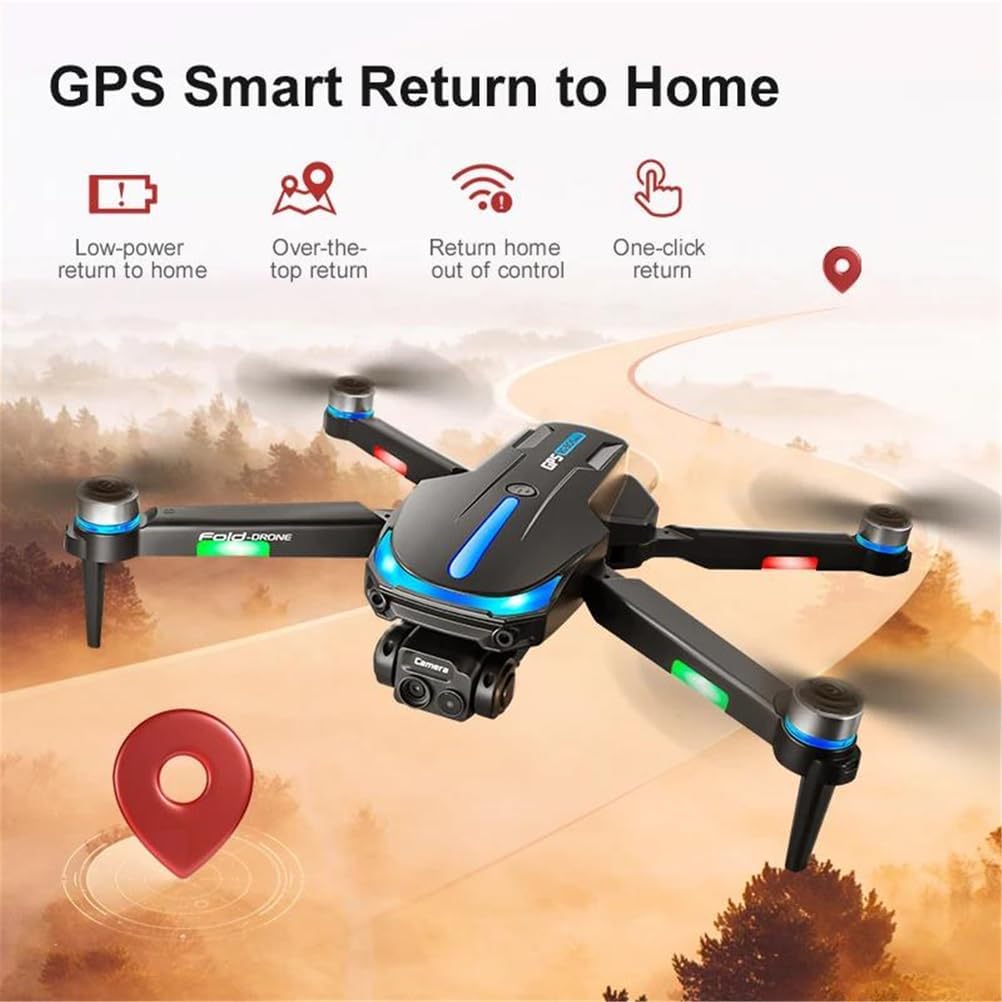
Figure 6.1: GPS Smart Return to Home. This image details the various return-to-home functions enabled by GPS, including low-power, over-the-top, out-of-control, and one-click return.
The drone utilizes GPS for outdoor stability and optical flow sensors for indoor hovering. Ensure GPS signal is strong before outdoor flights.
- Ipo GPS: Provides precise positioning, altitude hold, and enables features like Return to Home and Custom Course.
- Ipo Sisan Opitika: Automatically engages in indoor environments or when GPS signal is weak, using downward-facing sensors for stable hovering.
- Pada si Ile (RTH): Press the RTH button on the remote control, or the drone will automatically return if battery is low or connection is lost (if GPS signal is available).
- Custom Course: Plan flight paths directly on the remote control's screen for automated flight.
6.3 Obstacle Avoidance System
The RG806 MAX is equipped with three-sided visual obstacle avoidance. This system helps the drone detect and avoid obstacles in its path, enhancing flight safety. However, it is crucial to remain vigilant and not solely rely on this feature, especially in complex environments or at high speeds.
6.4 kamẹra isẹ
The integrated 4K camera allows for high-resolution photo and video capture.
- Ya Fọto: Press the 'Photograph' button on the remote control.
- Ṣe igbasilẹ fidio: Press the 'Videotape' button to start recording, press again to stop.
- Atunse Igun Kamẹra: Use the dedicated buttons or fine-tuning controls on the remote to adjust the camera's 90-degree tilt.
- Ibi ipamọ Media: Photos and videos are saved to the installed 64GB memory card.
6.5 Smart Awọn ẹya ara ẹrọ
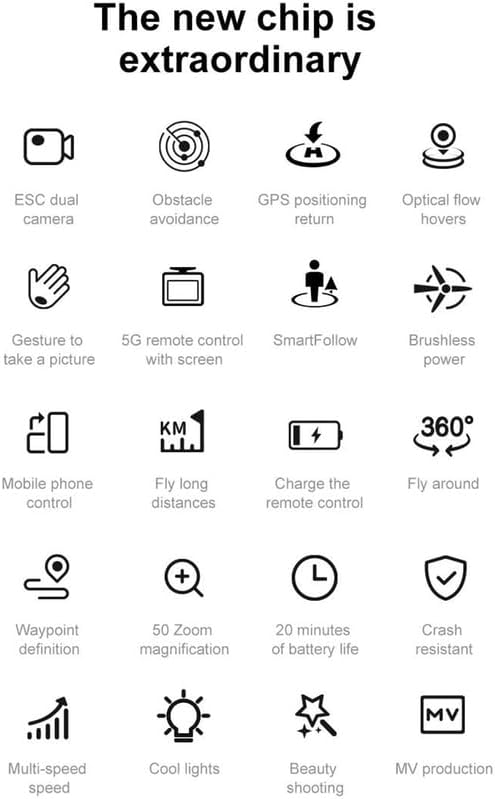
Figure 6.2: Drone Features Overview. This image displays icons representing various intelligent features of the drone, such as gesture control, SmartFollow, and waypoint definition.
- Iṣakoso afarajuwe: Perform specific hand gestures to trigger photo or video capture. Refer to the detailed manual for specific gestures.
- SmartFollow: Drone le laifọwọyi tẹle koko-ọrọ ti o yan.
- Fò kiri ni ayika: Ṣètò drone náà láti yí ojú ibi tí ó wù ú.
- Ìtumọ̀ Ọ̀nà: Set multiple waypoints for the drone to follow a pre-defined flight path.
7. Itọju
- Ninu: Use a soft, dry cloth to clean the drone and remote control. Avoid using liquids or solvents. Ensure camera lens and sensors are free of dust and debris.
- Rirọpo Propeller: If propellers are damaged or bent, replace them immediately using the provided spares and screwdriver. Ensure correct A/B propeller types are installed.
- Itọju Batiri: Store batteries in a cool, dry place. Do not fully discharge batteries for extended periods. Charge them to approximately 50-60% for long-term storage.
- Ibi ipamọ: When not in use, store the drone and remote control in the provided storage bag in a dry environment, away from direct sunlight and extreme temperatures.
8. Laasigbotitusita
| Isoro | Owun to le Fa | Ojutu |
|---|---|---|
| Drone ko ni agbara lori | Batiri kekere; A ko fi batiri sori ẹrọ ni deede | Charge drone battery; Reinstall battery securely |
| Iṣakoso latọna jijin ko sopọ mọ | Low remote battery; Pairing failed | Charge remote control; Re-attempt pairing process |
| Ìfò tí kò dúró ṣinṣin/Ìrìnkiri | No GPS signal (outdoor); No optical flow (indoor); Calibration needed; Damaged propellers | Fly in open area with clear GPS; Ensure good lighting for optical flow; Perform GPS calibration; Replace damaged propellers |
| Kámẹ́rà kò gba/ya fọ́tò sílẹ̀ | Memory card full/not inserted; Camera not activated | Insert/replace memory card; Ensure camera is powered on and connected |
| Yẹra fun idiwo ko ṣiṣẹ | Sensors blocked/dirty; System error | Clean sensors; Restart drone and remote; Avoid flying in complex environments |
9. Awọn pato
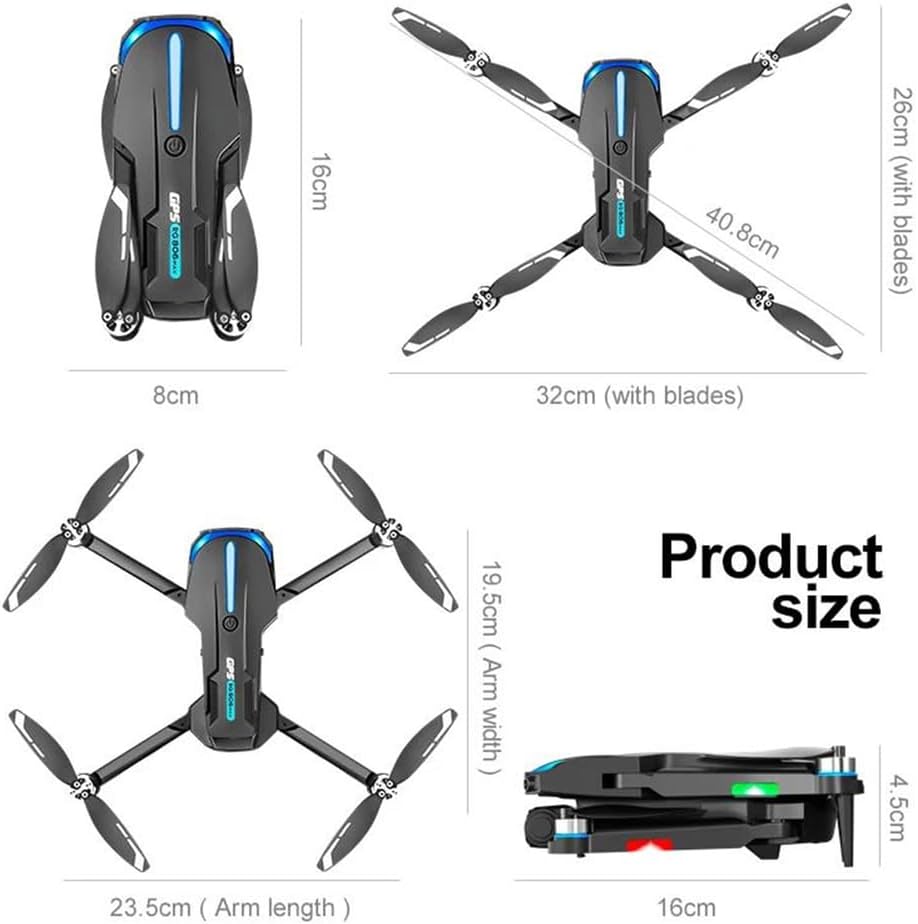
Ṣe nọmba 9.1: Awọn Iwọn Ọja. This image provides the folded and unfolded dimensions of the drone.
- Awoṣe: RG806 MAX
- Iwọn Drone: 190g
- Akoko ofurufu: O fẹrẹ to iṣẹju 20
- Ijinna jijin: Ti o de 250m
- Kamẹra: 4K HD Video Recording, 1/1.28 Inches Sensor Size
- Atunse Kamẹra: 90-degree remote control electric adjustment
- Igbohunsafẹfẹ Ṣiṣẹ: 5GHz
- Atako Iyara Afẹfẹ ti o pọju: <10 km/H
- Iru mọto: Brushless Motor
- Yẹra fun Idiwo: Three-sided Visual Avoidance
- Ipo: GPS, Optical Flow Positioning
- Asopọmọra: WiFi
- Remote Control Display: Integrated 5.6-inch screen
- Awọn iwọn ti a ṣe pọ: 16cm (Ipari) x 8cm (Iwọn) x 4.5cm (Iga)
- Awọn iwọn ti a ṣi silẹ: 32cm (with blades) x 40.8cm (with blades)
- Arm Length (unfolded): 23.5cm
- Arm Width (unfolded): 19.5cm
10. Atilẹyin ọja ati Support
For warranty information, technical support, or service inquiries, please refer to the contact details provided with your purchase documentation or contact the manufacturer directly. Keep your proof of purchase for warranty claims.