Ọrọ Iṣaaju
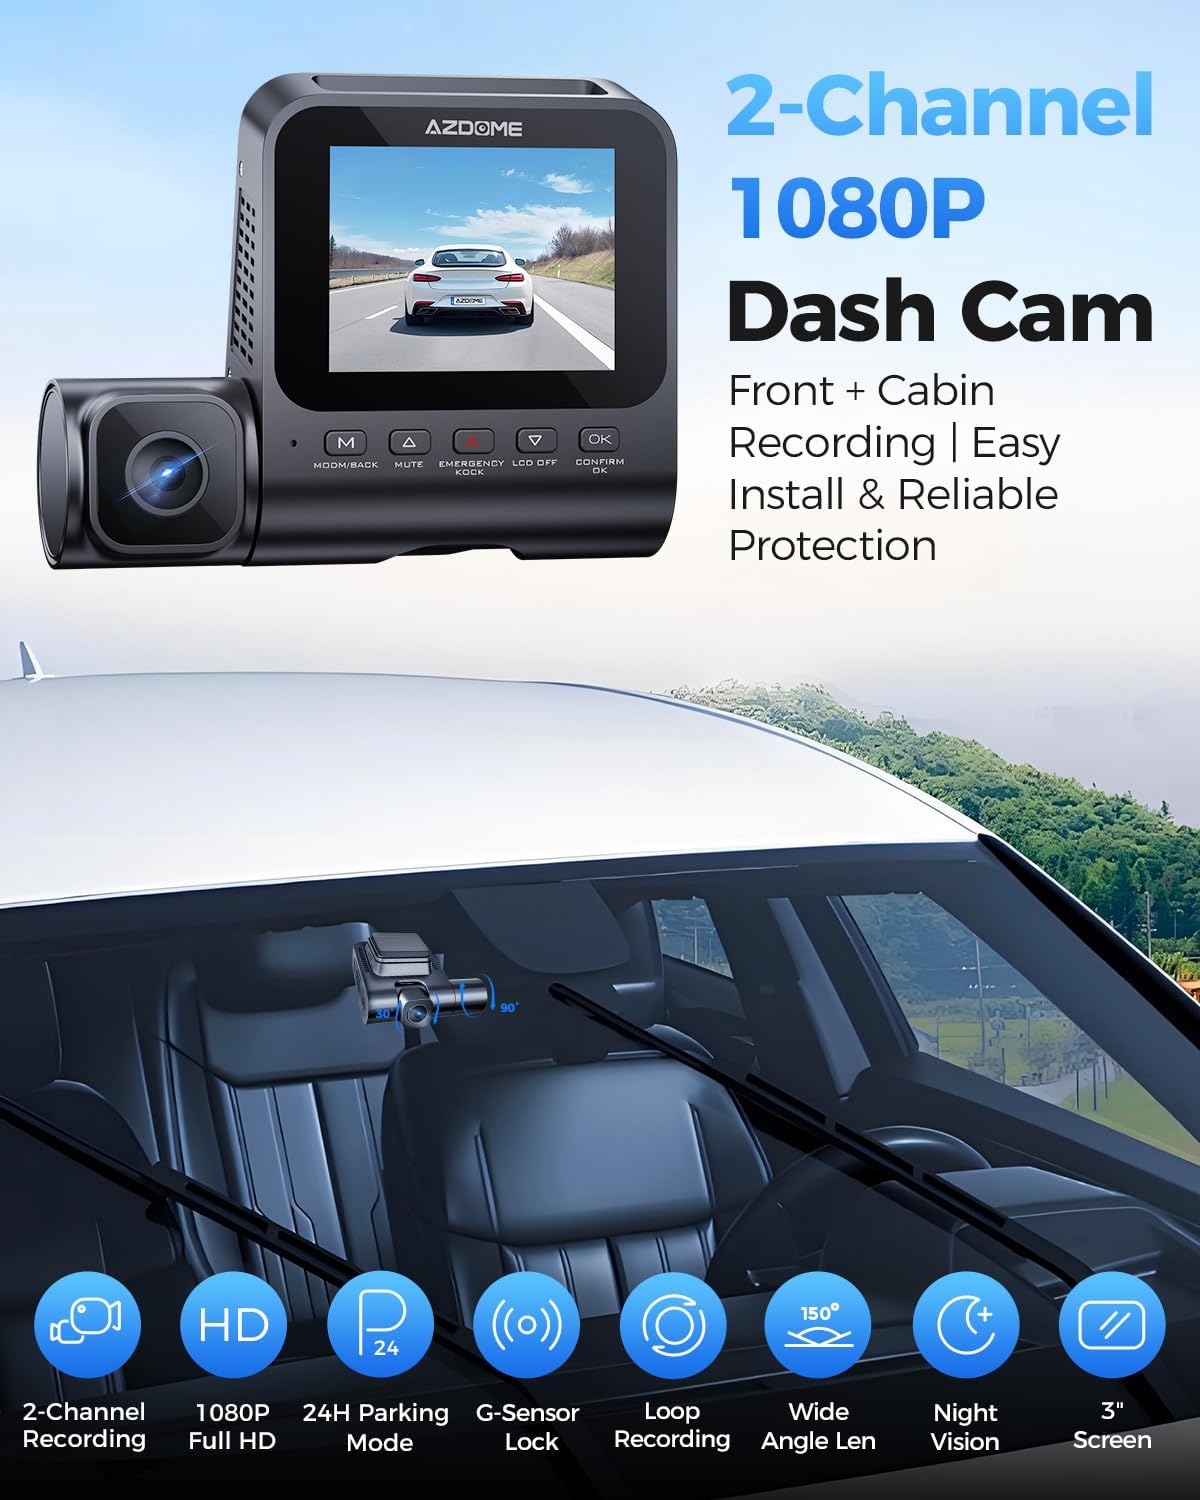
This manual provides detailed instructions for the installation, operation, and maintenance of your AZDOME V600 Dual Dash Cam. Please read this manual thoroughly before using the device to ensure proper functionality and safety. The AZDOME V600 is designed to record both front road views and interior cabin activity simultaneously, offering comprehensive coverage for your vehicle.

Image: The AZDOME V600 Dual Dash Cam, illustrating its compact design and dual-channel recording capability for both front road and interior cabin views.
Package Awọn akoonu
Daju pe gbogbo awọn nkan ti a ṣe akojọ rẹ si isalẹ wa ninu package rẹ:
- Dash camera × 1
- Type-C Car Charger × 1
- Electrostatic Films × 2
- 3M alemora × 1
- Awọn agekuru okun × 5
- Pry Tool × 1
- Afowoyi Olumulo × 1

Image: A visual representation of all items included in the AZDOME V600 Dash Cam package, such as the camera, charger, mounting accessories, and user manual.
Ọja Pariview
The AZDOME V600 features a compact design with a 3-inch screen, dual lenses for front and cabin recording, and intuitive controls. It is equipped with infrared night vision for clear interior recording in low light conditions.

Àwòrán: Àwòrán tó ṣe àpèjúwe lóríview of the AZDOME V600 Dash Cam, highlighting its 2-channel 1080P recording, parking mode, G-sensor, loop recording, wide-angle lens, and night vision capabilities.
Gbigbasilẹ ikanni-meji
The V600 records both the road ahead and the vehicle's interior simultaneously. The front lens captures external road details, while the interior lens records cabin activity and audio.
Aworan: Iyapa view demonstrating the front camera's perspective of the road and the interior camera's view of the cabin, both recording in 1080P Full HD.
Wide Field ti View
The dashcam system provides a wide field of view, with a 121° front lens and a 131° cabin lens, designed to capture more of the road and interior surroundings, reducing blind spots.
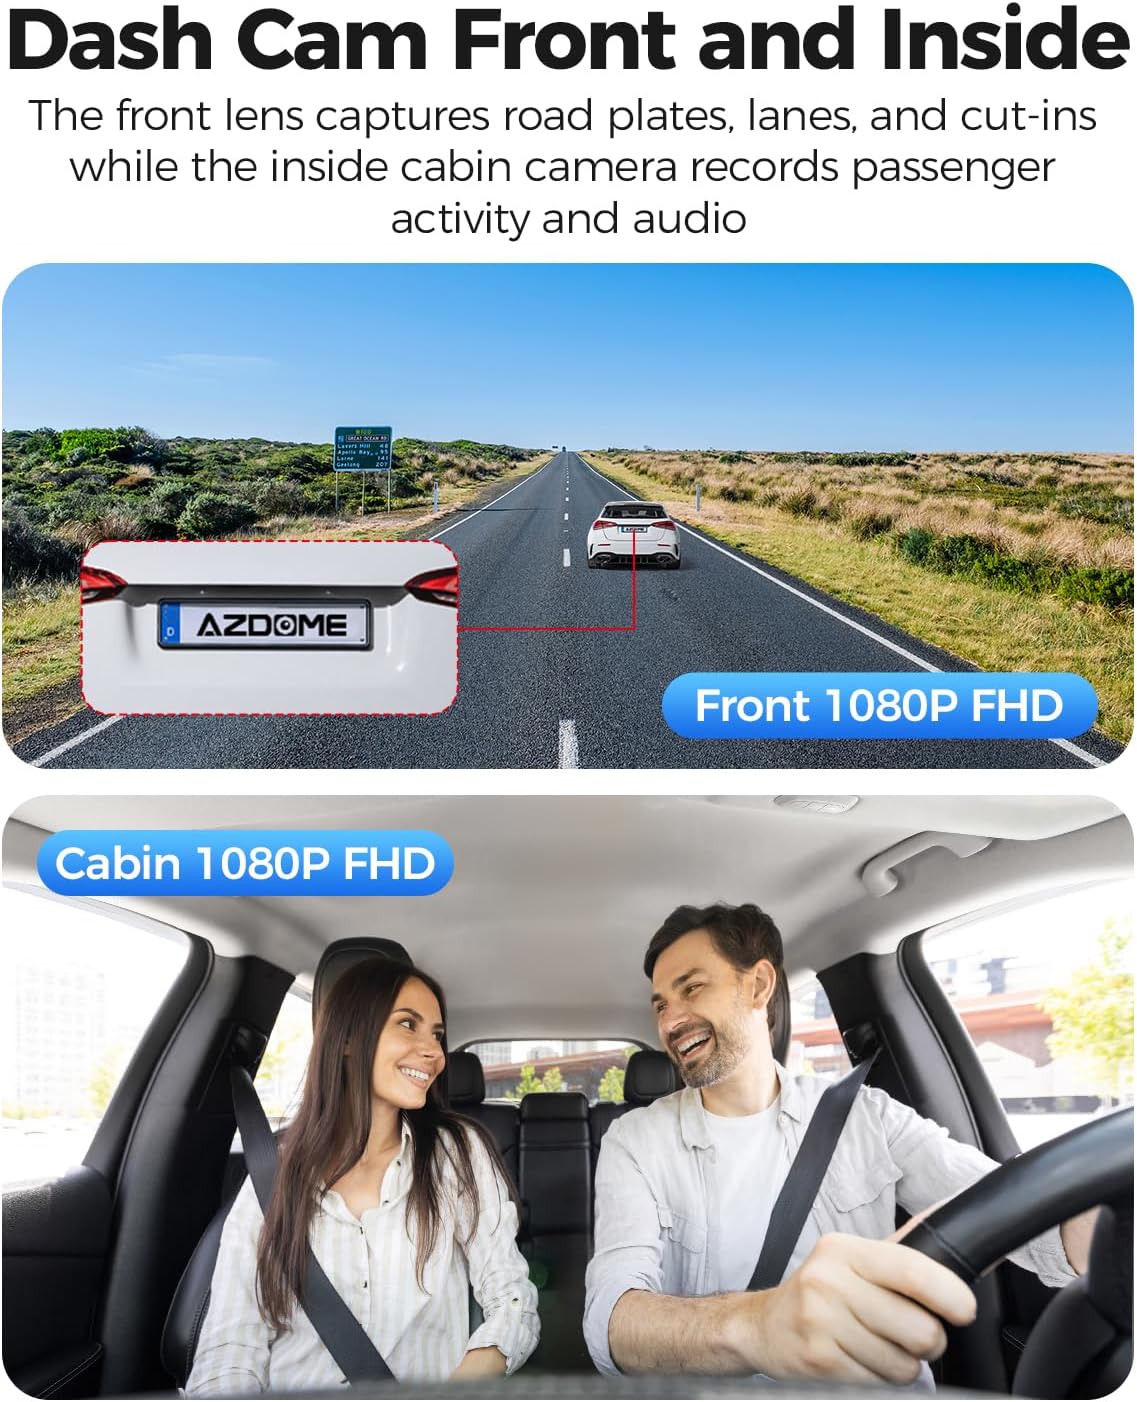
Image: A diagram illustrating the wide-angle coverage of the front (121°) and cabin (131°) cameras, showing how they capture a broad area around the vehicle.
Eto ati fifi sori
Follow these steps for quick and secure installation of your dash cam.
- Foju afẹfẹ mimọ: Ensure the chosen area on your windshield is clean and dry for optimal adhesion.
- Lo Sitika Aimi: Place the electrostatic film on the desired spot on the windshield. This helps in easy removal and repositioning without leaving residue.
- Oke Dash Cam: Attach the dash cam to the static sticker using the provided 3M adhesive. Ensure the lenses have a clear view of the road and cabin.
- So agbara: Plug the Type-C car charger into the dash cam and then into your vehicle's cigarette lighter socket. Route the cable neatly using the provided cable clips and pry tool.
- Fi kaadi MicroSD sii: Before powering on, insert a compatible MicroSD card (up to 128GB, not included) into the designated slot. Ensure the card is inserted correctly until it clicks into place.
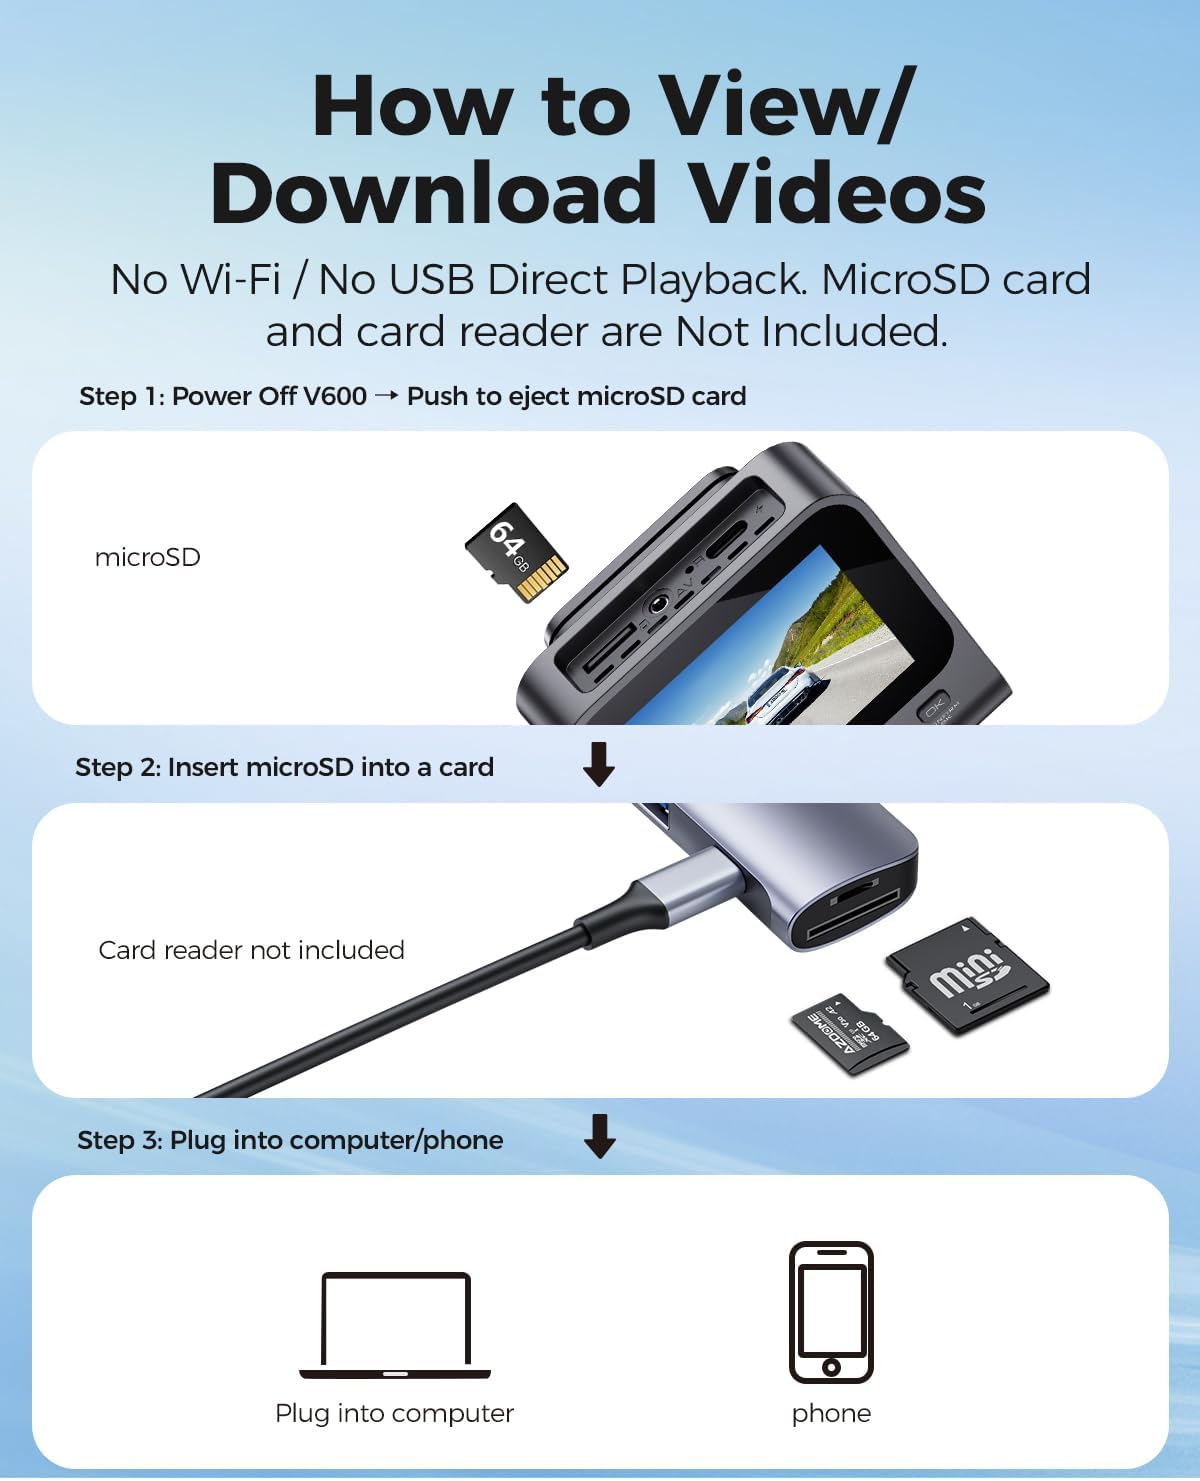
Image: A visual guide demonstrating the quick installation process of the dash cam, including cable routing and camera placement on the windshield.
Awọn ilana Iṣiṣẹ
Basic Recording (Loop Recording)
Once powered on, the dash cam will automatically begin recording. The loop recording function continuously records video in segments (e.g., 1, 3, or 5 minutes) and overwrites the oldest unlocked files when the memory card is full. This ensures continuous recording without manual deletion.

Image: A visual representation of the loop recording feature, showing how new footage overwrites older, unlocked files lati rii daju gbigbasilẹ lemọlemọfún.
G-Sensọ (Titiipa pajawiri)
Sensọ G-sensọ ti a ṣe sinu rẹ n ṣe awari awọn ipa tabi awọn ijamba lojiji. Nigbati a ba rii iṣẹlẹ kan, apakan fidio lọwọlọwọ ni a tiipa laifọwọyi ati fipamọ lati ṣe idiwọ ki a ma fi gbigbasilẹ loop kun un. Foo yiitage serves as crucial evidence in case of an accident.

Image: An illustration depicting the G-Sensor Auto Lock feature, showing how it detects impacts and automatically locks video clips to protect them from being overwritten.
24-Hour Parking Mode
To enable continuous 24-hour parking monitoring, a 3-lead hardwire kit (not included, search ASIN: B096G6FKZP) is required. In parking mode, the dash cam can detect impacts (Collision Detection Parking Mode) or record continuously at a low frame rate (Time-Lapse Parking Mode). It also features low voltage protection to prevent draining your car battery.

Image: A graphic detailing the 24-Hour Parking Mode, including collision detection, time-lapse recording, and low voltage protection, with a note about the required hardwire kit.
IR Night Iran
The dash cam is equipped with IR lights to enhance interior cabin clarity in low-light conditions. For optimal night vision, the interior recording may switch to black-and-white mode to capture clearer details.

Image: An illustration highlighting the Clear Night Vision capabilities, showing how it brightens dark roads and reduces glare to capture more details, especially with infrared for the cabin.
Viewing and Downloading Videos
Si view or download recorded videos, follow these steps:
- Agbara Pa: Ensure the V600 dash cam is powered off.
- Eject MicroSD Card: Gently push the MicroSD card to eject it from the slot.
- Insert into Card Reader: Insert the MicroSD card into a card reader (not included).
- Sopọ si Ẹrọ: Plug the card reader into a computer or compatible phone to access the video files.

Image: A step-by-step guide demonstrating how to remove the MicroSD card from the V600, insert it into a card reader, and connect it to a computer or phone to view ati ki o gba awọn fidio.
Itoju
Itọju to peye ṣe idaniloju gigun ati iṣẹ to dara julọ ti kamera dash rẹ.
- Ninu: Use a soft, dry cloth to clean the camera lenses and screen. Avoid abrasive cleaners or solvents.
- Iwọn otutu: Do not expose the dash cam to extreme temperatures for extended periods.
- Kaadi MicroSD: Regularly format your MicroSD card (at least once a month) to prevent data corruption and ensure smooth recording. Back up important files ṣaaju ki o to kika.
- Awọn imudojuiwọn famuwia: Ṣayẹwo osise AZDOME webaaye lorekore fun eyikeyi awọn imudojuiwọn famuwia ti o wa lati mu ilọsiwaju ṣiṣẹ ati ṣafikun awọn ẹya tuntun.
Laasigbotitusita
Tọkasi apakan yii fun awọn ojutu si awọn ọran ti o wọpọ.
| Isoro | Ojutu |
|---|---|
| Kamẹra Dash ko ni agbara lori. | Ensure the car charger is securely connected to both the dash cam and the vehicle's cigarette lighter. Check if the vehicle's power outlet is functioning. |
| Gbigbasilẹ duro lairotẹlẹ. | The MicroSD card may be full or corrupted. Format the card regularly. Ensure you are using a high-speed (Class 10 or U1/U3) MicroSD card. |
| Fidio footage jẹ blurry tabi koyewa. | Clean the camera lenses with a soft cloth. Ensure the protective film has been removed from the lenses. Check if the camera is securely mounted and not vibrating. |
| Ipo gbigbe ko ṣiṣẹ. | Parking mode requires a dedicated hardwire kit (ASIN: B096G6FKZP) for continuous power. Ensure the hardwire kit is correctly installed and connected. |
| G-Sensor is too sensitive or not sensitive enough. | Ṣàtúnṣe ètò ìfàmọ́ra G-sensọ nínú àkójọ àworán dash cam. |
Awọn pato
| Ẹya ara ẹrọ | Ẹ̀kúnrẹ́rẹ́ |
|---|---|
| Orukọ awoṣe | V600 |
| Ipinnu Yaworan fidio | 1080p (Front and Cabin) |
| Front Field Of View | Awọn iwọn 150 |
| Pataki Awọn ẹya ara ẹrọ | G-Sensor, Loop Recording, IR Night Vision, 24-Hour Parking Mode |
| Ifihan | 3-inch Iboju |
| Atilẹyin ipamọ | Up to 128GB MicroSD card |
| Iṣagbesori Iru | Dasibodu Oke |
| Orisun agbara | Charging Cable (Type-C Car Charger) |
| Ọja Mefa | 16 x 14 x 6 inches |
| Iwọn Nkan | 10.2 iwon |
Atilẹyin ọja ati Support
Fun alaye atilẹyin ọja ati atilẹyin imọ-ẹrọ, jọwọ tọka si AZDOME osise website or contact AZDOME customer service directly. Keep your purchase receipt as proof of purchase for warranty claims.
Olupese: AZDOME
Webojula: Visit the AZDOME Store on Amazon (fun alaye iyasọtọ gbogbogbo)