
1. Ifihan
This manual provides detailed instructions for the installation, operation, and maintenance of your darkFlash DS900 Air ATX Mid-Tower PC Gaming Case. Please read this manual thoroughly before beginning assembly to ensure proper setup and safe usage. The DS900 Air is designed to offer a clear view of your components with its 270° full-view tempered glass and provides excellent cooling capabilities for high-performance systems.

Figure 1.1: darkFlash DS900 Air ATX Mid-Tower PC Gaming Case with internal components and RGB lighting.
2. Alaye Aabo
Nigbagbogbo ṣe akiyesi awọn iṣọra ailewu atẹle lakoko fifi sori ẹrọ ati iṣẹ:
- Disconnect the power supply from the wall outlet before installing or removing any components.
- Wọ okun ọwọ-atako-aimi lati ṣe idiwọ isọjade elekitirotatiki (ESD) ibajẹ si awọn paati ifura.
- Handle tempered glass panels with care. Avoid impacts or dropping them, as they can shatter.
- Pa awọn ẹya kekere ati awọn skru kuro lati ọdọ awọn ọmọde.
- Rí i dájú pé afẹ́fẹ́ tó yẹ wà ní àyíká àpótí náà kí ó má baà gbóná jù.
- Do not attempt to modify the case structure, as this may void the warranty and pose safety risks.
3. Awọn pato
| Ẹya ara ẹrọ | Sipesifikesonu |
|---|---|
| Orukọ awoṣe | DS900 Air |
| Iru Irú | ATX Mid-Tower |
| Modaboudu Support | ATX, Micro ATX, Mini ITX |
| GPU Ipari Kiliaransi | Ti o de 425mm |
| Ìdádúró Gíga Itutu CPU | Ti o de 170mm |
| Iru PSU | ATX (Bottom-mounted) |
| Wakọ Bays | 2x 3.5" HDD or 2x 2.5" SSD, 2x 2.5" SSD |
| Imugboroosi Iho | 7 Awọn iho PCIe |
| I/O Ports | 1x USB-C, 1x USB 3.0, Audio (HD Audio) |
| Fan Support | Bottom: 3x 120mm; Top: 3x 120mm or 2x 140mm; Rear: 1x 120mm; Right Side: 2x 120mm |
| Radiator Support | Top: Up to 360mm; Side: Up to 240mm |
| Awọn ohun elo | Irin, Gilasi Onígboná |
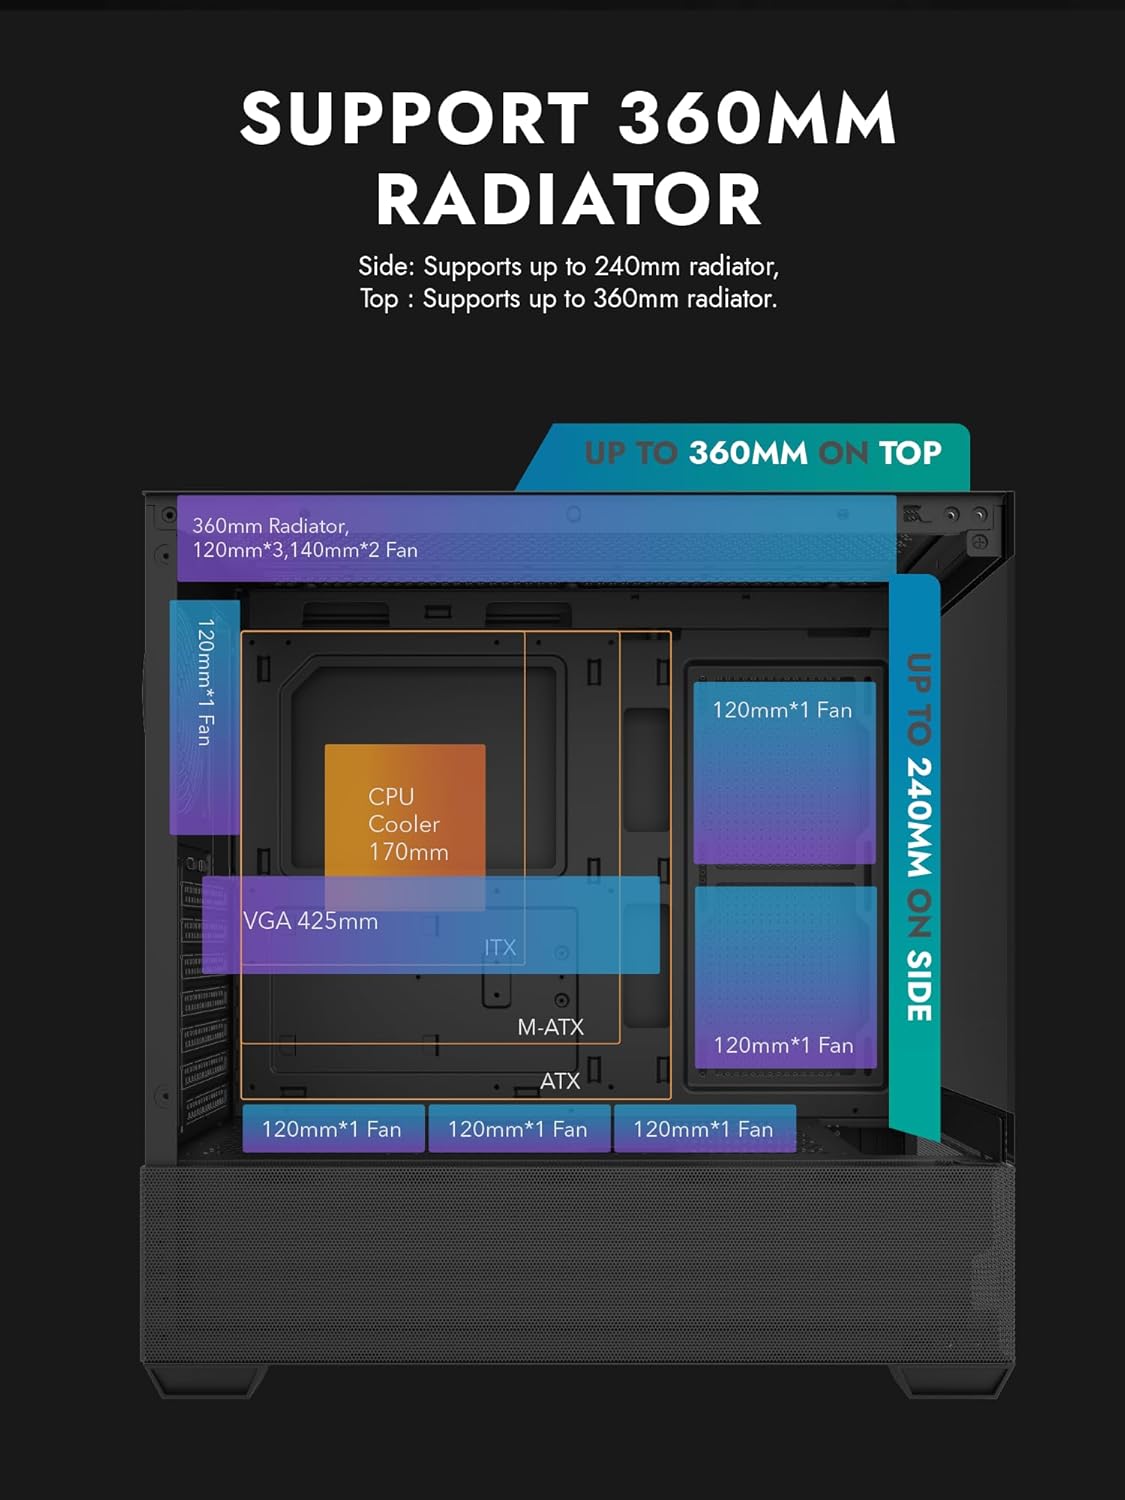
Figure 3.1: Radiator and fan support diagram for the DS900 Air case, illustrating maximum component dimensions.
4. Eto ati fifi sori
Follow these steps to assemble your PC components within the darkFlash DS900 Air case.
4.1. Ngbaradi Ọran naa
- Yọ Awọn Paneli ẹgbẹ kuro: The DS900 Air features a tool-free clamshell side panel. Gently pull the top edge of the tempered glass side panel to unlatch it, then lift it off. Repeat for the other side panel if necessary.
- Apoti Ẹya: Locate the accessory box inside the case, which contains screws, cable ties, and other mounting hardware.
4.2. Modaboudu fifi sori
- Fi I/O shield sinu ẹhin šiši ọran naa.
- Align your ATX, Micro-ATX, or Mini-ITX motherboard with the standoffs inside the case. Ensure the I/O ports align with the I/O shield.
- Ṣe aabo modaboudu nipa lilo awọn skru ti a pese.
4.3. Agbara Ipese Unit (PSU) fifi sori
- The DS900 Air has a dedicated bottom PSU chamber. Slide your ATX power supply into the chamber from the rear of the case.
- Ṣe aabo PSU pẹlu awọn skru lati ẹhin ọran naa.
- Route necessary power cables through the cutouts into the main compartment.
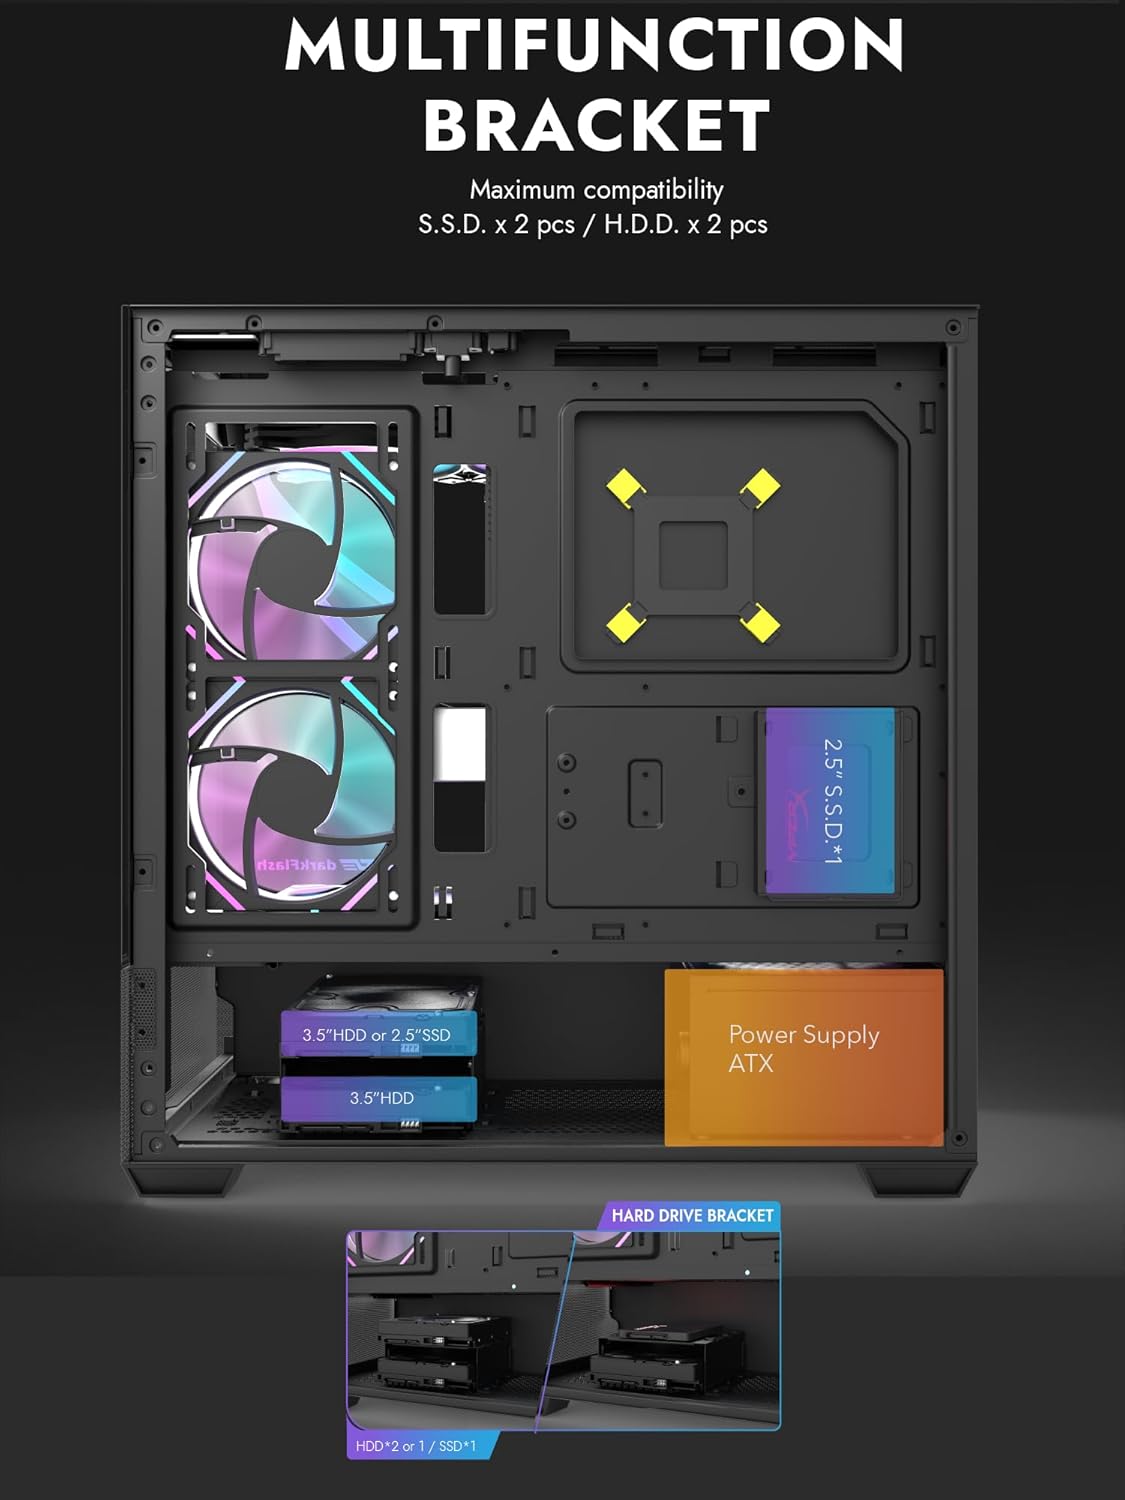
Figure 4.1: Internal layout showing the multifunction drive bracket and the bottom-mounted PSU chamber.
4.4. Fifi sori ẹrọ ẹrọ ipamọ
The case supports up to two 3.5" HDDs or 2.5" SSDs in the hard drive bracket, and two additional 2.5" SSDs on the multifunction bracket.
- 3.5" HDD / 2.5" SSD: Install drives into the removable hard drive bracket located in the PSU chamber. Secure with screws.
- 2.5" SSD: Mount 2.5" SSDs onto the multifunction bracket located on the motherboard tray. Secure with screws.
4.5. Kaadi eya aworan (GPU) fifi sori
- Yọ awọn ideri PCIe pataki ti o yẹ lati ẹhin ọran naa.
- Fi kaadi eya rẹ sinu aaye PCIe ti o yẹ lori modaboudu.
- Secure the graphics card with screws. The case supports GPUs up to 425mm in length.
4.6. Cooling System Installation (Fans/Radiators)
The DS900 Air offers extensive cooling options:
- Oke: Supports up to 3x 120mm fans or 2x 140mm fans, or a 360mm radiator.
- Isalẹ: Supports up to 3x 120mm fans.
- Ẹyìn: Ṣe atilẹyin fun 1x 120mm àìpẹ.
- Apa otun: Supports 2x 120mm fans or a 240mm radiator.
Install fans and radiators using the appropriate screws and mounting points. Ensure correct airflow direction for optimal cooling.

Figure 4.2: Fan support locations and quantities within the DS900 Air chassis.

Figure 4.3: Airflow diagram demonstrating optimal cooling paths through the case.
4.7. Connecting Front I/O Cables
Connect the front panel cables (USB-C, USB 3.0, HD Audio, Power, Reset, LED) to their corresponding headers on your motherboard. Refer to your motherboard manual for exact header locations.

Figure 4.4: Top-right I/O panel featuring USB-C and USB 3.0 ports.
4.8. Iṣakoso USB
Lo àwọn ibi tí a ti gé àwọn okùn ìtọ́sọ́nà àti àwọn ibi tí a ti so mọ́ ẹ̀yìn àtẹ motherboard láti ṣàkóso àwọn okùn. Èyí mú kí afẹ́fẹ́ àti ẹwà wọn sunwọ̀n síi.
5. Ṣiṣẹ PC rẹ
Once all components are installed and cables are connected, replace the side panels. Connect your monitor, keyboard, mouse, and power cable. Press the power button on the case to start your system. Ensure all fans are spinning and components are receiving power.
6. Itọju
Itọju deedee n ṣe iranlọwọ lati rii daju pe iṣẹ ṣiṣe to dara julọ ati igba pipẹ ti awọn paati PC rẹ.
- Pipa eruku: Periodically clean dust filters and internal components using compressed air. The DS900 Air features mesh panels that help filter dust.
- Fife ategun: Ensure no obstructions block the intake or exhaust vents of the case.
- Iṣakoso USB: Re-evaluate cable routing periodically to ensure no cables are interfering with fan blades or airflow.
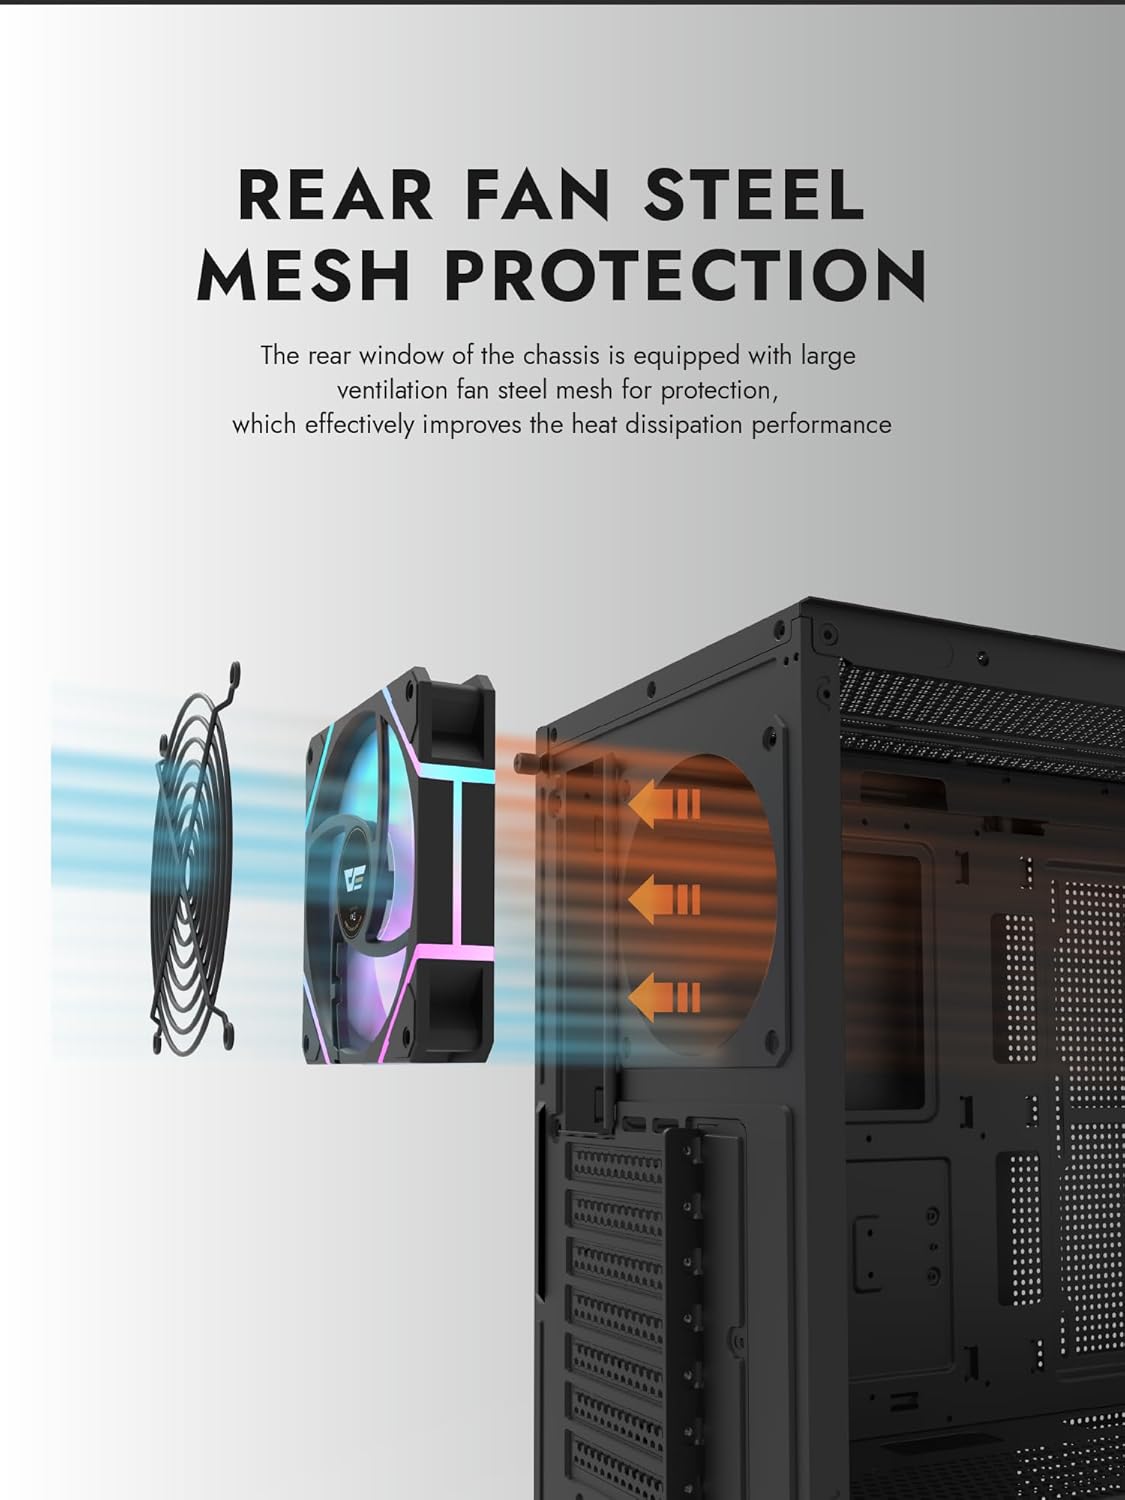
Figure 6.1: Rear fan steel mesh protection, designed to improve heat dissipation.
7. Laasigbotitusita
Tí o bá ní ìṣòro pẹ̀lú ìkọ́lé PC rẹ, ronú nípa àwọn ìgbésẹ̀ tí ó wọ́pọ̀ láti yanjú ìṣòro wọ̀nyí:
- Ko si Agbara: Check all power connections, including the PSU to the wall, PSU to motherboard, and front panel power switch cable to the motherboard.
- Ko si Ifihan: Ensure your monitor is connected to the graphics card (not the motherboard I/O unless using integrated graphics). Reseat the graphics card and RAM.
- Igbóná púpọ̀: Verify all fans are spinning correctly and are oriented for proper airflow. Check CPU cooler installation.
- Ko ṣe awari ohun elo: Reseat the component (e.g., RAM, GPU, storage drive) and check its power and data connections.
8. Atilẹyin ọja ati Support
darkFlash products are manufactured to high-quality standards. For warranty information or technical support, please refer to the official darkFlash webojula tabi kan si alagbata rẹ. Jeki ẹri rira rẹ fun awọn iṣeduro atilẹyin ọja.