1. Awọn Ilana Aabo pataki
Please read all instructions before using this sewing machine. This machine is intended for household use only.
EWU - Lati dinku ewu mọnamọna ina:
- Ohun elo ko yẹ ki o fi silẹ laini abojuto nigbati o ba ṣafọ sinu.
- Yọọ ohun elo yii kuro nigbagbogbo lati inu ina mọnamọna lẹsẹkẹsẹ lẹhin lilo ati ṣaaju mimọ.
- Yọọ kuro nigbagbogbo ṣaaju ki o to tun lamping. Rọpo boolubu pẹlu iru kanna ti a ṣe iwọn 15 wattis (agbegbe 110-120V) tabi 15 wattis (agbegbe 220-240V).
ÌKÌLỌ̀ - Láti dín ewu ìjóná, iná, ìjamba iná mànàmáná, tàbí ìpalára kù sí àwọn ènìyàn:
- Maṣe gba laaye lati lo bi nkan isere. Ifarabalẹ sunmọ jẹ pataki nigbati ohun elo yii ba lo nipasẹ tabi sunmọ awọn ọmọde.
- Lo ohun elo yii nikan fun lilo ipinnu rẹ gẹgẹbi a ti ṣalaye ninu iwe afọwọkọ yii. Lo awọn asomọ nikan ti a ṣeduro nipasẹ olupese bi o ti wa ninu iwe afọwọkọ yii.
- Maṣe ṣiṣẹ ohun elo yii ti o ba ni okun tabi plug ti o bajẹ, ti ko ba ṣiṣẹ dada, ti o ba ti lọ silẹ tabi bajẹ, tabi sọ sinu omi. Da ohun elo pada si ọdọ alagbata ti a fun ni aṣẹ to sunmọ tabi ile-iṣẹ iṣẹ fun idanwo, atunṣe, itanna tabi atunṣe ẹrọ.
- Maṣe ṣiṣẹ ohun elo naa pẹlu awọn ṣiṣi afẹfẹ eyikeyi ti dina. Jeki awọn šiši fentilesonu ti ẹrọ masinni ati oludari ẹsẹ laisi ikojọpọ ti lint, eruku, ati asọ alaimuṣinṣin.
- Jeki awọn ika ọwọ si gbogbo awọn ẹya gbigbe. A nilo itọju pataki ni ayika abẹrẹ ẹrọ abẹrẹ.
- Nigbagbogbo lo awo abẹrẹ to dara. Awo ti ko tọ le fa ki abẹrẹ naa fọ.
- Maṣe lo awọn abere ti o tẹ.
- Ma ṣe fa tabi Titari aṣọ nigba stipping. O le yi abẹrẹ naa pada ti o fa ki o fọ.
- Always unplug sewing machine off ("O") when making any adjustments in the needle area, such as threading needle, changing needle, threading bobbin, or changing presser foot, and the like.
- Nigbagbogbo yọọ ẹrọ masinni kuro ni itanna eleyi nigbati o ba n yọ awọn ideri kuro, lubrication, tabi nigbati o ba ṣe eyikeyi awọn atunṣe iṣẹ olumulo miiran ti a mẹnuba ninu itọnisọna itọnisọna.
- Maṣe ju silẹ tabi fi ohunkan sinu ṣiṣi eyikeyi.
- Maṣe lo ni ita.
- Maṣe ṣiṣẹ nibiti a nlo awọn ọja fun sokiri aerosol tabi ibiti a nṣe nṣakoso atẹgun.
- Láti gé ìjápọ̀ kúrò, yí gbogbo àwọn ìṣàkóso padà sí ipò pípa ("O"), lẹ́yìn náà yọ pulọọgi kúrò ní ibi tí ó ti jáde.
- Ma ṣe yọọ kuro nipa fifaa lori okun. Lati yọọ, di plug naa, kii ṣe okun naa.
- Ipele titẹ ohun labẹ awọn ipo iṣẹ deede jẹ 75dB (A).
- Always turn off the machine or unplug when the machine is not operating properly.
- Maṣe gbe ohunkohun sori oludari ẹsẹ.
- If the supply cord to the foot controller is damaged, it must be replaced by the manufacturer or its service agent or a similar qualified person in order to avoid a hazard.
- Ohun elo yii kii ṣe ipinnu fun lilo nipasẹ awọn eniyan (pẹlu awọn ọmọde) pẹlu idinku ti ara, imọlara tabi awọn agbara ọpọlọ, tabi aini iriri ati imọ, ayafi ti wọn ba ti fun wọn ni abojuto tabi itọnisọna nipa lilo ohun elo nipasẹ eniyan ti o ni iduro fun aabo wọn.
- Awọn ọmọde yẹ ki o wa ni abojuto lati rii daju pe wọn ko ṣere pẹlu ohun elo naa.
FIPAMỌ awọn ilana
Image: Important Safety Instructions page from the Singer 2250 manual, detailing electrical and general safety warnings.
2. Eto
2.1 Awọn ẹya ẹrọ
The Singer 2250 sewing machine comes with a set of standard accessories and supports various optional accessories for different sewing tasks.
- Awọn ẹya ara ẹrọ boṣewa: All purpose foot, Button sewing foot, Zipper foot, Screwdriver, Seam ripper/brush, Pack of needles, Bobbin (3), Darning plate, Spool holder.
- Optional Accessories (not supplied with machine, available from SINGER® retailers): Edge/quilting guide, Zipper foot, Straight stitch foot, Overcasting foot, Hemmer foot, Blind hem foot, Satin stitch foot, Cording/embroidery foot, Second spool pin, Spool pin felt.
2.2 Yiyi Bobbin
- Place thread and corresponding spool holder onto the spool pin.
- Snap the thread into the thread guide.
- Wind the thread counterclockwise around the bobbin winder tension disc.
- Thread the bobbin as illustrated and place it on the spindle.
- Push the bobbin spindle to the right.
- Hold the thread end.
- Step on the foot control pedal to begin winding.
- Cut the thread once the bobbin is full.
- Push the bobbin spindle to the left and remove the wound bobbin.
Jọwọ ṣakiyesi: When the bobbin winder spindle is in the "bobbin winding" position, the machine will not sew and the hand wheel will not turn. To start sewing, push the bobbin winder spindle to the left (sewing position).

Image: Manual page illustrating standard and optional accessories, and a step-by-step guide for winding the bobbin.
2.3 Connecting to Power Source
Ensure the machine's power switch is in the "O" (off) position. Insert the machine plug into the electrical outlet. Always use a grounded outlet.
2.4 Raising the Presser Foot Lifter
The presser foot lifter is located at the back of the needle bar area. Lift it to raise the presser foot for placing fabric, and lower it to hold the fabric in place for sewing.
3. Isẹ
3.1 Choosing Your Pattern
The Singer 2250 features a Pattern Selector Dial to choose various stitch patterns.
- Stitches indicated in black on the diagram correspond to the Pattern Selector Dial.
- For patterns indicated with the "S" color, turn the Pattern Selector Dial to "S", then use the Stitch Length Dial to adjust the desired stitch length.
- The Pattern Selector Dial can be turned in either direction.
3.2 Stitch Length Dial
The Stitch Length Dial controls the length of straight stitches and the density of zig-zag stitches.
- For Straight Stitching: Turn the Pattern Selector Dial to the straight stitch symbol. The stitch length increases as the dial approaches "4". Use longer stitches for heavier fabrics and thicker needles, shorter stitches for lighter fabrics and finer needles.
- For Zig-Zag Stitching: Turn the Pattern Selector Dial to "~~~ ". The density of zig-zag stitches increases as the setting of the stitch length dial approaches "0". Dense zig-zag stitches are known as satin stitches.

Image: Manual page detailing how to choose stitch patterns and adjust stitch length for various sewing applications.
3.3 Asapo ẹrọ
Proper threading is crucial for smooth sewing. Follow these general steps:
- Fi okùn ìfọ́ náà sí orí ìfọ́ náà.
- Guide the thread through the upper thread guides.
- Ṣe o tẹle ara nipasẹ awọn disiki ẹdọfu.
- Mu okùn naa soke nipasẹ lefa gbigba.
- Ṣe itọsọna o tẹle ara si isalẹ nipasẹ itọsọna o tẹle igi abẹrẹ.
- Tẹ abẹrẹ naa lati iwaju si ẹhin.
- Raise the bobbin thread by turning the handwheel towards you, catching the bobbin thread with the needle thread.
- Pull both threads under the presser foot and towards the back.
3.4 Sewing on Buttons
To sew buttons using your Singer 2250:
- Fi awo okunkun sori ẹrọ.
- Change the all-purpose foot to the button sewing tool.
- Position the fabric and button under the foot.
- Lower the button to the desired position and lower the foot.
- Set the Pattern Selector Dial on "---" and sew a few securing stitches.
- Select one of the two narrow zig-zag patterns (between 0.5 and 1.5) and sew through both holes of the button. Turn the handwheel to check needle clearance.
- Slowly sew the button with about 10 stitches.
- Select pattern "---" again and sew a few securing stitches.
- If a shank is required, place a darning needle on top of the button and sew.
- For buttons with 4 holes, sew through the front two holes first, then sew backwards and then sew through the back two holes.
3.5 Installing the Removable Extension Table
The removable extension table provides a larger work surface and also serves as an accessory box.
- Lati fi sori ẹrọ: Hold the removable extension table horizontally and push it in the direction of the arrow until it clicks into place.
- Lati Yọ: Pull the extension table towards the left.
- The inside of the removable extension table can be used as an accessory box. To open, flip the cover down.
4. Itọju
4.1 Darning Plate
The darning plate is used for specific tasks like darning or free-hand embroidery.
- Fifi sori: Install the darning plate as illustrated in the manual.
- Yiyọ: Fun masinni deede, yọ awo okunkun kuro.
- For free-motion sewing, a darning/embroidery foot (optional accessory) is recommended.
4.2 Inserting & Changing Needles
Regularly change your needle, especially if sewing problems occur. Use SINGER® Brand Needles for best results.
- Turn the power switch to off ("O").
- Loosen abẹrẹ clamp dabaru.
- Insert the new needle with the flat side of the shaft facing the back, pushing it up as far as it will go.
- Mu abẹrẹ clamp dabaru.
Ifarabalẹ: Needles must be in perfect condition. Problems can occur with bent needles, damaged points, or blunt needles.
4.3 Changing the Bulb
To change the light bulb, ensure the machine is unplugged. Replace the bulb with the same type rated 15 watts (110-120V area) or 15 watts (220-240V area).
4.4 Ninu
Regularly clean the lint and dust from the bobbin case area and feed dogs using the provided brush. Ensure the machine is unplugged before cleaning.
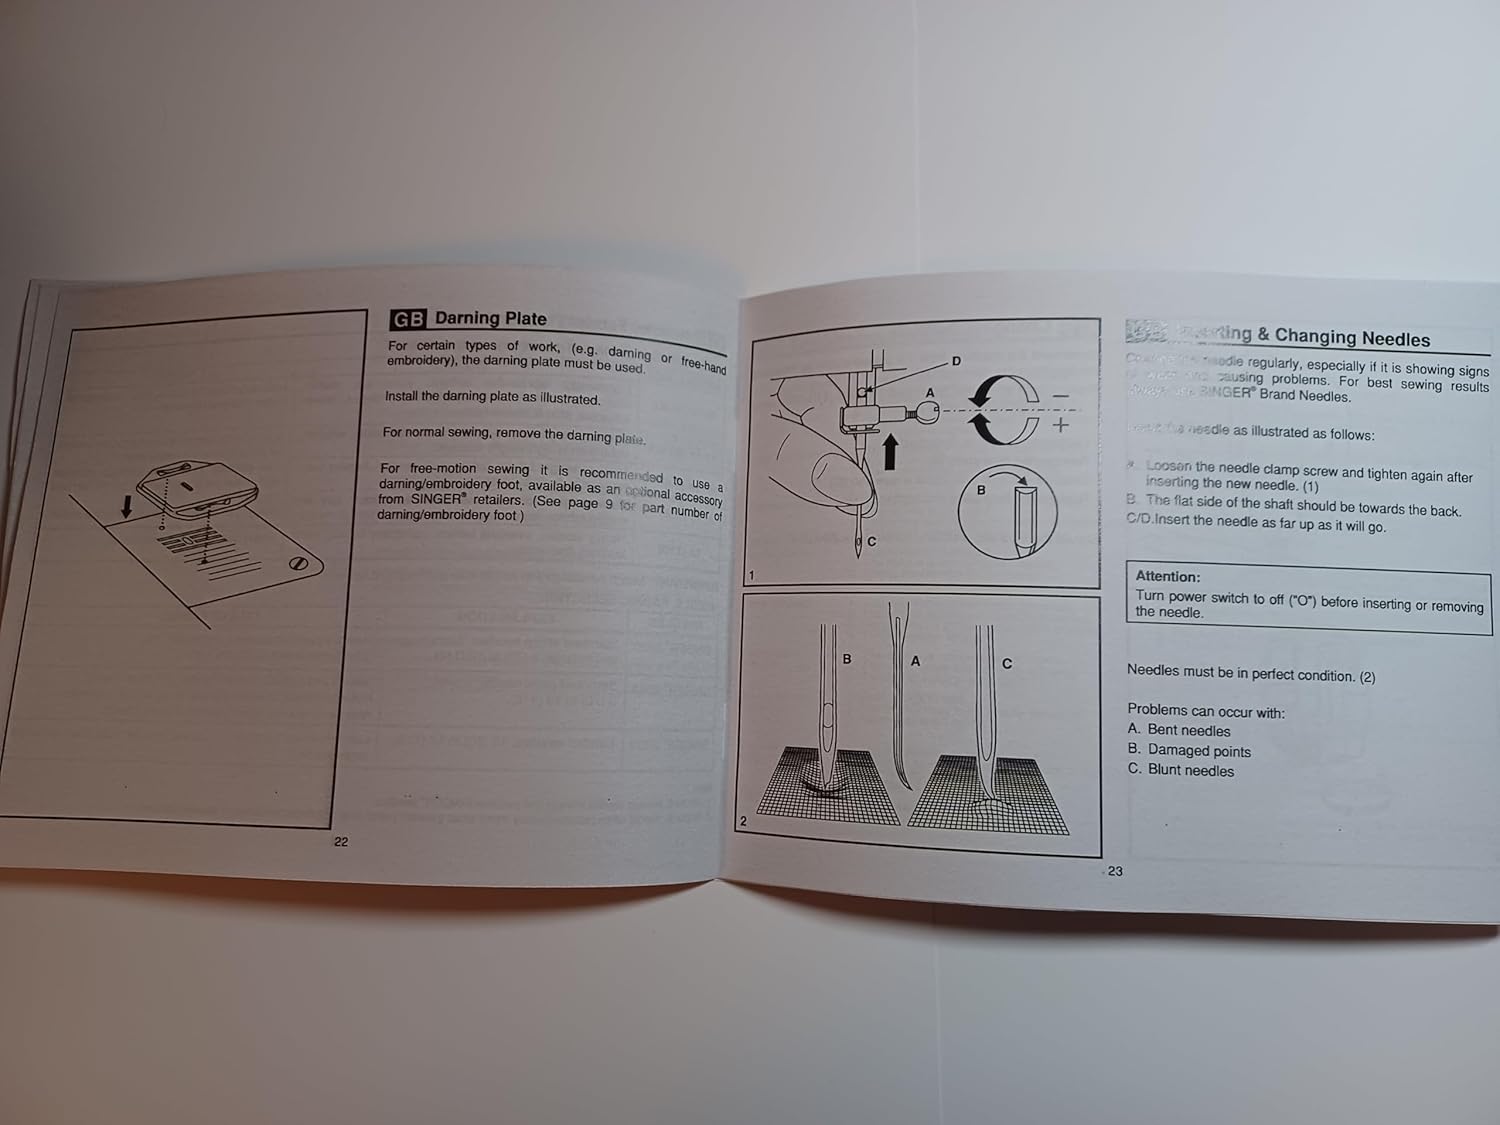
Image: Manual page illustrating procedures for sewing on buttons, installing the extension table, using the darning plate, and changing needles.
5. Laasigbotitusita
If you encounter issues with your Singer 2250, refer to the following common problems and solutions:
- Awọn aranpo ti a fo: Ensure the needle is inserted correctly, not bent, and is the appropriate size for the fabric and thread. Re-thread the machine.
- Fifọ okun: Check for correct threading, proper tension, a bent or blunt needle, or burrs on the needle plate or bobbin case.
- Fifọ aṣọ: Adjust tension settings, use the correct needle size, or ensure the presser foot pressure is appropriate for the fabric.
- Aṣọ Ẹ̀rọ Tí Kò Fúnni Ní Ìfúnni: Check if the feed dogs are raised. Ensure the presser foot is lowered.
- Isẹ alariwo: Clean and lubricate the machine as per maintenance instructions. Check for loose parts or a bent needle.
For persistent problems, contact an authorized Singer service center.
6. Awọn pato
| Ọja Mefa | 8.5 x 5.5 x 0.1 inches |
| Iwọn Nkan | 3 iwon |
| Nọmba awoṣe | SINGER 2250 Manual |
| Olupese | TabSynth Design (for reproduction manual) |
| ASIN | B0G19M5M63 |
7. Atilẹyin ọja ati Support
This instruction manual is a reproduction for the Singer 2250 Sewing Machine. For warranty information regarding your Singer 2250 sewing machine, please refer to the original documentation provided with your machine or contact Singer customer support directly.
For support related to the operation or maintenance of your Singer 2250, please consult this manual. If further assistance is needed, contact an authorized Singer service center or your local Singer dealer.