1. Ifihan
Thank you for choosing the VEVOR 46-inch Rotisserie Grill. This manual provides essential information for the safe assembly, operation, and maintenance of your rotisserie grill. Please read these instructions thoroughly before use and retain them for future reference. This grill is designed for outdoor use to roast various meats, including whole pigs, lambs, turkeys, and other large cuts, providing even cooking with its motorized rotation.
2. Awọn ilana aabo
- Always operate the rotisserie grill outdoors in a well-ventilated area.
- Jeki awọn ọmọde ati awọn ohun ọsin kuro lati yiyan nigba iṣẹ.
- Ensure the grill is placed on a stable, level surface to prevent tipping.
- Do not use flammable liquids to start or rekindle charcoal.
- Wear heat-resistant gloves when handling hot components or food.
- Disconnect the motor from the power source before cleaning or servicing.
- Do not overload the rotisserie spit beyond the maximum capacity of 132 lbs (60 kg).
- Allow the grill to cool completely before moving or storing.
- Rí i dájú pé gbogbo àwọn ìsopọ̀ iná mànàmáná gbẹ, tí wọ́n sì dáàbò bò wọ́n kúrò lọ́wọ́ ọrinrin.
3. Package Awọn akoonu
Rii daju pe gbogbo awọn paati wa ṣaaju apejọ:
- Rotisserie Grill Unit (main body with lid)
- Rotisserie Spit Rod
- 38W Electric Motor
- Motor akọmọ
- 2 x Spit Forks (Food-Grade SUS304)
- Grill Grates (Food-Grade SUS304)
- Legs with Lockable Caster Wheels
- 1 x Manual Crank Handle
- 1 x Stainless Steel Food Tongs
- 1 x Stainless Steel Wire Brush with Curved Handle
- 2 x Stainless Steel Spice Shakers
- Assembly Hardware (nuts, bolts, washers)

4. Apejọ
Follow these steps to assemble your VEVOR Rotisserie Grill. It is recommended to have two people for easier assembly.
- So awọn ẹsẹ: Securely attach the four legs with lockable caster wheels to the main grill body using the provided hardware. Ensure the wheels are locked during assembly for stability.
- Install the Motor Bracket: Mount the motor bracket to the designated side of the grill frame.
- So mọto naa sori ẹrọ: Attach the 38W electric motor to the motor bracket. Ensure it is securely fastened.
- Insert the Spit Rod: Slide the rotisserie spit rod through the opening on the motor side and through the support on the opposite side.
- Attach Spit Forks: Place the spit forks onto the spit rod. These will hold the meat in place. Adjust their position based on the size of the item to be roasted.
- Install Grill Grates: Place the grill grates inside the main grill body. These can be used for grilling smaller items or as a base for charcoal.


Video 1: VEVOR Electric Rotating Grill Overview. This video demonstrates the assembly and key features of the VEVOR Electric Rotating Grill, including its rotation and capacity.
5. Awọn ilana Iṣiṣẹ
- Prepare the Meat: Securely attach the meat (e.g., whole pig, lamb, turkey) to the rotisserie spit rod using the spit forks. Ensure it is balanced to prevent strain on the motor. The maximum load capacity is 132 lbs (60 kg).
- Prepare the Heat Source: Place charcoal or wood in the bottom of the grill. Ignite the charcoal and allow it to reach the desired temperature.
- Adjust Spit Height: Use the 4-level height adjustment mechanism to position the spit rod at the optimal distance from the heat source. This allows for precise temperature control.
- Start Rotation: Plug in the 38W electric motor and turn it on. The motor will rotate the spit rod at approximately 3 RPM, ensuring even cooking. The dual bearing design provides smooth and steady movement.
- Atẹle Sise: Periodically check the meat's internal temperature and adjust the spit height or charcoal as needed. The built-in cooling fan helps prevent the motor from overheating during extended use.
- Manual Rotation (Optional): If desired, the rotisserie can also be operated manually using the included crank handle.
- Ṣiṣẹ: Once cooked, carefully remove the spit rod and meat from the grill. Allow the meat to rest before carving.


6. Itọju
Proper maintenance ensures the longevity and optimal performance of your VEVOR Rotisserie Grill.
- Ninu: After each use, allow the grill to cool completely. Remove the spit rod, forks, and grill grates. Clean all stainless steel components with warm soapy water and the included stainless steel wire brush. Rinse thoroughly and dry immediately to prevent water spots.
- Itọju mọto: Pa mọto ile pẹlu ipolowoamp cloth. Do not immerse the motor in water. Ensure the cooling fan vents are clear of debris.
- Ibi ipamọ: Tọju gilasi ni agbegbe gbigbẹ, ti a bo nigbati ko si ni lilo lati daabobo rẹ lati awọn eroja.
- Ayewo: Periodically inspect all nuts, bolts, and connections to ensure they are tight. Check the electrical cord for any signs of damage.

7. Laasigbotitusita
If you encounter issues with your VEVOR Rotisserie Grill, refer to the following common problems and solutions:
| Isoro | Owun to le Fa | Ojutu |
|---|---|---|
| Motor ko yiyi | Power cord unplugged, power outlet malfunction, motor switch off, motor overloaded. | Check power connection and outlet. Ensure motor switch is ON. Reduce load on spit rod if exceeding 132 lbs. |
| Unneven sise | Meat not balanced on spit, inconsistent heat source, spit rod too close/far from heat. | Ensure meat is centered and balanced. Distribute charcoal evenly. Adjust spit height using the 4-level adjustment. |
| Motor overheating | Prolonged use, blocked cooling fan vents, excessive load. | Allow motor to cool down. Clear any debris from cooling fan vents. Ensure load does not exceed 132 lbs. |
| Grill wobbles or tips | Uneven surface, wheels unlocked, tripod not secured. | Place grill on a firm, level surface. Lock all caster wheels. Ensure the reinforced tripod is fixed with ground nails for maximum stability. |
Ti iṣoro naa ba wa lẹhin igbiyanju awọn ojutu wọnyi, jọwọ kan si atilẹyin alabara VEVOR fun iranlọwọ.
8. Awọn pato
| Ẹya ara ẹrọ | Ẹ̀kúnrẹ́rẹ́ |
|---|---|
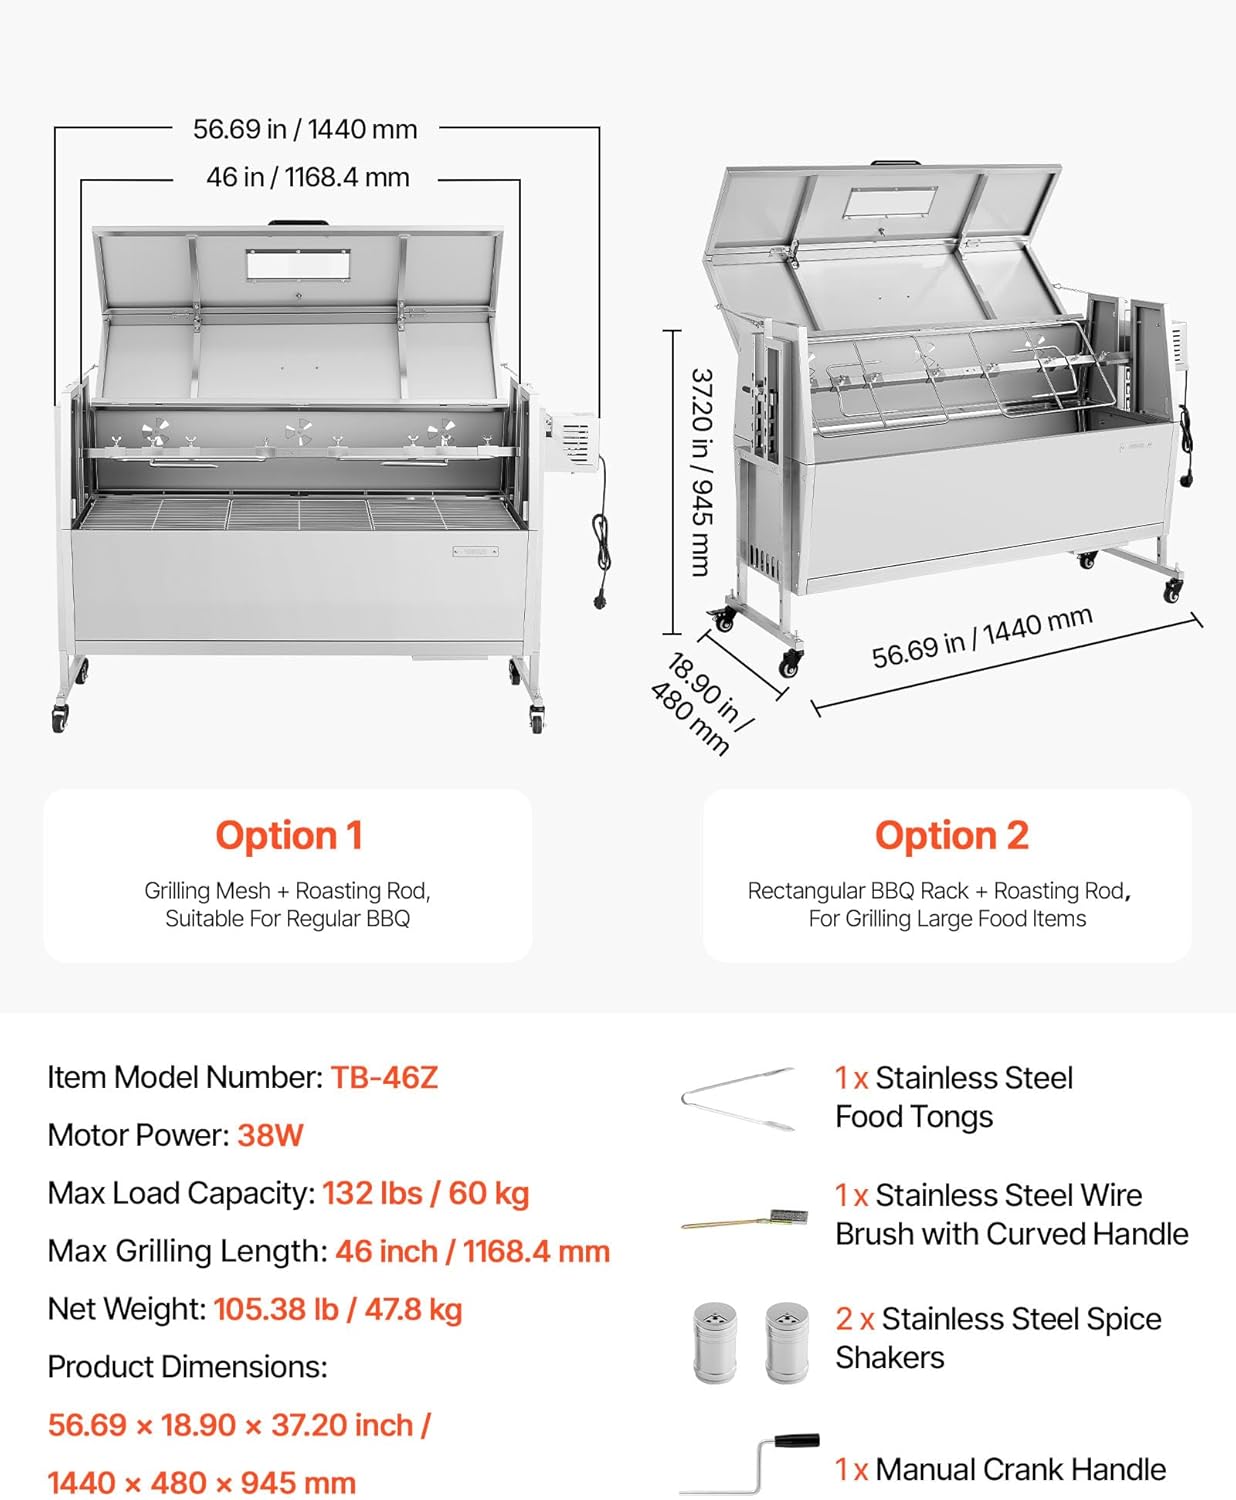
| Nọmba awoṣe | TB-46Z |
| Agbara mọto | 38W |
| Iyara Yiyi | 3 RPM |
| O pọju fifuye Agbara | 132 lbs (60 kg) |
| Max Grilling Length | 46 inches (1168.4 mm) |
| Ọja Mefa | 50.79 x 18.9 x 15.35 inches (1440 x 480 x 945 mm) |
| Iwọn Nkan | 97 poun (44 kg) |
| Ohun elo | Stainless Steel (Food-Grade SUS304 for forks/grates) |
| Orisun agbara | AC |
| Pataki Awọn ẹya ara ẹrọ | Adjustable height (4-level), Portable, Locking Caster Wheels, Built-in Cooling Fan, Dual Bearings |
9. Atilẹyin ọja ati Support
VEVOR products are designed for durability and performance. While specific warranty details are not provided in this manual, VEVOR typically offers support for their products. For any questions, technical assistance, or warranty claims, please contact VEVOR customer support through their official webaaye tabi alagbata ti o ti ra ọja naa. Tọju iwe-ẹri rira rẹ bi ẹri rira.
Optional protection plans may be available for extended coverage. Please refer to your purchase documentation for details on any purchased protection plans.