
Ọrọ Iṣaaju
This manual provides detailed instructions for the installation, operation, and maintenance of your PolarLander AV252B Universal 1-DIN In-Dash Car Audio Player. Please read this manual thoroughly before using the product to ensure proper function and safety. Keep this manual for future reference.
Alaye Aabo
- Ensure all wiring is correctly connected to prevent damage to the unit or vehicle. Incorrect wiring can cause fire or electrical shock.
- Always connect the unit to a 12V DC power supply with a negative ground.
- Ma ṣe ṣiṣẹ ẹyọ naa ni ọna ti o ṣe idiwọ fun ọ lati wakọ. Nigbagbogbo ni ayo aabo opopona.
- Yẹra fún fífi ohun èlò náà sí àwọn iwọn otutu tó le koko, oòrùn tààrà, tàbí ọriniinitutu gíga.
- Ma ṣe gbiyanju lati ṣajọpọ tabi yi ẹyọ naa pada. Tọkasi gbogbo iṣẹ si oṣiṣẹ oṣiṣẹ.
Package Awọn akoonu
Jẹrisi pe gbogbo awọn ohun kan wa ninu package:
- 1 x PolarLander AV252B 12V Bluetooth Vehicle MP3 Audio Player
- Ìwé Ìtọ́sọ́nà Olùlò Gẹ̀ẹ́sì 1 x (ìwé yìí)
- Ikun iṣan
- Ohun elo iṣagbesori (ti o ba wulo)
Ọja Pariview
The PolarLander AV252B is a versatile 1-DIN in-dash car audio player featuring Bluetooth connectivity, FM radio, USB, SD card, and AUX-in support. It is designed for easy integration into most vehicles with a standard 1-DIN slot.

Aworan: Iwaju view of the PolarLander AV252B car audio player, showing the display, control knob, and various buttons.
Awọn iṣakoso nronu iwaju ati Awọn isopọ
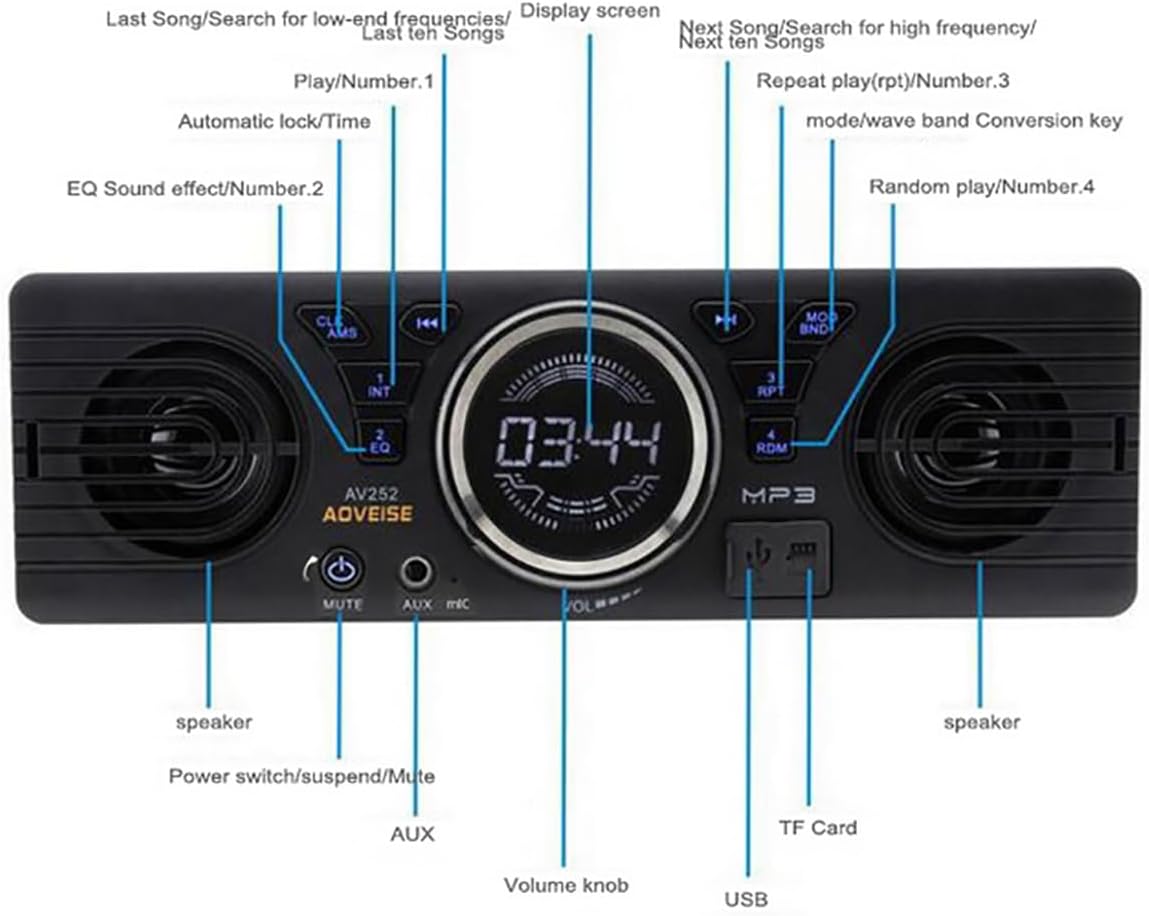
Image: Diagram illustrating the front panel controls of the AV252B unit, with labels for each button and port.
- CLK/AMS Button: Short press for clock display, long press to set time. In radio mode, short press for automatic station search.
- INT/EQ Button: Short press for intro play (first 10 seconds of each track). Long press to cycle through EQ sound effects (Jazz, Rock, Pop, Classical, etc.).
- MUTE/Power Button: Short press to mute/unmute audio. Long press to power the unit on/off.
- Ibudo AUX-IN: Jack 3.5mm fun sisopọ awọn ẹrọ ohun afetigbọ ita.
- MIC: Built-in microphone for Bluetooth hands-free calls.
- Bọtini Iwọn didun: Rotate to adjust volume. Press to select functions in menu.
- Ibudo USB: For connecting USB flash drives for media playback and charging.
- Iho Kaadi TF: For inserting TF (MicroSD) cards for media playback.
- MOD/BND Button: Short press to switch between modes (FM, Bluetooth, USB, SD, AUX). In radio mode, long press to switch between FM bands.
- RPT/Number 3 Button: Short press for repeat play.
- RDM/Number 4 Button: Short press for random play.
- Next Song/Search Button: Short press for next track/station. Long press for fast forward.
- Previous Song/Search Button: Short press for previous track/station. Long press for fast rewind.
- Iboju ifihan: Shows current time, radio frequency, track information, etc.
- Awọn agbọrọsọ: Integrated speakers for audio output.
Fifi sori ẹrọ
Awọn iwọn

Aworan: Oke-isalẹ view of the AV252B unit showing its length (178mm / 7 inches) and height (58mm / 2.3 inches).

Aworan: Apa view of the AV252B unit showing its depth (54mm).
The installation size is 187mm x 49mm, suitable for standard 1-DIN center consoles. The unit's dimensions are approximately 178mm (length) x 58mm (height) x 54mm (depth).
Aworan onirin
Wo àwòrán tó wà nísàlẹ̀ yìí fún àwọn ìsopọ̀ wáyà tó tọ́. Wáyà tó tọ́ lè ba ẹ̀rọ tàbí ọkọ̀ jẹ́.

Image: A detailed wiring diagram for the car radio, showing connections for antenna, ignition switch, battery, and RCA audio outputs.
- Okun Yellow: Connect to the car's battery positive (+) (constant 12V).
- Okun Pupa: Connect to the car's ACC ignition switch (switched 12V).
- Waya Dudu: Connect to the car's battery negative (-) / ground.
- Blue Waya: Sopọ si awọn automatic antenna (ti o ba wulo).
- White RCA: Left RCA audio output.
- Red RCA: Right RCA audio output.
- Iho eriali: Sopọ si eriali redio ti ọkọ.
Important: The car radio cannot be turned on if the red and yellow wires are not connected to the 12V power positive at the same time. Ensure the black wire is securely connected to ground.
Physical Installation Steps
Follow these general steps for installing the unit into your vehicle's dashboard. Specific vehicle models may vary.

Image: A series of six images demonstrating the step-by-step process of removing an old car radio and installing a new one, including dashboard disassembly, wiring, and reassembly.
- Igbesẹ 1: Carefully remove the trim panels and screws securing the existing car radio or blank panel in your dashboard.
- Igbesẹ 2: Use removal tools to extract the old radio or the factory blanking plate from the dashboard slot.
- Igbesẹ 3: If applicable, install the mounting sleeve or cage into the dashboard opening.
- Igbesẹ 4: Disconnect any existing wiring from the old unit.
- Igbesẹ 5: Connect the wiring harness of the AV252B unit to your vehicle's wiring, following the wiring diagram provided above. Ensure all connections are secure.
- Igbesẹ 6: Carefully slide the AV252B unit into the dashboard opening until it clicks into place or is secured with screws. Reassemble any removed trim panels.
Awọn ilana Iṣiṣẹ
Titan / Paa
Tẹ mọlẹ MUTE/Power bọtini lati tan tabi pa kuro.
Iṣakoso iwọn didun
Yiyi awọn Iwọn didun Iwọn láti mú kí ìró pọ̀ sí i àti láti dín ìró kù ní ọ̀nà òdìkejì.
Aṣayan Ipo
Tẹ awọn MOD/BND button repeatedly to cycle through available modes: FM Radio, Bluetooth, USB, SD Card, and AUX-in.
FM Radio isẹ
- Laifọwọyi Search: Ni ipo FM, tẹ gun CLK/AMS bọtini lati wa ati tọju awọn ibudo to lagbara laifọwọyi.
- Itọsọna Afowoyi: Lo awọn Previous/Next Song/Search buttons to manually tune to frequencies.
- Aṣayan Ẹgbẹ: Gun tẹ awọn MOD/BND button to switch between FM bands (FM1, FM2, FM3).
Bluetooth Pairing and Audio Playback
The unit features built-in Bluetooth 2.1 + EDR for hands-free calls and audio streaming.
- Ensure the unit is powered on and in Bluetooth mode (select using MOD/BND bọtini).
- Lori ẹrọ alagbeka rẹ, mu Bluetooth ṣiṣẹ ki o wa awọn ẹrọ to wa.
- Select "AV252B" (or similar name) from the list of devices to pair. No password is typically required.
- Once paired, you can play audio from your device, and it will stream through the car audio player.
- For hands-free calls, the built-in microphone will capture your voice.
USB / SD Kaadi Sisisẹsẹhin
Fi okun filasi USB sinu Ibudo USB or a TF (MicroSD) card into the Iho TF Kaadi. The unit will automatically switch to USB/SD mode and begin playing compatible audio files (MP3/WMA).
- Lo awọn Previous/Next Song/Search awọn bọtini lati lilö kiri awọn orin.
- Tẹ RPT for repeat play (e.g., repeat current track).
- Tẹ RDM for random play.
AUX-in Operation
So ohun ita ohun ẹrọ (fun apẹẹrẹ, foonuiyara, MP3 player) si awọn AX-IN Port using a 3.5mm audio cable. Select AUX mode using the MOD/BND button. Audio will play through the car speakers.
Awọn ipa didun ohun EQ
Gun tẹ awọn INT/EQ button to cycle through preset equalizer settings such as Jazz, Rock, Pop, and Classical.
Ṣiṣeto aago
Kukuru tẹ awọn CLK/AMS button to display the time. Long press it to enter time setting mode. Use the Iwọn didun Iwọn to adjust hours and minutes, and press the knob to confirm.
Itoju
- Ninu: Lo aṣọ rírọrùn tí ó gbẹ láti nu ojú ohun èlò náà. Má ṣe lo àwọn ohun ìfọṣọ tàbí àwọn ohun èlò ìfọṣọ.
- Eruku: Keep the USB and SD card slots free of dust and debris.
- Iwọn otutu: Avoid prolonged exposure to direct sunlight or extreme temperatures, which can affect the unit's lifespan.
Laasigbotitusita
| Isoro | Owun to le Fa | Ojutu |
|---|---|---|
| Ẹka ko ni agbara lori. | Incorrect wiring (Red/Yellow wires not connected to 12V, Black wire not grounded). Blown fuse. | Check all power connections (Red to ACC, Yellow to constant 12V, Black to ground). Check vehicle's fuse box and the unit's fuse. |
| Ko si ohun. | Volume too low. Mute function active. Speaker wires disconnected. Incorrect source selected. | Increase volume. Press MUTE button. Check speaker wiring. Select correct input mode (FM, BT, USB, AUX). |
| Gbigba redio FM ti ko dara. | Antenna not connected or damaged. Weak signal area. | Ensure antenna is securely connected. Try tuning to a stronger station or move to an area with better reception. |
| Bluetooth ko sopọ. | Unit not in Bluetooth mode. Device not discoverable. Already paired with another device. | Switch unit to Bluetooth mode. Ensure your mobile device's Bluetooth is on and discoverable. Disconnect from other devices. |
| A ko mọ kaadi USB/SD. | Ti ko ni atilẹyin file format. Card/drive corrupted. Incorrectly inserted. | Rii daju files are MP3/WMA format. Try a different USB/SD card. Reinsert the card/drive correctly. |
Awọn pato
| Ẹya ara ẹrọ | Sipesifikesonu |
|---|---|
| Nọmba awoṣe | AV252B |
| Iṣagbewọle Voltage | 12V DC |
| Agbara Ijade | 60W x 4 (Max) |
| Ẹya Bluetooth | 2.1 + EDR |
| Iwọn Igbohunsafẹfẹ FM | 87.5 - 108 MHz |
| Awọn ọna kika ohun ni atilẹyin | MP3, WMA |
| Asopọmọra | Bluetooth, USB, TF Card, AUX-in, RCA Output |
| Ipalara | 4ohm / 8ohm |
| Idahun Igbohunsafẹfẹ | 20 - 20000Hz |
| Ifamọ | Kere ju 12dB |
| Awọn iwọn (Ẹyọ) | 180 x 42 x 50mm (isunmọ.) |
| Iwọn igbimọ | 188 x 15 x 58mm (isunmọ.) |
Atilẹyin ọja ati Support
This product is covered by a standard manufacturer's warranty. For specific warranty terms, please refer to the documentation provided at the time of purchase or contact your retailer. For technical support or service inquiries, please reach out to your product vendor or the PolarLander customer service department.