1. Ifihan
The Saker Aluminum Alloy Multi-Angle Marking Ruler is a versatile precision tool designed for accurate measurement and marking in woodworking, carpentry, and design applications. This tool integrates a T-square, protractor, scriber, and ruler into a single unit, offering efficiency and precision for various tasks.
Constructed from high-grade aluminum alloy, it is engineered for durability and consistent performance. The laser-etched scales ensure clear readability and long-term precision. This manual provides instructions for the proper setup, operation, and maintenance of your Saker Multi-Angle Marking Ruler.
2. Awọn ẹya Ọja
- Apẹrẹ Gbogbo-ni-Ọkan: Combines T-square, protractor, scriber, and ruler functions.
- Wiwọn Konge: Measures lengths (0-48cm/0-18in) and angles with clear, accurate scales.
- Ikole ti o tọ: Made from high-grade aluminum alloy for resistance to wear and deformation.
- Quick-Adjust Angle Scribing: Features a locking knob for setting and securing angles for bevels, miters, and radial lines.
- Permanent Markings: Laser-engraved scales provide exceptional clarity and resistance to fading.
- Integrated Scriber: Includes a mechanical pencil and spare refills for immediate use.

Image: High-quality aluminum alloy body ensures durability and precision.

Image: Laser-engraved scales for clear and permanent markings in both centimeters and inches.
3. Eto
3.1 Unpacking ati ayewo
Carefully remove the Saker Multi-Angle Marking Ruler from its packaging. Inspect the tool for any signs of damage. Ensure all components, including the mechanical pencil and spare refills, are present.
3.2 Inserting the Pencil
- Unscrew the cap from the mechanical pencil.
- Insert a lead refill into the pencil.
- Rọpo fila.
- To use the scriber function, insert the mechanical pencil into the designated hole on the sliding mechanism.
Video: This video demonstrates the basic setup and adjustment of the Saker Multi-Angle Marking Ruler, including how to insert the mechanical pencil and adjust the sliding mechanism for various marking tasks.
4. Awọn ilana Iṣiṣẹ
4.1 Adjusting Angles
The ruler features an adjustable T-square head with angle markings. To set an angle:
- Loosen the central locking knob on the T-square head.
- Rotate the T-square head to the desired angle (e.g., 15°, 30°, 45°, 60°, 75°).
- Tighten the locking knob to secure the angle.

Image: The adjustable design allows for rotatable, vertical, and controlled sliding movements for precise marking.
4.2 Scribing Lines
The ruler supports various scribing methods:
- Vertical Scribing: Position the T-square head against the edge of your workpiece. Slide the ruler along the edge while holding the pencil in the sliding mechanism to create a parallel line.
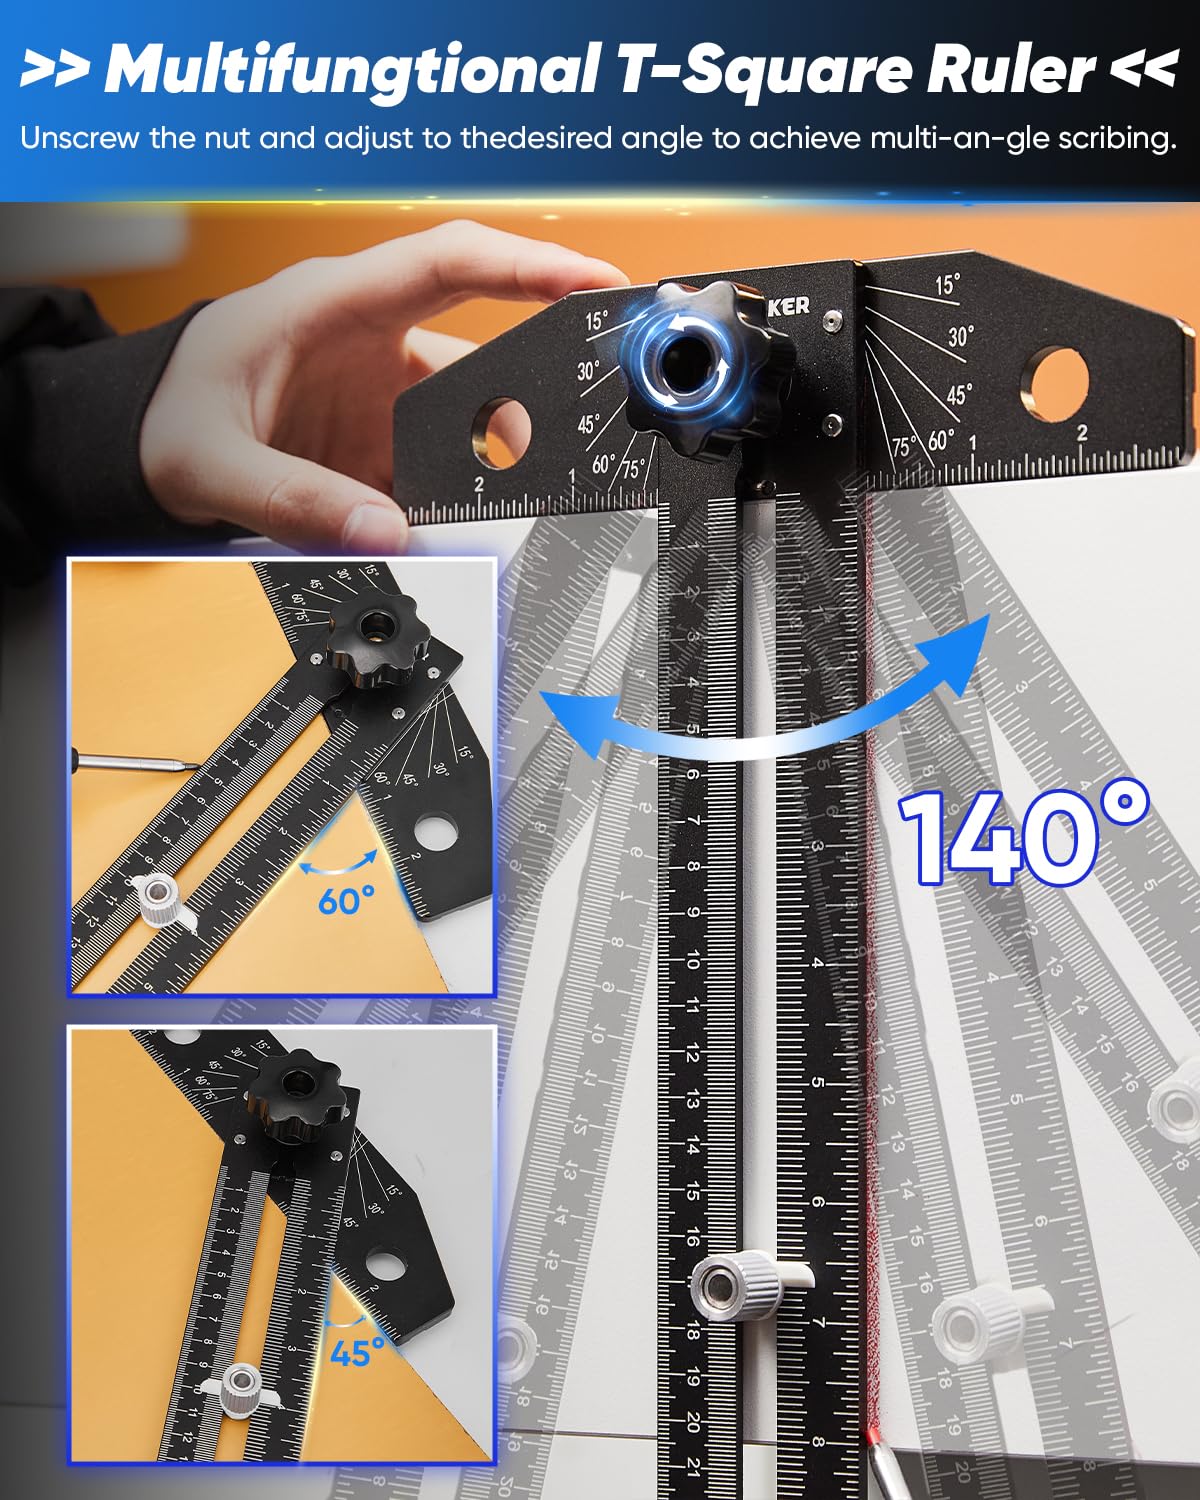
Image: Demonstrates vertical scribing by guiding the ruler along the workpiece edge.
- Horizontal Scribing: For horizontal lines, use the main ruler body as a guide. Position the pencil in the sliding mechanism and move the ruler across the surface.

Image: Illustrates horizontal scribing using the ruler's main body as a guide.
- Angle Scribing: After setting the desired angle on the T-square head, position the angled edge against your workpiece. Use the pencil in the sliding mechanism to mark the angle.

Image: Shows how to scribe precise angles using the adjustable T-square head.
4.3 Using the Parallel Positioning Knob
The parallel positioning knob allows for consistent offset marking. Adjust the knob to the desired distance from the edge, then slide the ruler along the workpiece to create a parallel line at that exact offset.

Image: Key components of the T-bevel design, including the parallel positioning knob for offset marking.
5. Itọju
To ensure the longevity and accuracy of your Saker Multi-Angle Marking Ruler, follow these maintenance guidelines:
- Ninu: After each use, wipe the ruler with a clean, dry cloth to remove dust, wood shavings, or marking residue. For stubborn marks, a slightly damp asọ le ṣee lo, atẹle nipa gbigbe lẹsẹkẹsẹ.
- Ibi ipamọ: Store the ruler in a dry environment, away from excessive moisture or extreme temperatures. The foldable design allows for compact storage in a toolbox.

Image: The ruler's foldable design facilitates easy storage and transport.
- Lubrication: Periodically apply a small amount of dry lubricant (e.g., graphite powder) to the sliding mechanisms to ensure smooth operation. Avoid oil-based lubricants that can attract dust.
- Lead Refills: Ensure you have an adequate supply of mechanical pencil lead refills. The included pencil uses standard lead sizes.
6. Laasigbotitusita
- Oro: Inaccurate angle markings.
- Ojutu: Ensure the central locking knob is fully tightened after setting the desired angle. Verify that the T-square head is firmly seated against the angle guides.
- Oro: Sliding mechanism feels stiff or rough.
- Ojutu: Clean the sliding channels thoroughly to remove any debris. Apply a small amount of dry lubricant to the channels.
- Oro: Pencil does not fit or is loose in the scribe hole.
- Ojutu: Ensure you are using the provided mechanical pencil or one with a compatible diameter for the scribe hole. If the pencil is too thin, it may cause slight inaccuracies.
- Oro: Markings are fading or difficult to read.
- Ojutu: The laser-etched markings are designed for durability. Ensure the ruler is clean and free from dirt or residue that might obscure the scales.
7. Awọn pato
| Ẹya ara ẹrọ | Sipesifikesonu |
|---|---|
| Brand | Saker |
| Nọmba awoṣe | 01US-GJ69697-X52052 |
| Ohun elo | Aluminiomu Alloy |
| Àwọ̀ | Dudu |
| Iwọn Iwọn | 0-48cm / 0-18in |
| Iwọn Nkan | 449 giramu |
| To wa Awọn ẹya ẹrọ | Mechanical pencil, 8 spare refills |

Image: Product dimensions for reference.
8. Atilẹyin ọja ati Support
For warranty information and customer support, please refer to the official Saker webaaye tabi kan si alagbata lati ọdọ ẹniti o ra ọja naa. Jeki ẹri rira rẹ fun eyikeyi awọn ibeere atilẹyin ọja.
Manufacturer: saker