1. Ifihan
This manual provides detailed instructions for the installation, operation, and maintenance of your FOHERE Commercial Ice Maker Machine Model ZB300. Please read this manual thoroughly before operating the appliance to ensure safe and efficient use. Retain this manual for future reference.
2. Awọn ilana aabo
- Rii daju pe ohun elo naa ti sopọ si iṣan agbara ti o wa lori ilẹ daradara.
- Ma ṣe ṣiṣẹ alagidi yinyin pẹlu okun agbara ti bajẹ tabi pulọọgi.
- Jeki awọn šiši fentilesonu kuro ninu awọn idena.
- Ma ṣe fi awọn nkan ibẹjadi pamọ gẹgẹbi awọn agolo aerosol pẹlu itọka ina ninu ohun elo yii.
- Lo omi mimu nikan fun iṣelọpọ yinyin.
- Yọọ ohun elo ṣaaju ṣiṣe mimọ tabi ṣiṣe itọju eyikeyi.
- Ohun elo yii jẹ ipinnu fun lilo iṣowo.
3. Package Awọn akoonu
Daju pe gbogbo awọn nkan wa ninu apoti:
- Ice Ẹlẹda Unit
- Bin yinyin Ibi ipamọ Ice
- Ice ofofo
- Ajọ omi
- Iho Inu
- Draining Hoses
- 4 Stable Feet
- Operation Guide (this manual)
- Itọju Itọsọna

Image: The FOHERE Commercial Ice Maker Machine with its various accessories, including the ice maker unit, storage bin, water filter, hoses, and ice scoop.

Image: A diagram illustrating that the product is shipped in two separate boxes, one for the main ice maker unit and another for the accessories and storage bin.
4. Eto ati fifi sori
4.1 Ṣiṣii ati Gbe
- Fara yọ gbogbo awọn ohun elo apoti kuro.
- Place the ice maker on a flat, stable surface capable of supporting its weight.
- Ensure adequate ventilation around the unit. The air-cooled compressor requires sufficient airflow.
- The product dimensions are approximately 33.5"D x 22.3"W x 65"H. Allow extra space for connections and air circulation.
4.2 Water Filter Assembly and Installation
The included water filter helps reduce sediment, chlorine, taste, and odor for purer ice. Follow these steps to assemble and install the filter:
- Unscrew the filter cover and insert the filter element.
- Ensure the filter element is properly seated and secure.
- Screw the filter cover back on tightly.
- Connect the inlet hose to the filter's 'Tap water' side and the purified water hose to the 'Purified water' side.
- Mount the filter securely using the provided bracket and screws.
Video: This video demonstrates the process of assembling the water filter for the commercial ice maker machine, showing how to insert the filter element and connect the hoses.

Image: A detailed diagram illustrating the internal components and flow of the upgraded water filter, highlighting its role in reducing impurities for clean ice.
4.3 Omi ati Sisan awọn isopọ
Connect the ice maker to a potable water supply and ensure proper drainage:
- Connect the purified water hose from the filter to the water inlet on the ice maker.
- Connect the drain hose from the ice maker to a floor drain or suitable drainage system.
- Rii daju pe gbogbo awọn asopọ wa ni aabo ati laisi jijo.

Image: A visual guide showing the three main steps for installation: connecting the ice maker to the storage bin, connecting the water supply through the filter, and placing the drain pipe.
4.4 Asopọ agbara
- Plug the ice maker into a dedicated, grounded electrical outlet.
- Verify that the power supply matches the requirements specified on the appliance's rating label.
5. Awọn ilana Iṣiṣẹ
5.1 Iṣakoso igbimo Loriview
The ice maker features a 3.5-inch LCD intelligent control panel for easy operation and monitoring. Key indicators and functions include:
- Ice Making Status: Displays current ice production cycle.
- Shor omitage Itaniji: Indicates when the water supply is low.
- Full Ice Reminder: Notifies when the storage bin is full.
- Iṣẹ́ Mímọ́ Àìfọwọ́sí: Pilẹṣẹ awọn ara-ninu ọmọ.
- Sisanra yinyin ti o le ṣatunṣe: Allows selection of ice cube size.
- Timing/Reservation: Sets scheduled ice production times.
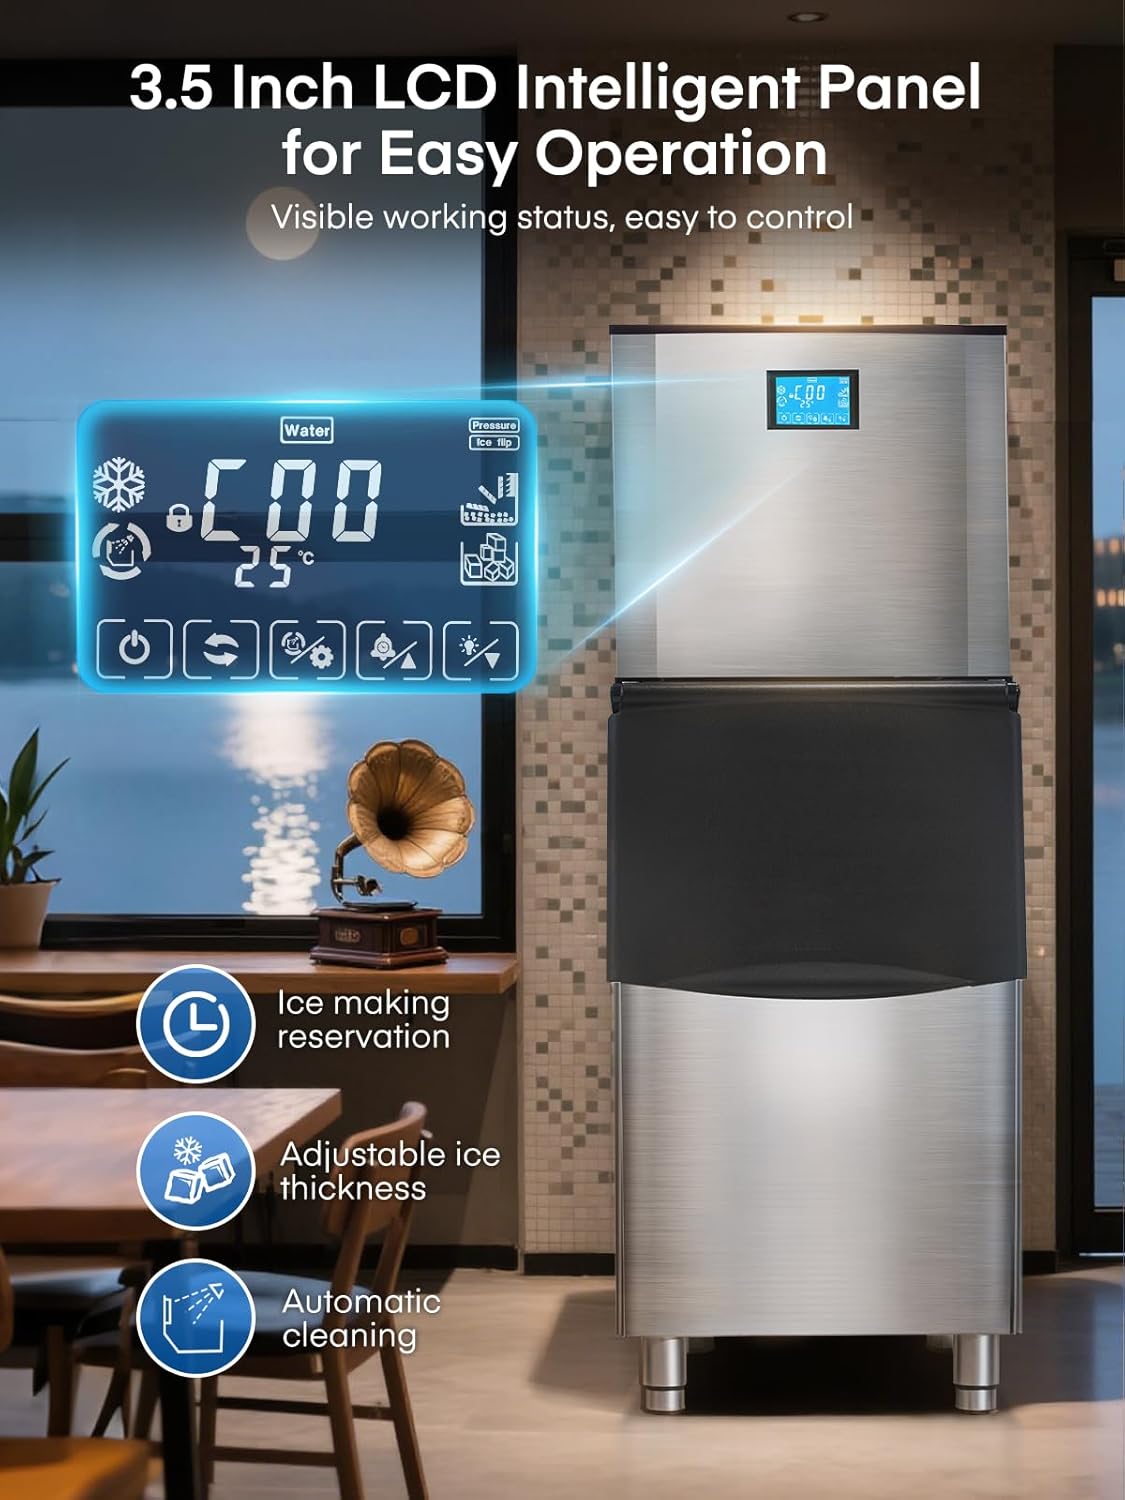
Aworan: A sunmọ-soke view of the ice maker's 3.5-inch LCD control panel, displaying various operational statuses and control options.
5.2 Bibẹrẹ Ice Production
- Rii daju pe ipese omi ti sopọ ati titan.
- Press the 'Power' button on the LCD panel to turn on the machine.
- The machine will automatically begin the ice-making cycle. Ice production typically takes 8-15 minutes per cycle.
5.3 Adjusting Ice Cube Thickness
The ice maker allows you to adjust the thickness of the ice cubes to suit different needs:
- Yinyin Tinrin: Ideal for quick chilling, typically 5-8 minutes.
- Yinyin Alabọde: Standard size for drinks, typically 8-11 minutes.
- Yinyin ti o nipọn: Longer-lasting ice, typically 11-15 minutes.
Use the corresponding buttons on the LCD panel to select your desired ice thickness.

Image: Visual representation of different ice cube thicknesses (thin, medium, thick) and their suggested applications, such as seafood, drinks, and beer.
5.4 Intelligent Reservation (Scheduling)
The 24-hour intelligent reservation function allows you to schedule ice production in advance:
- Access the timing function on the LCD panel.
- Set the desired start and stop times for ice production.
- This feature is useful for ensuring a continuous supply of ice during peak hours or having ice ready for opening business hours.

Image: The ice maker's LCD panel showing the 24-hour intelligent reservation feature, allowing users to pre-set ice making times.
6. Itọju
6.1 Laifọwọyi Cleaning
The ice maker is equipped with an automatic self-cleaning function:
- Press the 'Auto-Clean' button on the LCD panel to initiate a 3-minute cleaning cycle.
- Regular use of this function helps maintain hygiene and ice quality.

Image: The ice maker's LCD panel highlighting the 'Automatic Cleaning' function, which can be activated with a single touch for a 3-minute cleaning cycle.
6.2 Gbogbogbo Cleaning
- Wipe the exterior of the stainless steel unit with a soft, damp asọ. Yago fun abrasive ose.
- Periodically clean the interior of the ice storage bin with a mild detergent and rinse thoroughly.
- Ensure the drain is clear of any blockages.
6.3 Omi Filter Rirọpo
The water filter should be replaced periodically to ensure optimal water quality and ice production. Refer to the filter manufacturer's guidelines for replacement frequency, typically every 3-6 months depending on water quality and usage.
7. Laasigbotitusita
- Ko si iṣelọpọ yinyin: Check water supply connection, power connection, and ensure the machine is turned on. Verify no 'Water Shortage' alert is active.
- Ice Quality Issues: Ensure the water filter is clean and properly installed. Consider replacing the filter if ice taste or clarity is poor.
- Ẹrọ Ko Ibẹrẹ: Ṣàyẹ̀wò okùn agbára, ìjáde, àti ẹ̀rọ ìfọwọ́sowọ́pọ̀.
- Ariwo Pupọ: Ensure the unit is level and stable. Check for any obstructions around the air-cooled compressor.
Fun awọn iṣoro ti a ko yanju nipasẹ awọn igbesẹ wọnyi, jọwọ kan si atilẹyin alabara.
8. Awọn pato
| Ẹya ara ẹrọ | Sipesifikesonu |
|---|---|
| Nọmba awoṣe | ZB300 |
| Ice Production Agbara | Over 500 lbs/24 H |
| Ice Ibi Bin Agbara | 350 lbs |
| Ice Ṣiṣe ọmọ Time | 8-15 minutes (for 182 cubes) |
| Awọn iwọn Ọja (D x W x H) | 33.5" x 22.3" x 65" |
| Iwọn | 262 iwon |
| Wattage | 1200 watt |
| Insulation Duration | Titi di wakati 8-11 |
9. Atilẹyin ọja ati Support
The FOHERE Commercial Ice Maker Machine ZB300 comes with a 3-year protection plan. FOHERE also provides 7*24 hours after-sales service for customer support.
For further assistance or to inquire about warranty claims, please visit the official FOHERE Store on Amazon tabi kan si wọn onibara iṣẹ taara.