
1. Ifihan
The diymore USB C Tester is a professional digital measurement device designed for comprehensive analysis of USB-C and Power Delivery (PD) chargers and cables. It provides high-precision measurements of voltage, current, power, and capacity, and can analyze fast charging protocols. Its compact and portable design makes it an essential tool for electricians, technicians, and anyone needing to verify the performance of USB-C power sources and cables.
2. Alaye Aabo
Please read and understand all safety instructions before using the device. Failure to follow these instructions may result in electric shock, fire, or damage to the device or connected equipment.
- Ma ṣe fi ẹrọ naa han si ọrinrin tabi iwọn otutu to gaju.
- Ma ṣe gbiyanju lati tunto tabi yi ẹrọ naa pada.
- Use the device only within its specified voltage and current ranges (DC 4-28V, 0-10A). Exceeding these limits may cause damage.
- Ensure proper connection to avoid short circuits.
- Jeki kuro ni arọwọto awọn ọmọde.
3. Package Awọn akoonu
Daju pe gbogbo awọn nkan wa ninu apo rẹ:
- diymore USB C Tester (Power Meter)
- Apoti ipamọ
4. Ọja Ipariview
The diymore USB C Tester features a compact design with a 0.96-inch IPS LCD color screen for clear display of measurement data. It is housed in a durable CNC metal casing.

Nọmba 4.1: diymore USB C Tester with its protective CNC metal housing and compact dimensions (31.8 x 16.1 x 8.1 mm).
The device is equipped with a USB-C input and output, allowing it to be inserted inline between a power source and a load. It features two control buttons (K- and K+) for navigating menus and adjusting settings.
5. Eto
The diymore USB C Tester is designed for plug-and-play operation. No external power supply is required for the tester itself.
- Connect the USB-C male connector of the tester to the USB-C output port of your power source (e.g., charger, power bank).
- Connect your USB-C device (e.g., smartphone, tablet, laptop) to the USB-C female port of the tester using a compatible USB-C cable.
- The tester's display will automatically power on and begin showing real-time measurement data.

Nọmba 5.1: Example setup showing the USB C Tester connected in-line with a PD3.1 charger and a laptop.
Akiyesi:
- 1. The tester supports peak voltage up to 36V and peak current up to 10A.
- 2. When only the PD charging head is connected without a load, the device may not start. It must be connected to a useful electrical equipment in order to work.
6. Awọn ilana Iṣiṣẹ
The diymore USB C Tester features multiple display interfaces and functions, navigable via the K- and K+ buttons.
6.1. Awọn iṣẹ bọtini

Nọmba 6.1: Quick explanation of button functions for navigating display pages and settings.
Use the K- and K+ buttons to switch between display pages, adjust settings, and confirm selections. A short press typically switches screens or values, while a long press activates specific functions.
6.2. Display Pages
The tester offers four main display interfaces:
P1: Large Display (Current/Voltage)
This page provides a clear, large character display of real-time voltage (U), current (I), and power (P). It also indicates the current direction.
- Long press K-: Switch data refresh speed (2nd gear).
- Long press K+: Rotate the screen display direction.
- Short press KEY- KEY+ button: Switch between screens forward/backwards.
Nọmba 6.2: P1 interface displaying large voltage, current, and power values.
P2: Fast Charging Protocol Display & Detection
This page displays voltage (V), current (A), power (W), recording capacity (Wh), D+/D- communication line voltage, and detects fast charging protocols (PD/QC/PPS).
- Long press K-: Switch Ah, Wh capacity display unit.
- Long press K+: Switch capacity recording starting current threshold.
- Akiyesi: Only records when current ≥ threshold; less than this current will automatically stop capacity accumulation.
Nọmba 6.3: P2 interface for fast charging protocol detection and detailed charging parameters.
P3: Capacity Statistics Screen
This screen provides statistics on charging energy (Wh), recording time (R), maximum recorded values (MAX), and average values (AVG) calculated since power-on.
- Long press K-: Clear capacity records.
- Long press K+: Switch between MAX and AVG display.
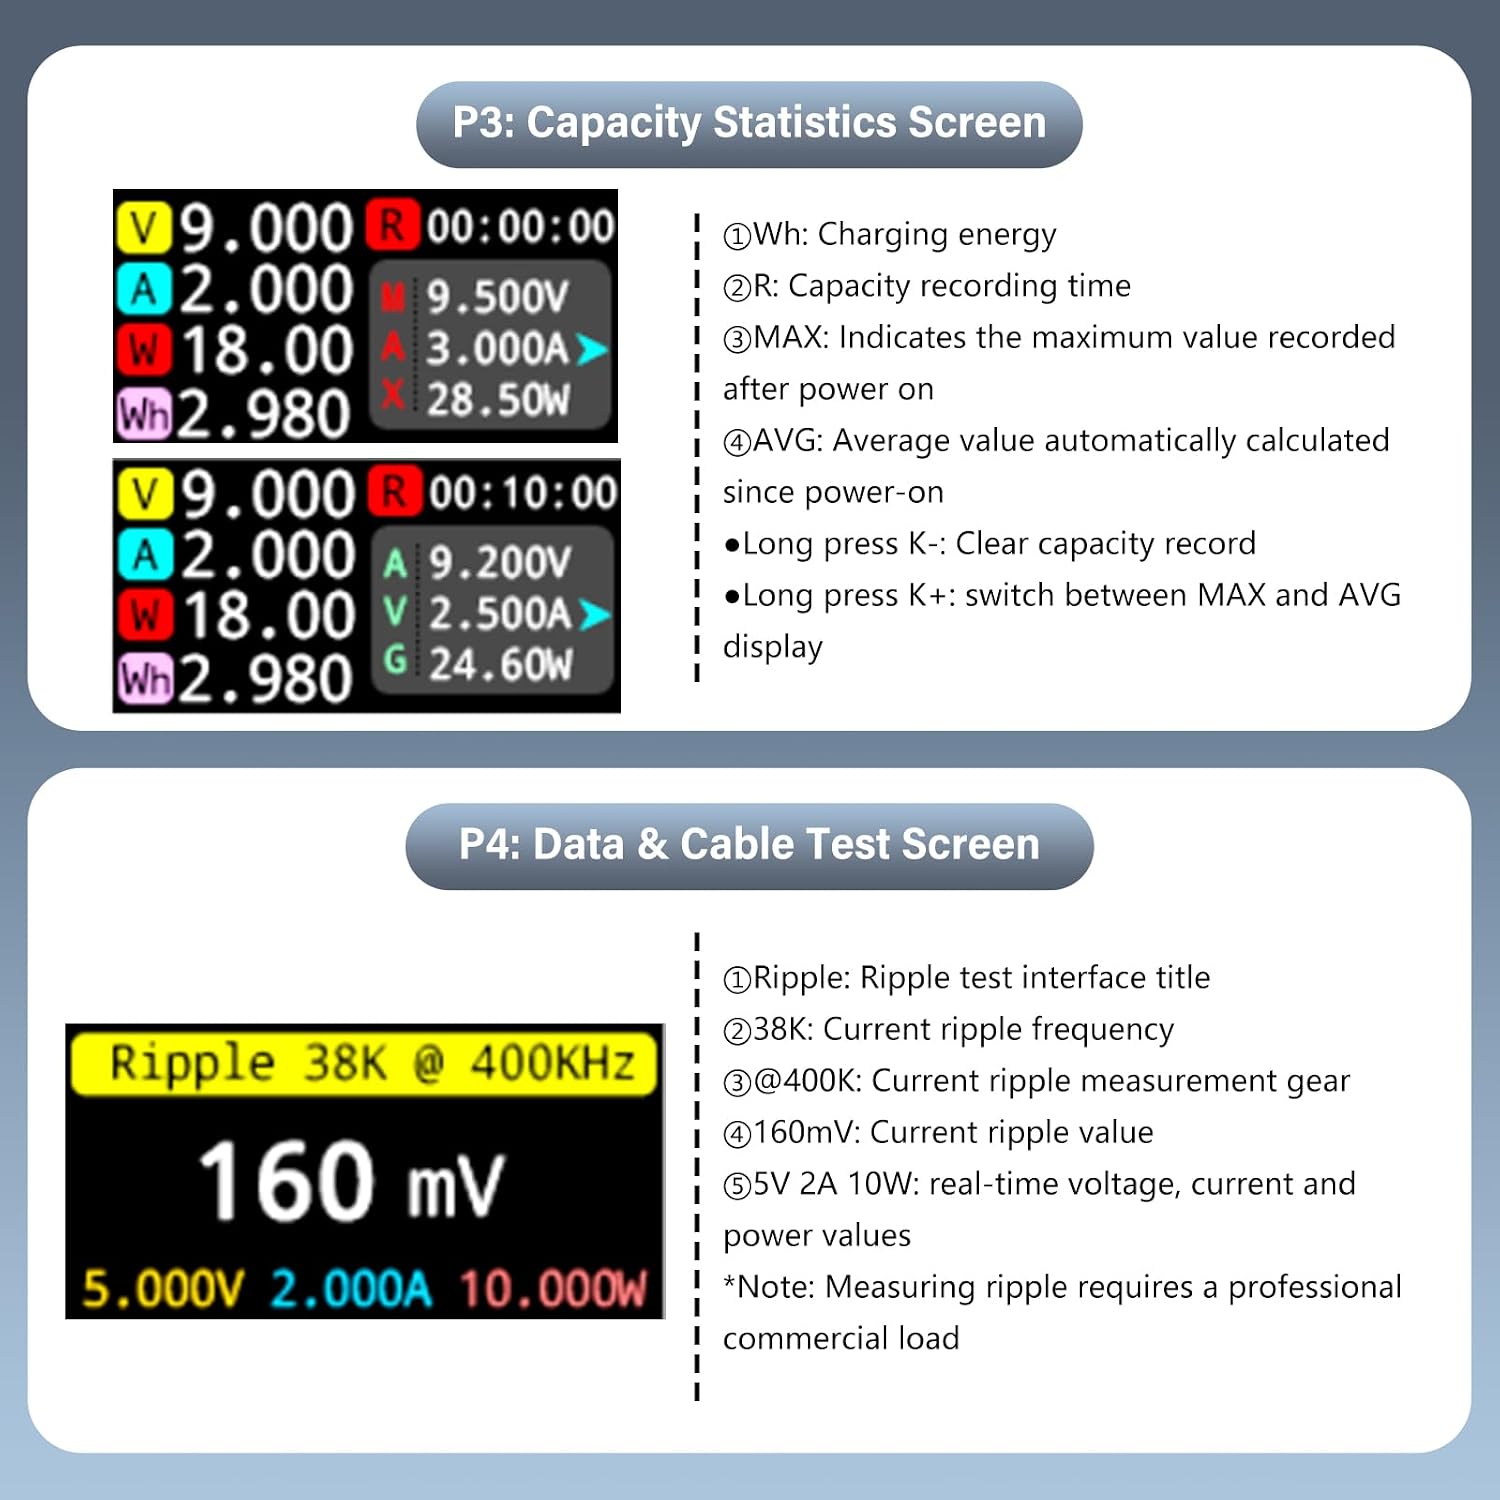
Nọmba 6.4: P3 interface for monitoring charging capacity statistics.
P4: Data & Cable Test Screen
This page is used for ripple testing and cable resistance measurement. It displays ripple frequency, measurement gear, ripple value, and real-time voltage, current, and power values.
- Long press K-: Enter Cable Submenu.
- Long press K+: Switch Sampling Igbohunsafẹfẹ.
- Akiyesi: Measuring ripple requires a professional commercial load.
Nọmba 6.5: P4 interface for data and cable testing, including ripple measurement.
7. Itọju
To ensure the longevity and accuracy of your diymore USB C Tester, follow these maintenance guidelines:
- Ninu: Lo asọ asọ ti o gbẹ lati nu ẹrọ naa. Ma ṣe lo abrasive ose tabi epo.
- Ibi ipamọ: Store the tester in its provided storage box when not in use to protect it from dust and physical damage. Avoid storing in areas with high humidity or extreme temperatures.
- Mimu: Mu ẹrọ naa pẹlu itọju. Yago fun sisọ silẹ tabi tẹriba si awọn ipa to lagbara.
8. Laasigbotitusita
If you encounter issues with your diymore USB C Tester, refer to the following common problems and solutions:
| Isoro | Owun to le Fa | Ojutu |
|---|---|---|
| Ifihan ko ni tan. | No power source or no load connected. | Ensure the tester is connected between a working power source and a device drawing power. The tester requires a load to activate. |
| Awọn kika ti ko pe. | Faulty cable, unstable power source, or device malfunction. | Try using a different USB-C cable. Test with a known good power source and load. If issues persist, the device may require service. |
| Awọn bọtini ko dahun. | Ibùgbé software glitch. | Disconnect and reconnect the tester to reset it. |
| Cannot detect fast charging protocol. | Connected device/charger does not support fast charging, or cable is not compatible. | Ensure both the charger and the device support the desired fast charging protocol (e.g., PD, QC, PPS) and that the cable is rated for it. |
9. Awọn pato
Detailed technical specifications for the diymore USB C Tester:
- Awoṣe: Oluyẹwo USB
- Voltage Iwọn Iwọn: DC 4-28V (supports peak up to 36V)
- Ibi Iwọn Iwọn lọwọlọwọ: 0-10A (supports peak up to 10A)
- Iwọn Iwọn Agbara: Up to 360W (peak)
- Ifihan: 0.96-inch IPS LCD Color Screen
- ADC Chip: 16-bit Independent ADC Chip (for accurate data line resistance measurement)
- Fast Charging Protocol Support: PD/QC/PPS detection
- Awọn iwọn: 31.8 x 16.1 x 8.1 mm (tó tó 7 x 1 x 2 cm)
- Ìwúwo: 20 giramu
- Ibugbe: CNC Metal
- Nọmba Abala Olupese: KBAI0051-AAC

Nọmba 9.1: Key technical features including the 16-bit ADC chip and measurement capabilities.
10. Atilẹyin ọja ati Support
For warranty information and technical support, please refer to the retailer's return policy or contact diymore directly through their official channels. Specific warranty terms may vary by region and retailer.
- Ilana Pada: Typically 30 days for refund/replacement (as per Amazon buybox winner info).
- Olupese: diymore
- Olutaja: diymore® (fulfilled by Amazon)
For further assistance, please visit the diymore official webojula tabi kan si wọn onibara iṣẹ.