1. Ifihan
The Tascam MD-CD1 is a professional 2U rackmountable unit combining a CD player and a MiniDisc recorder. Designed for reliable performance in various applications, it offers features such as MP3 CD playback, pitch control, and RS-232C serial control. This manual provides essential information for the proper setup, operation, and maintenance of your MD-CD1 unit.
Awọn ẹya pataki:
- CD playback with tempo change without affecting key.
- Dedicated Digital I/O (optical) and analog I/O (RCA).
- PS/2 Keyboard input for title input and external control.
- MD-CD continuous playback.
- Wireless IR remote controller included.
- Supports ST, MONO, LP2, and LP4 MiniDisc recording modes.
- 4x speed duplication from CD to MiniDisc.
2. Alaye Aabo
Always read and follow all safety instructions provided in this manual to prevent electric shock, fire, or injury. Do not expose the unit to rain or moisture. Do not remove the cover or attempt to service the unit yourself. Refer all servicing to qualified service personnel. Ensure proper ventilation and avoid blocking ventilation openings. Use only the power supply specified by the manufacturer.
3. Package Awọn akoonu
Jẹrisi pe gbogbo awọn ohun kan wa ninu package:
- Tascam MD-CD1 Unit
- Isakoṣo latọna jijin
- Okun agbara
- Ilana Afowoyi (iwe yii)
4. Ọja Ipariview
The MD-CD1 features a robust front panel for easy access to controls and a rear panel for various input/output connections.
Igbimo iwaju:
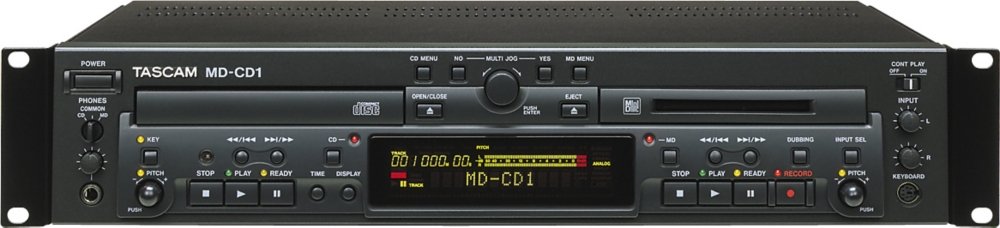
olusin 4.1: Iwaju view of the Tascam MD-CD1 unit, showing the CD tray, MiniDisc slot, display, and various control buttons and knobs.

olusin 4.2: Angled iwaju view of the Tascam MD-CD1, highlighting the rackmount ears and the layout of the CD and MiniDisc sections.
Iṣakoso yii:

olusin 4.3: Ẹyìn view of the Tascam MD-CD1, displaying the various audio input/output ports, digital connections, and the power inlet.
5. Eto
5.1 agbeko iṣagbesori
The MD-CD1 is designed for 2U rackmounting. Secure the unit into a standard 19-inch equipment rack using appropriate rack screws. Ensure sufficient space for ventilation around the unit.
5.2 Awọn isopọ Ohun
Connect the audio outputs of the MD-CD1 to your amplifier, mixer, or powered speakers. The unit provides both analog RCA and digital optical outputs. For MiniDisc recording, connect your audio source to the analog RCA or digital optical inputs.
- Analog RCA: Use standard RCA cables for unbalanced analog audio connections.
- Digital Optical: Use optical cables for digital audio input/output.
- Agbekọri: Connect headphones to the front panel 1/4-inch jack for monitoring.
5.3 Asopọ agbara
Connect the supplied power cable to the AC inlet on the rear panel and then to a suitable AC power outlet. Ensure the power switch on the front panel is in the OFF position before connecting.
5.4 PS/2 Keyboard Connection
A PS/2 keyboard can be connected to the dedicated port on the front panel for easier title input and external control of certain functions.
6. Awọn ilana Iṣiṣẹ
6.1 CD Player isẹ
- Nkojọpọ CD kan: Press the OPEN/CLOSE button to open the CD tray. Place a CD with the label side up and press OPEN/CLOSE again to close the tray.
- Sisisẹsẹhin: Press the PLAY button to start playback. Use the SKIP buttons to navigate between tracks.
- MP3 Sisisẹsẹhin: The unit supports MP3 file playback from CDs. ID3 tag alaye le ti wa ni han.
- Iṣakoso ipolowo: Use the dedicated pitch control on the CD section to adjust playback speed by +/-16%. The unit can also change tempo without affecting the key.
6.2 MiniDisc Recorder Operation
- Loading a MiniDisc: Insert a MiniDisc into the slot.
- Awọn ọna Gbigbasilẹ: The MD-CD1 supports Stereo (ST), Mono (MONO), LP2, and LP4 recording modes. Select the desired mode from the MD menu.
- Gbigbasilẹ: Select the input source (analog or digital). Adjust recording levels as needed. Press the RECORD button to arm, then PLAY to start recording.
- Awọn iṣẹ Ṣatunkọ: The unit provides various editing functions for MiniDisc tracks, including divide, combine, erase, and move.
- Overwrite Recording: Allows recording over existing material on a MiniDisc.
- Iṣakoso ipolowo: Adjust MiniDisc playback pitch by +/-12.5%.
6.3 Combined Features
- 4x Speed Duplication: The unit allows for high-speed duplication from CD to MiniDisc.
- MD-CD Continuous Playback: Configure the unit for continuous playback between the CD and MiniDisc sections.
6.4 Remote Control and External Control
- Wireless IR Remote: Use the included remote control for convenient operation from a distance.
- RS-232C Serial Control: The unit supports RS-232C for integration into larger control systems. Refer to the detailed RS-232C protocol documentation for programming information.
7. Itọju
To ensure the longevity and optimal performance of your MD-CD1, follow these maintenance guidelines:
- Ninu: Use a soft, dry cloth to clean the exterior of the unit. For stubborn dirt, lightly dampen awọn asọ pẹlu omi. Yago fun abrasive ose tabi epo.
- Itọju Disiki: Handle CDs and MiniDiscs by their edges. Store them in their cases to prevent scratches and dust accumulation.
- Afẹfẹ: Rii daju pe awọn šiši fentilesonu ko ni idiwọ lati ṣe idiwọ igbona.
- Ibi ipamọ: When not in use for extended periods, disconnect the power cable and store the unit in a clean, dry environment.
8. Laasigbotitusita
This section addresses common issues you might encounter with the MD-CD1.
8.1 Ko si Agbara
- Check if the power cable is securely connected to both the unit and the AC outlet.
- Ensure the power switch on the front panel is in the ON position.
8.2 Kò sí Ìjáde Ohùn
- Verify that audio cables are correctly connected to the appropriate output jacks on the MD-CD1 and input jacks on your amplifier / alapapo.
- Ṣayẹwo yiyan titẹ sii lori rẹ amplifier / alapapo.
- Ensure the volume levels on both the MD-CD1 and your connected audio equipment are adequately set.
- If using headphones, ensure they are fully inserted and the headphone volume is adjusted.
8.3 Recording Issues (MiniDisc)
- Ko si Gbigbasilẹ: Ensure a blank or erasable MiniDisc is inserted and not write-protected. Verify the input source is correctly selected and active.
- Incorrect Recording Levels: Adjust the input level controls for the MiniDisc section. Note that the CD playback volume adjustment (in the digital domain) can affect the recording level when dubbing from CD to MD at regular speed. It is recommended to adjust the CD playback volume to achieve desired recording levels on the MD side, leaving the MD record level at 0.0dB for more predictable results.
- Blank Spaces Between Tracks During Dubbing: The MD-CD1 is designed to insert a short blank space between tracks when dubbing directly from the internal CD player to the MiniDisc recorder, regardless of speed or settings. To avoid these blank spaces, it is necessary to physically connect the CD digital output to the MD digital input using an optical cable. This bypasses the internal dubbing mechanism that introduces the gaps.
- Noisy Analog Inputs: If you experience excessive noise when recording via the analog inputs, ensure all cables are shielded and properly grounded. Consider using digital inputs if available for your source.
8.4 Isakoṣo latọna jijin Ko Ṣiṣẹ
- Ṣayẹwo awọn batiri ni isakoṣo latọna jijin ki o rọpo wọn ti o ba jẹ dandan.
- Rí i dájú pé kò sí ìdènà láàárín ìṣàkóso latọna jijin àti olugba IR ti ẹ̀rọ náà.
9. Awọn pato
| Brand | Tascam |
| Orukọ awoṣe | MDCD1 |
| Nọmba Awoṣe Nkan | MD-CD1 |
| Iwọn Nkan | 12.8 poun (5.8 kg) |
| Ọja Mefa | 22 x 15 x 7 inches (55.9 x 38.1 x 17.8 cm) |
| Awọn ẹrọ ibaramu | Agbọrọsọ, Agbekọri |
| Asopọmọra Iru | Optical, RCA |
| Asopọmọra Technology | Infrared (fun iṣakoso latọna jijin) |
| Pataki Ẹya | Wireless (Remote Control) |
| Awọn irinše to wa | Isakoṣo latọna jijin |
10. atilẹyin ọja Information
Warranty details for the Tascam MD-CD1 are typically provided with the product documentation at the time of purchase. Please refer to the warranty card or contact Tascam customer support for specific terms and conditions regarding your unit. Keep your proof of purchase for warranty claims.
11. Atilẹyin
For further assistance, technical support, or service inquiries, please contact Tascam customer support. You can find contact information and additional resources on the official Tascam webojula: www.tascam.com.